Ieșire din organizație
Când un angajat părăsește compania, este important să existe un plan de offboarding pentru a te asigura că toți pașii necesari sunt urmați, cum ar fi returnarea echipamentelor, revocarea accesului la sistemele companiei, completarea formularelor HR, susținerea unui interviu de ieșire și altele. În funcție de companie, pot exista mai multe planuri de offboarding, configurate pentru anumite departamente sau divizii, care au cerințe și pași diferiți față de planul principal.
Pe lângă un plan de offboarding, înregistrarea angajatului trebuie actualizată pentru a reflecta plecarea acestuia, să înregistreze motivul pentru care a plecat și să închidă orice activități deschise asociate cu angajatul.
Vezi planul de offboarding
Înainte de a începe offboarding-ul, este recomandat să verificați planul de offboarding implicit care vine preconfigurat cu aplicația Angajați. Pentru a vizualiza planul implicit curent, navigați la . Faceți clic pe Offboarding pentru a vizualiza formularul detaliat al planului de offboarding.
Pașii planului de offboarding
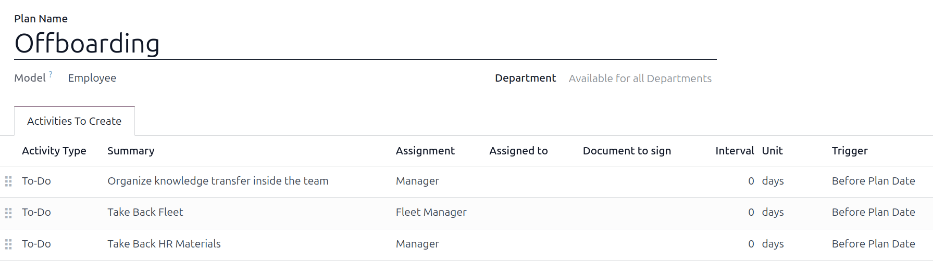
Planul implicit Offboarding este minimal, cu două etape implicite (trei dacă aplicația Flotă este instalată). Toate etapele sunt activități De făcut și sunt programate pentru ziua în care planul de offboarding este lansat (0 zile înainte de data planului). Etapele implicite sunt:
Organizați transferul de cunoștințe în cadrul echipei: Managerul trebuie să se asigure că toate cunoștințele pe care angajatul le are în legătură cu postul său sunt fie documentate, fie partajate cu colegii, astfel încât să nu existe niciun decalaj de cunoștințe.
Preluați flotă înapoi: Managerul de flotă se asigură că orice vehicule atribuite angajatului sunt fie neatribuite (disponibile pentru alți angajați) sau următorul șofer este atribuit. Această etapă apare doar dacă aplicația Flotă este instalată.
Recuperează materialele HR: Managerul trebuie să obțină toate documentele și materialele solicitate de departamentul HR. Este recomandat să se verifice cu departamentul HR pentru a se asigura că tot ce este necesar pentru acest pas a fost finalizat.
Modifică planul de offboarding
Planul implicit de offboarding este minimal, astfel încât să poată fi modificat pentru a se adapta nevoilor oricărei companii. Fiecare companie are cerințe diferite, de aceea este necesar să adaugi pașii necesari în planul de offboarding.
Dacă planul de offboarding este universal, adăugați sau modificați planul de offboarding implicit. Dacă planul de offboarding necesar este doar pentru un departament specific, atunci un plan nou ar trebui creat, special pentru acel departament.
Pentru a modifica planul implicit, mai întâi navigați la , apoi faceți clic pe Offboarding.
Pentru a modifica o etapă, faceți clic pe etapă și va apărea o fereastră pop-up Deschide: Activități. Efectuați orice modificări dorite pentru etapă, apoi faceți clic pe Salvează pentru a accepta modificările și a închide fereastra pop-up.
Pentru a adăuga un pas nou, apasă Adaugă o linie la finalul listei de activități din fila Activități de creat, iar o fereastră pop-up Creează activități va apărea. Completează toate informațiile în fereastră, apoi apasă Salvează și închide dacă nu mai sunt alți pași de adăugat sau Salvează și nou dacă mai sunt necesari pași suplimentari.
Configurează toți pașii doriți pentru planul de offboarding.
Creează plan de offboarding
În unele companii, pot fi necesare planuri de offboarding specifice pentru anumite departamente. În aceste cazuri, poate fi nevoie de un plan de offboarding nou, dedicat departamentului respectiv.
Pentru a crea un plan de onboarding nou, navigați la . Faceți clic pe butonul Nou din colțul din stânga sus, iar un formular gol Planuri pentru angajați se va încărca.
Introduceți Numele planului și selectați Departamentul utilizând meniul derulant. Aceasta creează un plan exclusiv pentru acel departament.
Adăugați diversele activități de offboarding făcând clic pe Adăugați o linie în fila Activități de creat, și configurați fiecare activitate.
Introduceți următoarele informații în formular:
Numele planului: Numele specific pentru plan.
Model: Acest câmp specifică unde poate fi folosit planul. În acest caz, în aplicația Angajați. Acest câmp nu poate fi modificat.
Departament: Dacă este lăsat gol (setarea implicită), planul este disponibil pentru toate departamentele. Pentru a face planul specific unui departament, selectați un departament utilizând meniul derulant.
Apoi, adăugați diversele etape pentru plan făcând clic pe Adăugați o linie în partea de jos a activităților listate în fila Activități de creat, și va apărea o fereastră pop-up goală Creează activități.
Completează următoarele informații în fereastra pop-up:
Tip de activitate: Utilizând meniul derulant, selectați activitatea specifică care urmează să fie programată. Opțiunile implicite sunt De făcut, E-mail, Apel, Întâlnire, Document sau Certificări. Dacă aplicația Sign este instalată, este disponibilă o opțiune Semnătură.
Sumar: Introdu o scurtă descriere pentru acest pas.
Atribuire: Folosește meniul derulant pentru a selecta persoana care va efectua activitatea. Opțiunile implicite sunt: Întreabă la lansare, Utilizator implicit, Antrenor, Manager și Angajat. Dacă aplicația Flotă este instalată, este disponibilă și opțiunea Manager flotă.
Notă
Selecția pentru rolul Atribuire este în raport cu angajatul. Dacă este selectat Antrenor, antrenorul angajatului va fi atribuit activității.
Dacă este selectat Utilizator implicit, va apărea câmpul Atribuit lui. Folosește meniul derulant pentru a selecta utilizatorul care va primi întotdeauna această activitate.
Interval: Configurează câmpurile din această linie pentru a stabili data scadentă a activității. Introdu un număr în primul câmp, apoi folosește meniurile derulante din următoarele două câmpuri pentru a configura când să fie creată data scadentă; (
#) de zile, săptămâni sau luni, fie Înainte de data planului, fie După data planului.
Când formularul Creează activități este completat, faceți clic pe Salvează și închide dacă nu mai sunt alte etape de adăugat, sau faceți clic pe Salvează și nou pentru a adăuga mai multe etape, după necesități.
Example
O companie specializată în programe de artă după școală are două planuri de offboarding separate: unul pentru profesorii care lucrează pe teren și unul pentru angajații de birou.
Planul de offboarding pentru profesori este setat pentru departamentul Profesori program artă și include sarcini specializate pentru aceste roluri. Acestea includ asigurarea că toate materialele de artă sunt inventariate și returnate, toate formularele de feedback ale elevilor sunt predate și toate legitimațiile și cheile de acces pentru diverse locații sunt returnate.

Lansează planul de offboarding
După ce un angajat și-a dat demisia (de obicei cu două săptămâni înainte) sau după ce compania a decis să încheie relația de muncă cu angajatul, planul de offboarding ar trebui lansat. Navigați la și faceți clic pe profilul angajatului care pleacă. Faceți clic pe butonul Lansează plan și se va încărca o fereastră pop-up Lansează plan goală.
Partea de sus a ecranului afișează un buton pentru fiecare plan disponibil, precum și un buton pentru diversele activități disponibile. Faceți clic pe planul de offboarding dorit pentru a-l selecta. Apoi, utilizând selectorul de calendar, setați o dată în câmpul Termen limită. Aceasta este de obicei ultima zi a angajatului, dar poate fi selectată orice dată.
Secțiunea Rezumat plan din fereastra pop-up Lansează plan afișează toate etapele din planul selectat, împreună cu pictograma utilizatorului pentru persoana responsabilă de fiecare activitate.
Faceți clic pe butonul Programează și Odoo programează totul din plan, conform termenelor limită respective.
Arhivează un angajat
În Odoo, când un angajat părăsește compania, acesta trebuie arhivat. Acest pas trebuie făcut după ce angajatul a fost complet offboardat. Pentru a arhiva un angajat, accesează . De aici, găsește angajatul care părăsește compania și apasă pe cardul său de angajat.
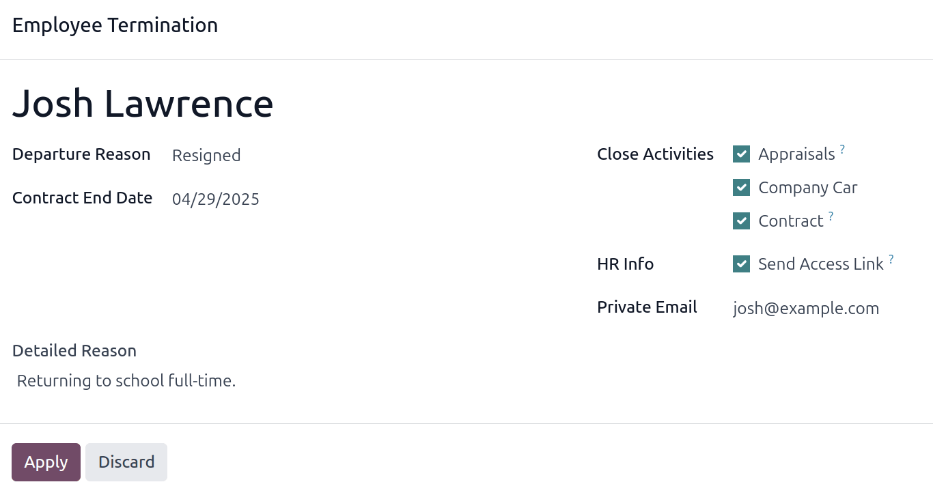
Formularul angajatului se încarcă, afișând toate informațiile acestuia. Faceți clic pe pictograma (roată dințată) din colțul din stânga sus și va apărea un meniu drop-down. Faceți clic pe Arhivează și va apărea o fereastră pop-up Încetarea contractului de muncă.
Completați următoarele câmpuri din formular:
Angajați: Angajatul selectat populează implicit acest câmp. Mai mulți angajați pot fi arhivați simultan prin adăugarea angajaților suplimentari de arhivat în acest câmp.
Motivul plecării: Selectează un motiv pentru care angajatul pleacă din meniul derulant. Opțiunile implicite sunt:
Concediat: Selectează această opțiune când un angajat este concediat, iar compania a notificat acest lucru.
Demisie: Selectează această opțiune când angajatul nu mai dorește să fie angajat și a notificat compania.
Pensionat: Selectați această opțiune când angajatul se pensionează.
Notă
Dacă este necesar un nou motiv de plecare, poate fi creat unul nou. Închideți fereastra pop-up Încetarea contractului de muncă și navigați la . Faceți clic pe butonul Nou și va apărea o linie goală în partea de jos a listei. Introduceți noul motiv și faceți clic pe Salvează.
Data de sfârșit a contractului: Folosește selectorul de calendar pentru a selecta ultima zi în care angajatul lucrează pentru companie.
Motiv detaliat: Introdu o scurtă descriere a motivului plecării angajatului în acest câmp.
Închide activități: Bifați caseta de lângă fiecare tip de activitate pentru a închide sau șterge orice activități deschise asociate acesteia. Se recomandă să bifați toate casetele aplicabile. Opțiunile disponibile sunt:
Contract: Aplică o dată de încheiere pentru contractul actual.
Mașină de serviciu: Elimină angajatul ca șofer pentru mașina de serviciu actuală și atribuie următorul șofer, dacă este cazul.
Echipament: Elimină atribuirea angajatului de la orice echipament alocat.
Evaluări: Anulează toate evaluările programate după data de încheiere a contractului.
Când formularul este complet, faceți clic pe Aplică. Înregistrarea angajatului este arhivată și un banner roșu Arhivat apare în colțul din dreapta sus al formularului angajatului. Chatter-ul înregistrează diversele detalii, inclusiv Data plecării, Motivul plecării, Data de încheiere a contractului, datele pentru ultimele înregistrări de muncă și versiunea angajatului care a fost arhivată.
Notă
Dacă există probleme care împiedică Odoo să arhiveze angajatul, motivele detaliate apar într-o casetă roșie de avertizare în fereastra pop-up Încetarea contractului de muncă. Avertizarea indică Planul "(Numele planului)" nu poate fi lansat, apoi enumeră diversele etape care trebuie finalizate înainte de arhivarea angajatului.