Salida
Cuando un empleado deja la empresa, es importante tener un plan de salida de empleado para asegurarnos de seguir todos los pasos necesarios, como la devolución de equipo, revocar permisos de acceso a los sistemas de la empresa, llenar formularios de RR. HH., tener una entrevista de salida y más. Según la empresa, puede haber varios planes de salida configurados para diferentes departamentos o divisiones que tienen necesidades y pasos diferentes al plan de salida principal.
Además de un plan de salida, debes actualizar el registro del empleado para reflejar que esto ocurrió, registrar el motivo de su salida y cerrar cualquier actividad abierta relacionada con el empleado.
Revisar el plan de salida
Antes de iniciar el proceso de baja, es recomendable que revises el plan de salida predeterminado que está preconfigurado en la aplicación Empleados. Para ver el plan predeterminado actual, ve a . Haz clic en Salida para ver el formulario detallado de este plan.
Pasos del plan de salida
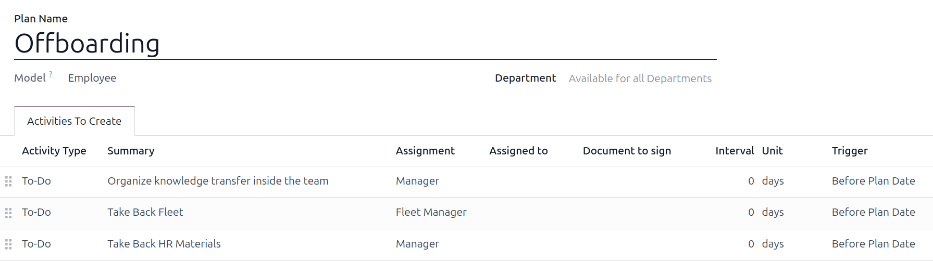
El plan predeterminado de salida es mínimo, ya que cuenta con dos pasos predeterminados (tres si la aplicación Flotilla está instalada). Todos los pasos son actividades pendientes y están programadas para el día en el que inicia el plan de baja (0 días antes de la fecha del plan). Los pasos predeterminados son:
Organizar la transferencia de información dentro del equipo: El gerente debe asegurarse de que el empleado documente o comparta toda la información relacionada con su puesto con sus compañeros para evitar vacíos de información.
Recuperar el vehículo de la flotilla: El gerente de la flotilla debe asegurarse de que los vehículos asignados al empleado ya no estén asignados (para que estén disponibles para otros empleados) o se asignen al siguiente conductor. Este paso solo aparece la aplicación Flotilla está instalada.
Recuperar materiales de RR. HH.: El gerente debe obtener todos los documentos y materiales que solicite el departamento de RR. HH. Es recomendable hablar con el departamento de RR. HH. para asegurar que todo lo necesario para este paso se complete.
Modificar el plan de salida
El plan predeterminado de salida incluye una configuración mínima para que se puedan hacer modificacines según las necesidades de salida de cada empresa. Cada empresa tiene necesidades diferentes, por lo tanto, es posible que se deban agregar pasos adicionales al plan de salida.
Si el plan de salida aplica para toda la empresa, agrega o modifica el plan predeterminado correspondiente. Si el plan de salida aplica solo a un departamento específico, entonces crea un nuevo plan para ese departamento.
Para modificar el plan predeterminado, ve a y haz clic en Salida.
Para modificar un paso, haz clic en él y aparecerá la ventana emergente Abrir: Actividades. Realiza los cambios necesarios y después haz clic en Guardar para aceptar los cambios y cerrar la ventana.
Para agregar un paso nuevo, haga clic en Agregar una línea en la parte inferior de la lista de actividades en la pestaña Actividades por crear y aparecerá la ventana emergente Crear actividades. Ingrese toda la información en la ventana emergente, después haga clic en Guardar y cerrar si no hay otros pasos que agregar, o haga clic en Guardar y crear nuevo si necesita más pasos.
Configure todos los pasos deseados para el plan de salida.
Crear un plan de salida
Algunas empresas pueden necesitar planes de salida específicos para algunos departamentos. Para estos casos, es posible que necesie un nuevo plan de salida específico para el departamento.
Para crear un nuevo plan de incorporación, ve a . Haz clic en el botón Nuevo ubicado en la esquina superior izquierda y el sistema abrirá un formulario vacío de planes de empleados.
Escribe el nombre del plan y selecciona el departamento con el menú desplegable. Esta acción crea un plan exclusivo para ese departamento.
Agrega las distintas actividades de salida al hacer clic en Agregar una línea en la pestaña Actividades por crear y configura cada una de ellas.
Proporcione la siguiente información en el formulario:
Nombre del plan: El nombre específico del plan.
Modelo: Este campo especifica dónde se puede usar este plan. En este caso, es la aplicación Empleados. Este campo no se podrá modificar.
Departamento: Si lo dejas vacío (que es el ajuste predeterminado), el plan estará disponible para todos los departamentos. Para crear un plan específico para un departamento, selecciona uno con el menú desplegable.
Después, para agregar los distintos pasos del plan, haz clic en Agregar una línea al final de la lista de actividades en la pestaña Actividades por crear y aparecerá la ventana emergente Crear actividades vacía.
Ingresa la siguiente información en la ventana emergente:
Tipo de actividad: Usa el menú desplegable para seleccionar la actividad a programar. Las opciones predeterminadas son Actividades pendientes, Correo electrónico, Llamada, Reunión, Documento o Certificaciones. La opción Firma aparecerá si la aplicación Firma electrónica está instalada.
Resumen: Ingrese una descripción corta del paso.
Asignación: Usa el menú desplegable para seleccionar a la persona asignada para realizar la actividad. Las opciones predeterminadas son: Preguntar en el lanzamiento, Usuario predeterminado, Instructor, Gerente y Empleado. La opción Gerente de la flotilla aparecerá si la aplicación Flotilla está instalada.
Nota
La selección del rol de Asignación es en relación al empleado. Si se selecciona Instructor, se selecciona el instructor del empleado en la actividad.
Si se selecciona Usuario predeterminado, aparecerá el campo Asignado a. Con el menú desplegable, seleccione el usuario al que siempre se le asignará la actividad.
Intervalo: Configure los campos en esta línea para determinar la fecha límite de la actividad. Ingrese un número en el primer campo, luego, con los menús desplegables en los siguientes campos, configure cuándo se debe crear la fecha límite, el (
número) de días, semanas, o meses ya sea Antes de la fecha del plan o Después de la fecha del plan.
Cuando completes el formulario Crear actividades, haz clic en Guardar y cerrar si no necesitas agregar más pasos, o en Guardar y nuevo para agregar más pasos.
Example
Una empresa que se especializa en programas de arte después de clases tiene dos planes de salida por separado, uno para profesores que trabajan yendo a otras escuelas y otro para los que trabajan en las oficinas.
El plan de salida para profesores está configurado para el departamento Profesores del programa de arte e incluye tareas especializadas que se relacionan a esos trabajos. Estas tareas incluyen asegurarse que todos los suministros de arte se cateloguen y devuelvan, se entreguen todos los formularios de retroalimentación de los estudiantes y que todas las credenciales y llaves de acceso para las diferentes ubicaciones se regresen

Iniciar el plan de salida
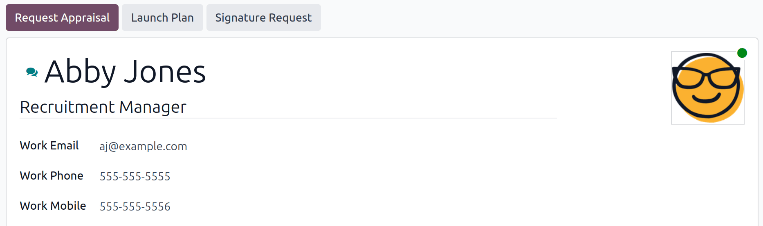
Una vez que el empleado avise sobre su salida (por lo general con dos semanas de anticipación) o cuando la empresa decida terminar la relación laboral, inicia el plan de salida. Ve a y haz clic en el perfil del empleado que se retira. Haz clic en el botón Iniciar plan y el sistema abrirá la ventana emergente Iniciar plan vacía.
En la parte superior de la pantalla aparecerá un botón por cada plan disponible y un botón para las distintas actividades disponibles. Haz clic en el plan de salida a seleccionar. Después, usa el selector de calendario para definir una fecha en el campo Fecha límite. Por lo general, esta fecha coincide con el último día de trabajo del empleado, aunque puedes elegir cualquier fecha.
La sección Resumen del plan de la ventana emergente Iniciar plan muestra todos los pasos del plan seleccionado, junto con el icono del usuario asignado a cada actividad.
Haz clic en el botón Programar y Odoo programará todas las actividades del plan según sus respectivas fechas límite.
Archivar empleados
En Odoo es necesario archivar a los empleados cuando estos dejan la empresa. Este paso se debe hacer después de terminar el proceso de salida completo. Para archivar a un empleado, primero vaya a , luego busque al empleado correspondiente y haga clic en su tarjeta.
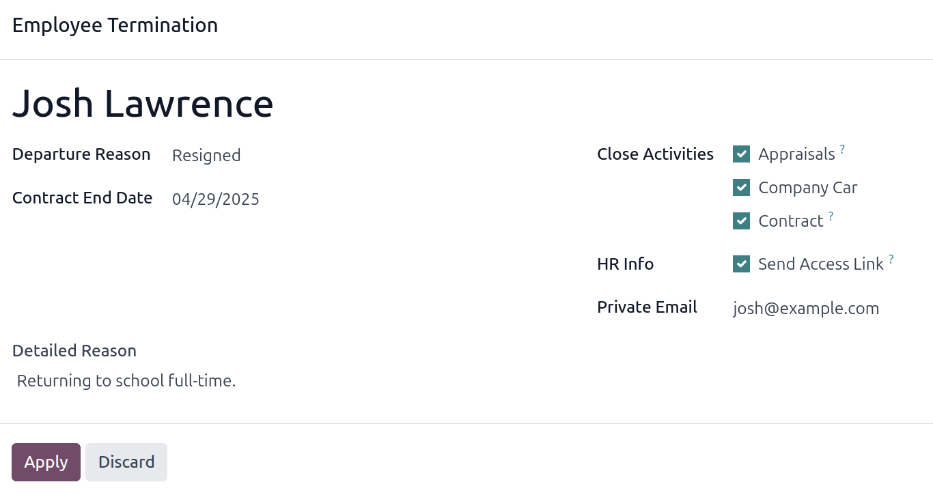
El sistema abrirá el formulario del empleado y mostrará toda su información. Haz clic en el icono (engranaje) ubicado en la esquina superior izquierda y aparecerá un menú desplegable. Haz clic en Archivar y aparecerá la ventana emergente Despido del empleado.
Complete los siguientes campos del formulario:
Empleados: El empleado seleccionado completa este campo de forma predeterminada. Puedes archivar varios empleados a la vez si agregas más a este campo.
Motivo de salida: Seleccione el motivo por el que el empleado se va con el menú desplegable. Las opciones predeterminadas son:
Despedido: Seleccione esta opción si el empleado fue despedido y la empresa dio el aviso correspondiente.
Renunció: Seleccione esta opción si el empleado ya no desea trabajar en la empresa y haya dado aviso.
Jubilado: Selecciona esta opción si el empleado se jubilará.
Nota
Si es necesario un nuevo motivo de salida entonces puedes crearlo. Cierra la ventana emergente Despido del empleado y ve a . Haz clic en el botón Nuevo y aparecerá una línea vacía al final de la lista. Ingresa el nuevo motivo y haz clic en Guardar.
Fecha de finalización del contrato: Use el selector de calendario para seleccionar el último día en que el empleado trabajará para la empresa.
Motivo detallado: Escriba una breve descripción acerca de la partida del empleado en este campo.
Cerrar actividades: Haz clic en la casilla ubicada junto a cada tipo de actividad para cerrar o eliminar las actividades abiertas asociadas. Te recomendamos seleccionar todas las casillas que correspondan. Las opciones disponibles son:
Contrato: Aplica una fecha de finalización al contrato actual.
Automóvil de la empresa: Elimina al empleado como conductor del vehículo actual de la empresa y asigna al siguiente conductor si corresponde.
Equipo: Elimina la asignación del empleado de cualquier equipo asignado.
Evaluaciones: Cancela todas las evaluaciones programadas después de la fecha de finalización del contrato.
Haz clic en Aplicar una vez que completes el formulario. El sistema archivará el registro del empleado y mostrará una cinta roja con el texto Archivado en la esquina superior derecha del formulario del empleado. El chatter registrará los distintos detalles, como la fecha de salida, el motivo de salida, la fecha de finalización del contrato, las fechas de las últimas entradas de trabajo y la versión del empleado que archivaste.
Nota
Si existe algún problema que impida que Odoo archive al empleado, el sistema mostrará los motivos en un cuadro rojo de advertencia en la ventana emergente Despido del empleado. La advertencia indica No es posible iniciar el plan "(Nombre del plan)" y luego enumera los pasos que debes completar antes de archivar al empleado.