Aprobări de lucru și ore suplimentare
Aplicația Pontaje de la Odoo necesită supraveghere managerială pentru a asigura corectitudinea tuturor pontajelor, în special a orelor suplimentare și a turelor incomplete.
Panou de control management
Toate pontajele care necesită aprobare, de obicei din cauza suprapunerii înregistrărilor de lucru sau a absențelor neaprobate, sunt gestionate dintr-un panou centralizat de management. Pentru a accesa, navigați la .
Panoul Management afișează doar înregistrările de prezență ale angajaților activi care trebuie aprobate, într-o vizualizare de tip listă. Acest lucru se datorează celor două filtre implicite din bara de căutare: De aprobat și Angajați activi.
Fiecare înregistrare de prezență afișează următoarele informații:
Angajat: Numele angajatului.
Intrare: Data și ora la care angajatul a intrat.
Pontare ieșire: Data și ora la care angajatul a pontat ieșirea.
Timp lucrat: Numărul de ore lucrate înregistrate de angajat.
Ore suplimentare lucrate: Cantitatea de ore suplimentare lucrate.
Ore suplimentare: Totalul orelor suplimentare aprobate.

Aprobări și respingeri
Înregistrările de prezență pot fi aprobate sau respinse direct din panoul de management. În partea dreaptă a fiecărei înregistrări apar butoanele Aprobă și Respinge. Apasă butonul corespunzător pentru a aproba sau respinge înregistrarea de prezență.
Notă
Când se aprobă sau se resping înregistrări de prezență din panoul Management, nu este posibilă vizualizarea detaliilor înregistrării respective.
Aprobări parțiale
Este posibil să aprobi doar o parte din Orele suplimentare înregistrate, nu întreaga cantitate. Pentru a aproba doar o parte din orele suplimentare, accesează detaliile unei înregistrări de prezență.
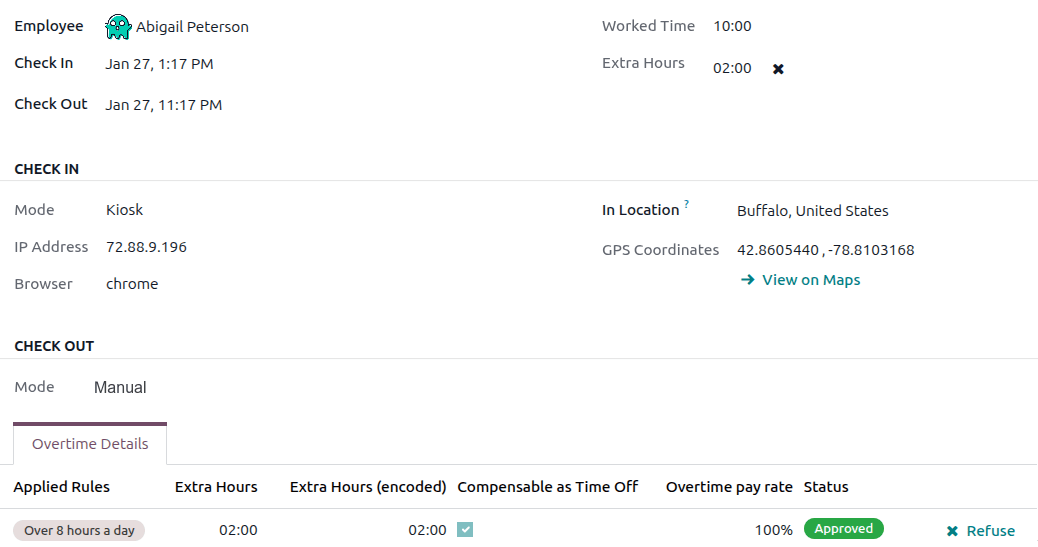
Jumătatea de sus a înregistrării afișează detaliile specifice de pontare a intrării și ieșirii, inclusiv metoda utilizată. Informațiile Pontare intrare și Pontare ieșire din jumătatea de sus a formularului pot fi modificate, dacă este necesar. Faceți clic în câmpul dorit și efectuați orice modificări necesare.
Jumătatea de jos a formularului conține fila Detalii ore suplimentare. Această filă listează regulile pentru ore suplimentare utilizate pentru a calcula orele suplimentare, împreună cu rata de plată și starea. Orele suplimentare listate în această filă pot fi modificate, permițând aprobarea parțială a orelor suplimentare.
Faceți clic în câmpul Ore suplimentare (codificate) al liniei care este modificată. Introduceți numărul de ore aprobate în formatul HH:MM, apoi faceți clic pe Aprobă la sfârșitul liniei.

După editarea și aprobarea câmpului Ore suplimentare (codificate), starea se schimbă în Aprobat, iar câmpul Ore suplimentare din jumătatea superioară a formularului se actualizează pentru a afișa orele suplimentare aprobate.
Important
Odată ce orele suplimentare parțiale sunt aprobate, este încă posibil să refuzați orele suplimentare făcând clic pe pictograma de lângă câmpul Ore suplimentare din jumătatea superioară a formularului sau făcând clic pe Refuză la sfârșitul intrării de ore suplimentare din fila Detalii ore suplimentare.
Notă
Ocazional, poate fi necesară verificarea locației angajatului la pontare. Metoda prin care angajatul s-a pontat la lucru se găsește pe fișa individuală, în câmpul Mod.
Câmpul Mod nu poate fi modificat, deoarece înregistrează doar metoda prin care a fost creată înregistrarea de prezență.
Opțiunile posibile sunt:
Chioșc: Angajatul a efectuat fizic check-in sau check-out utilizând un dispozitiv chioșc. Angajatul a fost prezent la chioșc pentru a efectua check-in.
Systray: Angajatul a efectuat check-in sau check-out direct din baza de date. În funcție de Adresa IP afișată pe înregistrarea detaliată de prezență, se poate determina locația angajatului la momentul efectuării check-in-ului.
Manual: Înregistrarea a fost creată manual în aplicația Prezențe. Acest lucru se face de obicei de către conducere, pentru a adăuga o înregistrare lipsă.
Convertirea orelor suplimentare în timp liber
Unele companii permit convertirea orelor suplimentare în timp liber. Pentru a converti toate sau o parte din orele suplimentare în timp liber, navigați la . Faceți clic pe înregistrarea de prezență dorită pentru a vizualiza detaliile specifice de prezență.
În fila Detalii ore suplimentare, ajustați, dacă este necesar, cantitatea de ore suplimentare care urmează să fie convertite în timp liber în câmpul Ore suplimentare (codificate). Apoi, bifați caseta din coloana Compensabil ca timp liber, indicând că orele suplimentare trebuie convertite în timp liber. Faceți clic pe Aprobă la sfârșitul liniei, starea se schimbă în Aprobat, iar câmpul Ore suplimentare din jumătatea superioară a formularului se actualizează pentru a reflecta orele suplimentare aprobate.
Creare fișe de pontaj
Atunci când este necesar, utilizatorii cu drepturi de acces pot crea manual fișe de pontaj în aplicația Pontaje. Unele situații care necesită acest lucru sunt atunci când angajații uită să se ponteze la începutul sau sfârșitul turei, deoarece angajații nu pot crea retroactiv fișe de pontaj.
Pentru a adăuga o înregistrare de prezență lipsă, navigați la . Faceți clic pe butonul Nou din colțul din stânga sus pentru a deschide o fereastră pop-up Creează. Introduceți următoarele informații în formular, apoi faceți clic pe Salvează și închide:
Angajat: Selectați angajatul pentru care se creează înregistrarea. Utilizatorul conectat populează implicit acest câmp.
Check In: Utilizând calendarul, selectați data și ora de check-in, apoi faceți clic pe Aplică. În mod implicit, este selectată data curentă, iar ora este setată la
12:00:AM.Check Out: Utilizând calendarul, selectați data și ora de check-out, apoi faceți clic pe Aplică. În mod implicit, este selectată data următoare, iar ora este setată la
12:00:AM.Timp lucrat: Acest câmp este populat automat cu diferența dintre orele selectate de Check In și Check Out. Acest câmp nu poate fi modificat.
Ore suplimentare: Acest câmp nu poate fi modificat, deoarece orele suplimentare trebuie aprobate. Acest câmp afișează zero (
00:00) în mod implicit.
