Avstigning
När en anställd lämnar företaget är det viktigt att ha en offboarding-plan för att säkerställa att alla nödvändiga steg följs, såsom att återlämna utrustning, återkalla åtkomst till affärssystem, fylla i HR-formulär, ha en exit-intervju och mer. Beroende på företaget kan det finnas flera olika offboarding-planer, konfigurerade för specifika avdelningar eller divisioner, som har olika krav och steg från den huvudsakliga offboarding-planen.
Förutom en offboardingplan måste den anställdes post uppdateras för att återspegla deras avgång, logga anledningen till varför de lämnade och stänga eventuella öppna aktiviteter kopplade till den anställde.
Visa offboarding-plan
Innan offboarding kan påbörjas rekommenderas det att kontrollera den standard offboardingplan som kommer förkonfigurerad med appen Anställda. För att se den aktuella standardplanen, navigera till . Klicka på Offboarding för att se det detaljerade offboardingplanformuläret.
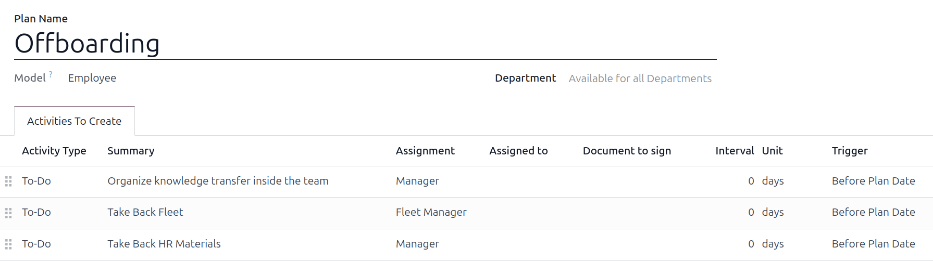
Steg i offboarding-plan
Standard Offboarding-planen är minimal, med två standardsteg (tre om appen Fordon är installerad). Alla steg är Att-göra-aktiviteter och är schemalagda för den dag offboardingplanen lanseras (0 dagar före plandatum). Standardstegen är:
Organisera kunskapsöverföring inom arbetsgruppen: Chefen måste säkerställa att all kunskap som den anställde har relaterat till sin tjänst antingen dokumenteras eller delas med kollegor så att det inte finns något kunskapsgap.
Ta tillbaka fordon: Fordonchefen säkerställer att eventuella fordon som tilldelats den anställde antingen inte är tilldelade (tillgängliga för andra anställda) eller att nästa förare tilldelas. Detta steg visas endast om appen Fordon är installerad.
Ta tillbaka HR-material: Chefen måste erhålla alla dokument och material som HR-avdelningen kräver. Det rekommenderas att kontrollera med HR-avdelningen för att säkerställa att allt som krävs för detta steg är slutfört.
Ändra offboarding-plan
Standardplanen för offboarding är minimal, så att ändringar kan göras för att tillgodose vilket företags behov som helst vid offboarding. Varje företag har olika krav, därför är det nödvändigt att lägga till de nödvändiga stegen i offboarding-planen.
Om offboardingplanen är universell, lägg till eller ändra standard offboardingplan. Om den offboardingplan som behövs endast är för en specifik avdelning, ska en ny plan skapas, specifikt för den avdelningen.
För att ändra standardplanen, navigera först till , klicka sedan på Offboarding.
För att ändra ett steg, klicka på steget så visas ett popup-fönster Öppna: Aktiviteter. Gör eventuella önskade ändringar av steget och klicka sedan på Spara för att acceptera ändringarna och stänga popup-fönstret.
För att lägga till ett nytt steg klickar du på Lägg till en rad längst ned i listan över aktiviteter på fliken Aktiviteter att skapa, och ett tomt popup-fönster Skapa aktiviteter visas. Ange all information i popup-fönstret och klicka sedan på Spara & stäng om det inte finns fler steg att lägga till, eller klicka på Spara & ny om fler steg behövs.
Konfigurera alla önskade steg för offboarding-planen.
Skapa offboarding-plan
För vissa företag kan specifika offboarding-planer vara nödvändiga för vissa avdelningar. I dessa fall kan en ny avdelningsspecifik offboarding-plan behövas.
För att skapa en ny onboardingplan, navigera till . Klicka på knappen Skapa i det övre vänstra hörnet så laddas ett tomt formulär Anställdplaner.
Ange plannamn och välj avdelning med hjälp av rullgardinsmenyn. Detta skapar en plan exklusivt för den avdelningen.
Lägg till de olika offboarding-aktiviteterna genom att klicka på Lägg till en rad i fliken Aktiviteter att skapa och konfigurera varje aktivitet.
Ange följande information på formuläret:
Plannamn: Det specifika namnet för planen.
Modell: Detta fält anger var denna plan kan användas. I detta fall i appen Anställda. Detta fält kan inte ändras.
Avdelning: Om fältet lämnas tomt (standardinställningen) är planen tillgänglig för alla avdelningar. För att göra planen avdelningsspecifik, välj en avdelning med hjälp av rullgardinsmenyn.
Lägg sedan till de olika stegen för planen genom att klicka på Lägg till en rad längst ner i listan över aktiviteter i fliken Aktiviteter att skapa, och ett tomt popup-fönster Skapa aktiviteter visas.
Ange följande information i popup-fönstret:
Aktivitetstyp: Använd rullgardinsmenyn för att välja den specifika aktivitet som ska schemaläggas. Standardalternativen är Att-göra, E-post, Samtal, Möte, Dokument eller Certifieringar. Om appen Underskrifter är installerad finns alternativet Underskrift tillgängligt.
Sammanfattning: Ange en kort beskrivning av steget.
Tilldelning: Använd rullgardinsmenyn för att välja den person som är tilldelad att utföra aktiviteten. Standardalternativen är: Fråga vid start, Standardanvändare, Coach, Chef och Anställd. Om appen Fordon är installerad är alternativet Fordonsansvarig tillgängligt.
Observera
Valet för rollen Tilldelning är i förhållande till den anställde. Om Coach väljs, tilldelas den anställdes coach aktiviteten.
Om Standardanvändare väljs visas ett fält Tilldelad till. Använd rullgardinsmenyn för att välja den användare som alltid kommer att tilldelas denna aktivitet.
Intervall: Konfigurera fälten på denna rad för att bestämma aktivitetens förfallodatum. Ange ett nummer i det första fältet, och använd sedan rullgardinsmenyerna i de följande två fälten för att konfigurera när förfallodatumet ska skapas; (#) dagar, veckor eller månader, antingen Före plandatum eller Efter plandatum.
När formuläret Skapa aktiviteter är komplett, klicka på Spara & stäng om det inte finns fler steg att lägga till, eller klicka på Spara & nytt för att lägga till fler steg vid behov.
Example
Ett företag som specialiserar sig på konstprogram efter skoltid har två separata offboarding-planer, en för lärarna som arbetar i fält och en för kontorsanställda.
Offboarding-planen för lärarna är inställd för avdelningen Konstprogramlärare och inkluderar specialiserade uppgifter som rör dessa jobb. Dessa inkluderar att säkerställa att alla konsttillbehör katalogiseras och returneras, alla återkopplingsformulär från elever lämnas in och alla passerkort och nycklar för de olika platserna returneras.

Starta offboarding-plan
Efter att en anställd har sagt upp sig (vanligtvis två veckor) eller när företaget har beslutat att avsluta arbetsförhållandet med den anställde, bör offboarding-planen lanseras. Navigera till och klicka på den avgående anställdes profil. Klicka på knappen Lansera plan, och ett tomt popup-fönster Lansera plan öppnas.
Överst på skärmen visas en knapp för varje tillgänglig plan, samt en knapp för de olika tillgängliga aktiviteterna. Klicka på önskad offboarding-plan för att välja den. Använd sedan kalenderväljaren för att ange ett datum i fältet Förfallodatum. Detta är vanligtvis den anställdes sista dag, men vilket datum som helst kan väljas.
Avsnittet Plansammanfattning i popup-fönstret Lansera plan visar alla steg i den valda planen, tillsammans med användarikonen för personen som är tilldelad varje aktivitet.
Klicka på knappen Schemalägg, och Odoo schemalägger allt i planen enligt respektive förfallodatum.
Arkivera en anställd
I Odoo måste en anställd arkiveras när de lämnar företaget. Detta steg bör göras efter att den anställde har offboardats helt. För att arkivera en anställd, navigera först till . Hitta härifrån den anställde som lämnar företaget och klicka på deras anställdkort.
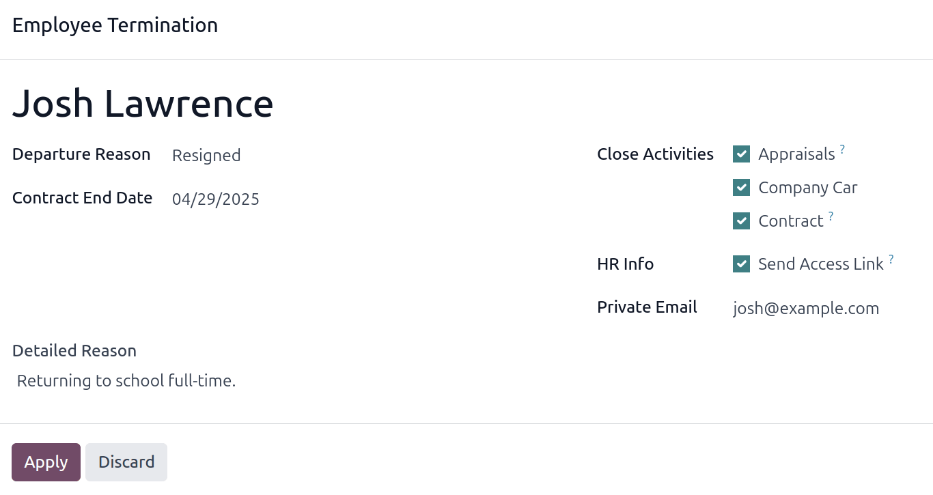
Anställdformuläret öppnas och visar all deras information. Klicka på ikonen (kugghjul) i det övre vänstra hörnet, och en rullgardinsmeny visas. Klicka på Arkiv, och ett popup-fönster Anställningsavslut visas.
Fyll i följande fält på formuläret:
Anställda: Den valda anställde fylls i detta fält som standard. Flera anställda kan arkiveras samtidigt genom att lägga till ytterligare anställda att arkivera i detta fält.
Avgångsorsak: Välj en anledning till att den anställde slutar i rullgardinsmenyn. Standardalternativen är:
Fyrad: Välj detta alternativ när en anställd ska sägas upp och företaget har meddelat detta.
Resigned: Välj detta alternativ när den anställde inte längre vill vara anställd och den anställde har sagt upp sig.
Pensionerad: Välj detta alternativ när den anställde går i pension.
Observera
Om en ny avgångsorsak behövs kan en ny skapas. Stäng popup-fönstret Anställningsavslut och navigera till . Klicka på knappen Nytt, och en tom rad visas längst ner i listan. Ange den nya orsaken och klicka på Spara.
Kontraktets slutdatum: Använd kalenderväljaren för att välja den sista dagen som den anställde arbetar för företaget.
Detaljerad orsak: Ange en kort beskrivning av den anställdes avgång i detta fält.
Stäng aktiviteter: Klicka i kryssrutan bredvid varje typ av aktivitet för att stänga eller radera eventuella öppna aktiviteter associerade med den. Det rekommenderas att klicka i alla kryssrutor som är tillämpliga. De tillgängliga alternativen är:
Avtal: Tillämpar ett slutdatum för det aktuella avtalet.
Företagsbil: Tar bort den anställde som förare för deras nuvarande företagsbil och tilldelar nästa förare, om tillämpligt.
Utrustning: Tar bort den anställdes tilldelning från all tilldelad utrustning.
Bedömningar: Avbryter alla bedömningar som är schemalagda efter avtalets slutdatum.
När formuläret är komplett, klicka på Tillämpa. Den anställdes post arkiveras och en röd Arkiverad banner visas i det övre högra hörnet av den anställdes formulär. Händelseflödet loggar de olika detaljerna, inklusive Avgångsdatum, Avgångsorsak, Avtalets slutdatum, datumen för de senaste arbetsposterna och den anställdes version som arkiverades.
Observera
Om det finns några problem som hindrar Odoo från att arkivera den anställde, visas detaljerade orsaker i en röd varningsruta i popup-fönstret Anställningsavslut. Varningen anger Planen "(Plannamn)" kan inte startas, och listar sedan de olika steg som måste utföras innan den anställde kan arkiveras.