Arbeitsgenehmigungen und Überstunden
Odoos Anwesenheiten-App erfordert eine Überwachung durch die Geschäftsleitung, um sicherzustellen, dass alle erfassten Anwesenheiten korrekt sind, insbesondere Überstunden und unvollständige Schichten.
Verwaltungsdashboard
Alle Anwesenheitsdaten, die genehmigt werden müssen, beispielsweise aufgrund von sich überschneidenden Arbeitseinträgen oder nicht genehmigten Abwesenheiten, werden über ein zentrales Verwaltungdashboard verwaltet. Um darauf zuzugreifen, navigieren Sie zu .
Das Dashboard Verwaltung zeigt in der Standardlistenansicht nur Anwesenheitseinträge für aktuelle Mitarbeiter an, die genehmigt werden müssen. view. Dies liegt an den beiden Standardfiltern in der Suchleiste: Zu genehmigen und Aktive Mitarbeiter.
Jeder Anwesenheitseintrag zeigt die folgenden Informationen an:
Employee: Der Name des Mitarbeiters.
Check In: Datum und Uhrzeit, zu der sich der Mitarbeiter eingestempelt hat.
Ausstempeln: Datum und Uhrzeit, zu der der Mitarbeiter ausgestempelt hat.
Arbeitszeit: Die Anzahl der gearbeiteten Stunden, die der Mitarbeiter protokolliert hat.
Geleistete Überstunden: Die Menge der geleisteten Überstunden.
Zusätzliche Stunden: Die insgesamt genehmigten zusätzlichen Stunden.

Genehmigungen und Ablehnungen
Anwesenheitseinträge können direkt über das Verwaltungsdashboard genehmigt oder abgelehnt werden. Ganz rechts bei jedem Eintrag erscheinen die Schaltflächen Genehmigen und Ablehnen. Klicken Sie auf die entsprechende Schaltfläche, um den protokollierten Anwesenheitseintrag entweder zu genehmigen oder abzulehnen.
Bemerkung
Beim Genehmigen oder Ablehnen von Anwesenheitseinträgen über das Dashboard Verwaltung ist es nicht möglich, die Details des Eintrags einzusehen.
Teilgenehmigungen
Es ist möglich, nur einen Teil der protokollierten Überstunden zu genehmigen, nicht die gesamte Menge. Um nur einen Teil der Überstunden zu genehmigen, klicken Sie auf einen Anwesenheitseintrag, um die Details anzuzeigen.
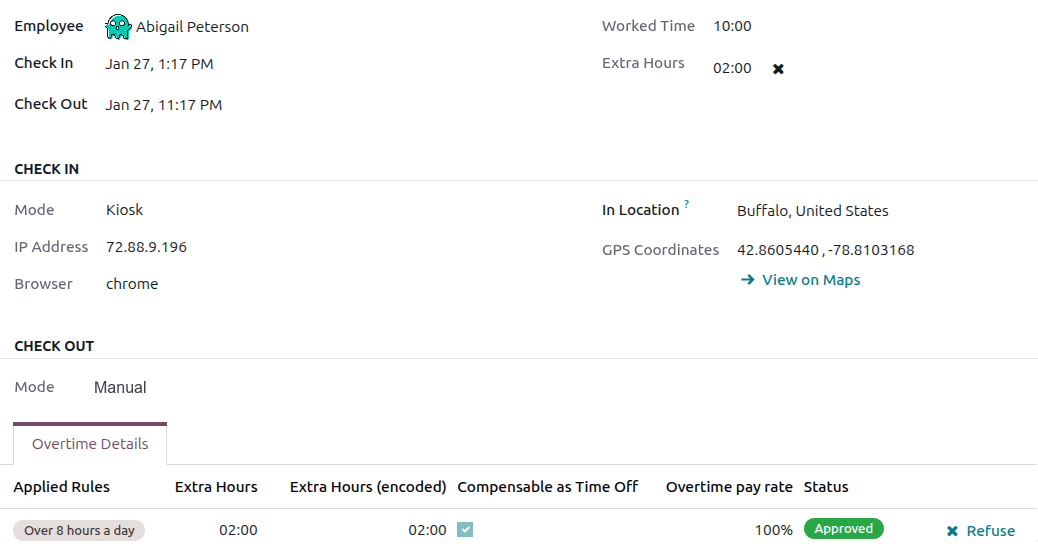
Die obere Hälfte des Datensatzes zeigt die spezifischen Ein- und Ausstempeldetails einschließlich der verwendeten Methode. Die Informationen zu Einstempeln und Ausstempeln in der oberen Hälfte des Formulars können bei Bedarf geändert werden. Klicken Sie in das gewünschte Feld und nehmen Sie die erforderlichen Änderungen vor.
Die untere Hälfte des Formulars enthält den Tab Überstundendetails. Dieser Tab listet die Überstundenregeln auf, die zur Berechnung der zusätzlichen Stunden verwendet wurden, zusammen mit dem Vergütungssatz und dem Status. Die in diesem Tab aufgeführten zusätzlichen Stunden können geändert werden, wodurch eine teilweise Genehmigung von Überstunden möglich ist.
Klicken Sie in das Feld Zusätzliche Stunden (erfasst) der zu ändernden Zeile. Geben Sie die Anzahl der zu genehmigenden Stunden im Format HH:MM ein und klicken Sie dann am Ende der Zeile auf Genehmigen.

Nach dem Bearbeiten und Genehmigen des Feldes Zusätzliche Stunden (erfasst) ändert sich der Status zu Genehmigt, und das Feld Zusätzliche Stunden in der oberen Hälfte des Formulars wird aktualisiert, um die genehmigten Überstunden anzuzeigen.
Wichtig
Sobald teilweise Überstunden genehmigt wurden, ist es immer noch möglich, Überstunden abzulehnen, indem Sie auf das Symbol neben dem Feld Zusätzliche Stunden in der oberen Hälfte des Formulars klicken oder am Ende des Überstundeneintrags im Tab Überstundendetails auf Ablehnen klicken.
Bemerkung
Gelegentlich kann es notwendig sein, den Standort eines Mitarbeiters bei der Anmeldung zu überprüfen. Die Methode, mit der sich der Mitarbeiter angemeldet hat, ist im individuellen Datensatz im Feld Modus zu finden.
Das Feld Modus kann nicht geändert werden, da es nur die Methode protokolliert, mit der der Anwesenheitsdatensatz erstellt wurde.
Die möglichen Optionen sind:
Kiosk: Der Mitarbeiter hat sich physisch mit einem Kiosk-Gerät ein- oder ausgestempelt. Der Mitarbeiter war am Kiosk anwesend, um sich einzustempeln.
Systray: Der Mitarbeiter hat sich direkt aus der Datenbank ein- oder ausgestempelt. Abhängig von der im detaillierten Anwesenheitsdatensatz angezeigten IP-Adresse kann der Standort des Mitarbeiters zum Zeitpunkt des Einstempelns bestimmt werden.
Manuell: Der Datensatz wurde manuell in der Anwesenheiten-App erstellt. Dies wird typischerweise von der Geschäftsführung durchgeführt, um einen fehlenden Datensatz hinzuzufügen.
Überstunden in Abwesenheiten umwandeln
Einige Unternehmen erlauben die Umwandlung von Überstunden in Abwesenheiten. Um alle oder einen Teil der Überstunden in Abwesenheiten umzuwandeln, navigieren Sie zu . Klicken Sie auf den gewünschten Anwesenheitsdatensatz, um die spezifischen Anwesenheitsdetails anzuzeigen.
Im Reiter Überstunden-Details passen Sie bei Bedarf die Menge der in Abwesenheiten umzuwandelnden Überstunden im Feld Zusatzstunden (erfasst) an. Klicken Sie anschließend das Kontrollkästchen in der Spalte Als Abwesenheiten ausgleichbar, um anzugeben, dass die Überstunden in Abwesenheiten umgewandelt werden sollen. Klicken Sie am Ende der Zeile auf Genehmigen, und der Status ändert sich zu Genehmigt, und das Feld Zusatzstunden in der oberen Hälfte des Formulars wird aktualisiert, um die genehmigten Überstunden widerzuspiegeln.
Anwesenheitsdatensätze erstellen
Benutzer mit den entsprechenden Zugriffsrechten können bei Bedarf Anwesenheitsdatensätze manuell in der Anwesenheiten-App erstellen. Dies ist z. B. erforderlich, wenn Mitarbeiter vergessen, sich für ihre Schichten an- oder abzumelden, da Mitarbeiter Anwesenheitsdatensätze nicht nachträglich selbst erstellen können.
Um einen fehlenden Anwesenheitsdatensatz hinzuzufügen, navigieren Sie zu . Klicken Sie auf die Schaltfläche Neu in der oberen linken Ecke, um ein Erstellen-Pop-up-Fenster zu öffnen. Geben Sie die folgenden Informationen im Formular ein und klicken Sie dann auf Speichern & Schließen:
Mitarbeiter: Wählen Sie den Mitarbeiter aus, für den der Datensatz erstellt wird. Standardmäßig wird dieses Feld mit dem angemeldeten Benutzer ausgefüllt.
Einstempeln: Wählen Sie mit dem Kalender das Einstempeldatum und die Uhrzeit aus und klicken Sie dann auf Anwenden. Standardmäßig ist das aktuelle Datum ausgewählt und die Uhrzeit ist auf
12:00gesetzt.Ausstempeln: Wählen Sie mit dem Kalender das Ausstempeldatum und die Uhrzeit aus und klicken Sie dann auf Anwenden. Standardmäßig ist das Folgedatum ausgewählt und die Uhrzeit ist auf
12:00gesetzt.Arbeitszeit: Dieses Feld wird automatisch mit der Differenz zwischen den ausgewählten Einstempel- und Ausstempel-Zeiten ausgefüllt. Dieses Feld kann nicht geändert werden.
Zusatzstunden: Dieses Feld ist nicht änderbar, da Überstunden genehmigt werden müssen. Dieses Feld zeigt standardmäßig null (
00:00) an.
