Plug-in Outlook
Outlook permette alle applicazioni di terze parti di collegarsi per eseguire le azioni di un database dalle e-mail. Odoo dispone di un plug-in per Outlook che consente di creare un’opportunità dal pannello e-mail.
Nota
Il plugin di Outlook è disponibile sia per la versione desktop che per quella web di Outlook. Leggi `l'articolo di Microsoft sui componenti aggiuntivi https://support.microsoft.com/it-it/office/usare-i-componenti-aggiuntivi-in-outlook-1ee261f9-49bf-4ba6-b3e2-2ba7bcab64c8`_.
Configurazione
Il plug-in e-mail Outlook deve essere configurato sia su Odoo che su Outlook.
Importante
Assicurati di verificare la versione del database dall’app Impostazioni –> mpostazioni generali, in fondo alla pagina.
Per le versioni del database 19.2 e successive, consulta la documentazione più recente all’indirizzo ` <https://www.odoo.com/documentation/master/applications/general/integrations/mail_plugins/outlook.html>`_ per le istruzioni di installazione.
Abilitare il plug-in e-mail
Per prima cosa, abilitare il modulo Mail Plugin nel database. Andare in , abilitare Mail Plugin e Salvare la configurazione.
Installare il plug-in Outlook
Scarica () il seguente file XML da caricare più tardi: https://download.odoocdn.com/plugins/outlook/manifest.xml.
Successivamente, aprire la casella di posta Outlook e selezionare un’email qualsiasi. Dopo averlo fatto, fare clic sul pulsante Apps in alto a destra, quindi fare clic su Get add-ins.

Segui la procedura e seleziona la scheda I miei componenti aggiuntivi a sinistra.

Sotto Custom Addins verso il basso, fare clic su + Add a custom add-in, quindi selezionare Add from file…

Il prossimo passo consiste nell’allegare il file manifest.xml scaricato e poi fare clic su OK. In seguito, leggi l’avviso e fai clic su Installa.

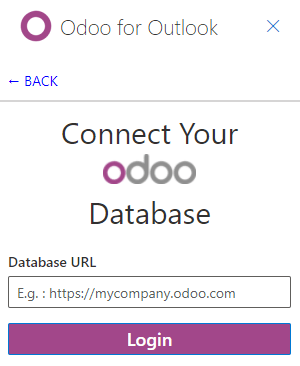
Collegare il database
Ora Outlook sarà connesso al database Odoo. Per prima cosa, aprire un’email qualsiasi nella casella di posta Outlook, fare clic sul pulsante Apps in alto a destra e selezionare Odoo Inbox Addin.

Il pannello a destra ora mostra anche le Informazioni azienda. Nella parte in basso, fai clic su Login.

Nota
Su un database di prova, è possibile inviare solo un numero limitato di richieste relative a Informazioni aziendali (Lead enrichment). Questa funzionalità richiede crediti prepagati.
Suggerimento
Se, dopo un breve periodo, il pannello è ancora vuoto, è possibile che le impostazioni dei cookie del browser ne abbiano impedito il caricamento. Si noti che queste impostazioni cambiano anche se il browser è in modalità Incognito.
Per sistemare il problema, configura il browser per consentire sempre i cookie sulla pagina del plugin di Odoo.
Per Google Chrome, modifica le impostazioni dei cookie del browser seguendo la guida: https://support.google.com/chrome/answer/95647?hl=it&sjid=2322092630079085228-EU e aggiungi download.odoo.com all’elenco di siti che possono utilizzare sempre i cookie.
Una volta completato il processo, è necessario aprire di nuovo il pannello Outlook.
Ora, inserisci l’URL del database Odoo e fai clic su Login.
In seguito, fai clic su Consenti per aprire la finestra pop-up.

Se l’utente non ha effettuato l’accesso sul database, inserisci le credenziali. Fai clic su Consenti per permettere al plug-in Outlook di collegarsi al database.

Utilizzare il plugin della posta in arrivo
Per utilizzare il plugin, aprire un’email qualsiasi nella casella di posta Outlook, fare clic sul pulsante Apps in alto a destra e selezionare Odoo Inbox Addin per aprire il pannello.
Nota
Le opzioni disponibili nel pannello varieranno in base alle applicazioni installate nel database.
Creare un contatto
Per creare un record di contatto in Odoo da un’email, fare clic sull’icona (cerchio più).
Nota
Un record di contatto deve essere creato prima che possa essere creata un’opportunità/lead.
Creare un’opportunità
Per creare un’opportunità da un’email, fare clic sull’icona (più) accanto a Opportunities. In questo modo si apre un nuovo record di opportunità in Odoo in una nuova scheda. L’oggetto dell’email viene utilizzato come titolo dell’opportunità e il contenuto dell’email viene aggiunto alla scheda Notes dell’opportunità.
Creare un’attività
Per creare un’attività da un’email, fare clic sull’icona (più) accanto a Attività. Quindi, inserire il titolo del progetto in cui deve essere creata l’attività nel campo risultante e selezionare il progetto appropriato dall’elenco risultante. Questo apre un nuovo record di attività in Odoo in una nuova scheda. L’oggetto dell’email viene utilizzato come titolo dell’attività e il contenuto dell’email viene aggiunto alla scheda Descrizione.
Creare un ticket
Per creare un ticket da un’email, fare clic sull’icona (più) accanto a Ticket. Questo apre un nuovo record di ticket in Odoo in una nuova scheda. L’oggetto dell’email viene utilizzato come titolo del ticket e il contenuto dell’email viene aggiunto alla scheda Descrizione del ticket.