Regole di automazione
Le regole di automazione permettono di eseguire una o più azioni predefinite in risposta a uno specifico trigger, ad esempio creare un’attività quando un campo viene impostato su un valore specifico o archiviare un record 7 giorni dopo il suo ultimo aggiornamento.
Al momento della creazione di una regola di automazione, è possibile aggiungere condizioni da rispettare affinché la regola venga eseguita correttamente, ad esempio un’opportunità deve essere assegnata a un addetto vendite specifico oppure lo stato di un record non deve essere Bozza.
Per creare una regola di automazione con Odoo Studio:
apri Studio e fai clic su Automazioni e poi Nuova.
assegna alla regola di automazione un nome chiaro e significativo che ne identifichi lo scopo
seleziona il Trigger e, se necessario, completa i campi che appaiono sullo schermo in base al trigger scelto
fai clic su Aggiungi un’azione nella scheda Azioni da fare
seleziona la Tipologia di azione e completa i campi rilevanti in base all’azione scelta
fai clic su Salva e chiudi oppure, per definire azioni aggiuntive, su Salva e nuova.
Example
Per garantire il follow-up dei clienti meno soddisfatti, questa regola di automazione crea un’attività 3 mesi dopo la creazione di un ordine di vendita per i clienti con una percentuale di soddisfazione inferiore al 30%.

Suggerimento
Utilizza la scheda Note per descrivere lo scopo e il funzionamento delle regole di automazione così da rendere la manutenzione più semplice e facilitare la collaborazione tra utenti.
Per modificare il modello oggetto della regola di automazione, cambia modello prima di fare clic su Automazioni in Studio, oppure attiva la modalità sviluppatore, crea o modifica una regola di automazione e seleziona il Modello nel modulo Regole di automazione.
Le regole di automazione possono essere create da qualsiasi fase kanban facendo clic sull’icona (Impostazioni) che appare quando si passa con il mouse sul nome della fase kanban per poi selezionare Automazioni. In questo caso, il trigger è impostato su Fase impostata su per impostazione predefinita ma può essere modificato se necessario.

Trigger
Il trigger viene utilizzato per stabilire cosa deve accadere per far sì che venga eseguita la regola di automazione. I trigger disponibili dipendono dal modello. Nel complesso, sono disponibili cinque categorie di trigger:
Aggiungere condizioni
I filtri di dominio consentono di determinare i record che una regola di automazione deve includere o escludere. Un filtraggio efficiente migliora le prestazioni complessive, poiché evita l’elaborazione superflua dei record che non sono interessati dalla regola.
Suggerimento
Attiva la modalità sviluppatore prima di creare una regola di automazione per avere la massima flessibilità durante l’aggiunta di filtri di dominio.
A seconda del trigger scelto, è possibile definire una o più condizioni che un record deve soddisfare prima e/o dopo che si verifica un trigger.
La condizione Dominio pre-aggiornamento`indica le condizioni che un record deve rispettare *prima* che l’evento attivato dal trigger si verifichi. Ad esempio, il record deve rispettare i seguenti paramentri `Tipo = Fattura cliente e
Stato = Registrato.Dopo aver attivato la modalità sviluppatore, fai clic su Modifica dominio, se disponibile, e poi su Nuova regola.
Il dominio Applica a indica le condizioni che un record deve rispettare dopo il verificarsi dell’evento trigger, ad esempio la fattura del cliente deve avere`Stato pagamento = Pagato parzialmente`.
Dopo aver attivato la modalità sviluppatore, fai clic su Modifica dominio e poi su Nuova regola.
Suggerimento
Se la modalità sviluppatore non è attiva, per definire un dominio Applica a, fai clic su Aggiungi condizione. Completa o elimina la condizione consigliata. Per aggiungere una condizione, fai clic su Nuova regola.
Quando viene attivato un trigger, ad es., lo stato di una fattura cliente registrata viene aggiornato, la regola di automazione verifica le condizioni indicate ed esegue l’azione solo se il record rispetta le condizioni stabilite.
Example
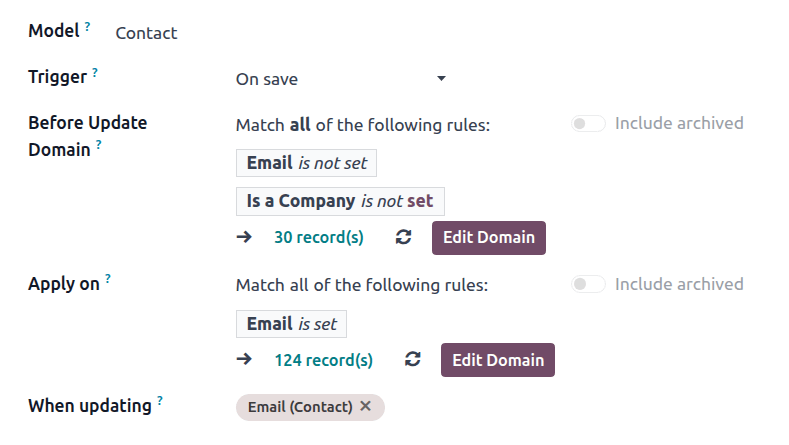
Se l’azione automatizzata deve essere eseguita quando viene configurato un indirizzo e-mail per la prima volta (a differenza della modifica di un indirizzo e-mail) per un contatto esistente individuale e non per un’azienda, usa i valori E-mail non configurata ed È un'azienda non configurata per il campo Dominio pre-aggiornamento e il valore E-mail configurata per il dominio Applica a.
Nota
Al momento della creazione di un record, il campo :guilabel:`Dominio pre-aggiornamento`non viene selezionato.
Valori aggiornati
Attiva azioni automatizzate quando si verificano cambiamenti specifici nel database. I trigger disponibili in questa categoria dipendono dal modello e si basano sulle modifiche comuni, cone l’aggiunta di un tag specifico (ad es., a un lavoro) o la configurazione del valore di un campo (ad es., configurazione del campo Utente).
Seleziona il trigger e poi un valore se richiesto.
E-mail eventi
Attiva azioni automatizzate dopo aver ricevuto o inviato e-mail.
Condizioni di tempo
Attiva azioni automatizzate in un momento specifico relativo a un campo data o alla creazione o aggiornamento di un record. Sono disponibili i seguenti trigger:
In base al campo data: l’azione viene attivata nel periodo di tempo indicato prima o dopo la data configurata nel campo data scelto, ad esempio 30 giorni prima della data di fine del contratto
Dopo la creazione: l’azione viene attivata in un periodo di tempo specifico a seguito della creazione e del salvataggio di un record.
Dopo l’ultimo aggiornamento: l’azione viene attivata in un periodo di tempo specifico a seguito della modifica e del salvataggio di un record esistente.
Una volta attivata la modalità sviuppatore, per configurare un trigger basato su Condizioni di tempo:
seleziona il Trigger appropriato dalla categoria Condizioni di tempo. Se selezioni il trigger In base a campo data, scegli il campo data rilevante
configura il Ritardo per stabilire l’orario e la data di esecuzione delle azioni. Per farlo, inserisci il numero di Minuti, Ore, Giorni o Mesi dopo i quali deve essere eseguita l’azione. Se hai selezionato il trigger In base a campo data, l’azione può essere attivata Dopo o Prima del campo data scelto
in alternativa, è possibile aggiungere condizioni che il record deve rispettare prima e/o dopo l’attivazione della regola
fai clic su salva manualmente
fai clic su Azione programmata per aprire l’azione programmata Regole di automazione: verifica ed esegui
Nota
Quest’azione programmata verifica le date e gli orari di esecuzione raggiunti dall’ultima esecuzione e, se pertinente, esegue le azioni correlate. Per impostazione predefinita, l’azione pianificata è impostata su Esegui ogni 4 ore, che in genere è sufficiente per ritardi quali 3 mesi dalla data dell’ordine o 7 giorni dall’ultimo aggiornamento.
Se una regola di automazione ha un trigger basato sul tempo con un ritardo inferiore all’equivalente di 40 ore, ad esempio 3 ore prima della data e dell’ora di inizio dell’evento, la frequenza dell’azione pianificata viene automaticamente aumentata, ad esempio a Esegui ogni 18 minuti. Ciò consente di eseguire l’azione in un momento più vicino alla data e all’ora di esecuzione pianificate.
fai clic su Esegui manualmente in alto a sinistra.
Avvertimento
Questo passaggio è fondamentale per impedire che la regola venga eseguita retroattivamente sui record storici. L’esecuzione manuale dell’azione pianificata inizializza il timestamp della sua ultima esecuzione nella regola di automazione, che è un elemento chiave della logica di esecuzione della regola.
fai clic sul nome della regola di automazione nella barra di navigazione per tornare alla configurazione della regola stessa
aggiungi le azioni da eseguire e poi, quando tutte le azioni sono state selezionate, fai clic su Salva manualmente.
L’azione viene eseguita per la prima volta quando l’azione programmata Regole di automazione: verifica ed esegui viene eseguita dopo il raggiungimento della data di esecuzione e quando tutte le condizioni vengono rispettate.
Logica di esecuzione
Quando si utilizza un trigger basato sul tempo, un’azione viene eseguita solo quando la data e l’ora di esecuzione ricadono tra l’ultima esecuzione dell’azione pianificata e l’esecuzione corrente (sia essa pianificata o eseguita manualmente), ovvero:
ultima esecuzione –> data e ora di esecuzione –> esecuzione corrente
Nota
L’esecuzione manuale dell’azione programmata Regole di automazione: verifica ed esecuzione non comporta necessariamente l’esecuzione dell’azione stabilita da una regola. Durante la fase di test di una regola di automazione con un trigger basato sul tempo, assicurati che la sequenza sia vera e poi verifica che l’azione sia stata eseguita.
Example
La mattina del 15 ottobre, crei una regola di automazione che attiva l’invio di un’e-mail 30 giorni prima della Data di scadenza del contratto. I contratti scadono alle 23:59 della data di scadenza del contratto. Durante la creazione della regola, l’azione pianificata Regole di automazione: verifica ed esegui è stata eseguita manualmente alle 11:00 ed è impostata per essere eseguita ogni quattro ore da quel momento in poi.
Questa nuova regola di automazione si applicherà ai contratti la cui data di scadenza è almeno 30 giorni dopo la creazione della regola, ovvero con data di scadenza pari o successiva al 14 novembre.
Per un contratto con data di scadenza il 14 novembre, l’ora di esecuzione dell’azione è alle 23:59 del 15 ottobre. L’azione verrà quindi eseguita la prima volta che l’azione pianificata Regole di automazione: verifica ed esegui verrà eseguita dopo che tale data e ora saranno trascorse, ovvero:
ultima esecuzione dell’azione pianificata: 15 ottobre alle 23:00
data e ora di esecuzione: 15 ottobre alle 23:59
esecuzione corrente dell’azione pianificata: alle 3:00 del mattino del 16 ottobre.
Personalizzata
Trigger azioni automatizzate:
Al momento della creazione: quando un record viene salvato per la prima volta
Al momento della creazione e modifica: quando un record viene salvato per la prima volta e le successive
Al momento dell’eliminazione: quando un record viene eliminato
Al momento della modifica IU: quando il valore di un campo viene modificato nella vista modulo, anche prima del salvataggio del record stesso.
Per i trigger Al momento della creazione e modifica e Al momento della modifica dell’IU, è necessario selezionare i campi da utilizzare per attivare la regola di automazione nel campo Al momento dell’aggiornamento.
Avvertimento
Se non viene selezionata nessuna opzione per il campo Quando si aggiorna, l’azione automatizzata potrebbe essere eseguita più volte per record.
In alternativa, puoi anche indicare condizioni aggiuntive da rispettare per attivare la regola di automazione nel campo Applicato a.
Esterno
Attiva azioni automatizzate in base a un evento specifico in un sistema o un’applicazione esterni usando un webhook.
Dopo aver configurato il webhook in Odoo, una volta generato l’URL dello stesso e definito il record bersaglio, è necessario implementarlo nel sistema esterno.
Avvertimento
È altamente consigliato consultare uno sviluppatore, un architetto di soluzioni o un altro ruolo tecnico quando si decide di utilizzare i webhook nonché durante l’intero processo di implementazione. Se non configurati correttamente, i webhook possono disturbare il database di Odoo e possono richiedere tempo per essere ripristinati.

Nota
Inoltre, è possibile configurare un’azione automatizzata che invia dati al webhook di un sistema esterno quando si verifica un evento nel tuo database Odoo.
Vedi anche
Azioni
Dopo aver stabilito il trigger della regola di automazione, fai clic su Aggiungi azione nella scheda Azioni da eseguire per stabilire l’azione da eseguire.
Suggerimento
Se non viene inserito alcun nome esplicito, il nome dell’azione verrà generato automaticamente in base all’azione definita. Il nome può essere aggiornato in qualsiasi momento.
È possibile definire più azioni per la stessa regola di automazione. Per impostazione predefinita, le azioni vengono eseguite nell’ordine in cui vengono configurate.
Ciò significa, ad esempio, che se definisci un’azione Aggiorna record e poi un’azione Invia e-mail dove l’e-mail fa riferimento al campo aggiornato, l’e-mail utilizza i valori aggiornati. Tuttavia, se l’azione Invia e-mail viene definita prima dell’azione Aggiorna record, l’e-mail usa i valori configurati prima dell’aggiornamento del record.
Per modificare l’ordine delle azioni definite, fai clic sull’icona :guilabel:`(trascinamento)`accanto a un’azione e trascinala nella posizione desiderata.
Aggiorna record
Quest’azione viene utilizzata per aggiornare uno dei campi (correlati) del record. Sono disponibili le seguenti opzioni:
Aggiorna: aggiorna il campo selezionato con il valore specificato
Aggiorna con AI: aggiorna dinamicamente il campo selezionato in base al prompt AI fornito. Quest’opzione richiede l’installazione dell’app Odoo AI
Sequenza: aggiorna il campo selezionato con una sequenza definita
Calcola: aggiorna il campo selezionato dinamicamente usando del codice Python.
Per definire l’azione:
con l’opzione Aggiorna, Aggiorna con AI, Sequenza o Calcola selezionata, a seconda dei casi, seleziona o cerca il campo da aggiornare o calcolare. Se necessario, fai clic sull’icona (freccia destra) accanto al nome del campo per accedere all’elenco dei campi correlati
fornisci le informazioni pertinenti in base all’opzione selezionata.
Aggiorna
Seleziona o inserisci il valore aggiornato per il campo.
Se un campo many2many viene aggiornato, scegli se il campo deve essere aggiornato tramite Aggiunta, Rimozione o Configurazione del valore selezionato oppure tramite Cancellazione.
Example
Se vuoi che l’azione automatizzata elimini un tag dal record di un cliente, imposta il campo Aggiorna su Cliente > Tag, seleziona Rimuovendo per poi scegliere il tag da rimuovere.

Aggiorna con l’AI
Inserisci un prompt per indicare aIl’AI di Odoo come aggiornare il campo. Digita / per aprire gli strumenti prompt AI; utilizza il Selettore campo per indicare all’AI quali campi correlati controllare per il contesto e il Selettore record per fornire i valori possibili per il campo aggiornato.
Example
Se desideri che la regola di automazione aggiorni il campo Assegnatari di un lavoro appena creato in base alle competenze dei dipendenti, puoi scrivere un prompt per istruire Odoo AI a controllare il campo Nome visualizzato del lavoro per il contesto, quindi assegnare il dipendente più adatto.

Sequenza
Seleziona una sequenza esistente oppure per crearne una nuova:
fai clic su Cerca di più`e poi fai clic su :guilabel:`Nuova
nella finestra che si apre, inserisci il Nome della sequenza
nella scheda Sequenza, configura la sequenza stessa:
Prefisso: caratteri aggiunti prima del numero successivo nella sequenza
Suffisso: caratteri aggiunti dopo il numero successivo nella sequenza
Dimensione sequenza: determina il numero di cifre in ogni numero della sequenza. Se necessario, vengono aggiunti degli zeri iniziali prima del numero per ottenere la dimensione della sequenza indicata, ad esempio, per una dimensione della sequenza pari a
5, il primo numero della sequenza è00001Fase: determina gli incrementi tra i numeri nella sequenza
Numero successivo: il numero successivo che verrà utilizzato nella sequenza, senza zeri iniziali.
Suggerimento
Utilizza segnaposto dinamici come
%(year)so%(month)scome Prefisso e/o Suffisso per creare sequenze con elementi come l’anno corrente, il mese, ecc. I segnaposto disponibili sono visualizzati nella parte inferiore della finestra.Per utilizzare le sottosequenze, ad esempio per far ripartire la sequenza ogni anno o ogni mese, abilita Usa sottosequenze per date_range, quindi Aggiungi una riga per ogni intervallo di date e indica il Numero successivo per l’intervallo.
fai clic su Salva.
Example
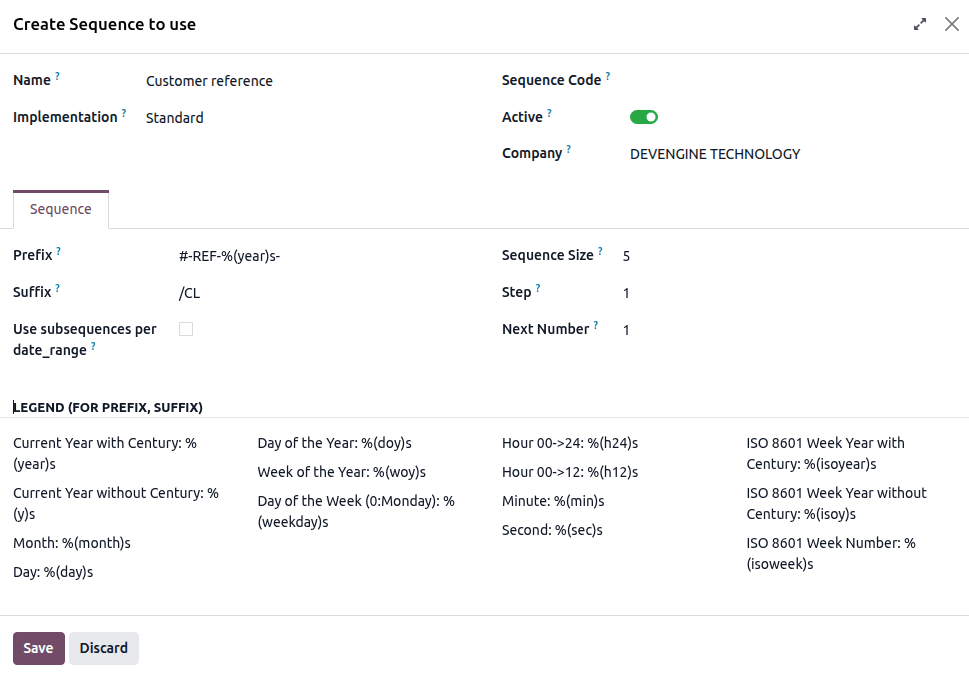
Se desideri che l’azione automatizzata crei un riferimento cliente sequenziale ogni volta che viene creato un nuovo cliente, imposta il campo Sequenza su Riferimento, quindi, nel menu a tendina, fai clic su Cerca di più. Fai clic su Nuova per creare una nuova sequenza.
Nell’esempio, ogni nuovo cliente riceve un riferimento sequenziale con il prefisso “#-REF-%(anno)s-”, dove “%(anno)s” è l’anno corrente compreso il secolo, e il suffisso “/CL”, ad esempio “#-REF-2025-00001/CL”, “#-REF-2025-00002/CL”, ecc.
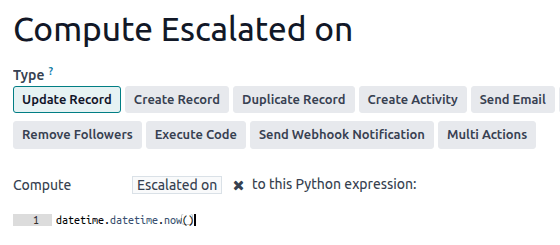
Calcola
Inserisci il codice da utilizzare per calcolare il valore del campo.
Example
Se desideri che la regola di automazione calcoli un campo data ora personalizzato, Passato a, quando la priorità di un lavoro è impostata su Molto alta (tre stelle), puoi definire il trigger Priorità impostata su Molto alta e definire l’azione Aggiorna record come segue:
Creare e duplicare un record
Queste azioni vengono utilizzate per creare un record nuovo o duplicato su qualsiasi modello.
Per definire l’azione:
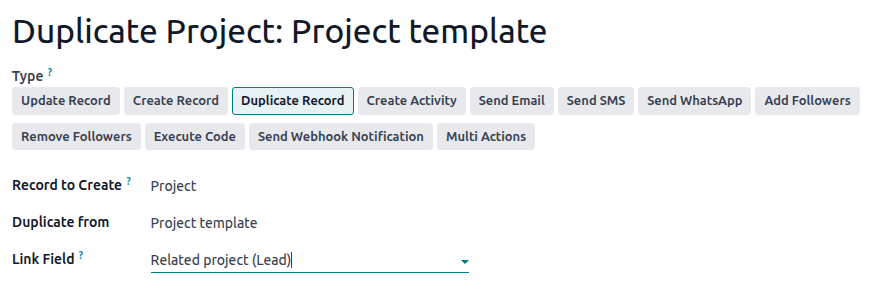
dopo aver selezionato Crea record o Duplica record come Tipo di azione, a seconda dei casi, seleziona il modello richiesto nel campo Record da creare; il campo contiene il modello corrente per impostazione predefinita
specifica un Nome per il record oppure, se l’azione duplica un record, indica il record da duplicare nel campo Duplica da
se il record nuovo o duplicato viene creato su un altro modello, seleziona un campo nel campo Campo link per collegare il record che ha attivato la creazione del record nuovo o duplicato.
Suggerimento
Il menu a tendina Campo link contiene solo campi one2many esistenti nel modello corrente che sono collegati a un campo many2one nel modello di destinazione.
Example
Se desideri che la regola di automazione duplichi un progetto, ad esempio un modello di progetto con lavori predefiniti, quando un’opportunità viene impostata su Vinta, aggiungi un campo personalizzato Opportunità correlata :ref: campo many2one <studio/fields/relational-fields-many2one> sul modello Progetto e un campo personalizzato Progetto correlato campo one2many sul modello Lead, quindi fornisci i seguenti dettagli sul record da duplicare:
Suggerimento
È possibile creare un’altra regola di automazione con le azioni Aggiorna record per aggiornare i campi del record nuovo o duplicato, se necessario. Ad esempio, è possibile utilizzare l’azione Crea record per creare un nuovo lavoro nel progetto e quindi assegnarlo a un utente specifico utilizzando l’azione Aggiorna record.
Creare un’attività
Quest’azione viene utilizzata per pianificare una nuova attività collegata al record.
Per definire l’azione:
dopo aver selezionato Crea attività come Tipo di azione, seleziona il Tipo di attività appropriato dal menu a discesa
inserisci un Titolo
indica entro quando l’attività deve essere completata specificando un numero di Giorni, Settimane o Mesi nel campo Data di scadenza
seleziona un Tipo di utente:
per assegnare l’attività sempre allo stesso utente, seleziona il campo Utente specifico, poi aggiungi l’utente nel campo Responsabile
Per selezionare dinamicamente un utente collegato al record, seleziona Utente dinamico (basato sul record). Se necessario, modifica il Campo utente facendo clic sul nome del campo segnaposto, quindi selezionando o cercando il campo utente nell’elenco visualizzato. Facendo clic sull’icona (freccia destra) accanto al nome del campo è possibile accedere ai campi correlati, se necessario
in alternativa, aggiungi una Nota per fornire più informazioni sull’attività.
Example
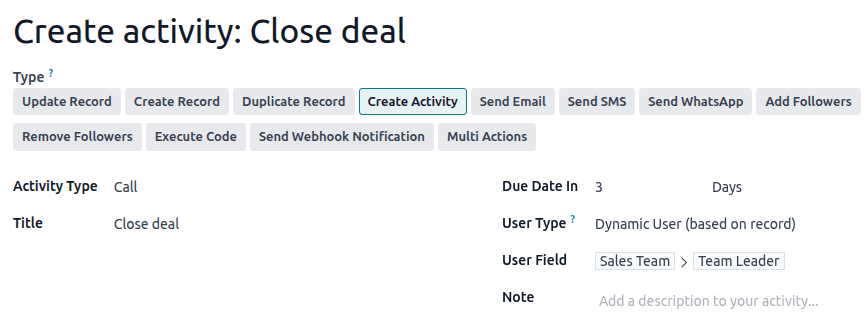
Dopo aver inviato una proposta a un’opportunità con un fatturato previsto elevato, è opportuno creare un’attività affinché il team leader del venditore chiami il potenziale cliente per aumentare le possibilità di concludere l’affare.
Per farlo, imposta il Tipo di attività su Chiamata e Tipo di utente su Utente dinamico (basato su record). Fai clic sul campo segnaposto e seleziona Team vendite, quindi fai clic sull’icona (freccia destra) e seleziona Team leader.
Inviare e-mail e SMS
Queste azioni vengono utilizzate per inviare un’e-mail o un messaggio di testo a un contatto collegato a un record specifico.
Per definire l’azione:
dopo aver selezionato Invia e-mail o Invia SMS come Tipo di azione, a seconda dei casi, seleziona o crea un Modello e-mail o un Modello SMS
nel campo Invia e-mail come o Invia SMS come, scegli come desideri inviare l’e-mail o il messaggio di testo
Per un’e-mail, seleziona:
E-mail: per inviare il messaggio come e-mail ai destinatari del Modello e-mail
Messaggio: per registrare il messaggio sul record e notificare i follower
Nota: per inviare il messaggio come nota interna visibile agli utenti interni nel chatter
Per un messaggio di testo, seleziona:
SMS (senza nota): per inviare il messaggio come messaggio di testo ai destinatari del modello SMS.
SMS (con nota): per inviare il messaggio come messaggio di testo ai destinatari del modello SMS e registrarlo come nota interna nel chatter.
Solo nota: per registrare il messaggio solo come nota interna nel chatter.
Invia Whatsapp
Importante
Per automatizzare l’invio di messaggi WhatsApp, è necessario creare un modello WhatsApp.
Quest’azione viene utilizzata per inviare un messaggio WhatsApp a un contatto collegato a un record specifico.
Dopo aver selezionato Invia WhatsApp come Tipo di azione, seleziona il Modello WhatsApp appropriato dal menu a tendina.
Aggiungere ed eliminare follower
Quest’azione viene utilizzata per iscrivere/cancellare i contatti esistenti come follower del record.
Dopo aver selezionato Aggiungi follower o Rimuovi follower come Tipo di azione, a seconda dei casi, seleziona un Tipo di follower:
per aggiungere/rimuovere sempre gli stessi contatti, seleziona Follower specifici, quindi seleziona i contatti dal menu a tendina. È possibile aggiungere/rimuovere più contatti
per aggiungere/rimuovere dinamicamente un contatto collegato al record, seleziona Follower dinamici. Se necessario, modifica il Campo seguaci facendo clic sul nome del campo segnaposto, quindi selezionando o cercando il campo partner nell’elenco che appare. Facendo clic sull’icona (freccia destra) accanto al nome del campo è possibile accedere ai campi correlati, se necessario.
Example
Per tenere informati i clienti sullo stato di avanzamento di un progetto, questa azione automatizzata aggiunge il cliente interessato come follower quando un lavoro del progetto viene impostato su “In corso”.

Esegui codice
Importante
Per le regole di automazione che richiedono l’esecuzione di codice personalizzato, nota che la manutenzione di tale codice non è inclusa nei piani Standard e Personalizzato e comporta costi aggiuntivi.
L’azione viene utilizzata per eseguire il codice Python. Puoi inserire il codice nella scheda Codice utilizzando le seguenti variabili:
env: ambiente in cui viene attivata l’azionemodel: modello del record su cui l’azione viene attivata, è un recordset vuotorecord: record su cui l’azione viene attivata, potrebbe essere vuotopiù record: recordset di tutti i record su cui l’azione viene attivata in modalità multipla, questo potrebbe restare vuototime,datetime,dateutil,timezone: librerie Python utilifloat_compare: funzione di utilità per confrontare i float in base a una precisione specificalog(message, level='info'): funzione di logging per registrare le informazioni di debug nella tabella ir.logging_logger.info(message): logger per emettere messaggi nei log del serverUserError: classe di eccezione per visualizzare messaggi di avviso per gli utentiCommand: x2many spazio nome comandoaction = {...}: per restituire un’azione
Suggerimento
Le variabili disponibili vengono descritte nelle schede Codice e Aiuto.
Vedi anche
Invia notifica Webhook
L’azione viene utilizzata per inviare una richiesta API POST`con i valori dei :guilabel:`campi selezionati per l’URL del webhook specificato nel campo URL.
Il Payload campione fornisce un’anteprima dei dati inclusi nella richiesta utilizzando i dati di un record a caso o dati campione se non ci sono record disponibili.
Nota
Inoltre, è possibile configurare un’azione automatizzata che utilizza un webhook per ricevere dati da un sistema esterno quando nel sistema si verifica un evento preconfigurato.
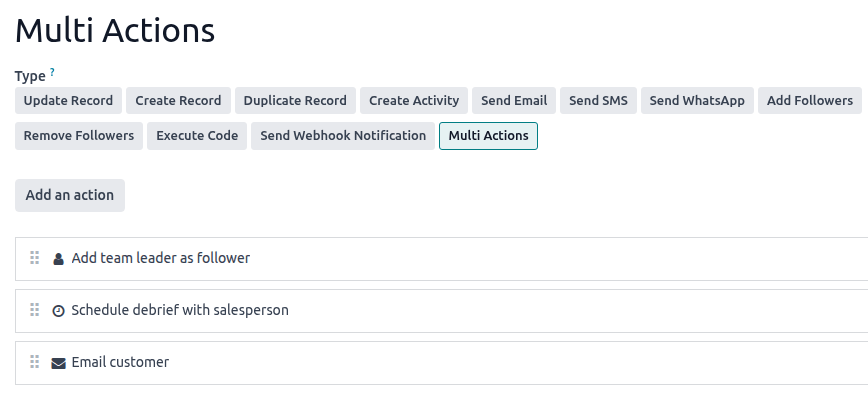
Più azioni
Questa azione viene utilizzata per attivare più azioni (collegate al modello corrente) contemporaneamente.
Per definire le azioni:
dopo aver selezionato Azioni multiple come Tipo di azione, fai clic su Aggiungi azione
nella finestra a comparsa Aggiungi azioni correlate:
seleziona una o più azioni esistenti e fai clic su Seleziona; oppure
fai clic su Nuova, indica l’azione da eseguire e poi fai clic su Salva e chiudi oppure per creare azioni aggiuntive fai clic su Salva e nuova
ripeti il processo tutte le volte che è necessario.