
Rifiuta candidati
In qualsiasi momento del processo di selezione, un candidato può essere rifiutato per una posizione lavorativa.
Per rifiutare un candidato, inizia navigando alla scheda del candidato nell’app Assunzioni. Questo può essere fatto in due modi:
Open the main Job Positions dashboard by navigating to . Next, click on the desired job position card, then click on the individual applicant card from the Applications page.
Vai a . Nell’elenco Candidature, fai clic in un punto qualsiasi della riga del candidato desiderato per aprire la scheda di quel candidato specifico.
Nella parte superiore della scheda del candidato, ci sono diversi pulsanti. Fai clic su quello etichettato Rifiuta.
Motivi di rifiuto
I motivi di rifiuto consentono ai selezionatori di documentare perché un candidato non era adatto e di inviare specifici modelli email di rifiuto al candidato.
Clicking Refuse on an applicant’s form makes the Refuse Reason pop-up window appear.
The default refuse reasons in Odoo, and their corresponding refusal email templates, are:
Modello e-mail |
Motivo rifiuto |
|---|---|
Assunzioni: Rifiuta |
Non soddisfa i requisiti della posizione
Posizione già occupata
Duplicato
Spam
|
Assunzioni: Non più interessato |
Rifiutato dal candidato: adeguatezza del ruolo
Rifiutato dal candidato: stipendio
|
Additional refusal reasons can be created, and existing ones can be modified (or deleted).
Creare o modificare i motivi di rifiuto
To view and configure refuse reasons, navigate to . Doing so reveals the Refuse Reasons page, where all the existing refusal reasons are listed.
To create a new refuse reason from the Refuse Reasons page, click the New button. A blank line appears at the bottom of the list, with an empty field present in the Description column.
Digitare il nuovo motivo di rifiuto nel campo. Si consiglia di inserire un motivo breve e conciso, come Offerta scaduta o Candidatura ritirata.
Then, click in the Email Template field to reveal a drop-down menu. Select the desired email template from the list to be used when the new refuse reason is selected.
If a new email template is desired, type in the name for the new template in the field. Then, click Create and edit…, and a Create Email Template pop-up window appears.
The Template Name field is populated with the name entered in the Email Template column by default, but can be modified if desired. Enter the email Subject in the corresponding field, and add the email content in the Body tab. To include attachments, click the Options tab, and add the attachment using the Attachments button. To assign an Owner for the template, select a user in the drop-down menu. Enter a Template Description in the corresponding field.
Click Save, and Odoo returns to the Refuse Reasons list.
Il nuovo modello viene visualizzato nel campo Modello email del nuovo motivo di rifiuto.
Nota
I modelli email di rifiuto per le assunzioni preconfigurati in Odoo utilizzano segnaposto dinamici, che sono segnaposto personalizzati che inseriscono i dati dal record del candidato nel corpo dell’email.
For example, if the applicant’s name is used in a dynamic placeholder, the applicant’s name appears anytime that dynamic placeholder appears on the email template.
Per informazioni più dettagliate sui modelli email, fare riferimento alla documentazione Modelli e-mail.
Inviare email di rifiuto
After clicking the Refuse button on an applicant form, a refuse reason is selected from the Refuse Reason pop-up window.
The applicant’s email address automatically populates the Applicant field. The Subject and email body are populated according to the corresponding email template.
To send the refusal email to the applicant, click Refuse at the bottom of the Refuse Reason pop-up window. The refusal email is sent to the applicant, and a red Refused banner appears on the applicant’s card in the corner.
Suggerimento
If an application should be refused but an email should not be sent (if, for example, the application was spam), click the Send Email toggle to deactivate it, and click Refuse at the bottom of the Refuse Reason pop-up window.

Refuse duplicate applicant
Occasionally, applicants apply multiple times for the same job position. When this occurs, it is possible to refuse all their applications at once, instead of individually.
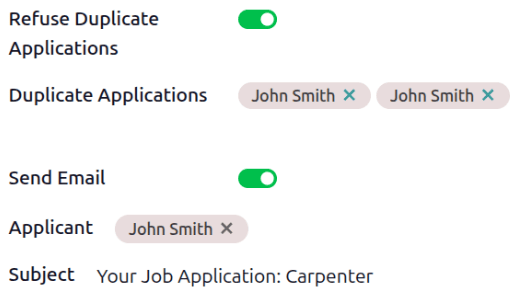
In this situation, a Refuse Duplicate Applications toggle appears on the Refuse Reason pop-up window. Enable the toggle, and a Duplicate Applications field appears beneath it, listing the applicant’s name for each duplicate application in the system.
To refuse all applications for that applicant, click the Refuse button.
The applicant is only sent one email, and all their applications for the job position are marked as Refused.
Visualizzare i candidati rifiutati
After refusal, the applicant’s card is hidden by default. However, it is still possible to view applicants who have been refused by job position, or view all refused applicants.
By job position
To view the refused applicants for a specific job position, navigate to , then click the desired job position Kanban card.
On the Applications page, click the (Toggle Search Panel) button in the search bar, then click Refused in the Filters column.
All applicants that have been refused for the job position appear in the stage they were in when they were refused, and all other applicants are hidden.

All refused applicants
To view all refused applicants across all job positions, navigate to . Every applicant record is displayed in a default list view.
Click the (Toggle Search Panel) button in the search bar, then click Refused in the Filters column.
All applicants that have been refused appear, with the text in red. Along with the applicant’s Name, the date they Applied on, the Job Position, Stage they were in when refused, their Matching percentage, any Tags, and the Recruiter responsible for the job position are listed.
