Mehrere Websites
Odoo allows you to create multiple websites from the same database. This can be useful, for example, if you have multiple brands operating under your organization, or if you want to create separate websites for different products/services or audiences.
Eine weitere Website erstellen
Das Erstellen mehrerer Websites erfordert mindestens einen Domainnamen. Es gibt verschiedene Alternativen, aber bevor Sie eine weitere Website erstellen, sollten Sie entweder
Einen Domainnamen kostenlos mit Odoo registrieren für Ihre erste Website. Für Ihre zweite Website dann entweder:
Einen von Ihnen gekauften Domainnamen verwenden für Ihre erste Website. Für Ihre zweite Website dann entweder:
Once it is time to map your second domain name’s address to your second Odoo website, you can create <../../website_creation> it and map it
directly by entering the second website’s address in the Website Domain field (e.g.,
https://www.yourseconddomain.com or https://subdomain.yourdomain.com).
Tipp
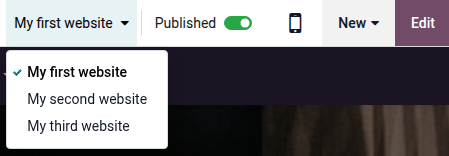
Um von der Frontend-Ansicht einer Website zu einer anderen zu wechseln, klicken Sie auf das Dropdown-Menü zur Website-Auswahl in der oberen rechten Ecke und wählen Sie die Website aus, zu der Sie wechseln möchten.
Website-spezifische Konfiguration
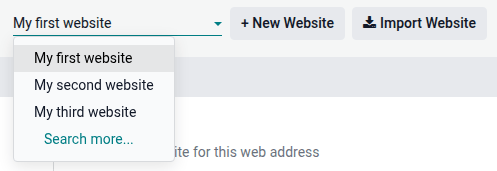
Die meisten Website-Einstellungen sind websitespezifisch. Um auf die Einstellungen einer Website zuzugreifen, gehen Sie zu und wählen Sie die gewünschte Website über das Dropdown-Menü zur Website-Auswahl oben links auf der Einstellungsseite aus.
Bemerkung
Einstellungen, die von allen Websites geteilt werden, sind durch das Symbol (Information) gekennzeichnet.

Wenn Sie eine weitere Website erstellen, verwendet diese die Standardeinstellungen; Einstellungen werden nicht von einer Website zur anderen kopiert.
E-Commerce-Funktionen
E-Commerce-Funktionen wie Produkte, E-Commerce-Kategorien, Preislisten, Rabatte, Zahlungsanbieter usw. können auf eine bestimmte Website beschränkt werden.
Kundenkonten
Um Ihren Kunden die Verwendung desselben Kontos auf allen Ihren Websites zu ermöglichen, gehen Sie zu und aktivieren Sie Gemeinsame Kundenkonten.
Positionen
Produkte können je nach Website mithilfe von Preislisten unterschiedlich bepreist werden. Gehen Sie dazu wie folgt vor:
Gehen Sie zu .
Scrollen Sie nach unten zum Abschnitt Shop - Produkte und wählen Sie unter Preislisten die Option Mehrere Preise pro Produkt.
Klicken Sie auf Preislisten, um neue Preislisten zu definieren oder bestehende zu bearbeiten.
Wählen Sie die Preisliste aus oder klicken Sie auf Neu, um eine neue zu erstellen. Wählen Sie dann den Reiter Konfiguration und befüllen Sie das Feld Website.
Verfügbarkeit von Inhalten über Websites hinweg
Bemerkung
Alle installierten websitebezogenen Apps (z. B. E-Commerce, E-Learning, Forum usw.) und deren zugehörige Seiten sind auch auf der neuen Website verfügbar. Sie können sie aus dem Menü der Website entfernen.
Standardmäßig werden die meisten Datensätze (Produkte, Kurse, Forumsbeiträge usw.), die im Frontend erstellt werden, auf allen Websites angezeigt. Um den Inhalt auf eine einzelne Website zu beschränken, suchen Sie im Backend nach dem Feld Website.
Für Produkte gehen Sie beispielsweise zu , wählen Sie ein Produkt aus, öffnen Sie den Reiter E-Commerce und geben Sie an, auf welcher Website das Produkt verfügbar sein soll.

Tipp
In einer Multi-Company-Umgebung kann jede Website mit einem bestimmten Unternehmen verknüpft werden, sodass nur die Daten dieses Unternehmens (z. B. Produkte, Veranstaltungen usw.) auf der Website angezeigt werden. Um unternehmensspezifische Daten anzuzeigen, gehen Sie zu Website –> Konfiguration –> Einstellungen und legen Sie das gewünschte Unternehmen im Feld Unternehmen fest.
Bemerkung
Beim Generieren von Links, z. B. eines Kundenportal-Links zu einem Angebot, verwendet Odoo die folgende Logik zur Auswahl der Website-Domain:
Wenn ein Unternehmen eine einzige Website hat, wird die Domain dieser Website verwendet.
Wenn ein Unternehmen mehrere Websites hat, verwendet Odoo die Domain der Website, die zuerst erstellt wurde. Um die Prioritätsreihenfolge zu ändern, aktivieren Sie den Entwicklermodus, gehen Sie zu und verwenden Sie das Symbol (Ziehgriff), um Websites neu zu ordnen.
Wenn die Website eines Unternehmens keine Domain hat, wird die Web-Basis-URL verwendet.
Website-Seiten
Um die Website zu ändern, auf der eine Seite veröffentlicht ist, gehen Sie wie folgt vor:
Gehen Sie auf .
Öffnen Sie die Suchleiste und wählen Sie die Website, auf der die Seite derzeit veröffentlicht ist.

Kreuzen Sie das Kontrollkästchen neben der/den Seite(n) an, die Sie ändern möchten.
Klicken Sie auf das Feld Website und wählen Sie die Website aus oder lassen Sie es leer, um die Seite auf allen Websites zu veröffentlichen.
Bemerkung
Jede Website muss ihre eigene Homepage haben; Sie dürfen nicht dieselbe Homepage für mehrere Websites verwenden.
Berichtswesen
Jede Website hat ihre eigene Analyse. Um zwischen Websites zu wechseln, verwenden Sie die Schaltflächen in der oberen rechten Ecke.

Andere Berichtsdaten, wie E-Commerce-Dashboard-Daten, Online-Verkaufsanalysen und Besucher, können nach Website gruppiert werden, indem Sie das Suchfeld öffnen und Gruppieren nach –> Website auswählen.