Varios sitios web
Odoo allows you to create multiple websites from the same database. This can be useful, for example, if you have multiple brands operating under your organization, or if you want to create separate websites for different products/services or audiences.
Crear otro sitio web
Crear múltiples sitios web requiere tener al menos un nombre de dominio. Existen diferentes alternativas, pero antes de crear otro sitio web, deberías
Registrar un nombre de dominio gratis con Odoo para tu primer sitio web y luego, para tu segundo sitio web:
Usar un nombre de dominio que hayas comprado para tu primer sitio web y luego, para tu segundo sitio web:
Once it is time to map your second domain name’s address to your second Odoo website, you can create <../../website_creation> it and map it
directly by entering the second website’s address in the Website Domain field (e.g.,
https://www.yourseconddomain.com or https://subdomain.yourdomain.com).
Truco
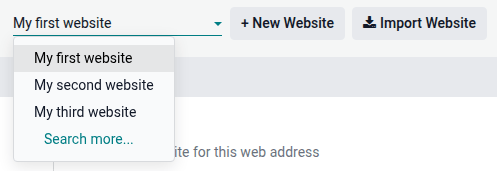
Para cambiar del frontend de un sitio web a otro, haz clic en el menú desplegable de selección de sitio web en la esquina superior derecha y selecciona el sitio web al que deseas cambiar.

Configuración específica del sitio web
La mayoría de los ajustes del sitio web son específicos de cada sitio web. Para acceder a los ajustes de un sitio web, ve a y selecciona el sitio web deseado usando el menú desplegable de selección de sitio web en la parte superior izquierda de la página de ajustes.
Nota
Los ajustes compartidos por todos los sitios web se indican con el icono (información).

Cuando creas otro sitio web, utiliza los ajustes predeterminados; los ajustes no se copian de un sitio web a otro.
Funciones de Comercio electrónico
Las funciones de comercio electrónico como productos, categorías de comercio electrónico, listas de precios, descuentos, proveedores de pago, etc., pueden restringirse a un sitio web específico.
Cuentas de cliente
Para permitir que tus clientes usen la misma cuenta en todos tus sitios web, ve a y activa Cuentas de cliente compartidas.
Precio
Los productos pueden tener precios diferentes según el sitio web utilizando listas de precios. Para hacerlo:
Vaya a .
Vaya a la sección Tienda - Productos y seleccione la opción Varios precios por producto de la lista de precios.
Haga clic en Listas de precios para definir listas nuevas o editar las que ya existen.
Seleccione la lista de precios o haga clic en Nuevo para crear una, luego vaya a la pestaña Configuración y seleccione el Sitio web en el campo correspondiente.
Disponibilidad de contenido entre sitios web
Nota
Todas las aplicaciones relacionadas con sitios web instaladas (por ejemplo, Comercio electrónico, eLearning, Foro, etc.) y sus páginas relacionadas también están disponibles en el nuevo sitio web. Puedes eliminarlas del menú del sitio web.
De forma predeterminada, la mayoría de los registros (productos, cursos, publicaciones del foro, etc.) creados desde el frontend se muestran en todos los sitios web. Para restringir el contenido a un solo sitio web, busca el campo Sitio web en el backend.
Por ejemplo, para productos, ve a , selecciona un producto, abre la pestaña Comercio electrónico y especifica en qué sitio web debe estar disponible el producto.

Truco
En un entorno multiempresa, cada sitio web puede vincularse a una empresa específica para que solo se muestren los datos de esa empresa (por ejemplo, productos, eventos, etc.) en el sitio web. Para mostrar datos específicos de la empresa, ve a Sitio web –> Configuración –> Ajustes y establece la empresa deseada en el campo Empresa.
Nota
Al generar enlaces, por ejemplo, un enlace del portal del cliente a una cotización, Odoo utiliza la siguiente lógica para seleccionar el dominio del sitio web:
Si una empresa tiene un único sitio web, se utiliza el dominio de ese sitio web.
Si una empresa tiene múltiples sitios web, Odoo utiliza el dominio del sitio web que se creó primero. Para cambiar el orden de prioridad, activa el modo de desarrollador, ve a y utiliza el icono (controlador de arrastre) para reordenar los sitios web.
Si el sitio web de una empresa no tiene dominio, se utiliza la URL base web.
Paginas de un sitio web
Para modificar el sitio web en el que se publica una página, procede de la siguiente manera:
Vaya a .
Abra el panel de búsqueda y seleccione el sitio web en el que está publicada la página.

Marque la casilla junto a las páginas que desea modificar.
Haga clic en el campo Sitio web y seleccione el sitio web, o déjelo vacío para publicar la página en todos los sitios web.
Nota
Cada sitio web debe tener su propia página de inicio, no puede utilizar la misma para varios sitios web.
Informes
Cada sitio web tiene sus propias analíticas. Para cambiar entre sitios web, utiliza los botones en la esquina superior derecha.

Otros datos de informes, como los datos del tablero de comercio electrónico, análisis de ventas en línea y visitantes, se pueden agrupar por sitio web abriendo el panel de búsqueda y seleccionando Agrupar por –> Sitio web.