Personalbeschaffung
Odoo hält alle Bewerber mit einer vorkonfigurierten Reihe von Schritten und Phasen organisiert, die jeder Bewerber durchläuft. Jede Phase hat spezifische Schritte, die durchgeführt werden sollten. Diese reichen beispielsweise von der Planung eines Telefonats über die Durchführung eines Vorstellungsgesprächs bis hin zum Versenden eines Stellenangebots. Dieser Prozess wird als Bewerbungsablauf bezeichnet.
Wenn sich ein Bewerber auf eine Stelle bewirbt, wird in der Personalbeschaffung-App von Odoo automatisch eine Bewerberkarte für diese spezifische Stelle erstellt. Während der Bewerber die Recruiting-Pipeline durchläuft, verschiebt das Recruiting-Team seine Karte von einer Phase zur nächsten.
Phasen können so konfiguriert werden, dass automatisch eine E-Mail mit einer festgelegten, vorkonfigurierten Vorlage versendet wird, sobald die Karte eines Bewerbers in eine Phase gelangt. Diese automatisierten E-Mails werden für jede Phase im Bewerbungsablauf definiert.
Der in diesem Dokument beschriebene Ablauf ist die Standardkonfiguration von Odoo, kann jedoch an jeden Recruiting-Prozess angepasst werden.
Bemerkung
Phasen gelten für alle Stellen, es sei denn, sie werden als stellenspezifisch markiert. Änderungen an Phasen (z. B. Hinzufügungen, Löschungen) wirken sich auf alle Stellen aus, sofern nicht ausdrücklich eingegrenzt.
Einstellungen
Bevor Sie eine Stelle in Odoo erstellen, konfigurieren Sie die erforderlichen Einstellungen für die Personalbeschaffung-App. Um die Einstellungen anzuzeigen und zu bearbeiten, navigieren Sie zu . Klicken Sie nach allen Änderungen auf die Schaltfläche Speichern in der oberen linken Ecke, um alle Änderungen zu speichern.
Prozess
Der Abschnitt Prozess auf der Einstellungsseite legt fest, was die Datenbank während des Recruiting-Prozesses tun kann und was nicht.
Bewerbungsumfrage versenden
Mit Odoo können Sie eine Umfrage an einen Bewerber senden, um mehr Informationen über ihn zu sammeln. Umfragen können als Prüfungen oder Fragebögen betrachtet werden und können auf verschiedene Weise angepasst werden, um dem Rekrutierungsteam wertvolle Einblicke in den Bewerber zu geben.
Aktivieren Sie die Option Bewerbungsumfrage versenden, um Umfragen an Bewerber zu senden. Sobald diese Option aktiviert ist, erscheint ein interner Link Bewerbungsumfrage. Klicken Sie auf den Link Bewerbungsumfrage, um zu einer Liste aller erstellten Umfragen zu navigieren.
Diese Liste enthält alle Umfragen, die in der Datenbank erstellt wurden, nicht nur Umfragen, die in der Personalbeschaffung-App verwendet werden. Wenn keine Umfragen erstellt wurden, zeigt die Umfragenliste die Meldung Keine Umfrage gefunden an und bietet Optionen zum Erstellen einer Umfrage aus mehreren vorkonfigurierten Umfragevorlagen.
Siehe auch
Bemerkung
Das Aktivieren der Option Vorstellungsgespräch-Umfrage senden installiert die Umfragen-Anwendung, sobald die Einstellungen gespeichert werden, falls sie noch nicht installiert ist.
Gehaltspaket-Konfigurator
Wenn Sie ein Angebot an einen Bewerber senden, können Sie ein Ablaufdatum für das Angebot festlegen. Geben Sie in das Feld Tage die Anzahl der Tage ein, für die ein Angebot gültig ist. Wenn der Bewerber das Angebot nach Ablauf der festgelegten Anzahl von Tagen nicht angenommen hat, ist das Angebot nicht mehr verfügbar.
Anzeige des Lebenslaufs
Wenn Bewerber eine Bewerbung einreichen, ist eines der standardmäßig erforderlichen Felder ein Lebenslauf oder CV. Alle Lebensläufe werden in der Dokumente-Anwendung gespeichert und sind auf der Bewerberkarte zugänglich.
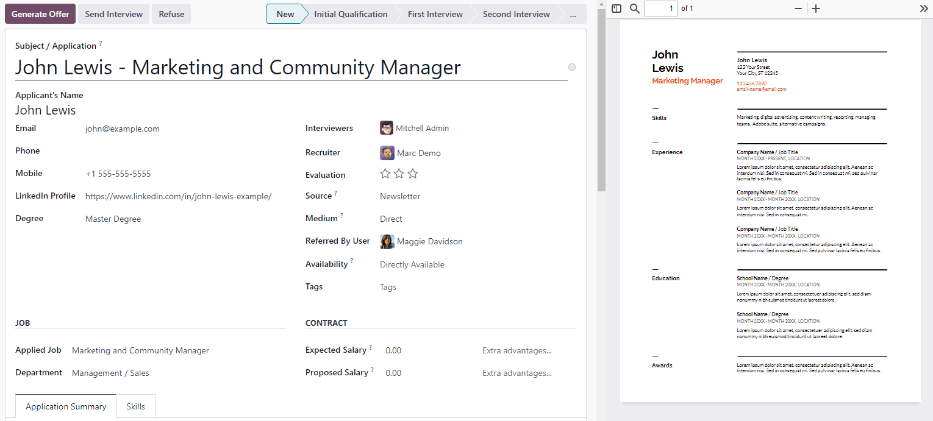
Ein Lebenslauf kann optional auf dem Formular des Bewerbers angezeigt werden, das durch Klicken auf die Bewerberkarte aufgerufen wird. Der Lebenslauf erscheint auf der rechten Seite des Bildschirms. Ist dies nicht aktiviert, wird auf den Lebenslauf über einen Link im Chatter zugegriffen, wo er angeklickt werden muss, um ihn zu erweitern und anzuzeigen, oder heruntergeladen werden muss.
Aktivieren Sie die Option Lebenslauf-Anzeige, um den Lebenslauf standardmäßig auf der Bewerberkarte anzuzeigen, zusätzlich zum Dokumentenlink. Wenn aktiviert, erscheint der Lebenslauf auf der rechten Seite der Bewerberkarte.
Bemerkung
Damit der Lebenslauf auf der rechten Seite erscheint, muss das Browserfenster im Vollbildmodus sein (bei dem der Browser den gesamten Bildschirm einnimmt).
Ist das Browserfenster kleiner als die gesamte Bildschirmbreite (nicht im Vollbildmodus), erscheint der Lebenslauf nicht auf der rechten Seite. Stattdessen erscheint der Lebenslauf im Abschnitt Dateien des Chatters unterhalb der Bewerberkarte.
In-App-Käufe
Der Abschnitt In-App-Käufe im Menü Einstellungen befasst sich mit Elementen, die Kredite zur Nutzung erfordern, wie SMS-Textnachrichten und die Digitalisierung von Lebensläufen.
Siehe auch
SMS versenden
Es ist möglich, Textnachrichten direkt über die App Personalbeschaffung an Bewerber zu senden. Diese Funktion erfordert Kredite. Klicken Sie auf den internen Link Service verwalten & Kredite kaufen und folgen Sie den Schritten zum Kauf von Krediten.
Lebenslauf-Digitalisierung (OCR)
Wenn eine Bewerbung über eine der verfügbaren Methoden eingereicht wird, z. B. durch Online-Bewerbung, E-Mail-Versand eines Lebenslaufs an den Alias der Stellenposition oder direkte Erstellung eines Bewerberdatensatzes in der Datenbank, kann Odoo den Namen, die Telefonnummer und die E-Mail-Adresse des Bewerbers aus dem Lebenslauf extrahieren und das Bewerberformular ausfüllen. Aktivieren Sie dazu die Option Lebenslauf-Digitalisierung (OCR).
Sobald diese aktiviert wurde, erscheinen zusätzliche Optionen. Klicken Sie auf die entsprechenden Radio-Buttons, um eine der folgenden Optionen auszuwählen:
Nicht digitalisieren: Diese Option deaktiviert die Lebenslauf-Digitalisierung.
Nur auf Anfrage digitalisieren: Diese Option digitalisiert Lebensläufe nur auf Anfrage. Auf Bewerberkarten erscheint eine Schaltfläche Dokument digitalisieren. Beim Klicken wird der Lebenslauf gescannt und die Bewerberkarte aktualisiert.
Automatisch digitalisieren: Diese Option digitalisiert alle Lebensläufe automatisch bei Einreichung.
Unter diesen Optionen befinden sich zwei zusätzliche Links. Klicken Sie auf den internen Link Service verwalten & Kredite kaufen, um Kredite für die Lebenslauf-Digitalisierung zu erwerben. Klicken Sie auf den internen Link Meine Services anzeigen, um eine Liste aller aktuellen Services und deren verbleibende Kreditguthaben anzuzeigen.
Weitere Informationen zur Dokumentdigitalisierung und IAP finden Sie in der Dokumentation zu In-App-Einkäufe (IAP).
Bemerkung
Die Option Nicht digitalisieren mag redundant erscheinen, erfüllt aber einen bestimmten Zweck. Die Deaktivierung der Option Lebenslauf-Digitalisierung (OCR) deinstalliert das Modul, während Nicht digitalisieren das Modul installiert, aber inaktiv lässt – sodass der Benutzer die Digitalisierung später erneut aktivieren kann, ohne das Modul neu zu installieren.
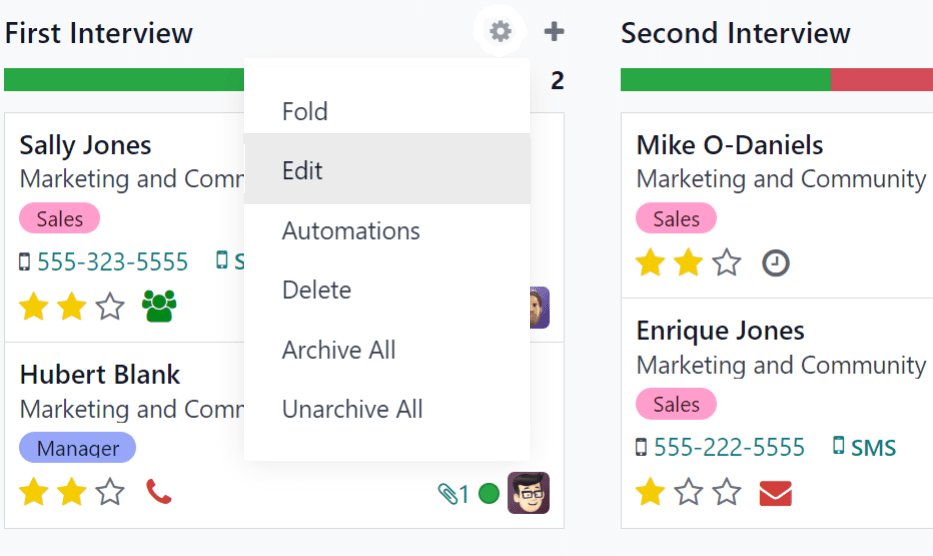
Kanban-Ansicht
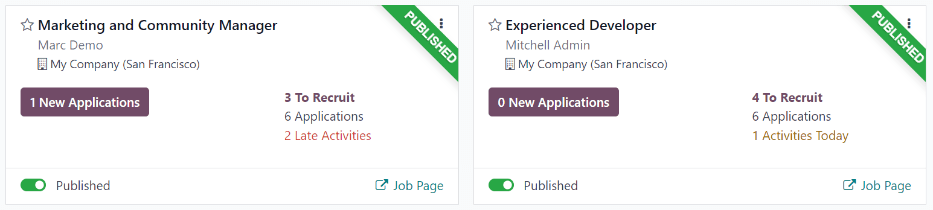
Um auf die Kanban-Ansicht für eine Stellenposition zuzugreifen, navigieren Sie zum Hauptdashboard der App , das die Standardansicht beim Öffnen der Anwendung ist. Alle Stellenpositionen erscheinen auf dem Hauptdashboard. Klicken Sie auf die Schaltfläche (#) Neue Bewerbungen auf einer Stellenpositionskarte, um zur Kanban-Ansicht aller Bewerber für diese bestimmte Stellenposition zu gelangen.
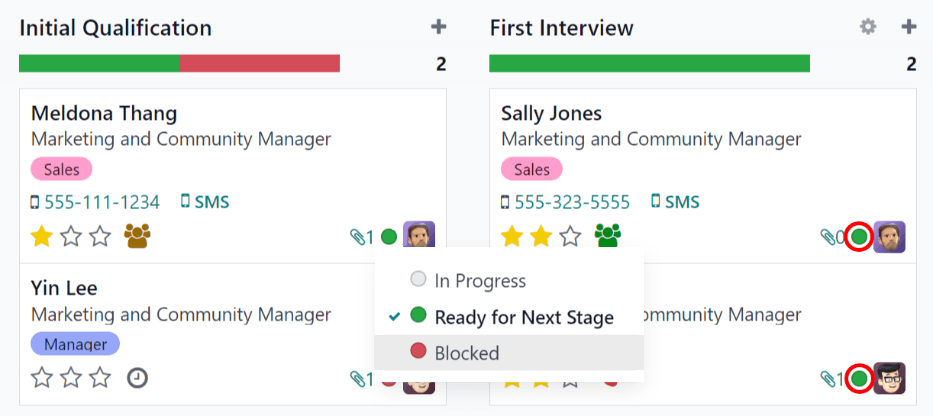
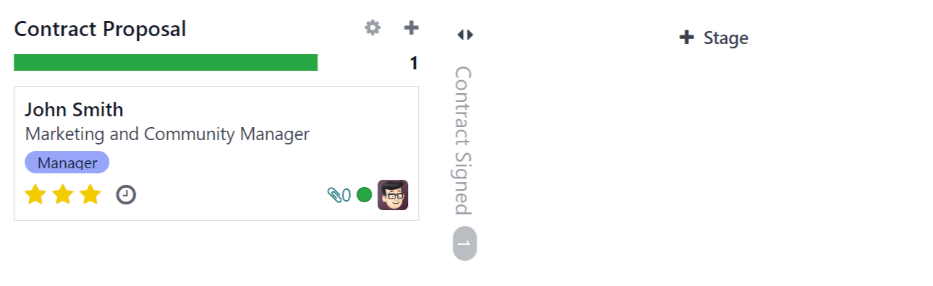
Innerhalb der Stellenbewerbung erscheinen die Kanban-Phasen mit allen Bewerbern in ihren jeweiligen Spalten, die anzeigen, in welcher Phase sie sich aktuell befinden. In Odoo sind standardmäßig sechs Phasen konfiguriert:
Die letzte Spalte Vertrag unterschrieben ist standardmäßig eingeklappt. Eingeklappte Spalten erscheinen in Grau und die Bewerber werden in der Ansicht ausgeblendet. Um die eingeklappte Phase auszuklappen und die Bewerberkarten für diese Spalte zu sehen, klicken Sie irgendwo in der dünnen grauen Spalte mit dem Spaltennamen und die Spalte wird ausgeklappt und zeigt die Bewerber.

Jede Phase hat eine farbgekennzeichnete Leiste unter dem Namen der Phase mit der Statusinformation für den Bewerber in dieser Phase. Die Statusfarben sind:
Grün: Der Bewerber ist bereit für die nächste Phase.
Rot: Der Bewerber ist für die die nächste Phase gesperrt.
Grau: Der Bewerber ist noch in Bearbeitung in der aktuellen Phase und nicht weder bereit noch gesperrt für die nächste Phase.
Der Status jeder Karte wird manuell eingestellt. Um den Status festzulegen, klicken Sie auf den kleinen Kreis in der linken unteren Ecke der Bewerberkarte. Ein Status-Pop-up-Fenster erscheint. Klicken Sie auf den gewünschten Status für den Bewerber. Der Statuspunkt auf der Bewerberkarte sowie der Statusleiste werden aktualisiert.
Tipp
Die Namen für die drei Statusfarben (In Bearbeitung, Bereit für nächste Phase und Blockiert) können geändert werden, falls gewünscht.
Phasen anpassen
Phasen können geändert, hinzugefügt oder gelöscht werden, um den spezifischen Einstellungsschritten eines Unternehmens zu entsprechen.
Neue Phase
Um eine neue Phase zu erstellen, klicken Sie auf Phase und eine neue Spalte erscheint. Geben Sie den Titel für die neue Phase in das Feld Phasentitel ein und klicken Sie dann auf Hinzufügen. Die neue Spalte wird angezeigt, und eine weitere neue Phase kann erstellt werden. Wenn keine neuen Phasen benötigt werden, klicken Sie auf eine beliebige Stelle des Bildschirms, um die Erstellung einer neuen Phase zu beenden.
Phase bearbeiten
Um die Einstellungen einer Phase zu ändern, bewegen Sie die Maus über den Namen der Phase. Ein Symbol (Einstellungen) erscheint oben rechts in der Phase. Klicken Sie auf das Symbol (Einstellungen), woraufhin ein Menü erscheint. Klicken Sie dann auf die Option Bearbeiten. Ein Formular Bearbeiten: (Phase) erscheint. Nehmen Sie die gewünschten Änderungen am Formular vor und klicken Sie anschließend auf Speichern & Schließen.
Phasenformular bearbeiten
Im Formular Bearbeiten (Phase) werden die Einstellungen der Phase konfiguriert. Das einzige Pflichtfeld ist Phasenbezeichnung.
Die auszufüllenden oder zu bearbeitenden Felder sind:
Phasenname: Geben Sie einen Namen für die Phase ein.
E-Mail-Vorlage: Wählen Sie eine E-Mail-Vorlage aus dem Dropdown-Menü aus. Wenn eine Vorlage ausgewählt ist, wird automatisch eine E-Mail an den Bewerber gesendet, wenn die Bewerberkarte in die Phase eintritt, wobei die ausgewählte Vorlage verwendet wird.
In Kanban eingeklappt: Aktivieren Sie das Kontrollkästchen, damit die Phase in der Standardansicht immer eingeklappt (ausgeblendet) angezeigt wird.
Eingestellte Phase: Aktivieren Sie dieses Kontrollkästchen, wenn diese Phase anzeigt, dass der Bewerber eingestellt wurde. Wenn die Karte eines Bewerbers in diese Phase wechselt, zeigt die Karte ein Eingestellt-Banner in der oberen rechten Ecke an. Wenn dieses Kontrollkästchen aktiviert ist, wird diese Phase verwendet, um das Einstellungsdatum eines Bewerbers zu bestimmen.
Stellenspezifisch: Wenn die Phase nur für bestimmte Stellenpositionen gilt, wählen Sie die Stellenpositionen aus dem Dropdown-Menü aus. Es können mehrere Stellenpositionen ausgewählt werden.
In Empfehlungen anzeigen: Aktivieren Sie dieses Kontrollkästchen, wenn diese Phase in der Anwendung Empfehlungen sichtbar sein soll und es dem Empfehlenden ermöglichen soll, Punkte zu sammeln, wenn eine seiner Empfehlungen diese Phase erreicht. Wenn dies aktiv ist, erscheint ein Feld Punkte. Geben Sie die Anzahl der Empfehlungspunkte ein, die der Mitarbeiter erhält, wenn ein Bewerber in diese Phase eintritt. Die Anwendung Empfehlungen muss installiert sein, um diese Option nutzen zu können.
Punkte: Wenn In Empfehlungen anzeigen aktiviert ist, erscheint dieses Feld. Geben Sie die Anzahl der Punkte ein, die der Mitarbeiter erhält, wenn ein Bewerber in diese Phase wechselt.
Abschnitt Tooltips: Es gibt drei vorkonfigurierte Statusbezeichnungen (farbige Kreise) für jede Bewerberkarte, die ihren Status anzeigen. Diese Farben werden oben in jeder Phase angezeigt, um die Status der Bewerber in der Phase widerzuspiegeln. Die Namen für die Bezeichnungen können geändert werden, die Bezeichnung selbst (die Farbe) jedoch nicht. Die Standardnamen und -bezeichnungen sind: In Bearbeitung (grau), Blockiert (rot) und Bereit für nächste Phase (grün).
Anforderungen: Geben Sie interne Notizen für diese Phase ein, die die Anforderungen der Phase erläutern.
Phase löschen
Wenn eine Phase nicht mehr benötigt wird, kann sie gelöscht werden. Um eine Phase zu löschen, fahren Sie mit der Maus über den Namen der Phase. Ein Symbol Einstellungen erscheint. Klicken Sie zunächst auf das Symbol Einstellungen, um ein Dropdown-Menü anzuzeigen, und klicken Sie dann auf Löschen. Eine Warnmeldung Bestätigung erscheint mit der Frage Sind Sie sicher, dass Sie diese Spalte löschen möchten? Klicken Sie auf Löschen, um die Spalte zu löschen.
Wichtig
Wenn sich derzeit Bewerber in der zu löschenden Phase befinden, erscheint eine Fehlermeldung, wenn Sie versuchen, die Phase zu löschen. Die Datensätze, die sich derzeit in der Phase befinden, müssen entweder gelöscht, archiviert oder in eine andere Phase verschoben werden, bevor die Phase gelöscht werden kann.
E-Mail-Vorlagen
Um mit dem Bewerber zu kommunizieren, stellt Odoo mehrere vorkonfigurierte E-Mail-Vorlagen zur Verfügung. Die vorkonfigurierten E-Mail-Vorlagen und ihre Verwendung sind wie folgt:
Personalbeschaffung: Erhalt einer Bewerbung: Diese Vorlage wird verwendet, um den Bewerber wissen zu lassen, dass seine Bewerbung eingegangen ist. Diese E-Mail wird automatisch versendet, sobald der Bewerber sich in der Phase Neu befindet.
Personalbeschaffung: Interesse: Diese Vorlage wird verwendet, um den Bewerber wissen zu lassen, dass seine Bewerbung die Aufmerksamkeit des Personalverantwortlichen erregt hat und dass ein Telefonat oder ein Bewerbungsgespräch geplant wird.
Personalabschaffun: nicht mehr interessiert: Diese Vorlage wird verwendet, wenn ein Bewerber mitteilt, dass er nicht mehr an der Stelle interessiert ist und bedankt sich für die Zeit und denn Aufwand.
Personalbeschaffung: Absage: Diese Vorlage wird verwendet, wenn ein Bewerber nicht länger für die Stelle in Frage kommt.
Personalbeschaffung: Vorstellungsgespräch planen: Diese Vorlage wird verwendet, um den Bewerber darüber zu informieren, dass er die Phase Erstqualifizierung bestanden hat und bald kontaktiert wird, um ein Vorstellungsgespräch mit dem Personalvermittler zu vereinbaren. Diese E-Mail wird automatisch versendet, sobald sich der Bewerber in der Phase Erstqualifizierung befindet.
Bemerkung
E-Mail-Vorlagen können erstellt, geändert und gelöscht werden, um sie an die Bedürfnisse eines Unternehmens anzupassen. Weitere Informationen zu E-Mail-Vorlagen finden Sie in der Dokumentation zu E-Mail-Vorlagen.
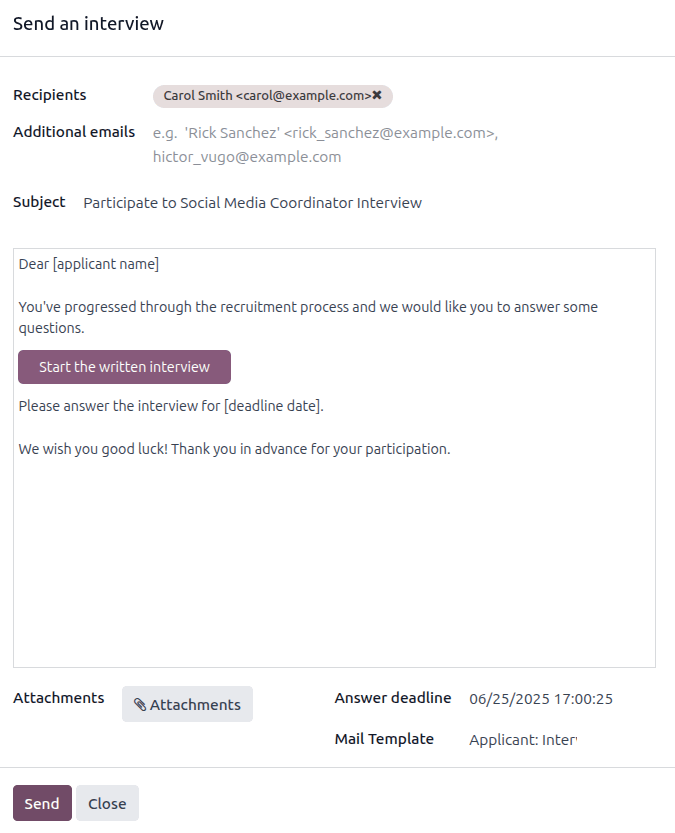
Um manuell eine E-Mail zu senden, klicken Sie im Chatter auf Nachricht versenden. Es erscheint ein Textfeld und die E-Mail-Adresse des Bewerbers.

Klicken Sie auf das Symbol Vollständiger Editor in der unteren rechten Ecke der Registerkarte Nachricht senden im Chatter. Ein Pop-up-Fenster E-Mail verfassen wird geladen, wobei An und Betreff vorausgefüllt sind. Die E-Mail-Adresse des Bewerbers wird in das Feld An eingetragen, und der Betreff lautet (Stellenposition). Der E-Mail-Text ist standardmäßig leer.
Um eine vorkonfigurierte E-Mail-Vorlage zu verwenden, klicken Sie auf die Schaltfläche vertikale Auslassungspunkte am unteren Rand des Fensters. Wählen Sie die zu verwendende E-Mail-Vorlage aus dem Dropdown-Menü aus.
Vorkonfigurierte E-Mail-Vorlagen können dynamische Platzhalter enthalten, sodass eindeutige Informationen in der E-Mail ausgefüllt werden können, um dem Bewerber eine persönlichere Nachricht zu senden. Es stehen mehrere vorkonfigurierte E-Mail-Vorlagen zur Auswahl. Je nach ausgewählter Vorlage können sich der E-Mail-Betreff oder der Text ändern.
Bemerkung
Es werden nur die E-Mail-Vorlagen geladen, die für das Modell konfiguriert sind. Andere E-Mail-Vorlagen sind in Odoo vorkonfiguriert, aber wenn sie nicht für die Personalbeschaffungsanwendung konfiguriert sind, erscheinen sie nicht in der Liste der verfügbaren Vorlagen.
Wenn Anhänge hinzugefügt werden müssen, klicken Sie auf die Schaltfläche Büroklammer am unteren Rand des Fensters. Navigieren Sie zu der anzuhängenden Datei und klicken Sie dann auf Öffnen, um sie anzuhängen. Um einen Anhang zu löschen, klicken Sie auf das Symbol Löschen rechts neben dem Anhang.
Wenn Änderungen an der E-Mail vorgenommen werden müssen, bearbeiten Sie den Text der E-Mail. Wenn die Bearbeitungen gespeichert werden sollen, um sie in Zukunft zu verwenden, kann die E-Mail als neue Vorlage gespeichert werden. Klicken Sie auf die Schaltfläche vertikale Auslassungspunkte am unteren Rand des Fensters und wählen Sie Als Vorlage speichern. Es werden Optionen angezeigt, um entweder eine vorhandene Vorlage zu überschreiben oder eine neue Vorlage zu speichern. Klicken Sie auf einen vorhandenen Vorlagennamen, um diese Vorlage zu überschreiben, oder klicken Sie auf Als Vorlage speichern, um eine neue Vorlage zu speichern. Ein Pop-up-Fenster E-Mail-Vorlage erstellen wird geladen. Geben Sie einen Namen für die Vorlage in das Feld Vorlagenname ein und klicken Sie dann auf Speichern.
Um die E-Mail zu senden, klicken Sie auf Senden. Die E-Mail wird dann an den Bewerber gesendet und erscheint im Chatter.
Siehe auch