
Veranstaltungen erstellen
Mit der Anwendung Veranstaltungen können Organisatoren persönliche oder Online-Veranstaltungen in Odoo erstellen und konfigurieren. Jede neue Veranstaltung enthält eine Reihe von Optionen zur Anpassung spezifischer Logistik wie Ticketverkauf, Registrierungsschalter, Stände, Vorträge, Sponsoren, Räume und mehr.
Veranstaltungen können manuell von Grund auf erstellt oder aus vorkonfigurierten Vorlagen erstellt werden. Nach dem Start integriert sich die Anwendung Veranstaltungen mit anderen Anwendungen für erweiterte Funktionen, einschließlich der Bewerbung von Veranstaltungen, des Verkaufs von Registrierungstickets an Teilnehmer und der Generierung von Leads mithilfe anpassbarer Regeln.
Dashboard
To create an event, navigate to the to land on the dashboard. By default, the Events dashboard uses the (Kanban) view, which showcases all events in the database in their respective pipeline stages. Other views can be set using the buttons at the top.
Jede Veranstaltungskarte zeigt den Namen der Veranstaltung, das geplante Datum, den Ort, die Anzahl der erwarteten Teilnehmer, alle geplanten Aktivitäten im Zusammenhang mit der Veranstaltung und den verantwortlichen Veranstaltungsmanager an.
The default stages in the Kanban view are New, Booked, Announced, and Ended. The cards can be dragged and dropped into any stage in the pipeline.
Bemerkung
The Ended stage is folded by default and located at the end of the dashboard, next to the final stage.

To add a new stage, click the Add Stage button at the end of the dashboard. Enter a name for the stage, then click (Add) to add the stage or (Remove) to cancel.
Neue Veranstaltung hinzufügen
Events can be created by opening the and clicking New. This opens a new Events form.
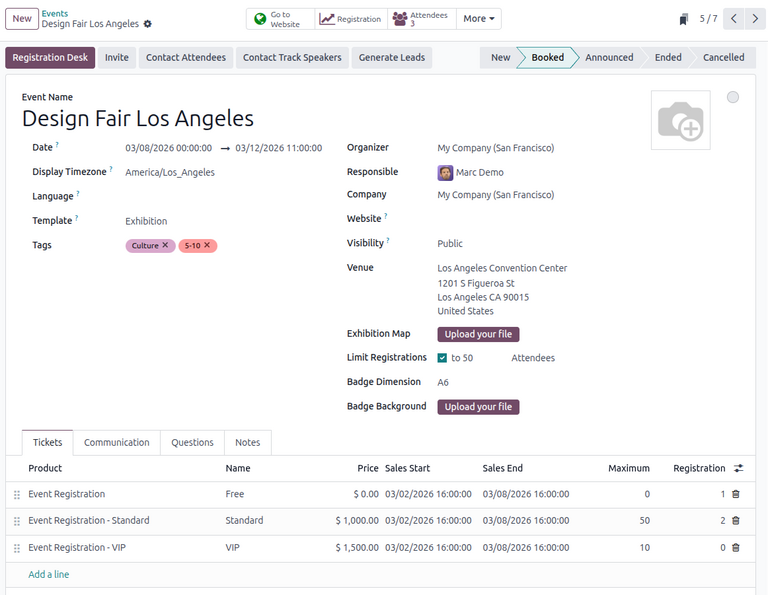
At the top of the event form are a series of clickable smart buttons to view details about event metrics, including attendee registrations, booths, ticket sales, event tracks, and sponsors.
Unterhalb der Smart-Buttons befindet sich das Veranstaltungsformular, das verschiedene Felder und anklickbare Registerkarten enthält, um die erforderlichen Details der Veranstaltung zu konfigurieren.
Geben Sie zunächst einige grundlegende Informationen zur Veranstaltung in die folgenden Felder ein:
Veranstaltungsname: Der Titel der Veranstaltung. Dieses Feld ist erforderlich.
Datum: Das geplante Datum oder der Datumsbereich der Veranstaltung (ausgedrückt in der lokalen Zeitzone). Dieses Feld wird automatisch ausgefüllt, ist aber änderbar und erforderlich.
Zeitzone anzeigen: Die Zeitzone, in der das Veranstaltungsdatum auf der Website angezeigt wird. Dieses Feld wird automatisch ausgefüllt, ist aber änderbar und erforderlich.
Sprache: Die gewählte Sprache für alle Veranstaltungskommunikationen.
Bemerkung
Next to the entered Event Name, there is a language tooltip, represented by an
abbreviated language indicator (e.g., EN). When clicked, a Translate: name pop-up window
appears, displaying various preconfigured language translation options available in the database.
Alternatively, to populate the event form from an event template, select an option in the Template drop-down menu.
Fügen Sie außerdem alle entsprechenden Tags (z. B. Online, Konferenz) für die Veranstaltung im Feld Tags hinzu. Pro Veranstaltung können mehrere Tags hinzugefügt werden.
Tipp
Tags können auf Veranstaltungen angezeigt werden, die auf der Website aufgelistet sind, indem das Kontrollkästchen Auf Website anzeigen unter aktiviert wird.
Fahren Sie fort, indem Sie Informationen wie Kontaktpersonen und Veranstaltungsort in den folgenden Feldern eingeben:
Organisator: Der Organisator der Veranstaltung (ein Unternehmen, ein Kontakt oder ein Mitarbeiter).
Verantwortlich: Der spezifische Benutzer, der für die Verwaltung der Veranstaltung in der Datenbank verantwortlich ist.
Unternehmen: Das spezifische Unternehmen in der Datenbank, auf das sich die Veranstaltung bezieht. Dieses Feld erscheint nur bei der Arbeit in einer Multi-Unternehmen-Umgebung. Dieses Feld wird automatisch ausgefüllt, ist aber änderbar. Es ist erforderlich.
Website: The specific website in the database on which the event is published. If this field is left blank, the event can be published on all websites in the database.
Visibility: The visibility of the event on the specified Website and in searches. The following options can be specified:
Public: The event is searchable and visible to all website visitors.
Via a Link: The event is visible only to visitors with a direct URL or already-registered participants.
Logged Users: The event is visible only to logged-in visitors or visitors with a direct URL.
Veranstaltungsort: Der Ort der Veranstaltung. Dieses Feld zieht Informationen aus der Anwendung Kontakte. Alternativ können die Informationen manuell eingegeben werden.
To limit the number of registrations for the event, select Limit Registrations and enter the maximum number of attendees allowed in the resulting field.
Zusätzliche Veranstaltungskonfigurationen
Nachdem Sie die Felder im Veranstaltungsformular ausgefüllt haben, fahren Sie mit den vier Registerkarten am unteren Rand fort, um weitere Anpassungen vorzunehmen.
Reiter „Tickets“
In the Tickets tab of the event form, create custom registration tickets and ticket tiers for events.

To create a ticket, click Add a line in the Tickets tab. In the Product field, either select the preconfigured Event Registration product, or create a new one by typing in the name of the new event registration product and then selecting either Create or Create and edit… from the resulting drop-down menu.
Then, enter a name for the ticket (e.g., Basic Ticket or VIP) in the Name field.
Wichtig
In order for an event registration product to be selectable in the Tickets tab, the event registration Product Type must be set to Service and the Create on Order field must be set to Event Registration.
Tipp
Existing event registration products can be modified directly from the Product field by clicking the (right arrow) icon next to the product. Doing so reveals that product’s form. If the Inventory application is installed, additional choices are available to customize for the product.
Als nächstes legen Sie die Kosten für die Registrierung des Tickets im Feld Preis fest.
Bemerkung
The Sales Price defined on the event registration product’s form sets the default cost of a ticket. Modifying the Price of the event ticket in the Tickets tab overrides the ticket’s default price with this new price.
Next, enter the Sales Start and Sales End dates in their respective fields. To do so, click into the blank field to reveal a calendar pop-over. Then, select the desired date and time and click Apply.
Optionally, designate a Maximum amount of the ticket that can be sold.
As attendees register, the Registration column automatically populates with the number of tickets sold.
To delete any tickets from the Tickets tab, click the (trash can) icon in the ticket’s corresponding line.
Tipp
To add an optional Description column to the Tickets tab, click the (additional options) drop-down menu at the end of the column titles.
Then, select the checkbox beside Description to add a brief description for each event ticket, informing registrants about ticket details.
Reiter „Kommunikation“
In the Communication tab of an event form, create various marketing communications that can be scheduled to be sent at specific intervals leading up to and following the event.

Bemerkung
Standardmäßig stellt Odoo drei separate vorkonfigurierte Kommunikationen in jedem neuen Veranstaltungsformular bereit. Eine ist eine E-Mail, die nach jeder Registrierung gesendet wird, um den Kauf beim Teilnehmer zu bestätigen. Die anderen beiden sind E-Mail-Veranstaltungserinnerungen, die so geplant sind, dass sie in verschiedenen Zeitintervallen vor der Veranstaltung gesendet werden, um den Empfänger an die bevorstehende Veranstaltung zu erinnern.
To add a communication in the Communication tab, click Add a line. Then, select the desired type of communication from the first drop-down menu in the Template column. The options are: Mail, SMS, Social Post, or WhatsApp.
Wichtig
Die Option Social-Media-Beitrag wird nur angezeigt, wenn die Anwendung Social Marketing installiert ist. Die Option WhatsApp wird nur angezeigt, wenn das Modul WhatsApp installiert ist.
WhatsApp-Vorlagen können während der aktiven Konfiguration nicht bearbeitet werden. Eine separate Genehmigung von Meta ist erforderlich.
Wählen Sie dann eine vorhandene E-Mail-Vorlage aus dem zweiten Dropdown-Menü im Feld Vorlage.
Next, define the Interval and Unit from their respective drop-down fields to specify when the communication should be sent. The Unit options are: Immediately, Hours, Days, Weeks, and Months.
Then, select one of the following options from the Trigger drop-down menu:
After each registration
Before the event starts
After the event started
After the event ended
Before the event ends
The (#) Sent column populates with the number of sent communications, along with different icons indicating the status of the communication:
(Running): The communication is active and running.
(Sent): The communications were sent and are no longer active.
(Scheduled): The communication is scheduled but has not been deployed.
Any number of communications can be added in the Communication tab of an event form.
Example
To send a confirmation email an hour after an attendee registers for an event, configure the communication as follows:
Intervall:
1Einheit: Stunden
Auslöser: Nach jeder Registrierung
Bemerkung
Existing email templates can be modified directly from the Template drop-down menu, by clicking the (Internal link) icon next to the template name. Doing so reveals a separate page where users can edit the Content, Email Configuration, and Settings of that particular email template.
To view and manage all email templates, activate Entwicklermodus (Fehlerbeseitigungsmodus) and navigate to . Modify with caution as email templates affect all communications where the template is used.
Reiter „Fragen“
In the Questions tab of an event form, users can create questionnaires to gather information from attendees when registering for the event.

Bemerkung
By default, Odoo provides three questions in the Questions tab for every event form. The default questions require registrants to provide their Name, Email, and an optional Phone number.
The information gathered from the Questions tab can be found on the Attendees dashboard, accessible via the Attendees smart button. Odoo populates individual records that contain basic information about the registrants, as well as their preferences.
To add a question in the Questions tab, click Add a line. Doing so reveals an Add: Question pop-up window. From here, users can select previously configured questions or click New to create a new one. Doing so opens a new Create Question pop-up window.

First, enter the question in the field at the top of the form. Then, specify if the question requires a Mandatory Answer.
Wählen Sie dann eine Option für den Fragetyp aus:
Auswahl: Bietet Antwortoptionen zur Frage, aus denen die Registranten wählen können. Auswählbare Antwortoptionen können in der Spalte Antworten am unteren Rand des Popup-Fensters verwaltet werden.
Texteingabe: Ermöglicht Benutzern, eine individuelle Antwort auf die Frage in einem Textfeld einzugeben.
Name: Bietet Registranten ein Feld, in das sie ihren Namen eingeben können.
E-Mail: Bietet Registranten ein Feld, in das sie ihre E-Mail-Adresse eingeben können.
Telefon: Bietet Registranten ein Feld, in das sie ihre Telefonnummer eingeben können.
Unternehmen: Bietet Registranten ein Feld, in das sie ein Unternehmen eingeben können, mit dem sie verbunden sind.
Additionally, select one or more of the following options to configure the question’s visibility and extendability:
Ask once per order: Ask this question only once for each registration, applying the answer to every attendee in the order (if multiple tickets are purchased at once).
Default question: Automatically add this question for all new events.
Is Reusable: Allow this question to be reusable for all new events. If Default question is selected, this option is automatically enabled.
If Selection was chosen as the Question Type, an Answers tab appears. Add any answers to the question under this tab by clicking Add a line.
Once all the desired configurations have been entered, click Save & Close to save the question and return to the Questions tab on the event form. Or, click Save & New to save the question and configure another. To cancel, click Discard.
Users can add as many questions in the Questions tab as needed.
Tipp
Bei den Typen Auswahl und Texteingabe erscheint eine Schaltfläche Statistik auf der rechten Seite der Fragezeile. Wenn Sie darauf klicken, öffnet Odoo eine separate Seite, auf der die Antwortmetriken zu dieser speziellen Frage angezeigt werden.
Notes & Documents tab
In the Notes & Documents tab of an event form, users can leave detailed internal notes and event-related instructions or information for attendees.

For in-person events, users can specify the venue map and attendee badge details in the following fields:
Exhibition Map: Upload an image of the event venue map. Do so by clicking Upload your file.
Badge Dimension: Select the desired paper format dimension for attendees‘ event badges. The options are A4 foldable, A6, 4 per sheet, and 96x82mm (Badge Printer).
Badge Background: Upload an image of the custom background image for the badge. Do so by clicking Upload your file.
In the Ticket Instructions field, users can leave specific instructions for attendees and display them on attendees‘ tickets.
In the Note field, users can leave internal notes for other event employees, such as „to-do“ lists, contact information, instructions, and so on.
Veranstaltungen veröffentlichen
Once all configurations and modifications are complete on the event form, the event can be published on the website. Doing so makes the event visible to website visitors and allows them to register for the event.
To publish an event, click the Go to Website smart button to open the event webpage. Then, toggle the Unpublished button in the header menu, changing it to a Published switch. The event webpage is now published and accessible by all website visitors.
Siehe auch
Weitere Informationen zu Funktionen und Optionen für Website-Design finden Sie in der Dokumentation zu Bausteinen.
Once the event website is ready to be shared, click the red Unpublished toggle switch in the header menu, changing it to a green Published switch. At this point, the event web page is published and accessible by all website visitors.
Veranstaltungseinladungen versenden
To send event invites to potential attendees, navigate to the desired event form via and click the desired event. On the event form, click the Invite button.
Doing so reveals a blank email form. Customize the message by specifying a mailing type, subject, recipients, and the mail body.
Tipp
Für den Versand von E-Mails aus Odoo gilt ein Tageslimit, das standardmäßig bei 200 liegt. Wenn Sie mehr über Tageslimits erfahren möchten, besuchen Sie die Dokumentation Tageslimit erreicht.