
Membuat acara
Dengan aplikasi Acara, penyelenggara dapat membuat dan mengonfigurasi acara tatap muka atau online di Odoo. Setiap acara baru berisi sejumlah opsi untuk menyesuaikan logistik spesifik seperti penjualan tiket, meja registrasi, booth, track, sponsor, ruangan, dan lainnya.
Acara dapat dibuat secara manual dari awal atau dibuat dari template yang telah dikonfigurasi sebelumnya. Setelah diluncurkan, aplikasi Acara terintegrasi dengan aplikasi lain untuk fungsionalitas yang ditingkatkan, termasuk mempromosikan acara, menjual tiket registrasi kepada peserta, dan menghasilkan prospek menggunakan aturan yang dapat disesuaikan.
Dashboard
To create an event, navigate to the to land on the dashboard. By default, the Events dashboard uses the (Kanban) view, which showcases all events in the database in their respective pipeline stages. Other views can be set using the buttons at the top.
Setiap kartu acara menampilkan nama acara, tanggal yang dijadwalkan, lokasi, jumlah Peserta yang diharapkan, aktivitas yang dijadwalkan terkait acara, dan manajer acara yang bertanggung jawab.
The default stages in the Kanban view are New, Booked, Announced, and Ended. The cards can be dragged and dropped into any stage in the pipeline.
Catatan
The Ended stage is folded by default and located at the end of the dashboard, next to the final stage.

To add a new stage, click the Add Stage button at the end of the dashboard. Enter a name for the stage, then click (Add) to add the stage or (Remove) to cancel.
Tambahkan acara baru
Events can be created by opening the and clicking New. This opens a new Events form.
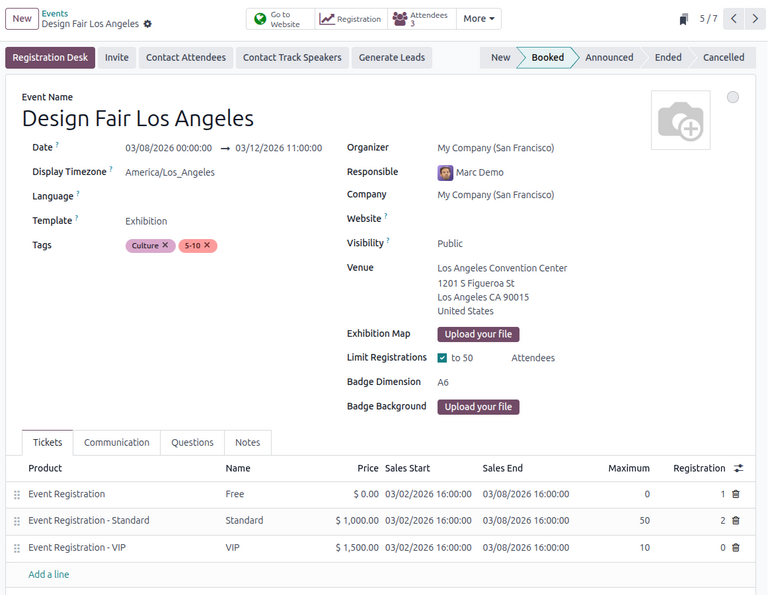
At the top of the event form are a series of clickable smart buttons to view details about event metrics, including attendee registrations, booths, ticket sales, event tracks, and sponsors.
Di bawah tombol pintar adalah formulir acara, yang berisi berbagai bidang dan tab yang dapat diklik untuk mengonfigurasi detail acara yang diperlukan.
Untuk memulai, masukkan beberapa informasi dasar tentang acara di bidang berikut:
Nama Acara: Judul acara. Bidang ini wajib diisi.
Tanggal: Tanggal atau rentang tanggal yang dijadwalkan untuk acara (dinyatakan dalam zona waktu lokal). Bidang ini terisi otomatis tetapi dapat dimodifikasi dan wajib diisi.
Tampilkan Zona Waktu: Zona waktu di mana tanggal acara ditampilkan di website. Bidang ini terisi otomatis tetapi dapat dimodifikasi dan wajib diisi.
Bahasa: Bahasa yang dipilih untuk semua komunikasi acara.
Catatan
Next to the entered Event Name, there is a language tooltip, represented by an
abbreviated language indicator (e.g., EN). When clicked, a Translate: name pop-up window
appears, displaying various preconfigured language translation options available in the database.
Alternatively, to populate the event form from an event template, select an option in the Template drop-down menu.
Selain itu, tambahkan tag terkait (misalnya, Online, Conference) untuk acara di bidang Tags. Beberapa tag dapat ditambahkan per acara.
Tip
Tag dapat ditampilkan pada acara yang terdaftar di website dengan mengaktifkan kotak centang Show on Website dari .
Lanjutkan dengan memasukkan informasi seperti titik kontak dan lokasi tempat di bidang berikut:
Organizer: Penyelenggara acara (perusahaan, kontak, atau karyawan).
Responsible: User spesifik yang bertanggung jawab mengelola acara dalam database.
Company: Perusahaan spesifik dalam database yang terkait dengan acara. Bidang ini hanya muncul jika bekerja di lingkungan multi-perusahaan. Bidang ini terisi otomatis tetapi dapat dimodifikasi. Bidang ini wajib diisi.
Website: The specific website in the database on which the event is published. If this field is left blank, the event can be published on all websites in the database.
Visibility: The visibility of the event on the specified Website and in searches. The following options can be specified:
Public: The event is searchable and visible to all website visitors.
Via a Link: The event is visible only to visitors with a direct URL or already-registered participants.
Logged Users: The event is visible only to logged-in visitors or visitors with a direct URL.
Venue: Lokasi tempat acara. Bidang ini mengambil informasi dari aplikasi Kontak. Sebagai alternatif, informasi dapat dimasukkan secara manual.
To limit the number of registrations for the event, select Limit Registrations and enter the maximum number of attendees allowed in the resulting field.
Konfigurasi acara tambahan
Setelah mengisi bidang pada formulir acara, lanjutkan ke empat tab di bagian bawah untuk kustomisasi lebih lanjut.
Tab tiket
In the Tickets tab of the event form, create custom registration tickets and ticket tiers for events.

To create a ticket, click Add a line in the Tickets tab. In the Product field, either select the preconfigured Event Registration product, or create a new one by typing in the name of the new event registration product and then selecting either Create or Create and edit... from the resulting drop-down menu.
Then, enter a name for the ticket (e.g., Basic Ticket or VIP) in the Name field.
Penting
In order for an event registration product to be selectable in the Tickets tab, the event registration Product Type must be set to Service and the Create on Order field must be set to Event Registration.
Tip
Existing event registration products can be modified directly from the Product field by clicking the (right arrow) icon next to the product. Doing so reveals that product's form. If the Inventory application is installed, additional choices are available to customize for the product.
Selanjutnya, atur biaya pendaftaran tiket di kolom Price.
Catatan
The Sales Price defined on the event registration product's form sets the default cost of a ticket. Modifying the Price of the event ticket in the Tickets tab overrides the ticket's default price with this new price.
Next, enter the Sales Start and Sales End dates in their respective fields. To do so, click into the blank field to reveal a calendar pop-over. Then, select the desired date and time and click Apply.
Optionally, designate a Maximum amount of the ticket that can be sold.
As attendees register, the Registration column automatically populates with the number of tickets sold.
To delete any tickets from the Tickets tab, click the (trash can) icon in the ticket's corresponding line.
Tip
To add an optional Description column to the Tickets tab, click the (additional options) drop-down menu at the end of the column titles.
Then, select the checkbox beside Description to add a brief description for each event ticket, informing registrants about ticket details.
Tab komunikasi
In the Communication tab of an event form, create various marketing communications that can be scheduled to be sent at specific intervals leading up to and following the event.

Catatan
Secara default, Odoo menyediakan tiga komunikasi yang telah dikonfigurasi sebelumnya pada setiap formulir acara baru. Satu adalah email yang dikirim setelah setiap pendaftaran untuk mengonfirmasi pembelian dengan peserta. Dua lainnya adalah pengingat acara email yang dijadwalkan untuk dikirim pada interval waktu berbeda menjelang acara untuk mengingatkan penerima tentang acara yang akan datang.
To add a communication in the Communication tab, click Add a line. Then, select the desired type of communication from the first drop-down menu in the Template column. The options are: Mail, SMS, Social Post, or WhatsApp.
Penting
Opsi Postingan Sosial hanya muncul jika aplikasi Social Marketing diinstal. Opsi WhatsApp hanya muncul jika modul WhatsApp diinstal.
Šablony WhatsApp nelze upravovat během aktivní konfigurace. Je vyžadováno samostatné schválení od společnosti Meta.
Kemudian, pilih template email yang ada dari menu drop-down kedua pada kolom Template.
Next, define the Interval and Unit from their respective drop-down fields to specify when the communication should be sent. The Unit options are: Immediately, Hours, Days, Weeks, and Months.
Then, select one of the following options from the Trigger drop-down menu:
After each registration
Before the event starts
After the event started
After the event ended
Before the event ends
The (#) Sent column populates with the number of sent communications, along with different icons indicating the status of the communication:
(Running): The communication is active and running.
(Sent): The communications were sent and are no longer active.
(Scheduled): The communication is scheduled but has not been deployed.
Any number of communications can be added in the Communication tab of an event form.
Example
To send a confirmation email an hour after an attendee registers for an event, configure the communication as follows:
Interval:
1Unit: Hours
Trigger: After each registration
Catatan
Existing email templates can be modified directly from the Template drop-down menu, by clicking the (Internal link) icon next to the template name. Doing so reveals a separate page where users can edit the Content, Email Configuration, and Settings of that particular email template.
To view and manage all email templates, activate Mode pengembang (mode debug) and navigate to . Modify with caution as email templates affect all communications where the template is used.
Tab pertanyaan
In the Questions tab of an event form, users can create questionnaires to gather information from attendees when registering for the event.

Catatan
By default, Odoo provides three questions in the Questions tab for every event form. The default questions require registrants to provide their Name, Email, and an optional Phone number.
The information gathered from the Questions tab can be found on the Attendees dashboard, accessible via the Attendees smart button. Odoo populates individual records that contain basic information about the registrants, as well as their preferences.
To add a question in the Questions tab, click Add a line. Doing so reveals an Add: Question pop-up window. From here, users can select previously configured questions or click New to create a new one. Doing so opens a new Create Question pop-up window.

First, enter the question in the field at the top of the form. Then, specify if the question requires a Mandatory Answer.
Selanjutnya, pilih opsi Jenis Pertanyaan:
Pilihan: Berikan opsi jawaban untuk pertanyaan yang dapat dipilih pendaftar. Opsi jawaban yang dapat dipilih dapat dikelola di kolom Jawaban di bagian bawah jendela pop-up.
Input Teks: Memungkinkan pengguna memasukkan respons kustom untuk pertanyaan dalam kolom teks.
Nama: Menyediakan kolom bagi pendaftar untuk memasukkan nama mereka.
Email: Menyediakan kolom bagi pendaftar untuk memasukkan alamat email mereka.
Telepon: Menyediakan kolom bagi peserta untuk memasukkan nomor telepon mereka.
Perusahaan: Menyediakan kolom bagi peserta untuk memasukkan perusahaan yang mereka terkait.
Additionally, select one or more of the following options to configure the question's visibility and extendability:
Ask once per order: Ask this question only once for each registration, applying the answer to every attendee in the order (if multiple tickets are purchased at once).
Default question: Automatically add this question for all new events.
Is Reusable: Allow this question to be reusable for all new events. If Default question is selected, this option is automatically enabled.
If Selection was chosen as the Question Type, an Answers tab appears. Add any answers to the question under this tab by clicking Add a line.
Once all the desired configurations have been entered, click Save & Close to save the question and return to the Questions tab on the event form. Or, click Save & New to save the question and configure another. To cancel, click Discard.
Users can add as many questions in the Questions tab as needed.
Tip
Untuk jenis Pilihan dan Input Teks, tombol Statistik muncul di sisi kanan baris pertanyaan. Ketika diklik, Odoo menampilkan halaman terpisah yang menunjukkan metrik respons untuk pertanyaan spesifik tersebut.
Notes & Documents tab
In the Notes & Documents tab of an event form, users can leave detailed internal notes and event-related instructions or information for attendees.

For in-person events, users can specify the venue map and attendee badge details in the following fields:
Exhibition Map: Upload an image of the event venue map. Do so by clicking Upload your file.
Badge Dimension: Select the desired paper format dimension for attendees' event badges. The options are A4 foldable, A6, 4 per sheet, and 96x82mm (Badge Printer).
Badge Background: Upload an image of the custom background image for the badge. Do so by clicking Upload your file.
In the Ticket Instructions field, users can leave specific instructions for attendees and display them on attendees' tickets.
In the Note field, users can leave internal notes for other event employees, such as "to-do" lists, contact information, instructions, and so on.
Publikasikan acara
Once all configurations and modifications are complete on the event form, the event can be published on the website. Doing so makes the event visible to website visitors and allows them to register for the event.
To publish an event, click the Go to Website smart button to open the event webpage. Then, toggle the Unpublished button in the header menu, changing it to a Published switch. The event webpage is now published and accessible by all website visitors.
Lihat juga
Další informace o funkčnosti a možnostech designu webu naleznete v dokumentaci Stavební bloky.
Once the event website is ready to be shared, click the red Unpublished toggle switch in the header menu, changing it to a green Published switch. At this point, the event web page is published and accessible by all website visitors.
Kirim undangan acara
To send event invites to potential attendees, navigate to the desired event form via and click the desired event. On the event form, click the Invite button.
Doing so reveals a blank email form. Customize the message by specifying a mailing type, subject, recipients, and the mail body.
Tip
Mengirim email dari Odoo memiliki batasan harian, yang secara default adalah 200. Untuk mempelajari lebih lanjut tentang batasan harian, kunjungi dokumentasi Batas harian tercapai.
Lihat juga