
ปฏิเสธผู้สมัคร
ในทุกขั้นตอนของกระบวนการรับสมัคร ผู้สมัครสามารถถูกปฏิเสธสำหรับตำแหน่งงานได้
หากต้องการปฏิเสธผู้สมัคร ให้เริ่มต้นด้วยการนำทางไปยังบัตรของผู้สมัครในแอป การรับสมัคร ซึ่งทำได้สองวิธี:
Open the main Job Positions dashboard by navigating to . Next, click on the desired job position card, then click on the individual applicant card from the Applications page.
นำทางไปที่ ในรายการ ใบสมัคร คลิกที่ใดก็ได้บนแถบของผู้สมัครที่ต้องการ เพื่อเปิดบัตรของผู้สมัครนั้นๆ
ที่ด้านบนของการ์ดผู้สมัคร มีปุ่มหลายปุ่ม คลิกปุ่มที่มีชื่อว่า ปฏิเสธ
เหตุผลการปฏิเสธ
เหตุผลการปฏิเสธ ช่วยให้ผู้รับสมัครสามารถบันทึกเหตุผลว่าทำไมผู้สมัครจึงไม่เหมาะสม และส่งเทมเพลตอีเมลเหตุผลการปฏิเสธเฉพาะเจาะจงไปยังผู้สมัคร
Clicking Refuse on an applicant's form makes the Refuse Reason pop-up window appear.
The default refuse reasons in Odoo, and their corresponding refusal email templates, are:
เทมเพลตอีเมล |
เหตุผลในการปฏิเสธ |
|---|---|
การรับสมัคร: ปฏิเสธ |
ไม่เหมาะสมกับความต้องการของงาน
ตำแหน่งงานได้รับการบรรจุแล้ว
รายการซ้ำ
สแปม
|
การรับสมัคร: ไม่สนใจอีกต่อไป |
ผู้สมัครปฏิเสธ: งานไม่เหมาะสม
ผู้สมัครปฏิเสธ: เงินเดือน
|
Additional refusal reasons can be created, and existing ones can be modified (or deleted).
สร้างหรือแก้ไขเหตุผลการปฏิเสธ
To view and configure refuse reasons, navigate to . Doing so reveals the Refuse Reasons page, where all the existing refusal reasons are listed.
To create a new refuse reason from the Refuse Reasons page, click the New button. A blank line appears at the bottom of the list, with an empty field present in the Description column.
พิมพ์เหตุผลการปฏิเสธใหม่ในฟิลด์ แนะนำให้ป้อนเหตุผลที่สั้นและกระชับ เช่น ข้อเสนอหมดอายุ หรือ ถอนใบสมัคร
Then, click in the Email Template field to reveal a drop-down menu. Select the desired email template from the list to be used when the new refuse reason is selected.
If a new email template is desired, type in the name for the new template in the field. Then, click Create and edit..., and a Create Email Template pop-up window appears.
The Template Name field is populated with the name entered in the Email Template column by default, but can be modified if desired. Enter the email Subject in the corresponding field, and add the email content in the Body tab. To include attachments, click the Options tab, and add the attachment using the Attachments button. To assign an Owner for the template, select a user in the drop-down menu. Enter a Template Description in the corresponding field.
Click Save, and Odoo returns to the Refuse Reasons list.
เทมเพลตใหม่จะปรากฏในฟิลด์ เทมเพลตอีเมล ของเหตุผลในการปฏิเสธใหม่
Note
เทมเพลตอีเมลปฏิเสธการรับสมัครที่กำหนดค่าไว้ล่วงหน้าใน Odoo ใช้ตัวแทนที่แบบไดนามิก ซึ่งเป็นตัวแทนที่ส่วนบุคคลที่เติมข้อมูลจากบันทึกของผู้สมัครในเนื้อหาอีเมล
For example, if the applicant's name is used in a dynamic placeholder, the applicant's name appears anytime that dynamic placeholder appears on the email template.
สำหรับข้อมูลโดยละเอียดเพิ่มเติมเกี่ยวกับเทมเพลตอีเมล โปรดดูเอกสารประกอบ เทมเพลตอีเมล
ส่งอีเมลปฏิเสธ
After clicking the Refuse button on an applicant form, a refuse reason is selected from the Refuse Reason pop-up window.
The applicant's email address automatically populates the Applicant field. The Subject and email body are populated according to the corresponding email
To send the refusal email to the applicant, click Refuse at the bottom of the Refuse Reason pop-up window. The refusal email is sent to the applicant, and a red Refused banner appears on the applicant's card in the corner.
Tip
If an application should be refused but an email should not be sent (if, for example, the application was spam), click the Send Email toggle to deactivate it, and click Refuse at the bottom of the Refuse Reason pop-up window.

Refuse duplicate applicant
Occasionally, applicants apply multiple times for the same job position. When this occurs, it is possible to refuse all their applications at once, instead of individually.
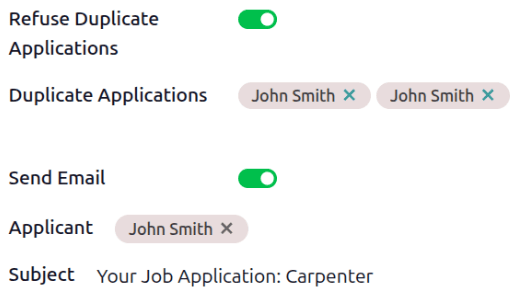
In this situation, a Refuse Duplicate Applications toggle appears on the Refuse Reason pop-up window. Enable the toggle, and a Duplicate Applications field appears beneath it, listing the applicant's name for each duplicate application in the system.
To refuse all applications for that applicant, click the Refuse button.
The applicant is only sent one email, and all their applications for the job position are marked as Refused.
ดูผู้สมัครที่ถูกปฏิเสธ
After refusal, the applicant's card is hidden by default. However, it is still possible to view applicants who have been refused by job position, or view all refused applicants.
By job position
To view the refused applicants for a specific job position, navigate to , then click the desired job position Kanban card.
On the Applications page, click the (Toggle Search Panel) button in the search bar, then click Refused in the Filters column.
All applicants that have been refused for the job position appear in the stage they were in when they were refused, and all other applicants are hidden.

All refused applicants
To view all refused applicants across all job positions, navigate to . Every applicant record is displayed in a default list view.
Click the (Toggle Search Panel) button in the search bar, then click Refused in the Filters column.
All applicants that have been refused appear, with the text in red. Along with the applicant's Name, the date they Applied on, the Job Position, Stage they were in when refused, their Matching percentage, any Tags, and the Recruiter responsible for the job position are listed.
