
Creare eventi
Con l’applicazione Eventi, gli organizzatori possono creare e configurare eventi in presenza o online in Odoo. Ogni nuovo evento contiene diverse opzioni per personalizzare aspetti logistici specifici come la vendita di biglietti, il desk di registrazione, gli stand, i track, gli sponsor, le sale e altro ancora.
Gli eventi possono essere creati manualmente da zero o costruiti a partire da modelli preconfigurati. Una volta avviata, l’app Eventi si integra con altre app per funzionalità avanzate, tra cui la promozione degli eventi, la vendita di biglietti di registrazione ai partecipanti e la generazione di opportunità utilizzando regole personalizzabili.
Dashboard
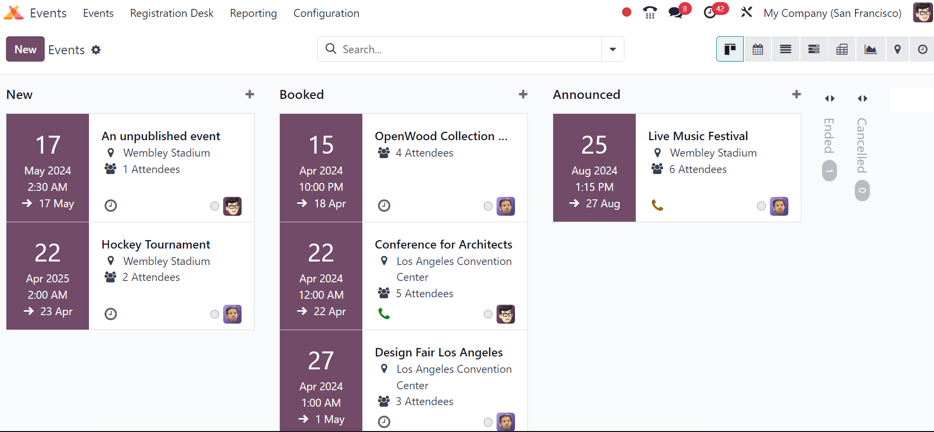
Per creare un evento, apri l’app per visualizzare la dashboard. Per impostazione predefinita, la dashboard dell’app Eventi utilizza la vista (Kanban) che mostra tutti gli eventi presenti nel database nelle rispettive fasi della pipeline. È possibile impostare altre viste utilizzando i pulsanti nella parte superiore.
Ogni scheda evento mostra il nome dell’evento, la data programmata, la posizione, il numero previsto di Partecipanti, eventuali attività programmate relative all’evento e il responsabile dell’evento.
Le fasi predefinite nella vista Kanban sono Nuovo, Prenotato, Annunciato, Finito e Annullato. Le schede possono essere trascinate e rilasciate in qualsiasi fase della pipeline.
Nota
Le fasi Finito e Annullato sono minimizzate per impostazione predefinita e situate alla fine della dashboard, accanto alla fase finale.
Per aggiungere una nuova fase, fai clic sul pulsante Aggiungi fase alla fine della dashboard. Inserisci un nome, poi fai clic su Aggiungi per aggiungere la fase oppure premi Esc per annullare.
Aggiungi un nuovo evento
È possibile creare eventi aprendo l’app per poi fare clic su Nuovo. Apparirà un nuovo modulo Eventi.
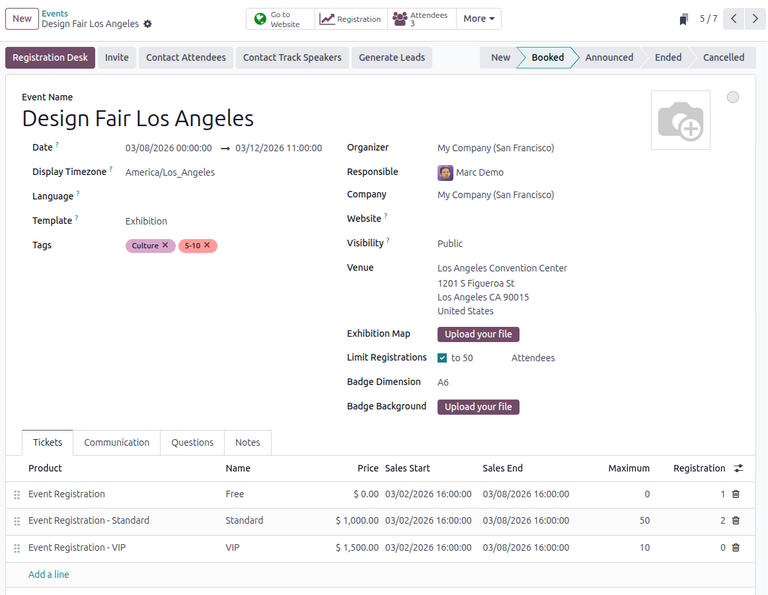
Nella parte superiore del modulo dell’evento vi sono una serie di pulsanti cliccabili per visualizzare dettagli sulle metriche dell’evento tra cui registrazioni dei partecipanti, stand, vendite dei biglietti, presentazioni e sponsor.
Sotto i pulsanti intelligenti si trova il modulo evento, che contiene vari campi e schede cliccabili per configurare i dettagli necessari dell’evento.
Per iniziare, inserisci alcune informazioni di base sull’evento nei seguenti campi:
Nome evento: il titolo dell’evento. Questo campo è obbligatorio.
Data: la data programmata o l’intervallo di date dell’evento (espresso nel fuso orario locale). Questo campo è compilato automaticamente ma modificabile ed è obbligatorio.
Visualizza fuso orario: il fuso orario in cui la data dell’evento viene visualizzata sul sito web. Questo campo è compilato automaticamente ma modificabile ed è obbligatorio.
Lingua: la lingua scelta per tutte le comunicazioni dell’evento.
Nota
Accanto al nome dell’evento aggiunto c’è un indicatore della lingua rappresentato dall’abbreviazione della lingua stessa (ad es., IT). Dopo aver fatto clic, apparirà la finestra pop-up Traduci: nome che mostra varie opzioni di traduzione di lingue preconfigurate disponibili nel database.
In alternativa, per compilare il modulo dell’evento a partire da un modello, seleziona un’opzione dal menu a tendina Modello.
Inoltre, aggiungi eventuali tag corrispondenti (ad es. Online, Conferenza) per l’evento nel campo Tag. È possibile aggiungere più tag per evento.
Suggerimento
I tag possono essere visualizzati sugli eventi elencati sul sito web abilitando la casella di controllo Mostra sul sito web da .
Continua inserendo informazioni come i punti di contatto e la sede dell’evento nei seguenti campi:
Organizzatore: l’organizzatore dell’evento (un’azienda, un contatto o un dipendente).
Responsabile: l’utente specifico responsabile della gestione dell’evento nel database.
Azienda: l’azienda specifica nel database a cui è correlato l’evento. Questo campo appare solo se si lavora in un ambiente multi-azienda. Questo campo viene compilato automaticamente ma è modificabile. È obbligatorio.
Sito web: il sito web specifico del database in cui viene pubblicato l’evento. Se il campo non viene compilato, l’evento può essere pubblicato su tutti i siti web nel database;
Visibilità: la visibilità dell’evento sul sito web specifico e nelle ricerche. È possibile specificare le seguenti opzioni:
Pubblico: è possibile cercare l’evento ed è visibile a tutti i visitatori del sito web;
Tramite link: l’evento è visibile solo ai visitatori con un URL diretto oppure ai partecipanti già registrati;
Utenti registrati: l’evento è visibile solo ai visitatori collegati oppure ai visitatori con un URL diretto;
Sede: la sede dell’evento. Questo campo estrae informazioni dall’applicazione Contatti. In alternativa, le informazioni possono essere inserite manualmente.
Mappa espositiva: l’immagine della mappa della sede dell’evento. Fai clic sul pulsante Carica il tuo file per caricare un’immagine della mappa della sede dell’evento.
Per limitare il numero di registrazioni per l’evento, seleziona Limita registrazioni e inserisci il numero massimo di partecipanti consentiti nel campo risultante.
Facoltativamente, per creare badge per i partecipanti all’evento, compila i seguenti campi:
Dimensione badge: la dimensione del formato carta desiderata per i badge. Le opzioni sono A4 pieghevole, A6 o 4 per foglio.
Sfondo badge: l’immagine di sfondo personalizzata per i badge. Fai clic sul pulsante Carica il tuo file per caricare un’immagine.
Configurazioni aggiuntive dell’evento
Dopo aver compilato i campi nel modulo evento, passa alle quattro schede in basso per ulteriori personalizzazioni.
Scheda biglietti
Nella scheda Biglietti del modulo dell’evento, crea biglietti di registrazione e categorie personalizzate per gli eventi.

Per creare un biglietto, fai clic su Aggiungi riga nella scheda Biglietti. Nel campo Prodotto, seleziona il prodotto preconfigurato Registrazione evento oppure creane uno nuovo digitando il nome del nuovo prodotto di registrazione all’evento e selezionando poi Crea oppure Crea e modifica… dal menu a tendina che appare. In seguito, inserisci un nome per il biglietto (ad es., Biglietto base o VIP) nel campo Nome.
Importante
Per far sì che un prodotto di registrazione a un evento sia disponibile nella scheda Biglietti, il tipo di prodotto di registrazione all’evento deve essere impostato su Servizio e il campo Crea un ordine deve essere impostato su Registrazione evento.
Suggerimento
I prodotti esistenti per la registrazione agli eventi possono essere modificati direttamente dal campo Prodotto facendo clic sull’icona (freccia destra) accanto al prodotto. In questo modo viene visualizzato il modulo relativo a quel prodotto. Se è installata l’applicazione Magazzino”, sono disponibili ulteriori opzioni di personalizzazione per il prodotto.
Successivamente, imposta il costo di registrazione del biglietto nel campo Prezzo.
Nota
Il prezzo di vendita indicato nel modulo del prodotto di registrazione all’evento stabilisce il costo di un biglietto. Se modifichi il prezzo del biglietto per l’evento nella scheda Biglietti, il prezzo predefinito del biglietto verrà sostituito con il nuovo prezzo.
Successivamente, inserisci le date di inizio vendita e fine vendita nei rispettivi campi. Per farlo, fai clic sul campo vuoto per aprire un calendario a comparsa. In seguito, seleziona la data e l’orario desiderati e fai clic su Applica.
Facoltativamente, indica una quantità massima di biglietti che può essere venduta.
Man mano che i partecipanti si registrano, la colonna Registrazione si aggiorna automaticamente con il numero di biglietti venduti.
Per eliminare qualsiasi biglietto dalla scheda Biglietti, fai clic sull’icona (cestino) nella riga corrispondente al biglietto.
Suggerimento
Per aggiungere una colonna Descrizione aggiuntiva alla scheda Biglietti, fai clic sul menu a tendina (opzioni aggiuntive) alla fine dei titoli delle colonne.
Successivamente, seleziona la casella accanto a Descrizione per aggiungere una breve descrizione per ogni biglietto dell’evento così da info gli iscritti sui dettagli del biglietto.
Scheda comunicazione
Nella scheda Comunicazioni di un modulo evento, crea varie comunicazioni di marketing che possono essere programmate per essere inviate a intervalli specifici prima e dopo l’evento.

Nota
Per impostazione predefinita, Odoo fornisce tre comunicazioni preconfigurate separate su ogni nuovo modulo evento. Una è un’email inviata dopo ogni registrazione per confermare l’acquisto con il partecipante. Le altre due sono email di promemoria dell’evento programmate per essere inviate a diversi intervalli di tempo prima dell’evento per ricordare al destinatario l’evento imminente.
Per aggiungere una comunicazione nella scheda Comunicazioni, fai clic su Aggiungi riga. Successivamente, seleziona il tipo di comunicazione desiderato dal primo menu a tendina nella colonna Modello. Le opzioni sono: e-mail, SMS, post social oppure WhatsApp.
Importante
L’opzione Post social appare solo se l’applicazione Social marketing è installata. L’opzione WhatsApp appare solo se il modulo WhatsApp è installato.
I template WhatsApp non possono essere modificati durante la configurazione attiva. È richiesta un’approvazione separata da Meta.
In seguito, seleziona un modello e-mail esistente dal secondo menu a tendina nel campo Modello.
Successivamente, indica l’intervallo e l’unità dai rispettivi campi a tendina per specificare quando inviare la comunicazione. Le opzioni di unità sono: Immediatamente, Ore, Giorni, Settimane e Mesi.
In seguito, seleziona una delle seguenti opzioni dal menu a discesa Attivazione:
Dopo ciascuna registrazione
prima dell’evento
dopo l’evento
La colonna (#) Inviate mostra la quantità di comunicazioni inviate insieme con varie icone che indicano lo stato della comunicazione stessa:
(In corso): la comunicazione è attiva e in corso;
(Inviato): le comunicazioni sono state inviate e non sono più attive;
(Pianificato): la comunicazione è pianificata ma non è stata ancora pubblicata.
È possibile aggiungere un numero illimitato di comunicazioni nella scheda Comunicazioni del modulo di un evento.
Example
Per inviare un’e-mail di conferma un’ora dopo la registrazione di un partecipante a un evento, configura la comunicazione come segue:
Intervallo:
1Unità: Ore
Trigger: Dopo ogni registrazione
Nota
I modelli e-mail esistenti possono essere modificati direttamente dal menu a tendina Modello facendo clic sull’icona (Link interno) accanto al nome del modello. In questo modo si apre una pagina separata in cui gli utenti possono modificare il Contenuto, la Configurazione e-mail e le Impostazioni di quel particolare modello e-mail.
Per visualizzare e gestire tutti i modelli e-mail, attiva la Modalità sviluppatore (modalità di debug) e vai su . Modifica con cautela poiché i modelli e-mail influenzano tutte le comunicazioni in cui il modello viene utilizzato.
Scheda domande
Nella scheda Domande del modulo di un evento, gli utenti possono creare questionari per raccogliere informazioni dai partecipanti al momento della registrazione all’evento.

Nota
Per impostazione predefinita, Odoo fornisce tre domande nella scheda Domande per ogni modulo evento. Le domande predefinite richiedono ai registrati di fornire Nome, E-mail e un numero di telefono facoltativo.
Le informazioni raccolte dalla scheda Domande sono visibili nella dashboard Presenze accessibile tramite il pulsante Partecipanti. Odoo popola i singoli record che contengono informazioni di base sulle persone registrate così come le rispettive preferenze.
Per aggiungere una domanda nella scheda Domande, fai clic su Aggiungi riga. In questo modo si apre la finestra pop-up Crea preventivo. Da qui, gli utenti possono creare e configurare il preventivo stesso.

Per prima cosa, inserisci la domanda nel campo nella parte superiore del modulo. In seguito, specifica se la domanda richiede una Risposta obbgligatoria.
Inoltre, specifica se fare una domanda per ordine per applicare la risposta a tutti i partecipanti dell’ordine (se vengono acquistati più biglietti contemporaneamente). Se la casella di controllo non è spuntata, la domanda viene posta a ogni partecipante della registrazione.
Successivamente, selezionare un’opzione Tipo di domanda:
Selezione: fornire opzioni di risposta alla domanda tra cui i registranti possono scegliere. Le opzioni di risposta selezionabili possono essere gestite nella colonna Risposte nella parte inferiore della finestra pop-up.
Inserimento testo: fornisce agli iscritti un campo di testo in cui inserire una risposta personalizzata alla domanda;
Nome: fornisce ai registranti un campo in cui inserire il proprio nome.
Email: Fornisce ai partecipanti un campo per inserire il proprio indirizzo email.
Telefono: Fornisce ai partecipanti un campo per inserire il proprio numero di telefono.
Azienda: Fornisce ai partecipanti un campo per inserire l’azienda a cui sono associati.
La scheda Risposte appare se il Tipo di domanda scelto è Selezione. Aggiungi le risposte alla domanda in questa scheda facendo clic su Aggiungi riga.
Una volta aggiunte tutte le configurazioni desiderate, fai clic su Salva e chiudi per salvare la domanda e tornare alla scheda Domande nel modulo dell’evento. In alternativa, fai clic su Salva e nuova per salvare la domanda e configurarne un’altra in una nuova finestra pop-up Crea domanda.
Gli utenti possono aggiungere tutte le domande necessarie nella scheda Domande.
Suggerimento
Per i tipi Selezione e Inserimento testo, il pulsante Statistiche appare accanto alla riga della domanda. Facendo clic sul pulsante appare una pagina separata che mostra le metriche di risposta alla domanda specifica.
Per eliminare qualsiasi domanda dalla scheda Domande, fai clic sull’icona (cestino) sulla riga della domanda corrispondente.
Scheda Note
Nella scheda Note di un modulo evento, gli utenti possono lasciare note interne dettagliate e/o istruzioni/informazioni relative all’evento per i partecipanti.

Nel campo Note, gli utenti possono lasciare note interne per gli altri dipendenti dell’evento, come elenchi di cose da fare, informazioni di contatto, istruzioni e così via.
Nel campo Istruzioni biglietto gli utenti possono aggiungere istruzioni specifiche per i partecipanti che appariranno sui biglietti.
Pubblicare eventi
Una volta completate tutte le configurazioni e le modifiche nel modulo dell’evento, l’evento può essere pubblicato sul sito web. In questo modo l’evento diventa visibile ai visitatori del sito web e consente loro di registrarsi all’evento.
Per pubblicare un evento, fai clic sul pulsante Vai al sito web per aprire la pagina dell’evento. In seguito, fai scorrere il pulsante Non pubblicato nel menu di intestazione per farlo diventare Pubblicato. La pagina web dell’evento ora è pubblicata e accessibile a tutti i visitatori del sito.
Vedi anche
Per saperne di più sulle funzionalità e le opzioni di progettazione del sito web, consultare la documentazione Blocco di costruzione.
Inviare inviti per eventi
Per inviare inviti agli eventi ai potenziali partecipanti, accedi al modulo dell’evento desiderato tramite l’app e fai clic sull’evento desiderato. Nel modulo dell’evento, fai clic sul pulsante Invita.
Si aprirà un modulo e-mail vuoto. Personalizza il messaggio specificando un tipo di invio, l’oggetto, i destinatari e il corpo dell’e-mail.
Suggerimento
L’invio di email da Odoo è soggetto a un limite giornaliero che, per impostazione predefinita, è di 200. Per saperne di più sui limiti giornalieri, consultare la documentazione Limite giornaliero raggiunto.
Vedi anche