Creare un modulo
Prima di creare il tuo primo modulo, è necessario creare un progetto Odoo.sh e conoscere l’URL del tuo repository GitHub.
Glossario
~/srcè la directory in cui si trovano i repository Git relativi ai tuoi progetti Odoo.odooè l’utente GitHub.odoo-addonsè il repository GitHub.feature-1è il nome di un branch di sviluppo.mainè il nome del branch di produzione.my_moduleè il nome del modulo.
Sostituiscili se necessario.
Creare il ramo di sviluppo
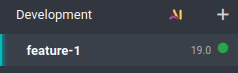
Dalla vista Rami:
Nel pannello di navigazione dei rami, fare clic sul pulsante + (Nuovo ramo di sviluppo) accanto a Sviluppo.
In Fork, selezionare il ramo
main.In A, inserire
feature-1.

Una volta pronta la build, è possibile accedere all”editor e al codice del ramo di sviluppo dalla cartella ~/src/user.
Clonare il repository GitHub sul computer eseguendo i seguenti comandi:
mkdir ~/src
cd ~/src
git clone https://github.com/odoo/odoo-addons.git
cd ~/src/odoo-addons
Creare un nuovo ramo eseguendo:
git checkout -b feature-1 main
Creare la struttura del modulo
Scaffolding
Sebbene non sia obbligatorio, lo scaffolding evita la noia di impostare la struttura base del modulo Odoo. È possibile creare lo scaffold di un nuovo modulo utilizzando l’eseguibile odoo-bin.
Dal terminale dell”editor, eseguire:
odoo-bin scaffold my_module ~/src/user/
Con Odoo installato sul computer, eseguire:
./odoo-bin scaffold my_module ~/src/odoo-addons/
Suggerimento
Se non si desidera installare Odoo sul computer, è anche possibile scaricare questo modello di struttura del modulo. Sostituire ogni occorrenza di my_module con il nome desiderato.
Verrà generata la struttura seguente:
my_module
├── __init__.py
├── __manifest__.py
├── controllers
│   ├── __init__.py
│   └── controllers.py
├── demo
│   └── demo.xml
├── models
│   ├── __init__.py
│   └── models.py
├── security
│   ├── ir.model.access.csv
│   └── models.py
└── views
    ├── templates.xml
    └── views.xml
Avvertimento
Utilizzare solo caratteri alfanumerici (a-z, 0-9) o trattini bassi (_) quando si nomina il modulo, poiché il suo nome viene utilizzato per le classi Python e i nomi di classe contenenti caratteri speciali diversi dai trattini bassi non sono validi in Python.
Decommentare i seguenti file:
models/models.pyun esempio di modello con i suoi campiviews/views.xmluna vista elenco e una vista modulo, con i menu che le apronodemo/demo.xmlrecord demo per il modello di esempiocontrollers/controllers.pyun esempio di controller che implementa alcune routeviews/templates.xmldue viste qweb di esempio utilizzate dalle route del controller__manifest__.pyil manifest del modulo, che include titolo, descrizione e file di dati da caricare. Decommentare il file di dati della lista di controllo degli accessi:# 'security/ir.model.access.csv',
Manuale
Per creare manualmente la struttura del modulo, seguire il tutorial Server framework 101 per comprendere la struttura di un modulo e il contenuto di ciascun file.
Push sul ramo di sviluppo
Preparare le modifiche per il commit eseguendo:
git add my_module
Eseguire il commit delle modifiche con:
git commit -m "My first module"Eseguire il push delle modifiche al repository remoto con:
Dal terminale dell”editor, eseguire:
git push https HEAD:feature-1
Eseguire:
git push -u origin feature-1
È necessario specificare
-u origin feature-1solo la prima volta che si esegue il push. Successivamente, eseguire:git push
Testare il modulo
Il ramo dovrebbe apparire nella sezione Sviluppo del pannello di navigazione Vista rami.
Fare clic sul nome del ramo per visualizzarne la cronologia, incluse le modifiche appena caricate. Una volta che il database è pronto, fare clic su Connetti per accedervi.

Se il progetto Odoo.sh è configurato per installare automaticamente il modulo, questo apparirà direttamente sulla Dashboard del database. In caso contrario, sarà disponibile per l’installazione nell’app App.
Testare con i dati di produzione
Nota
Per questo passaggio è necessario un database di produzione. Se non ne hai ancora uno, crealo.
Dopo aver testato il modulo in una build di sviluppo con i dati dimostrativi e aver verificato che sia pronto, è possibile testarlo con i dati di produzione utilizzando un ramo di staging.
Puoi:
Convertire il tuo branch di sviluppo in un branch di staging trascinandolo nella sezione Staging.
Unirlo a un branch di staging esistente trascinandolo su quel branch.
Usare il comando
git mergeper unire i tuoi branch.
Questo crea una nuova build di staging che duplica il database di produzione e lo esegue su un server aggiornato con le ultime modifiche del tuo branch.
Una volta che il database è pronto, fai clic su Connetti per accedervi.
Installare il modulo
Installa il modulo dall’app App. Poiché il modulo potrebbe non apparire direttamente nell’elenco delle app, aggiorna l’elenco delle app attivando la modalità sviluppatore e facendo clic su .
Nota
Il modulo non viene installato automaticamente, poiché lo scopo della build di staging è testare il comportamento delle tue modifiche come sarebbero sul database di produzione, quindi non vorresti che un modulo venisse installato automaticamente.
Distribuire in produzione
Una volta testato il modulo in un branch di staging con i dati di produzione e ritenuto che sia pronto per la produzione, puoi unire il tuo branch al branch di produzione:
Trascinando il branch di staging sul branch di produzione.
Usando il comando
git mergeper unire i tuoi branch.
Questo unisce le ultime modifiche dal branch di staging al branch di produzione e aggiorna il server di produzione con esse.
Una volta che il database è pronto, fai clic su Connetti per accedervi.
Installare il modulo
Installa il modulo dall’app App. Poiché il modulo potrebbe non apparire direttamente nell’elenco delle app, aggiorna l’elenco delle app attivando la modalità sviluppatore e facendo clic su .
Aggiungere una modifica
Questa sezione spiega come aggiungere una modifica nel tuo modulo aggiungendo un nuovo campo in un modello e distribuendolo.
Dall”editor o dal tuo computer, apri la cartella del modulo
~/src/odoo-addons/my_module, poi apri il filemodels/models.pyper modificarlo. Dopo il campo descrizione:description = fields.Text()
aggiungi un campo datetime:
start_datetime = fields.Datetime('Start time', default=lambda self: fields.Datetime.now())
Apri il file
views/views.xmle dopo:<field name="value2"/>
aggiungi:
<field name="start_datetime"/>
Queste modifiche alterano la struttura del database aggiungendo una colonna a una tabella e modificando una vista. Per essere applicate a un database esistente, come il tuo database di produzione, queste modifiche richiedono l’aggiornamento del modulo. Se desideri che l’aggiornamento venga eseguito automaticamente dalla piattaforma Odoo.sh quando invii le tue modifiche, aumenta la versione del modulo nel suo manifest aprendo
__manifest__.pye sostituendo:'version': '0.1',
con:
'version': '0.2',
La piattaforma rileverà una modifica della versione e attiverà l’aggiornamento del modulo al momento del deployment della nuova revisione.
Successivamente, effettua il push delle modifiche.
Una volta testate le modifiche, puoi unirle al branch di produzione, ad esempio trascinando e rilasciando il branch sul branch di produzione nell’interfaccia di Odoo.sh. Poiché hai incrementato la versione del modulo nel manifest, la piattaforma aggiornerà automaticamente il modulo e il nuovo campo sarà immediatamente disponibile. Altrimenti, puoi aggiornare manualmente il modulo dall’elenco delle app.
Utilizzare una libreria Python esterna
Se desideri utilizzare una libreria Python esterna non installata di default, puoi definire un file requirements.txt che elenca le librerie esterne da cui dipendono i tuoi moduli. La piattaforma utilizzerà questo file per installare automaticamente le librerie Python necessarie al tuo progetto.
Nota
Non è possibile installare o aggiornare pacchetti di sistema sui database Odoo.sh (ad esempio, pacchetti apt). Tuttavia, in condizioni specifiche, i pacchetti possono essere presi in considerazione per l’installazione. Ciò vale anche per i moduli Python che richiedono pacchetti di sistema per la compilazione e per i moduli Odoo di terze parti.
Le estensioni PostgreSQL non sono supportate su Odoo.sh, pertanto non è possibile installare estensioni (come PostGIS, ltree, …) nei database Odoo.sh.
Ad esempio, per utilizzare la libreria Unidecode nel tuo modulo:
Crea un file
requirements.txtnella cartella principale del tuo repository:Dall’editor Odoo.sh, crea e apri il file
~/src/user/requirements.txt.Dal tuo computer, crea e apri il file
~/src/odoo-addons/requirements.txt.
Aggiungi al file:
unidecode
Ora puoi utilizzare la libreria nel tuo modulo, ad esempio per rimuovere gli accenti dai caratteri nel campo nome del tuo modello. Per farlo, apri il file
models/models.pye prima:from odoo import models, fields, api
aggiungi:
from unidecode import unidecode
Dopo:
start_datetime = fields.Datetime('Start time', default=lambda self: fields.Datetime.now())
aggiungi:
@api.model
def create(self, values):
    if 'name' in values:
        values['name'] = unidecode(values['name'])
    return super(my_module, self).create(values)

def write(self, values):
    if 'name' in values:
        values['name'] = unidecode(values['name'])
    return super(my_module, self).write(values)
Incrementa la versione del modulo per installare la dipendenza Python modificando il manifest del modulo
__manifest__.py.Quindi, effettua il push delle modifiche.
Suggerimento
Metti in stage il file
requirements.txteseguendogit add requirements.txt.