
สร้างอีเวนต์
ด้วยแอปพลิเคชัน อีเวนต์ ผู้จัดงานสามารถสร้างและกำหนดค่าอีเวนต์แบบพบปะตัวเองหรือออนไลน์ใน Odoo อีเวนต์ใหม่แต่ละรายการมีตัวเลือกจำนวนหนึ่งในการปรับแต่งรายละเอียดเฉพาะเจาะจง เช่น การขายตั้ว โต๊ะลงทะเบียน บูธ แทร็ก ผู้สนับสนุน ห้อง และอื่นๆ
อีเวนต์สามารถสร้างขึ้นด้วยตนเองตั้งแต่ต้นหรือสร้างจากเทมเพลตที่กำหนดค่าไว้ล่วงหน้า เมื่อเปิดใช้งานแล้ว แอป อีเวนต์ จะผสานรวมกับแอปอื่นๆ เพื่อการทำงานที่ได้รับการปรับปรุง รวมถึงการโปรโมตอีเวนต์ การขายตั๋วลงทะเบียนให้กับผู้เข้าร่วม และการสร้างลีดโดยใช้กฎที่ปรับแต่งได้
แดชบอร์ด
To create an event, navigate to the app to land on the dashboard. By default, the Events dashboard uses the (Kanban) view, which showcases all events in the database in their respective pipeline stages. Other views can be set using the buttons at the top.
การ์ดอีเวนต์แต่ละใบแสดงชื่อของอีเวนต์ วันที่กำหนดไว้ สถานที่ จำนวน:guilabel:`ผู้เข้าร่วม`ที่คาดหวัง กิจกรรมที่กำหนดไว้ที่เกี่ยวข้องกับอีเวนต์ และผู้จัดการอีเวนต์ที่รับผิดชอบ
The default stages in the Kanban view are New, Booked, Announced, Ended, and Cancelled. The cards can be dragged and dropped into any stage in the pipeline.
Note
The Ended and Cancelled stages are folded by default and located at the end of the dashboard, next to the final stage.

To add a new stage, click the Add Stage button at the end of the dashboard. Enter a name for the stage, then click Add to add the stage or press Esc to cancel.
เพิ่มอีเวนต์ใหม่
Events can be created by opening the app and clicking New. This opens a new Events form.
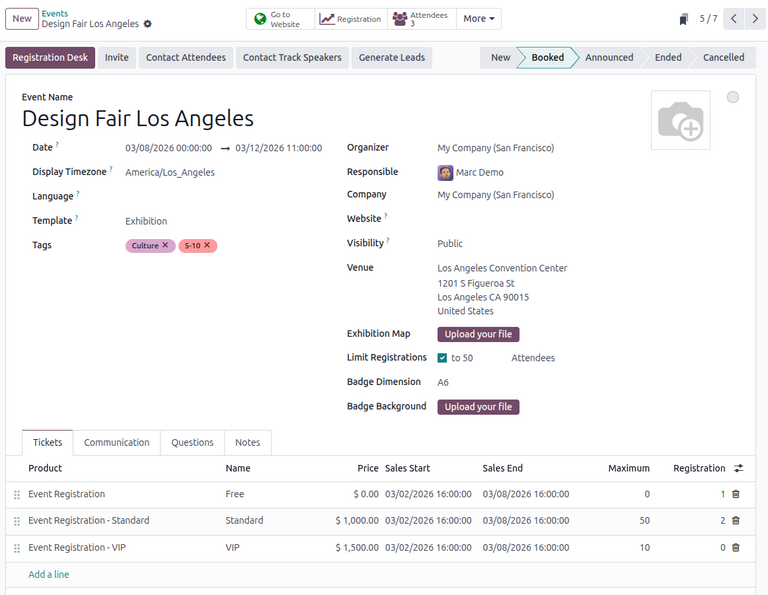
At the top of the event form are a series of clickable smart buttons to view details about event metrics, including attendee registrations, booths, ticket sales, event tracks, and sponsors.
ใต้ปุ่มอัจฉริยะคือฟอร์มอีเวนต์ซึ่งประกอบด้วยฟิลด์ต่างๆ และแท็บที่คลิกได้เพื่อกำหนดค่ารายละเอียดที่จำเป็นของอีเวนต์
ในการเริ่มต้น ให้ป้อนข้อมูลพื้นฐานเกี่ยวกับอีเวนต์ในฟิลด์ต่อไปนี้:
ชื่ออีเวนต์: ชื่อของอีเวนต์ ฟิลด์นี้เป็น ฟิลด์บังคับ
วันที่: วันที่หรือช่วงวันที่ที่กำหนดไว้ของอีเวนต์ (แสดงในเขตเวลาท้องถิ่น) ฟิลด์นี้จะถูกเติมอัตโนมัติแต่สามารถแก้ไxได้ และเป็น ฟิลด์บังคับ
แสดงเขตเวลา: เขตเวลาที่วันที่อีเวนต์แสดงบนเว็บไซต์ ฟิลด์นี้จะถูกเติมอัตโนมัติแต่สามารถแก้ไขได้ และเป็น ฟิลด์บังคับ
ภาษา: ภาษาที่เลือกสำหรับการสื่อสารอีเวนต์ทั้งหมด
Note
Next to the entered Event Name, there is a language tooltip, represented by an
abbreviated language indicator (e.g., EN). When clicked, a Translate: name pop-up window
appears, displaying various preconfigured language translation options available in the database.
Alternatively, to populate the event form from an event template, select an option in the Template drop-down menu.
นอกจากนี้ ให้เพิ่มแท็กที่เกี่ยวข้อง (เช่น ออนไลน์, การประชุม) สำหรับอีเวนต์ในฟิลด์ แท็ก สามารถเพิ่มได้หลายแท็กต่ออีเวนต์หนึ่งอีเวนต์
Tip
แท็กสามารถแสดงบนอีเวนต์ที่แสดงรายการบนเว็บไซต์ได้โดยเปิดใช้งานช่องทำเครื่องหมาย แสดงบนเว็บไซต์ จาก
ดำเนินการต่อโดยป้อนข้อมูล เช่น ผู้ติดต่อและสถานที่จัดงานในฟิลด์ต่อไปนี้:
ผู้จัดงาน: ผู้จัดงานของอีเวนต์ (บริษัท รายชื่อผู้ติดต่อ หรือพนักงาน)
ผู้รับผิดชอบ: ผู้ใช้เฉพาะที่รับผิดชอบในการจัดการอีเวนต์ในฐานข้อมูล
บริษัท: บริษัทเฉพาะในฐานข้อมูลที่อีเวนต์เกี่ยวข้องด้วย ฟิลด์นี้จะปรากฏ เฉพาะ เมื่อทำงานในสภาพแวดล้อมหลายบริษัท ฟิลด์นี้จะถูกเติมอัตโนมัติแต่สามารถแก้ไขได้ และเป็น ฟิลด์บังคับ
Website: The specific website in the database on which the event is published. If this field is left blank, the event can be published on all websites in the database.
Visibility: The visibility of the event on the specified Website and in searches. The following options can be specified:
Public: The event is searchable and visible to all website visitors.
Via a Link: The event is visible only to visitors with a direct URL or already-registered participants.
Logged Users: The event is visible only to logged-in visitors or visitors with a direct URL.
สถานที่: สถานที่จัดงานอีเวนต์ ฟิลด์นี้ดึงข้อมูลจากแอปพลิเคชัน รายชื่อผู้ติดต่อ อีกทางหนึ่ง สามารถป้อนข้อมูลด้วยตนเองได้
แผนที่นิทรรศการ: ภาพแผนที่สถานที่จัดงานอีเวนต์ คลิกปุ่ม อัปโหลดไฟล์ของคุณ เพื่ออัปโหลดภาพแผนที่สถานที่จัดงานอีเวนต์
เพื่อจำกัดจำนวนการลงทะเบียนสำหรับอีเวนต์ ให้เลือก จำกัดการลงทะเบียน และป้อนจำนวนผู้เข้าร่วมสูงสุดที่อนุญาตในฟิลด์ที่ปรากฏขึ้น
หากต้องการ สามารถสร้างป้ายชื่อสำหรับผู้เข้าร่วมอีเวนต์ได้โดยกรอกข้อมูลในฟิลด์ต่อไปนี้:
ขนาดป้ายชื่อ: ขนาดรูปแบบกระดาษที่ต้องการสำหรับป้ายชื่อ ตัวเลือกได้แก่ A4 พับได้, A6 หรือ 4 ใบต่อแผ่น
พื้นหลังป้ายชื่อ: ภาพพื้นหลังที่กำหนดเองสำหรับป้ายชื่อ คลิกปุ่ม อัปโหลดไฟล์ของคุณ เพื่ออัปโหลดภาพ
การกำหนดค่าอีเวนต์เพิ่มเติม
หลังจากกรอกข้อมูลในฟิลด์ต่างๆ ในแบบฟอร์มอีเวนต์แล้ว ให้ไปที่แท็บทั้งสี่ด้านล่างเพื่อปรับแต่งเพิ่มเติม
แท็บตั๋ว
In the Tickets tab of the event form, create custom registration tickets and ticket tiers for events.

To create a ticket, click Add a line in the Tickets tab. In the Product
field, either select the preconfigured Event Registration product, or create a new one
by typing in the name of the new event registration product and then selecting either
Create or Create and edit... from the resulting drop-down menu. Then, enter
a name for the ticket (e.g., Basic Ticket or VIP) in the Name field.
Important
In order for an event registration product to be selectable in the Tickets tab, the event registration Product Type must be set to Service and the Create on Order field must be set to Event Registration.
Tip
Existing event registration products can be modified directly from the Product field by clicking the (right arrow) icon next to the product. Doing so reveals that product's form. If the Inventory application is installed, additional choices are available to customize for the product.
ถัดไป กำหนดค่าใช้จ่ายในการลงทะเบียนของตั๋วในฟิลด์ ราคา
Note
The Sales Price defined on the event registration product's form sets the default cost of a ticket. Modifying the Price of the event ticket in the Tickets tab overrides the ticket's default price with this new price.
Next, enter the Sales Start and Sales End dates in their respective fields. To do so, click into the blank field to reveal a calendar pop-over. Then, select the desired date and time and click Apply.
Optionally, designate a Maximum amount of the ticket that can be sold.
As attendees register, the Registration column automatically populates with the number of tickets sold.
To delete any tickets from the Tickets tab, click the (trash can) icon in the ticket's corresponding line.
Tip
To add an optional Description column to the Tickets tab, click the (additional options) drop-down menu at the end of the column titles.
Then, select the checkbox beside Description to add a brief description for each event ticket, informing registrants about ticket details.
แท็บการสื่อสาร
In the Communication tab of an event form, create various marketing communications that can be scheduled to be sent at specific intervals leading up to and following the event.

Note
โดยค่าเริ่มต้น Odoo มีการสื่อสารที่กำหนดค่าไว้แล้วสามรายการในทุกแบบฟอร์มอีเวนต์ใหม่ หนึ่งรายการคืออีเมลที่ส่งหลังการลงทะเบียนแต่ละครั้งเพื่อยืนยันการซื้อกับผู้เข้าร่วม อีกสองรายการคืออีเมลเตือนอีเวนต์ที่กำหนดเวลาให้ส่งในช่วงเวลาที่แตกต่างกันก่อนอีเวนต์เพื่อเตือนผู้รับเกี่ยวกับอีเวนต์ที่จะมีขึ้น
To add a communication in the Communication tab, click Add a line. Then, select the desired type of communication from the first drop-down menu in the Template column. The options are: Mail, SMS, Social Post, or WhatsApp.
Important
ตัวเลือก โพสต์โซเชียล จะปรากฏเฉพาะเมื่อติดตั้งแอปพลิเคชัน กการตลาดผ่านโซเชียล แล้ว ตัวเลือก WhatsApp จะปรากฏเฉพาะเมื่อติดตั้งโมดูล WhatsApp แล้ว
เทมเพลต WhatsApp ไม่สามารถ แก้ไขได้ในระหว่างการกำหนดค่าที่ใช้งานอยู่ ต้องได้รับการอนุมัติแยกต่างหากจาก Meta
Then, select an existing email template from the second drop-down menu in the Template field.
Next, define the Interval and Unit from their respective drop-down fields to specify when the communication should be sent. The Unit options are: Immediately, Hours, Days, Weeks, and Months.
Then, select one of the following options from the Trigger drop-down menu:
After each registration
Before the event
After the event
The (#) Sent column populates with the number of sent communications, along with different icons indicating the status of the communication:
(Running): The communication is active and running.
(Sent): The communications were sent and are no longer active.
(Scheduled): The communication is scheduled but has not been deployed.
Any number of communications can be added in the Communication tab of an event form.
Example
To send a confirmation email an hour after an attendee registers for an event, configure the communication as follows:
ช่วงเวลา:
1หน่วย: ชั่วโมง
ทริกเกอร์: หลังจากการลงทะเบียนแต่ละครั้ง
Note
Existing email templates can be modified directly from the Template drop-down menu by clicking the (Internal link) icon next to the template name. Doing so reveals a separate page where users can edit the Content, Email Configuration, and Settings of that particular email template.
To view and manage all email templates, activate โหมดนักพัฒนา (โหมดแก้ไขข้อบกพร่อง) and navigate to . Modify with caution as email templates affect all communications where the template is used.
แท็บคำถาม
In the Questions tab of an event form, users can create questionnaires to gather information from attendees when registering for the event.

Note
By default, Odoo provides three questions in the Questions tab for every event form. The default questions require registrants to provide their Name, Email, and an optional Phone number.
The information gathered from the Questions tab can be found on the Attendees dashboard, accessible via the Attendees smart button. Odoo populates individual records that contain basic information about the registrants, as well as their preferences.
To add a question in the Questions tab, click Add a line. Doing so reveals a Create Question pop-up window. From here, users can create and configure their question.

First, enter the question in the field at the top of the form. Then, specify if the question requires a Mandatory Answer.
Additionally, specify whether to Ask once per order to apply the answer to every attendee in the order (if multiple tickets are purchased at once). If the checkbox is not ticked, the question is asked for every attendee in the registration.
ถัดไป เลือกตัวเลือก ประเภทคำถาม:
การเลือก: จัดเตรียมตัวเลือกคำตอบสำหรับคำถามให้ผู้ลงทะเบียนเลือก ตัวเลือกคำตอบที่เลือกได้สามารถจัดการได้ในคอลัมน์:guilabel:`คำตอบ`ที่ด้านล่างของหน้าต่างป๊อปอัป
Text Input: Provides registrants with a text field to enter a custom response to the question.
ชื่อ: จัดเตรียมฟิลด์สำหรับผู้ลงทะเบียนเพื่อป้อนชื่อของพวกเขา
อีเมล: จัดเตรียมฟิลด์สำหรับผู้ลงทะเบียนเพื่อป้อนที่อยู่อีเมลของพวกเขา
โทรศัพท์: จัดเตรียมฟิลด์สำหรับผู้ลงทะเบียนเพื่อป้อนหมายเลขโทรศัพท์ของพวกเขา
บริษัท: จัดเตรียมฟิลด์สำหรับผู้ลงทะเบียนเพื่อป้อนบริษัทที่พวกเขาเกี่ยวข้องด้วย
If Selection was chosen as the Question Type, an Answers tab appears. Add any answers to the question under this tab by clicking Add a line.
Once all the desired configurations have been entered, click Save & Close to save the question and return to the Questions tab on the event form. Or, click Save & New to save the question and configure another question on a new Create Question pop-up window.
Users can add as many questions in the Questions tab as needed.
Tip
For Selection and Text Input types, a Stats button appears next to the question line. Clicking this button reveals a separate page, showcasing the response metrics to that specific question.
To delete any question from the Questions tab, click the (trash can) icon on the corresponding question line.
แท็บบันทึกภายใน
In the Notes tab of an event form, users can leave detailed internal notes and/or event-related instructions/information for attendees.

In the Note field, users can leave internal notes for other event employees, like "to-do" lists, contact information, instructions, and so on.
In the Ticket Instructions field, users can leave specific instructions for attendees and display them on attendees' tickets.
เผยแพร่อีเว้นต์
Once all configurations and modifications are complete on the event form, the event can be published on the website. Doing so makes the event visible to website visitors and allows them to register for the event.
To publish an event, click the Go to Website smart button to open the event webpage. Then, toggle the Unpublished button in the header menu, changing it to a Published switch. The event webpage is now published and accessible by all website visitors.
ดูเพิ่มเติม
เพื่อเรียนรู้เพิ่มเติมเกี่ยวกับฟังก์ชันการทำงานและตัวเลือกการออกแบบเว็บไซต์ โปรดดูเอกสารประกอบ บล็อกการสร้าง
ส่งคำเชิญอีเว้นต์
To send event invites to potential attendees, navigate to the desired event form via and click into the desired event. On the event form, click the Invite button.
Doing so reveals a blank email form. Customize the message by specifying a mailing type, subject, recipients, and the mail body.
Tip
การส่งอีเมลจาก Odoo อยู่ภายใต้ข้อจำกัดรายวัน ซึ่งโดยค่าเริ่มต้นคือ 200 ฉบับ เมื่อต้องการเรียนรู้เพิ่มเติมเกี่ยวกับข้อจำกัดรายวัน โปรดดูเอกสารประกอบ ถึงขีดจำกัดสำหรับวันนี้แล้ว
ดูเพิ่มเติม