
イベントを作成
**イベント**アプリケーションを使用すると、主催者はOdooで対面またはオンラインイベントを作成および設定できます。新しいイベントには、チケット販売、受付デスク、ブース、トラック、スポンサー、部屋など、特定のロジスティクスをカスタマイズするための多数のオプションが含まれています。
イベントは手動でゼロから作成することも、事前設定されたテンプレートから構築することもできます。起動すると、**イベント**アプリは他のアプリと統合され、イベントの宣伝、参加者への登録チケットの販売、カスタマイズ可能なルールを使用したリードの生成など、機能が強化されます。
ダッシュボード
To create an event, navigate to the app to land on the dashboard. By default, the Events dashboard uses the (Kanban) view, which showcases all events in the database in their respective pipeline stages. Other views can be set using the buttons at the top.
各イベントカードには、イベントの名前、スケジュール済日付、場所、予想される:guilabel:`参加者`数、イベントに関連するスケジュール済アクティビティ、および担当イベントマネジャーが表示されます。
The default stages in the Kanban view are New, Booked, Announced, Ended, and Cancelled. The cards can be dragged and dropped into any stage in the pipeline.
注釈
The Ended and Cancelled stages are folded by default and located at the end of the dashboard, next to the final stage.

To add a new stage, click the Add Stage button at the end of the dashboard. Enter a name for the stage, then click Add to add the stage or press Esc to cancel.
新しいイベントを追加する
Events can be created by opening the app and clicking New. This opens a new Events form.
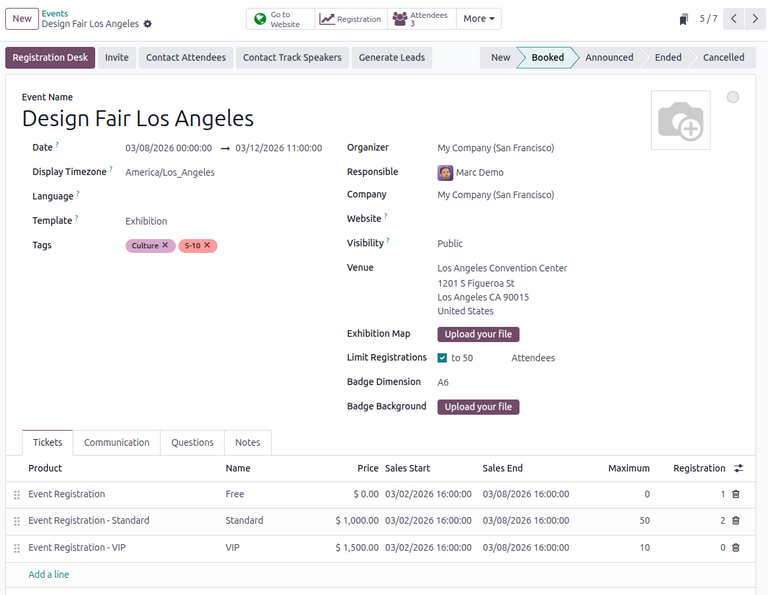
At the top of the event form are a series of clickable smart buttons to view details about event metrics, including attendee registrations, booths, ticket sales, event tracks, and sponsors.
スマートボタンの下にはイベントフォームがあり、イベントの必要な詳細を設定するためのさまざまなフィールドとクリック可能なタブが含まれています。
まず、以下のフィールドにイベントに関する基本情報を入力します。
イベント名:イベントのタイトル。このフィールドは**必須**です。
日付:イベントのスケジュール日付または日付範囲(ローカルタイムゾーンで表示)。このフィールドは自動入力されますが、変更可能であり、**必須**です。
表示タイムゾーン:ウェブサイトにイベント日付が表示されるタイムゾーン。このフィールドは自動入力されますが、変更可能であり、**必須**です。
言語:すべてのイベント通信に選択された言語。
注釈
Next to the entered Event Name, there is a language tooltip, represented by an
abbreviated language indicator (e.g., EN). When clicked, a Translate: name pop-up window
appears, displaying various preconfigured language translation options available in the database.
Alternatively, to populate the event form from an event template, select an option in the Template drop-down menu.
さらに、タグ`フィールドに、イベントの対応するタグ(例:`オンライン、カンファレンス)を追加します。イベントごとに複数のタグを追加できます。
ちなみに
:menuselection:`イベントアプリ --> 設定 --> イベントタグカテゴリ`から:guilabel:`ウェブサイトに表示`チェックボックスを有効にすることで、ウェブサイトに一覧表示されるイベントにタグを表示できます。
連絡先や会場の場所などの情報を以下のフィールドに入力して続行します。
開催者:イベントの開催者(会社、連絡先、または従業員)。
責任者:データベース内でイベントを管理する責任を持つ特定のユーザ。
会社:イベントが関連するデータベース内の特定の会社。このフィールドは、マルチカンパニー環境で作業している場合**のみ**表示されます。このフィールドは自動入力されますが、変更可能です。**必須**です。
Website: The specific website in the database on which the event is published. If this field is left blank, the event can be published on all websites in the database.
Visibility: The visibility of the event on the specified Website and in searches. The following options can be specified:
Public: The event is searchable and visible to all website visitors.
Via a Link: The event is visible only to visitors with a direct URL or already-registered participants.
Logged Users: The event is visible only to logged-in visitors or visitors with a direct URL.
会場:イベント会場の場所。このフィールドは**連絡先**アプリケーションから情報を取得します。または、情報を手動で入力することもできます。
展示マップ:イベント会場マップの画像。:guilabel:`ファイルをアップロード`ボタンをクリックして、イベント会場マップの画像をアップロードします。
イベントの登録数を制限するには、:guilabel:`登録を制限`をチェックし、表示されるフィールドに許可される参加者の最大数を入力します。
オプションで、参加者のイベントバッジを作成するには、次のフィールドに入力します:
追加のイベント設定
イベントフォームのフィールドに入力したら、下部にある4つのタブに移動してさらにカスタマイズします。
チケットタブ
In the Tickets tab of the event form, create custom registration tickets and ticket tiers for events.

To create a ticket, click Add a line in the Tickets tab. In the Product
field, either select the preconfigured Event Registration product, or create a new one
by typing in the name of the new event registration product and then selecting either
Create or Create and edit... from the resulting drop-down menu. Then, enter
a name for the ticket (e.g., Basic Ticket or VIP) in the Name field.
重要
In order for an event registration product to be selectable in the Tickets tab, the event registration Product Type must be set to Service and the Create on Order field must be set to Event Registration.
ちなみに
Existing event registration products can be modified directly from the Product field by clicking the (right arrow) icon next to the product. Doing so reveals that product's form. If the Inventory application is installed, additional choices are available to customize for the product.
次に、:guilabel:`価格`フィールドにチケットの登録費用を設定します。
注釈
The Sales Price defined on the event registration product's form sets the default cost of a ticket. Modifying the Price of the event ticket in the Tickets tab overrides the ticket's default price with this new price.
Next, enter the Sales Start and Sales End dates in their respective fields. To do so, click into the blank field to reveal a calendar pop-over. Then, select the desired date and time and click Apply.
Optionally, designate a Maximum amount of the ticket that can be sold.
As attendees register, the Registration column automatically populates with the number of tickets sold.
To delete any tickets from the Tickets tab, click the (trash can) icon in the ticket's corresponding line.
ちなみに
To add an optional Description column to the Tickets tab, click the (additional options) drop-down menu at the end of the column titles.
Then, select the checkbox beside Description to add a brief description for each event ticket, informing registrants about ticket details.
連絡タブ
In the Communication tab of an event form, create various marketing communications that can be scheduled to be sent at specific intervals leading up to and following the event.

注釈
デフォルトでは、Odooはすべての新しいイベントフォームに3つの個別の事前設定された連絡を提供します。1つは各登録後に送信され、参加者との購入を確認するメールです。他の2つは、イベントまでの異なる時間間隔で送信されるようスケジュールされたメールイベントリマインダーで、受信者に今後のイベントを思い出させます。
To add a communication in the Communication tab, click Add a line. Then, select the desired type of communication from the first drop-down menu in the Template column. The options are: Mail, SMS, Social Post, or WhatsApp.
重要
:guilabel:`ソーシャル投稿`オプションは、**ソーシャルマーケティング**アプリケーションがインストールされている場合にのみ表示されます。:guilabel:`WhatsApp`オプションは、**WhatsApp**モジュールがインストールされている場合にのみ表示されます。
:doc:`WhatsApp <../../../productivity/whatsapp>`テンプレートは、有効な設定中に編集**できません**。*Meta*からの個別の承認が必要です。
Then, select an existing email template from the second drop-down menu in the Template field.
Next, define the Interval and Unit from their respective drop-down fields to specify when the communication should be sent. The Unit options are: Immediately, Hours, Days, Weeks, and Months.
Then, select one of the following options from the Trigger drop-down menu:
After each registration
Before the event
After the event
The (#) Sent column populates with the number of sent communications, along with different icons indicating the status of the communication:
(Running): The communication is active and running.
(Sent): The communications were sent and are no longer active.
(Scheduled): The communication is scheduled but has not been deployed.
Any number of communications can be added in the Communication tab of an event form.
Example
To send a confirmation email an hour after an attendee registers for an event, configure the communication as follows:
間隔:
1単位: 時間
トリガー: 各登録後
注釈
Existing email templates can be modified directly from the Template drop-down menu by clicking the (Internal link) icon next to the template name. Doing so reveals a separate page where users can edit the Content, Email Configuration, and Settings of that particular email template.
To view and manage all email templates, activate 開発者モード (デバッグモード) and navigate to . Modify with caution as email templates affect all communications where the template is used.
質問タブ
In the Questions tab of an event form, users can create questionnaires to gather information from attendees when registering for the event.

注釈
By default, Odoo provides three questions in the Questions tab for every event form. The default questions require registrants to provide their Name, Email, and an optional Phone number.
The information gathered from the Questions tab can be found on the Attendees dashboard, accessible via the Attendees smart button. Odoo populates individual records that contain basic information about the registrants, as well as their preferences.
To add a question in the Questions tab, click Add a line. Doing so reveals a Create Question pop-up window. From here, users can create and configure their question.

First, enter the question in the field at the top of the form. Then, specify if the question requires a Mandatory Answer.
Additionally, specify whether to Ask once per order to apply the answer to every attendee in the order (if multiple tickets are purchased at once). If the checkbox is not ticked, the question is asked for every attendee in the registration.
次に、:guilabel:`質問タイプ`オプションを選択します:
選択: 登録者が選択できる回答オプションを質問に提供します。選択可能な回答オプションは、ポップアップウィンドウの下部にある:guilabel:`回答`列で管理できます。
Text Input: Provides registrants with a text field to enter a custom response to the question.
名前: 登録者が名前を入力するためのフィールドを提供します。
メールアドレス: 登録者がメールアドレスを入力するためのフィールドを提供します。
電話番号: 登録者が電話番号を入力するためのフィールドを提供します。
会社: 登録者が関連する会社を入力するためのフィールドを提供します。
If Selection was chosen as the Question Type, an Answers tab appears. Add any answers to the question under this tab by clicking Add a line.
Once all the desired configurations have been entered, click Save & Close to save the question and return to the Questions tab on the event form. Or, click Save & New to save the question and configure another question on a new Create Question pop-up window.
Users can add as many questions in the Questions tab as needed.
ちなみに
For Selection and Text Input types, a Stats button appears next to the question line. Clicking this button reveals a separate page, showcasing the response metrics to that specific question.
To delete any question from the Questions tab, click the (trash can) icon on the corresponding question line.
メモタブ
In the Notes tab of an event form, users can leave detailed internal notes and/or event-related instructions/information for attendees.

In the Note field, users can leave internal notes for other event employees, like "to-do" lists, contact information, instructions, and so on.
In the Ticket Instructions field, users can leave specific instructions for attendees and display them on attendees' tickets.
イベントを公開
Once all configurations and modifications are complete on the event form, the event can be published on the website. Doing so makes the event visible to website visitors and allows them to register for the event.
To publish an event, click the Go to Website smart button to open the event webpage. Then, toggle the Unpublished button in the header menu, changing it to a Published switch. The event webpage is now published and accessible by all website visitors.
参照
ウェブサイトデザインの機能とオプションについてさらに詳しくは、:doc:`ビルディングブロック <../../../websites/website/web_design/building_blocks>`のドキュメントを参照してください。
イベント招待状を送信
To send event invites to potential attendees, navigate to the desired event form via and click into the desired event. On the event form, click the Invite button.
Doing so reveals a blank email form. Customize the message by specifying a mailing type, subject, recipients, and the mail body.
ちなみに
Odooからのメール送信には1日の制限があり、デフォルトでは200通です。1日の制限の詳細については、:ref:`email-issues-outgoing-delivery-failure-messages-limit`ドキュメントを参照してください。
参照