Resoconti personalizzati
Odoo è dotato di un quadro di reportistica potente e facile da usare. Il motore consente di creare nuovi resoconti, come dichiarazioni fiscali, o stati patrimoniali e conti economici con raggruppamenti e layout specifici.
Importante
Attiva la modalità sviluppatore per accedere all’interfaccia di creazione dei rendiconti contabili.
Per creare un nuovo report, aprire l’app Contabilità e navigare in . Da qui, è possibile creare un report radice o una variante.
Resoconti radice
I resoconti radice sono resoconti contabili generici e neutrali che fungono da modelli per costruire le versioni locali. Se un resoconto non presenta un resoconto radice viene considerato esso stesso un resoconto radice.
Example
Un resoconto fiscale per il Belgio e gli Stati Uniti utilizzerebbe la stessa versione generica come base e la adatterebbe alle rispettive normative nazionali.
Quando si crea un nuovo report radice, è necessario creare una voce di menu per esso. Per farlo, aprire il report e, sullo stesso report, fare clic sull’icona (Azioni), quindi selezionare Crea voce di menu. Aggiornare la pagina; il report è ora disponibile in .
Nota
I casi che richiedono la creazione di un nuovo resoconto sono rari, come ad esempio quando le autorità fiscali di un Paese richiedono un nuovo e specifico tipo di resoconto.
Varianti
Le varianti sono versioni specifiche per Paese dei resoconti radice e, pertanto, fanno sempre riferimento a un resoconto radice. Per creare una variante, selezionare un resoconto generico (radice) nel campo Resoconto radice quando crei un nuovo resoconto.
Quando apri un resoconto radice da uno dei menu principali dell’applicazione Contabilità, tutte le sue varianti vengono visualizzate nel selettore delle varianti nell’angolo in alto a destra della vista.
Example
Nella seguente immagine, Dichiarazione IVA (BE) è la variante del resoconto radice Resoconto fiscale generico.
Righe del report
Dopo aver creato un report (radice o variante), è necessario riempirlo con righe di report. È possibile crearne una nuova facendo clic su Aggiungi una riga, o modificare una riga di report esistente facendo clic su di essa. Tutte le righe di report richiedono un Nome, e possono avere un Codice aggiuntivo facoltativo (a scelta) se si desidera utilizzare il loro valore nelle formule.

Espressioni
Ogni riga di report può contenere una o più espressioni. Le espressioni possono essere viste come sotto-variabili necessarie per una riga di report. Per creare un’espressione, fare clic su Aggiungi una riga all’interno di una riga di report.
Quando si crea un’espressione, è necessario attribuire un”Etichetta utilizzata per fare riferimento a tale espressione. Pertanto, deve essere univoca tra le espressioni di ogni riga. Devono essere indicati anche un Motore di calcolo e una Formula. Il motore definisce come vengono interpretate le formule e le sottoformule. È possibile combinare espressioni che utilizzano motori di calcolo diversi nella stessa riga, se necessario.
Nota
In base al motore, potrebbero essere richieste anche formule secondarie.
Motore “Dominio Odoo”
Con questo motore, una formula viene interpretata come un dominio Odoo indirizzato a account.move.line.
La formula secondaria consente di definire il modo in cui le righe di spostamento corrispondenti al dominio vengono utilizzate per calcolare il valore dell’espressione:
sumIl risultato è la somma di tutti i saldi delle righe di movimento abbinate.
sum_if_posIl risultato è la somma di tutti i saldi delle righe movimento abbinate se l’importo è positivo. Altrimenti, è pari a
0.sum_if_negIl risultato è la somma di tutti i saldi delle righe movimento abbinate se l’importo è negativo. Altrimenti, è pari a
0.count_rowsIl risultato è il numero di sotto-righe di questa espressione. Se la riga del report ha un valore di raggruppamento, questo corrisponderà al numero di chiavi di raggruppamento distinte nelle righe di movimento corrispondenti. In caso contrario, sarà il numero di righe di movimento corrispondenti.
Puoi aggiungere il segno - all’inizio della formula secondaria per invertire il segno del risultato.

Motore “Unisci altre formule”
Utilizzare questo motore quando è necessario eseguire operazioni aritmetiche sugli importi ottenuti per altre espressioni. Le formule qui sono composte da riferimenti a espressioni separate da uno dei quattro operatori aritmetici di base (addizione +, sottrazione -, divisione / e moltiplicazione *). Per fare riferimento a un’espressione, digitare il codice della riga del report seguito da un punto . e l”etichetta dell’espressione (es. codice.etichetta).
Di seguito, un elenco delle principali formule secondarie:
if_above(CUR(amount))Il valore dell’espressione aritmetica viene restituito solo se è maggiore del limite fornito. Altrimenti, il risultato sarà
0.if_below(CUR(amount))Il valore dell’espressione aritmetica viene restituito solo se è inferiore al limite fornito. Altrimenti, il risultato sarà
0.if_between(CUR1(amount1), CUR2(amount2))Il valore dell’espressione aritmetica viene restituito solo se è strettamente compreso tra i limiti forniti. In caso contrario, verrà riportato al limite più vicino.
if_other_expr_above(LINE_CODE.EXPRESSION_LABEL, CUR(amount))Il valore dell’espressione aritmetica verrà restituito solo se il valore dell’espressione denotata dal codice di riga e dall’etichetta di espressione forniti è maggiore del limite fornito. Altrimenti, il risultato sarà
0.if_other_expr_below(LINE_CODE.EXPRESSION_LABEL, CUR(amount))Il valore dell’espressione aritmetica verrà restituito solo se il valore dell’espressione denotata dal codice di riga e dall’etichetta di espressione forniti è inferiore al limite fornito. Altrimenti, il risultato sarà
0.
CUR corrisponde al codice valuta in maiuscolo e amount è l’importo del limite espresso in quella valuta.
Puoi utilizzare anche la formula secondaria cross_report per abbinare un’espressione trovata in un altro resoconto.
Motore “Prefisso codici conto”
Questo motore viene utilizzato per abbinare gli importi effettuati sui conti utilizzando i prefissi dei codici di questi conti come variabili in un’espressione aritmetica.
Example
21Example
21 + 10 - 521 e 10, e sottrae il saldo di quelle sui conti con il prefisso 5.È anche possibile ignorare la selezione di prefissi secondari.
Example
21 + 10\(101, 102) - 5\(57)101, 102 e 57.È possibile applicare un “sottofiltraggio” su crediti e debiti utilizzando i suffissi C e D. In questo caso, un conto verrà considerato solo se il suo prefisso corrisponde, e se il saldo totale delle righe di movimento effettuate su questo conto è credito/debito.
Example
Il conto 210001 ha un saldo di -42 e il conto 210002 ha un saldo di 25. La formula 21D corrisponde solo al conto 210002, e quindi restituisce 25. Il conto 210001 non viene abbinato, poiché il suo saldo è a credito.
Le esclusioni del prefisso possono essere mescolate con i suffissi C e D.
Example
21D + 10\(101, 102)C - 5\(57)21 se è a debito (D) e 10 se è a credito (C), ma ignora i prefissi 101, 102, e sottrae il saldo di quelle sui conti con il prefisso 5, ignorando il prefisso 57.Per abbinare la lettera C o D in un prefisso e non utilizzarla come suffisso, utilizza un’esclusione vuota ().
Example
21D\()21D, indipendentemente dal segno del saldo.Oltre a utilizzare i prefissi dei codici per includere i conti, è possibile abbinarli a tag conto. Questo è particolarmente utile, ad esempio, se nel tuo Paese non esiste un piano dei conti standardizzato, dove lo stesso prefisso potrebbe essere usato per scopi diversi da un’azienda all’altra.
Example
tag(25)Se il tag a cui si fa riferimento è definito in un file di dati, si può usare un xmlid al posto dell’id.
Example
tag(my_module.my_tag)È inoltre possibile utilizzare espressioni aritmetiche con i tag, eventualmente combinandole con selezioni di prefissi.
Example
tag(my_module.my_tag) + tag(42) + 1010.I suffissi C e D possono essere utilizzati allo stesso modo con i tag.
Example
tag(my_module.my_tag)CL’esclusione dei prefissi funziona anche con i tag.
Example
tag(my_module.my_tag)\(10)10.Motore “Valore esterno”
Il motore “valore esterno” è usato per riferirsi ai valori manuali e di riporto. Questi valori non vengono memorizzati con account.move.line, ma con account.report.external.value. Ognuno di questi oggetti punta direttamente all’espressione che impatta, quindi non è necessario fare molto per la loro selezione.
Le formule utilizzabili sono:
sumSe il risultato deve essere la somma di tutti i valori esterni nel periodo.
most_recentSe il risultato deve essere il valore dell’ultimo valore esterno nel periodo.
Inoltre, le formule secondarie possono essere usate in due modi:
rounding=XLa sostituzione di
Xcon un numero indica l’arrotondamento dell’importo a X decimali.editableIndica che questa espressione può essere modificata manualmente, attivando la visualizzazione di un’icona nel resoconto, che consente all’utente di eseguire questa azione.
Nota
I valori manuali vengono creati nella data date_to attualmente selezionata nel resoconto.
Entrambe le formule secondarie possono essere mescolate separandole con un ;.
Example
editable;rounding=2Motore “Funzione Python personalizzata”
Questo motore è un mezzo per gli sviluppatori per introdurre un calcolo personalizzato delle espressioni, caso per caso. La formula è il nome di una funzione Python da chiamare e la formula secondaria è una chiave da recuperare nel dizionario restituito da questa funzione. Usalo solo se stai creando un modulo personalizzato.
Colonne
I resoconti possono avere un numero indefinito di colonne da visualizzare. Ogni colonna ottiene i suoi valori dalle espressioni dichiarate sulle righe. Il campo expression_label della colonna fornisce l’etichetta delle espressioni il cui valore viene visualizzato. Se una riga non ha alcuna espressione in quel campo, non viene visualizzato nulla in questa colonna. Se sono necessarie più colonne, è necessario utilizzare etichette di espressione diverse.
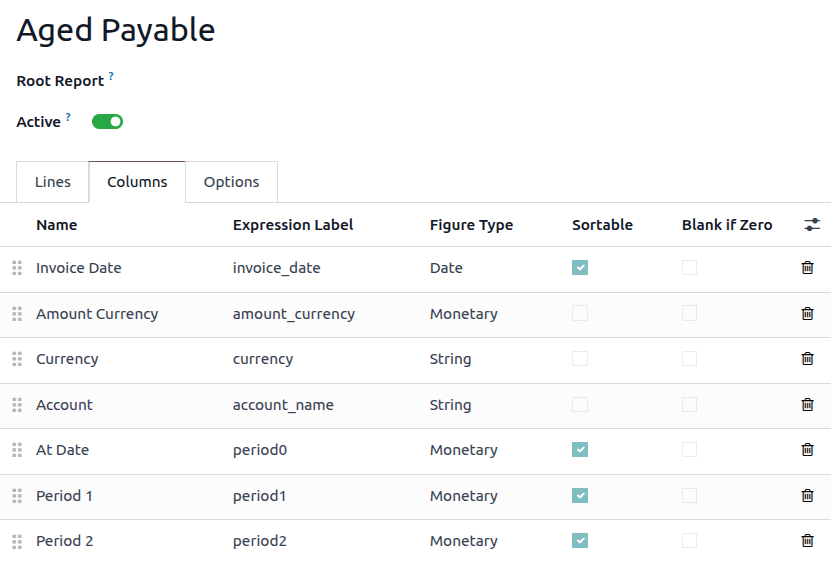
Quando si utilizza la funzione di confronto tra periodi presente nella scheda Opzioni di un rendiconto contabile, tutte le colonne vengono ripetute in e per ogni periodo.
Raggruppamento righe
È possibile un raggruppamento non standard aggiungendo o utilizzando campi esistenti sul modello Voce di registro, a condizione che i campi siano correlati e non memorizzati.
Nota
Il raggruppamento delle righe richiede che il report abbia righe di report esplicite che possono essere modificate. I report differiti, ad esempio, non supportano il raggruppamento delle righe in quanto utilizzano righe dinamiche generate.
Creare un nuovo campo sulla voce di registro
Per creare un campo correlato non memorizzato nel modello Voce di registro, andare prima a , e fare clic sull’icona (bug), quindi fare clic su Campi. Fare clic su Nuovo per creare un nuovo campo e compilare i seguenti campi:
Nome campo: un nome tecnico per il campo
Etichetta campo: l’etichetta da visualizzare per il campo
Tipo di campo: il tipo di campo a cui questo campo correlato dovrebbe puntare
Memorizzato: Lasciare questo campo deselezionato poiché solo i campi non memorizzati possono essere utilizzati per raggruppare le righe.
Modello correlato: Se il tipo di campo è one2many, many2many, o many2one, selezionare il modello del campo originale per cui raggruppare.
Definizione campo correlato: il percorso tecnico del campo per cui si desidera raggruppare
Example
Per raggruppare per il team di vendita del partner commerciale, impostare la definizione del campo correlato su
move_id.team_id.
Raggruppa righe
Per raggruppare le righe, andare alla scheda Righe del report desiderato, fare clic sulla riga che si desidera raggruppare e modificare il campo Raggruppa per. Inserire il nome tecnico (Nome campo) del campo da utilizzare come chiave di raggruppamento.
Suggerimento
Per trovare un elenco di tutti i campi del modello e i relativi nomi tecnici, vai a , clicca sull’icona (bug), quindi clicca su Campi. Il nome tecnico di ciascun campo è elencato nella colonna Nome campo.
Configurazione report fiscale personalizzato
Configurazione report
Suggerimento
Tutti i termini tecnici e le funzioni del motore dei report di Odoo sono spiegati nelle sezioni precedenti di questa pagina. Si consiglia vivamente di leggere queste sezioni prima di configurare un report fiscale personalizzato.
Per creare un report fiscale personalizzato, aprire l’app Contabilità, navigare in , quindi fare clic su Nuovo:
Inserire un nome per il report.
Selezionare un Report radice.
Nel campo Disponibilità, selezionare Corrispondenza paese, quindi selezionare il Paese corrispondente alla propria azienda.
Successivamente, creare una riga del report facendo clic su Aggiungi una riga. Una volta creata, fare clic su quella riga del report per configurarla:
Fare nuovamente clic su Aggiungi una riga per creare un”Espressione e assegnarle un nome.
Nella scheda Definizione, selezionare un Motore di calcolo per quell’espressione in base ai seguenti scenari:
In questo scenario, la propria azienda utilizza le griglie fiscali:
Selezionare Etichette fiscali come motore di calcolo. Odoo utilizza questo campo per collegare la riga del report alle imposte.
Nel campo Formula, digitare l’identificatore breve della griglia (ad es.,
vat_sales_base). Odoo genera automaticamente le varianti+e-di questa etichetta da mappare in .Nel campo Sottoformula, inserire
baseper riportare l’importo al netto delle imposte, oppuretaxper riportare l’importo effettivo dell’imposta riscossa/pagata.
Ripetere questo processo secondo necessità. Quindi, Salva e chiudi.
In alternativa, è possibile:
Selezionare Aggrega altre formule come motore di calcolo. Odoo utilizza questo campo per eseguire calcoli matematici su righe già presenti nel report anziché analizzare le transazioni grezze.
Nel campo Formula, utilizzare l’algebra di base facendo riferimento ai codici delle righe (ad es.,
LINE_10 - LINE_20).
Ripetere questo processo secondo necessità. Quindi, Salva e chiudi.
In questo scenario, la propria azienda non utilizza griglie fiscali. Tiene invece traccia di tutto esclusivamente tramite i conti del Libro mastro:
Selezionare Prefisso dei codici conto come motore di calcolo: Odoo lo utilizza per le righe che devono estrarre totali finanziari. Invece di cercare etichette di transazione, Odoo estrae i saldi in tempo reale direttamente dal piano dei conti.
Nel campo Formula, digitare le cifre iniziali dei conti che si desidera monitorare (ad es.,
40estrarrà il totale combinato di tutti i conti di ricavo che iniziano con400000,401000, ecc.).
Ripetere questo processo secondo necessità. Quindi, Salva e chiudi.
In alternativa, è possibile:
Selezionare Aggrega altre formule come motore di calcolo. Odoo lo utilizza per calcolare subtotali, imposte nette o totali complessivi sommando o sottraendo le altre righe del report.
Nel campo Formula, utilizzare l’algebra di base facendo riferimento ai codici delle righe (ad es.,
LINE_10 - LINE_20).
Ripetere questo processo secondo necessità. Quindi, Salva e chiudi.
In questo scenario, la tua azienda richiede filtri avanzati, sostituzioni manuali da parte dell’utente o una logica algoritmica complessa che i tag standard e i prefissi dei conti non possono gestire:
Seleziona Dominio Odoo come motore di calcolo: Odoo lo utilizza per ignorare completamente i tag fiscali e filtrare le voci contabili grezze (
account.move.line) utilizzando la sintassi di ricerca standard di Odoo.Nel campo Formula, inserisci un dominio valido che inizia con parentesi quadre per isolare le transazioni esenti da imposte per categorie specifiche di partner.
In alternativa, è possibile:
Seleziona Valore esterno come motore di calcolo. Odoo lo utilizza per registrare sostituzioni manuali o valori di riporto storico.
Nel campo Formula, digita
sum(per sommare tutti i valori manuali nei report multi-periodo) oppuremost_recent(per visualizzare solo il valore più recente).Nel campo Sottoformula, digita
editableper visualizzare un’icona di modifica nel report attivo, consentendo agli utenti di modificare il valore manualmente. Inoltre, puoi arrotondare i numeri digitandorounding=x.
In alternativa, è possibile:
Seleziona Funzione Python personalizzata come motore di calcolo. Odoo lo utilizza come motore di esecuzione per eseguire calcoli specifici tramite codifica backend quando le regole coinvolgono scaglioni progressivi, cicli o soglie a più livelli.
Nel campo Formula, inserisci il nome tecnico esatto del metodo Python definito nel tuo modulo di localizzazione personalizzato.
Ripetere questo processo secondo necessità. Quindi, Salva e chiudi.
Nella scheda Opzioni di un”Espressione, compila il campo Riporta a con una formula per riportare sempre i saldi o riportarli solo quando l’importo è negativo. Lascia questo campo vuoto se non desideri utilizzare questa funzionalità.
Example
if_below(EUR(0))Configurazione fiscale
Successivamente, vai su e fai clic su Nuovo per creare e configurare nuove imposte per il tuo report fiscale personalizzato. Crea le tue imposte per le Vendite e gli Acquisti e compila le Griglie fiscali per tutte le imposte utilizzando le griglie fiscali corrispondenti che hai creato in precedenza. Infine, assicurati di specificare sia un conto imposte da pagare che un conto imposte da ricevere per ogni imposta.
Example

Registrazione di chiusura
Per chiudere le imposte, è necessario specificare un gruppo fiscale su ogni imposta utilizzata nel tuo report fiscale personalizzato. Per farlo, apri l’app Contabilità, vai su , apri un’imposta che richiede un gruppo fiscale, fai clic sulla scheda Opzioni avanzate e seleziona un gruppo nel campo Gruppo fiscale. Una volta assegnato, fai clic sull’icona (freccia destra) e imposta sia un Conto imposte da pagare che un Conto imposte da ricevere.
Suggerimento
Quando tutto è stato configurato, assicurati di testare il tuo report creando fatture, acquisti e carte di credito utilizzando le imposte specifiche per quel report. Infine, testa la registrazione di chiusura stessa.
Se desideri nascondere un conto specifico dalla visualizzazione nella registrazione di chiusura fiscale, vai su , seleziona l’imposta e fai clic sull’icona (regola impostazioni). Da lì, seleziona la casella Registrazione di chiusura fiscale per regolarne la visibilità.
Vedi anche