
행사 만들기
행사애플리케이션을 사용하면 주최자가 Odoo에서 대면 또는 온라인 행사를 생성하고 구성할 수 있습니다. 각 새 행사에는 티켓 판매, 등록 데스크, 부스, 트랙, 스폰서, 룸 등과 같은 특정 물류를 사용자 지정할 수 있는 여러 옵션이 포함되어 있습니다.
행사는 처음부터 수동으로 생성하거나 미리 구성된 템플릿에서 빌드할 수 있습니다. 시작되면행사앱은 행사 홍보, 참석자에게 등록 티켓 판매, 사용자 지정 가능한 규칙을 사용한 리드 생성 등 향상된 기능을 위해 다른 앱과 통합됩니다.
현황판
To create an event, navigate to the app to land on the dashboard. By default, the Events dashboard uses the (Kanban) view, which showcases all events in the database in their respective pipeline stages. Other views can be set using the buttons at the top.
각 행사 카드에는 행사 이름, 예정된 날짜, 위치, 예상되는참석자수, 행사와 관련된 예약된 활동 및 담당 행사 관리자가 표시됩니다.
The default stages in the Kanban view are New, Booked, Announced, Ended, and Cancelled. The cards can be dragged and dropped into any stage in the pipeline.
참고
The Ended and Cancelled stages are folded by default and located at the end of the dashboard, next to the final stage.

To add a new stage, click the Add Stage button at the end of the dashboard. Enter a name for the stage, then click Add to add the stage or press Esc to cancel.
새 행사 추가
Events can be created by opening the app and clicking New. This opens a new Events form.
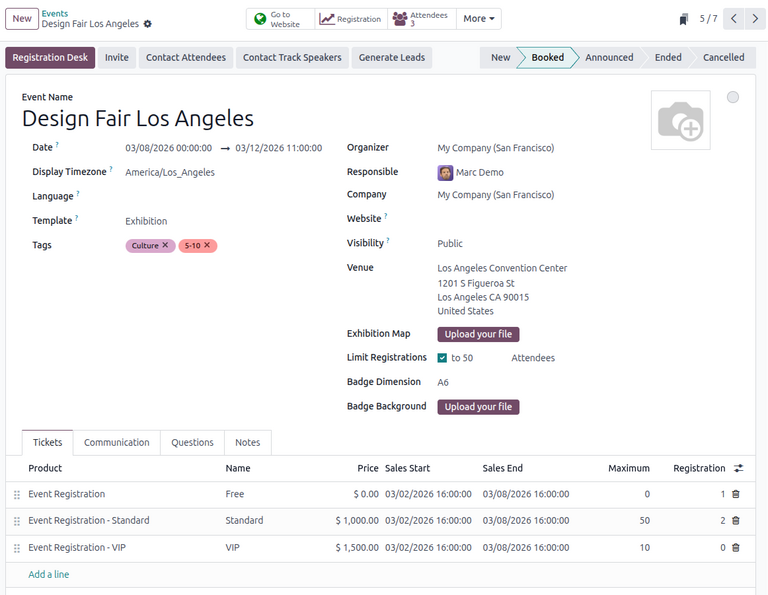
At the top of the event form are a series of clickable smart buttons to view details about event metrics, including attendee registrations, booths, ticket sales, event tracks, and sponsors.
스마트 버튼 아래에는 행사의 필요한 세부 정보를 구성할 수 있는 다양한 필드와 클릭 가능한 탭이 포함된 행사 양식이 있습니다.
시작하려면 다음 필드에 행사에 대한 기본 정보를 입력합니다.
행사 이름: 행사 제목입니다. 이 필드는필수입니다.
날짜: 행사의 예정된 날짜 또는 날짜 범위(현지 시간대로 표시됨)입니다. 이 필드는 자동으로 채워지지만 수정 가능하며필수입니다.
표시 시간대: 웹사이트에 행사 날짜가 표시되는 시간대입니다. 이 필드는 자동으로 채워지지만 수정 가능하며필수입니다.
언어: 모든 행사 커뮤니케이션에 대해 선택한 언어입니다.
참고
Next to the entered Event Name, there is a language tooltip, represented by an
abbreviated language indicator (e.g., EN). When clicked, a Translate: name pop-up window
appears, displaying various preconfigured language translation options available in the database.
Alternatively, to populate the event form from an event template, select an option in the Template drop-down menu.
또한 태그 필드에 이벤트에 해당하는 태그(예: 온라인, 컨퍼런스)를 추가하세요. 이벤트당 여러 태그를 추가할 수 있습니다.
팁
웹사이트에 나열된 이벤트에 태그를 표시하려면 체크박스를 활성화하면 됩니다.
다음 필드에 담당자 및 장소 위치와 같은 정보를 입력하세요:
주최자: 이벤트 주최자(회사, 연락처 또는 임직원)입니다.
책임자: 데이터베이스에서 이벤트를 관리하는 특정 사용자입니다.
회사: 이벤트와 관련된 데이터베이스의 특정 회사입니다. 이 필드는 다중 회사 환경에서 작업하는 경우에**만** 표시됩니다. 이 필드는 자동으로 채워지지만 수정할 수 있습니다. 필수 항목입니다.
Website: The specific website in the database on which the event is published. If this field is left blank, the event can be published on all websites in the database.
Visibility: The visibility of the event on the specified Website and in searches. The following options can be specified:
Public: The event is searchable and visible to all website visitors.
Via a Link: The event is visible only to visitors with a direct URL or already-registered participants.
Logged Users: The event is visible only to logged-in visitors or visitors with a direct URL.
장소: 이벤트 장소 위치입니다. 이 필드는 연락처 애플리케이션에서 정보를 가져옵니다. 또는 정보를 수동으로 입력할 수 있습니다.
전시 지도: 이벤트 장소 지도 이미지입니다. 파일 업로드 버튼을 클릭하여 이벤트 장소 지도 이미지를 업로드하세요.
이벤트의 등록 수를 제한하려면 :guilabel:`등록 제한`을 선택하고 허용되는 최대 참석자 수를 표시되는 필드에 입력하세요.
선택적으로 참석자를 위한 이벤트 배지를 만들려면 다음 필드를 작성하세요:
배지 크기: 배지의 원하는 용지 형식 크기입니다. 옵션은 A4 접이식, A6 또는 :guilabel:`시트당 4개`입니다.
배지 배경: 배지의 사용자 정의 배경 이미지입니다. 파일 업로드 버튼을 클릭하여 이미지를 업로드하세요.
행사 추가 환경설정
이벤트 양식의 필드를 작성한 후 하단의 4개 탭으로 이동하여 추가 사용자 지정을 진행하세요.
티켓 탭
In the Tickets tab of the event form, create custom registration tickets and ticket tiers for events.

To create a ticket, click Add a line in the Tickets tab. In the Product
field, either select the preconfigured Event Registration product, or create a new one
by typing in the name of the new event registration product and then selecting either
Create or Create and edit… from the resulting drop-down menu. Then, enter
a name for the ticket (e.g., Basic Ticket or VIP) in the Name field.
중요
In order for an event registration product to be selectable in the Tickets tab, the event registration Product Type must be set to Service and the Create on Order field must be set to Event Registration.
팁
Existing event registration products can be modified directly from the Product field by clicking the (right arrow) icon next to the product. Doing so reveals that product’s form. If the Inventory application is installed, additional choices are available to customize for the product.
다음으로, 가격 필드에 티켓 등록비를 설정합니다.
참고
The Sales Price defined on the event registration product’s form sets the default cost of a ticket. Modifying the Price of the event ticket in the Tickets tab overrides the ticket’s default price with this new price.
Next, enter the Sales Start and Sales End dates in their respective fields. To do so, click into the blank field to reveal a calendar pop-over. Then, select the desired date and time and click Apply.
Optionally, designate a Maximum amount of the ticket that can be sold.
As attendees register, the Registration column automatically populates with the number of tickets sold.
To delete any tickets from the Tickets tab, click the (trash can) icon in the ticket’s corresponding line.
팁
To add an optional Description column to the Tickets tab, click the (additional options) drop-down menu at the end of the column titles.
Then, select the checkbox beside Description to add a brief description for each event ticket, informing registrants about ticket details.
커뮤니케이션 탭
In the Communication tab of an event form, create various marketing communications that can be scheduled to be sent at specific intervals leading up to and following the event.

참고
기본적으로 Odoo는 모든 새 이벤트 양식에 세 가지 사전 구성된 커뮤니케이션을 제공합니다. 하나는 각 등록 후 참석자에게 구매를 확인하기 위해 전송되는 이메일입니다. 나머지 두 개는 이벤트 전 다른 시간 간격으로 예약되어 수신자에게 다가오는 이벤트를 상기시키기 위해 전송되는 이메일 이벤트 알림입니다.
To add a communication in the Communication tab, click Add a line. Then, select the desired type of communication from the first drop-down menu in the Template column. The options are: Mail, SMS, Social Post, or WhatsApp.
중요
소셜 게시물 옵션은 소셜 마케팅 애플리케이션이 설치된 경우에만 나타납니다. WhatsApp 옵션은 WhatsApp 모듈이 설치된 경우에만 나타납니다.
Then, select an existing email template from the second drop-down menu in the Template field.
Next, define the Interval and Unit from their respective drop-down fields to specify when the communication should be sent. The Unit options are: Immediately, Hours, Days, Weeks, and Months.
Then, select one of the following options from the Trigger drop-down menu:
After each registration
Before the event
After the event
The (#) Sent column populates with the number of sent communications, along with different icons indicating the status of the communication:
(Running): The communication is active and running.
(Sent): The communications were sent and are no longer active.
(Scheduled): The communication is scheduled but has not been deployed.
Any number of communications can be added in the Communication tab of an event form.
Example
To send a confirmation email an hour after an attendee registers for an event, configure the communication as follows:
간격:
1단위: 시간
트리거: 각각 등록 후
참고
Existing email templates can be modified directly from the Template drop-down menu by clicking the (Internal link) icon next to the template name. Doing so reveals a separate page where users can edit the Content, Email Configuration, and Settings of that particular email template.
To view and manage all email templates, activate 개발자 모드 (디버그 모드) and navigate to . Modify with caution as email templates affect all communications where the template is used.
질문 탭
In the Questions tab of an event form, users can create questionnaires to gather information from attendees when registering for the event.

참고
By default, Odoo provides three questions in the Questions tab for every event form. The default questions require registrants to provide their Name, Email, and an optional Phone number.
The information gathered from the Questions tab can be found on the Attendees dashboard, accessible via the Attendees smart button. Odoo populates individual records that contain basic information about the registrants, as well as their preferences.
To add a question in the Questions tab, click Add a line. Doing so reveals a Create Question pop-up window. From here, users can create and configure their question.

First, enter the question in the field at the top of the form. Then, specify if the question requires a Mandatory Answer.
Additionally, specify whether to Ask once per order to apply the answer to every attendee in the order (if multiple tickets are purchased at once). If the checkbox is not ticked, the question is asked for every attendee in the registration.
다음으로, 질문 유형 옵션을 선택합니다.
선택: 등록자가 선택할 수 있는 질문에 대한 답변 옵션을 제공합니다. 선택 가능한 답변 옵션은 팝업 창 하단의 답변 열에서 관리할 수 있습니다.
Text Input: Provides registrants with a text field to enter a custom response to the question.
이름: 등록자가 이름을 입력할 수 있는 필드를 제공합니다.
이메일: 등록자가 이메일 주소를 입력할 수 있는 필드를 제공합니다.
전화번호: 등록자가 전화번호를 입력할 수 있는 필드를 제공합니다.
회사: 등록자가 관련된 회사를 입력할 수 있는 필드를 제공합니다.
If Selection was chosen as the Question Type, an Answers tab appears. Add any answers to the question under this tab by clicking Add a line.
Once all the desired configurations have been entered, click Save & Close to save the question and return to the Questions tab on the event form. Or, click Save & New to save the question and configure another question on a new Create Question pop-up window.
Users can add as many questions in the Questions tab as needed.
팁
For Selection and Text Input types, a Stats button appears next to the question line. Clicking this button reveals a separate page, showcasing the response metrics to that specific question.
To delete any question from the Questions tab, click the (trash can) icon on the corresponding question line.
메모 탭
In the Notes tab of an event form, users can leave detailed internal notes and/or event-related instructions/information for attendees.

In the Note field, users can leave internal notes for other event employees, like “to-do” lists, contact information, instructions, and so on.
In the Ticket Instructions field, users can leave specific instructions for attendees and display them on attendees’ tickets.
행사 게시
Once all configurations and modifications are complete on the event form, the event can be published on the website. Doing so makes the event visible to website visitors and allows them to register for the event.
To publish an event, click the Go to Website smart button to open the event webpage. Then, toggle the Unpublished button in the header menu, changing it to a Published switch. The event webpage is now published and accessible by all website visitors.
더 보기:
웹사이트 디자인 기능 및 옵션에 대한 자세한 내용은구성 요소문서를 참조하십시오.
행사 초대 보내기
To send event invites to potential attendees, navigate to the desired event form via and click into the desired event. On the event form, click the Invite button.
Doing so reveals a blank email form. Customize the message by specifying a mailing type, subject, recipients, and the mail body.
팁
Odoo에서 이메일을 보내는 것은 일일 제한이 적용되며, 기본값은 200입니다. 일일 제한에 대해 자세히 알아보려면 일일 한도 도달 문서를 참조하세요.
더 보기: