Più siti web
Odoo allows you to create multiple websites from the same database. This can be useful, for example, if you have multiple brands operating under your organization, or to create separate websites for different products/services, or different audiences. In these cases, having different websites can help avoid confusion and make it easier to tailor your digital outreach strategies and reach your target audience.
Each website can be designed and configured independently with its own domain name, theme, pages, menus, languages, products, assigned sales team, etc. They can also share content and pages.
Suggerimento
I contenuti duplicati (ad esempio, pagine e contenuti condivisi tra più siti web) possono avere un impatto negativo su Ottimizzazione per i motori di ricerca (SEO).
Website creation
To create a new website, proceed as follows:
Vai a .
Click + New Website.

Specify the Website Name and Website domain. Each website must be published under its own domain.
Adapt the Company name, Languages and Default language if needed.
Click the Create button.
You can then start building your new website.
Nota
By default, all website-related apps that you have installed (e.g. eCommerce, Forum, Blog, etc.) and their related website pages are also available on the new website. You can remove them by amending the website’s menu.
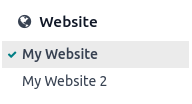
Switching websites
To switch from one website to another, click the menu next to the +New button in the top right corner and select the website you want to switch to.

Nota
Quando si cambia sito web, si viene reindirizzati alla homepage dell’altro sito web.
Configurazione specifica del sito web
La maggior parte delle impostazioni del sito web sono specifiche per ciascun sito web, il che significa che possono essere abilitate/disabilitate per singolo sito web. Per adattare le impostazioni di un sito web, andare in . Selezionare il sito web desiderato nel campo Impostazioni del sito web nella parte superiore della pagina Impostazioni, nel banner giallo. Quindi, adattare le opzioni per quel sito web specifico.
Nota
I siti web vengono creati con le impostazioni predefinite; le impostazioni non vengono copiate da un sito web all’altro.
In un ambiente multi-azienda, ogni sito web può essere collegato a un’azienda specifica nel database in modo che sul sito web vengano visualizzati solo i dati relativi all’azienda (ad esempio, prodotti, lavori, eventi, ecc.). Per visualizzare i dati specifici dell’azienda, impostare l’azienda desiderata nel campo Azienda.
Disponibilità dei contenuti
Per impostazione predefinita, pagine, prodotti, eventi, ecc. creati dal frontend (utilizzando il pulsante +Nuovo) sono disponibili solo sul sito web dal quale sono stati creati. I record creati dal backend, invece, sono resi disponibili su tutti i siti web per impostazione predefinita. La disponibilità del contenuto può essere modificata nel backend, nel campo Sito web. Ad esempio, per i prodotti, andare in , quindi selezionare il prodotto e andare nella scheda Vendite. Per i forum, andare in , quindi selezionare il forum.

I record e le funzionalità possono essere resi disponibili:
Su tutti i siti web: lasciare vuoto il campo Sito web;
Solo su un sito web: impostare il campo Sito web di conseguenza;
Su alcuni siti web: in questo caso, è necessario duplicare l’elemento e impostare il campo Sito web.
Pagine del sito web
Per modificare il sito web sul quale deve essere pubblicata una pagina, procedere come segue:
Vai a .
Apri il pannello di ricerca e seleziona il sito web sul quale la pagina è attualmente pubblicata.
Spunta la casella di controllo accanto alle pagine che desideri modificare.
Fai clic sul campo Sito web e seleziona il sito web, oppure lascialo vuoto per pubblicare la pagina su tutti i siti web.
Nota
Ogni sito web deve avere la propria homepage; non puoi utilizzare la stessa homepage per più siti web.
Funzionalità E-commerce
Le funzionalità di e-commerce come prodotti, categorie e-commerce, listini prezzi, sconti, fornitori di pagamento, ecc. possono essere limitate a un sito web specifico.
Account clienti
È possibile consentire ai clienti di utilizzare lo stesso account su tutti i siti web abilitando la casella di controllo Account clienti condivisi nelle impostazioni del sito web.
Tariffazione
I prodotti possono avere prezzi diversi in base al sito web utilizzando i listini prezzi. È richiesta la seguente configurazione:
Vai a .
Scorri verso il basso fino alla sezione Negozio - Prodotti e seleziona l’opzione Listini prezzi Prezzi multipli per prodotto.
Fai clic su Listini prezzi per definire nuovi listini o modificare quelli esistenti.
Seleziona il listino prezzi o fai clic su Nuovo per crearne uno nuovo, quindi seleziona la scheda Configurazione e imposta il campo Sito web.
Reportistica
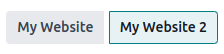
Analitiche
Ogni sito web ha le proprie statistiche. Per passare da un sito web all’altro, fare clic sui pulsanti nell’angolo in alto a destra.
Altri dati di reportistica
Altri dati di reportistica come i dati della dashboard e-commerce, le analisi delle vendite online e i visitatori possono essere raggruppati per sito web se necessario. Aprire il pannello di ricerca e selezionare Raggruppa per –> Sito web.