
Creați evenimente
Cu aplicația Evenimente, organizatorii pot crea și configura evenimente în persoană sau online în Odoo. Fiecare eveniment nou conține o serie de opțiuni pentru personalizarea logisticii specifice, cum ar fi vânzarea de bilete, biroul de înregistrare, standuri, prezentări, sponsori, săli și multe altele.
Evenimentele pot fi create manual de la zero sau construite din șabloane preconfigurate. Odată lansată, aplicația Evenimente se integrează cu alte aplicații pentru funcționalități îmbunătățite, inclusiv promovarea evenimentelor, vânzarea de bilete de înregistrare către participanți și generarea de clienți potențiali folosind reguli personalizabile.
Tablou de bord
To create an event, navigate to the app to land on the dashboard. By default, the Events dashboard uses the (Kanban) view, which showcases all events in the database in their respective pipeline stages. Other views can be set using the buttons at the top.
Fiecare card de eveniment afișează numele evenimentului, data programată, locația, numărul de Participanți așteptați, orice activități programate legate de eveniment și managerul de eveniment responsabil.
The default stages in the Kanban view are New, Booked, Announced, Ended, and Cancelled. The cards can be dragged and dropped into any stage in the pipeline.
Notă
The Ended and Cancelled stages are folded by default and located at the end of the dashboard, next to the final stage.

To add a new stage, click the Add Stage button at the end of the dashboard. Enter a name for the stage, then click Add to add the stage or press Esc to cancel.
Adăugați un eveniment nou
Events can be created by opening the app and clicking New. This opens a new Events form.
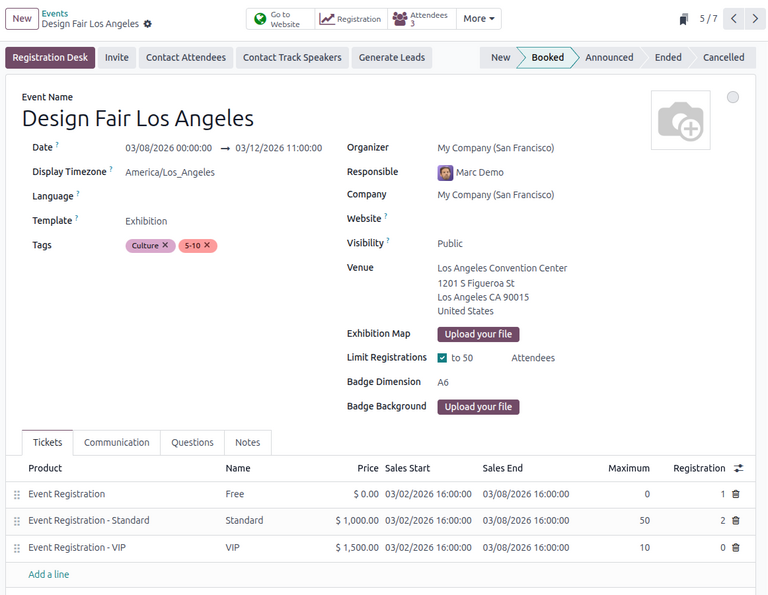
At the top of the event form are a series of clickable smart buttons to view details about event metrics, including attendee registrations, booths, ticket sales, event tracks, and sponsors.
Sub butoanele inteligente se află formularul de eveniment, care conține diverse câmpuri și file pe care se poate da clic pentru a configura detaliile necesare ale evenimentului.
Pentru a începe, introduceți câteva informații de bază despre eveniment în următoarele câmpuri:
Nume eveniment: Titlul evenimentului. Acest câmp este obligatoriu.
Dată: Data sau intervalul de date programat pentru eveniment (exprimat în fusul orar local). Acest câmp este populat automat, dar modificabil și este obligatoriu.
Fus orar afișat: Fusul orar în care data evenimentului este afișată pe site. Acest câmp este populat automat, dar modificabil și este obligatoriu.
Limbă: Limba aleasă pentru toate comunicările evenimentului.
Notă
Next to the entered Event Name, there is a language tooltip, represented by an
abbreviated language indicator (e.g., EN). When clicked, a Translate: name pop-up window
appears, displaying various preconfigured language translation options available in the database.
Alternatively, to populate the event form from an event template, select an option in the Template drop-down menu.
În plus, adăugați orice etichete corespunzătoare (de ex., Online, Conferință) pentru eveniment în câmpul Etichete. Se pot adăuga mai multe etichete per eveniment.
Sfat
Etichetele pot fi afișate la evenimentele listate pe site activând caseta de selectare Afișează pe site din .
Continuați introducând informații precum persoanele de contact și locația locației în următoarele câmpuri:
Organizator: Organizatorul evenimentului (o companie, persoană de contact sau angajat).
Responsabil: Utilizatorul specific responsabil de gestionarea evenimentului în baza de date.
Companie: Compania specifică din baza de date la care este legat evenimentul. Acest câmp apare doar dacă lucrați într-un mediu multi-companie. Acest câmp este populat automat, dar modificabil. Este obligatoriu.
Website: The specific website in the database on which the event is published. If this field is left blank, the event can be published on all websites in the database.
Visibility: The visibility of the event on the specified Website and in searches. The following options can be specified:
Public: The event is searchable and visible to all website visitors.
Via a Link: The event is visible only to visitors with a direct URL or already-registered participants.
Logged Users: The event is visible only to logged-in visitors or visitors with a direct URL.
Locația: Locul desfășurării evenimentului. Acest câmp preia informații din aplicația Contacte. Alternativ, informațiile pot fi introduse manual.
Harta expoziției: Imaginea hărții locației evenimentului. Apasă pe butonul Încarcă fișierul pentru a încărca o imagine a hărții locației evenimentului.
Pentru a limita numărul de înregistrări la eveniment, bifează Limitează înregistrările și introdu numărul maxim de participanți permis în câmpul rezultat.
Opțional, pentru a crea ecusoane de eveniment pentru participanți, completează următoarele câmpuri:
Dimensiune ecuson: Dimensiunea dorită a formatului de hârtie pentru ecusoane. Opțiunile sunt A4 pliabil, A6 sau 4 pe foaie.
Fundal ecuson: Imaginea de fundal personalizată pentru ecusoane. Apasă pe butonul Încarcă fișierul pentru a încărca o imagine.
Configurări suplimentare de eveniment
După completarea câmpurilor din formularul de eveniment, continuă cu cele patru file de jos pentru personalizare suplimentară.
Fila bilete
In the Tickets tab of the event form, create custom registration tickets and ticket tiers for events.

To create a ticket, click Add a line in the Tickets tab. In the Product
field, either select the preconfigured Event Registration product, or create a new one
by typing in the name of the new event registration product and then selecting either
Create or Create and edit… from the resulting drop-down menu. Then, enter
a name for the ticket (e.g., Basic Ticket or VIP) in the Name field.
Important
In order for an event registration product to be selectable in the Tickets tab, the event registration Product Type must be set to Service and the Create on Order field must be set to Event Registration.
Sfat
Existing event registration products can be modified directly from the Product field by clicking the (right arrow) icon next to the product. Doing so reveals that product’s form. If the Inventory application is installed, additional choices are available to customize for the product.
Apoi, setați costul de înregistrare al biletului în câmpul Preț.
Notă
The Sales Price defined on the event registration product’s form sets the default cost of a ticket. Modifying the Price of the event ticket in the Tickets tab overrides the ticket’s default price with this new price.
Next, enter the Sales Start and Sales End dates in their respective fields. To do so, click into the blank field to reveal a calendar pop-over. Then, select the desired date and time and click Apply.
Optionally, designate a Maximum amount of the ticket that can be sold.
As attendees register, the Registration column automatically populates with the number of tickets sold.
To delete any tickets from the Tickets tab, click the (trash can) icon in the ticket’s corresponding line.
Sfat
To add an optional Description column to the Tickets tab, click the (additional options) drop-down menu at the end of the column titles.
Then, select the checkbox beside Description to add a brief description for each event ticket, informing registrants about ticket details.
Fila Comunicare
In the Communication tab of an event form, create various marketing communications that can be scheduled to be sent at specific intervals leading up to and following the event.

Notă
În mod implicit, Odoo oferă trei comunicări separate preconfigurate pe fiecare formular de eveniment nou. Una este un email trimis după fiecare înregistrare pentru a confirma achiziția cu participantul. Celelalte două sunt emailuri de memento pentru eveniment, programate să fie trimise la intervale diferite de timp înainte de eveniment pentru a reaminti destinatarului de evenimentul viitor.
To add a communication in the Communication tab, click Add a line. Then, select the desired type of communication from the first drop-down menu in the Template column. The options are: Mail, SMS, Social Post, or WhatsApp.
Important
Opțiunea Postare socială apare doar dacă aplicația Marketing social este instalată. Opțiunea WhatsApp apare doar dacă modulul WhatsApp este instalat.
Șabloanele WhatsApp nu pot fi editate în timpul configurării active. Este necesară o aprobare separată din partea Meta.
Then, select an existing email template from the second drop-down menu in the Template field.
Next, define the Interval and Unit from their respective drop-down fields to specify when the communication should be sent. The Unit options are: Immediately, Hours, Days, Weeks, and Months.
Then, select one of the following options from the Trigger drop-down menu:
After each registration
Before the event
After the event
The (#) Sent column populates with the number of sent communications, along with different icons indicating the status of the communication:
(Running): The communication is active and running.
(Sent): The communications were sent and are no longer active.
(Scheduled): The communication is scheduled but has not been deployed.
Any number of communications can be added in the Communication tab of an event form.
Example
To send a confirmation email an hour after an attendee registers for an event, configure the communication as follows:
Interval:
1Unitate: Ore
Trigger: După fiecare înregistrare
Notă
Existing email templates can be modified directly from the Template drop-down menu by clicking the (Internal link) icon next to the template name. Doing so reveals a separate page where users can edit the Content, Email Configuration, and Settings of that particular email template.
To view and manage all email templates, activate Modul dezvoltator (mod depanare) and navigate to . Modify with caution as email templates affect all communications where the template is used.
Filă întrebări
In the Questions tab of an event form, users can create questionnaires to gather information from attendees when registering for the event.

Notă
By default, Odoo provides three questions in the Questions tab for every event form. The default questions require registrants to provide their Name, Email, and an optional Phone number.
The information gathered from the Questions tab can be found on the Attendees dashboard, accessible via the Attendees smart button. Odoo populates individual records that contain basic information about the registrants, as well as their preferences.
To add a question in the Questions tab, click Add a line. Doing so reveals a Create Question pop-up window. From here, users can create and configure their question.

First, enter the question in the field at the top of the form. Then, specify if the question requires a Mandatory Answer.
Additionally, specify whether to Ask once per order to apply the answer to every attendee in the order (if multiple tickets are purchased at once). If the checkbox is not ticked, the question is asked for every attendee in the registration.
Apoi, selectați o opțiune Tip de întrebare:
Selecție: Furnizați opțiuni de răspuns la întrebare pentru ca participanții să aleagă. Opțiunile de răspuns selectabile pot fi gestionate în coloana Răspunsuri din partea de jos a ferestrei pop-up.
Text Input: Provides registrants with a text field to enter a custom response to the question.
Nume: Oferă participanților un câmp pentru a-și introduce numele.
E-mail: Oferă participanților un câmp pentru a-și introduce adresa de e-mail.
Telefon: Oferă participanților un câmp pentru a-și introduce numărul de telefon.
Companie: Oferă participanților un câmp pentru a introduce o companie cu care sunt asociați.
If Selection was chosen as the Question Type, an Answers tab appears. Add any answers to the question under this tab by clicking Add a line.
Once all the desired configurations have been entered, click Save & Close to save the question and return to the Questions tab on the event form. Or, click Save & New to save the question and configure another question on a new Create Question pop-up window.
Users can add as many questions in the Questions tab as needed.
Sfat
For Selection and Text Input types, a Stats button appears next to the question line. Clicking this button reveals a separate page, showcasing the response metrics to that specific question.
To delete any question from the Questions tab, click the (trash can) icon on the corresponding question line.
Fila Note
In the Notes tab of an event form, users can leave detailed internal notes and/or event-related instructions/information for attendees.

In the Note field, users can leave internal notes for other event employees, like „to-do” lists, contact information, instructions, and so on.
In the Ticket Instructions field, users can leave specific instructions for attendees and display them on attendees» tickets.
Publicați evenimente
Odată ce toate configurările și modificările sunt finalizate în formularul evenimentului, acesta poate fi publicat pe site-ul web. Astfel, evenimentul devine vizibil pentru vizitatorii site-ului și le permite să se înregistreze la eveniment.
Pentru a publica un eveniment, faceți clic pe butonul inteligent Accesați site-ul web pentru a deschide pagina web a evenimentului. Apoi, comutați butonul Nepublicat din meniul antet, transformându-l într-un comutator Publicat. Pagina web a evenimentului este acum publicată și accesibilă tuturor vizitatorilor site-ului.
Vedeți și
Pentru a afla mai multe despre funcționalitatea și opțiunile de design al site-ului web, consultați documentația Blocuri de construcție.
Trimite invitații la eveniment
Pentru a trimite invitații la eveniment potențialilor participanți, navigați la formularul evenimentului dorit prin și faceți clic pe evenimentul dorit. În formularul evenimentului, faceți clic pe butonul Invitați.
Astfel, apare un formular de e-mail gol. Personalizați mesajul specificând un tip de corespondență, un subiect, destinatari și corpul mesajului.
Sfat
Trimiterea emailurilor din Odoo este supusă unei limite zilnice, care implicit este de 200. Pentru a afla mai multe despre limitele zilnice, vizitează documentația Limita zilnică a fost atinsă.
Vedeți și