Beendigungsphase
Wenn ein Mitarbeiter das Unternehmen verlässt, ist es wichtig, einen Austrittsplan zu haben, um sicherzustellen, dass alle notwendigen Schritte befolgt werden, wie z. B. die Rückgabe von Geräten, die Aufhebung des Zugriffs auf Unternehmenssysteme, das Ausfüllen von HR-Formularen, die Durchführung eines Austrittsgesprächs und vieles mehr. Je nach Unternehmen kann es mehrere verschiedene Austrittspläne geben, die für bestimmte Abteilungen oder Bereiche konfiguriert sind und sich in ihren Anforderungen und Schritten vom Hauptaustrittsplan unterscheiden.
Zusätzlich zu einem Offboarding-Plan muss der Mitarbeiterdatensatz aktualisiert werden, um das Ausscheiden zu dokumentieren, den Grund für das Ausscheiden protokollieren, alle offenen Aktivitäten des Mitarbeiters schließen und ihm alle wichtigen Dokumente zur Verfügung stellen.
Austrittsplan anzeigen
Bevor das Offboarding beginnen kann, wird empfohlen, den Standard-Offboarding-Plan zu prüfen, der mit der App Mitarbeiter vorkonfiguriert ist. Um den aktuellen Standardplan anzuzeigen, navigieren Sie zu . Klicken Sie auf Offboarding, um das detaillierte Offboarding-Planformular anzuzeigen.
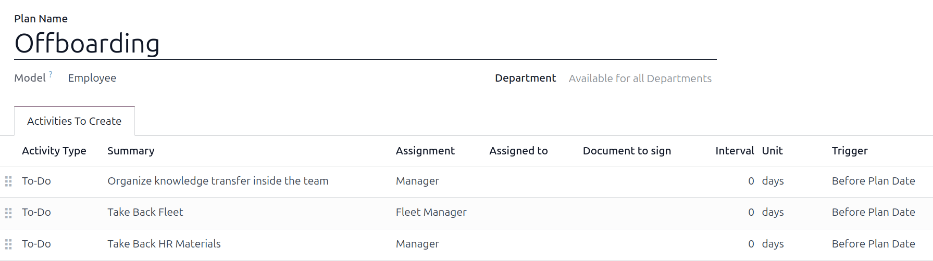
Schritte des Offboarding-Plans
Der Standard-Offboarding-Plan ist minimal und umfasst zwei Standardschritte (drei, wenn die App Fuhrpark installiert ist). Alle Schritte sind To-do-Aktivitäten und sind für den Tag geplant, an dem der Offboarding-Plan gestartet wird (0 Tage vor Plandatum).
Wissenstransfer im Team organisieren: Der Manager muss sicherstellen, dass alle Kenntnisse des Mitarbeiters in Bezug auf seine Position entweder dokumentiert oder mit Kollegen geteilt werden, damit keine Wissenslücke entsteht.
Fuhrpark zurücknehmen: Der Fuhrparkmanager stellt sicher, dass alle dem Mitarbeiter zugewiesenen Fahrzeuge entweder nicht zugewiesen sind (für andere Mitarbeiter verfügbar) oder der nächste Fahrer zugewiesen wird. Dieser Schritt erscheint nur, wenn die App Fuhrpark installiert ist.
HR-Materialien zurücknehmen: Der Manager muss alle Dokumente und Materialien beschaffen, die die Personalabteilung benötigt. Es wird empfohlen, sich mit der Personalabteilung abzustimmen, um sicherzustellen, dass alles Erforderliche für diesen Schritt abgeschlossen ist.
Offboarding-Plan ändern
Der Standard-Offboarding-Plan ist minimal gehalten, damit Anpassungen vorgenommen werden können, um die Offboarding-Anforderungen jedes Unternehmens zu erfüllen. Jedes Unternehmen hat unterschiedliche Anforderungen, daher ist es notwendig, die erforderlichen Schritte zum Offboarding-Plan hinzuzufügen.
Wenn der Offboarding-Plan universell ist, fügen Sie den Standard-Offboarding-Plan hinzu oder ändern Sie ihn. Wenn der benötigte Offboarding-Plan nur für eine bestimmte Abteilung gilt, sollte ein neuer Plan erstellt werden, speziell für diese Abteilung.
Um den Standardplan zu ändern, navigieren Sie zunächst zu und klicken Sie dann auf Offboarding.
Um einen Schritt zu ändern, klicken Sie auf den Schritt und ein Popup-Fenster Öffnen: Aktivitäten erscheint. Nehmen Sie die gewünschten Änderungen am Schritt vor und klicken Sie dann auf Speichern, um die Änderungen zu übernehmen und das Popup-Fenster zu schließen.
Um einen neuen Schritt hinzuzufügen, klicken Sie auf Zeile hinzufügen am Ende der aufgeführten Aktivitäten im Tab Zu erstellende Aktivitäten. Es erscheint ein leeres Pop-up-Fenster Aktivitäten erstellen. Geben Sie alle Informationen in das Pop-up-Fenster ein und klicken Sie dann auf Speichern & Schließen, falls keine weiteren Schritte hinzuzufügen sind, oder klicken Sie auf Speichern & Neu, falls weitere Schritte benötigt werden.
Konfigurieren Sie alle gewünschten Schritte für den Offboarding-Plan.
Offboarding-Plan erstellen
Für einige Unternehmen können spezifische Offboarding-Pläne für bestimmte Abteilungen erforderlich sein. In diesen Fällen kann ein neuer abteilungsspezifischer Offboarding-Plan notwendig sein.
Um einen neuen Offboarding-Plan zu erstellen, navigieren Sie zunächst zu . Klicken Sie auf die Schaltfläche Neu in der oberen linken Ecke, und ein leeres Planformular wird geladen.
Füllen Sie die folgenden Informationen des Formulars aus:
Planname: der spezifische Name für den Plan.
Modell: Dieses Feld gibt an, wo dieser Plan verwendet werden kann. In diesem Fall in der App Mitarbeiter. Dieses Feld kann nicht geändert werden.
Abteilung: Wenn das Feld leer bleibt (Standardeinstellung), ist der Plan für alle Abteilungen verfügbar. Um den Plan abteilungsspezifisch zu machen, wählen Sie über das Dropdown-Menü eine Abteilung aus.
Fügen Sie als Nächstes die verschiedenen Schritte für den Plan hinzu, indem Sie unten in der Liste der Aktivitäten im Tab Zu erstellende Aktivitäten auf Zeile hinzufügen klicken. Ein leeres Popup-Fenster Aktivitäten erstellen erscheint.
Geben Sie die folgenden Informationen in das Pop-up-Fenster ein:
Aktivitätstyp: Wählen Sie über das Dropdown-Menü die zu planende spezifische Aktivität aus. Die Standardoptionen sind E-Mail, Anruf, Besprechung, To-do oder Dokument hochladen. Wenn die App E-Signatur installiert ist, ist eine Option Signatur anfordern verfügbar.
Zusammenfassung: Geben Sie eine kurze Beschreibung für den Schritt ein.
Zuweisung: Wählen Sie über das Dropdown-Menü die Person aus, die die Aktivität durchführen soll. Die Standardoptionen sind: Beim Start fragen, Standardbenutzer, Coach, Manager und Mitarbeiter. Wenn die App Fuhrpark installiert ist, steht eine Option Fuhrparkleiter zur Verfügung.
Bemerkung
Die Auswahl für die Rolle Zuweisung bezieht sich auf den Mitarbeiter. Wenn Coach ausgewählt ist, wird der Coach des Mitarbeiters der Aktivität zugewiesen.
Wenn Standardbenutzer ausgewählt ist, erscheint ein Feld Zugewiesen an. Wählen Sie über das Dropdown-Menü den Benutzer aus, der dieser Aktivität immer zugewiesen wird.
Intervall: Konfigurieren Sie die Felder in dieser Zeile, um das Fälligkeitsdatum der Aktivität festzulegen. Geben Sie eine Zahl in das erste Feld ein und konfigurieren Sie dann über die Dropdown-Menüs in den folgenden beiden Feldern, wann das Fälligkeitsdatum erstellt werden soll: (#) Tage, Wochen oder Monate, entweder Vor Plandatum oder Nach Plandatum.
Wenn das Formular Aktivitäten erstellen ausgefüllt ist, klicken Sie auf Speichern & Schließen, wenn keine weiteren Schritte hinzugefügt werden sollen, oder klicken Sie auf Speichern & Neu, um bei Bedarf weitere Schritte hinzuzufügen.
Example
Ein Unternehmen, das auf außerschulische Kunstprogramme spezialisiert ist, hat zwei separate Offboarding-Pläne: einen für die Lehrer, die vor Ort arbeiten, und einen für Büroangestellte.
Der Offboarding-Plan für die Lehrer ist für die Abteilung Kunstprogramm-Lehrer festgelegt und umfasst spezialisierte Aufgaben im Zusammenhang mit diesen Tätigkeiten. Dazu gehören die Sicherstellung, dass alle Kunstmaterialien katalogisiert und zurückgegeben werden, alle Schüler-Feedbackformulare abgegeben werden und alle Zugangsausweise und Schlüssel für die verschiedenen Standorte zurückgegeben werden.

Offboarding-Plan starten
Nachdem ein Mitarbeiter gekündigt hat (üblicherweise zwei Wochen) oder sobald das Unternehmen beschlossen hat, das Arbeitsverhältnis mit dem Mitarbeiter zu beenden, sollte der Offboarding-Plan gestartet werden. Navigieren Sie zur und klicken Sie auf das Profil des ausscheidenden Mitarbeiters. Klicken Sie auf die Schaltfläche Plan starten, und ein leeres Popup-Fenster Plan starten wird geladen.
Wählen Sie über das Dropdown-Menü den gewünschten Offboarding-Plan im Feld Plan aus. Legen Sie dann mit dem Kalender-Auswahltool ein Datum im Feld Plandatum fest. Dies ist normalerweise der Tag, an dem der Mitarbeiter gekündigt hat, aber es kann jedes Datum ausgewählt werden.
Die rechte Seite des Popup-Fensters Plan starten zeigt alle Schritte des ausgewählten Plans an, gruppiert nach den Einstellungen in den Feldern Zuweisung für die verschiedenen Planschritte.
Sobald die Felder Plan und Plandatum konfiguriert sind, klicken Sie auf die Schaltfläche Planen, und Odoo plant alles im Plan entsprechend den jeweiligen Fälligkeitsdaten. Alle geplanten Aktivitäten erscheinen im Chatter des Mitarbeiterprofils.
Einen Mitarbeiter archivieren
Wenn ein Mitarbeiter das Unternehmen verlässt, muss er in Odoo archiviert werden. Dieser Schritt sollte nach vollständigem Offboarding erfolgen. Um einen Mitarbeiter zu archivieren, navigieren Sie zunächst zur . Suchen Sie hier den Mitarbeiter, der das Unternehmen verlässt, und klicken Sie auf seine Mitarbeiterkarte.
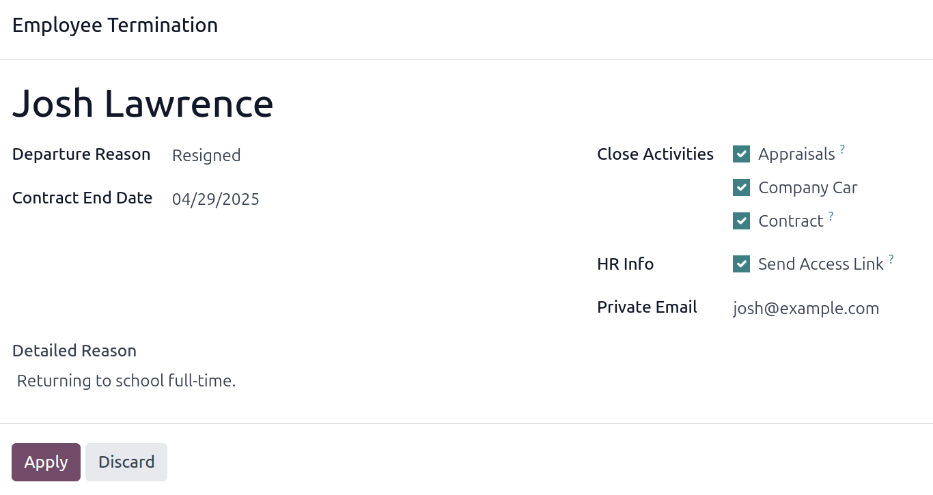
Das Mitarbeiterformular wird geladen und zeigt alle Informationen an. Klicken Sie auf das Symbol (Zahnrad) in der oberen linken Ecke, um ein Drop-down-Menü zu öffnen. Klicken Sie auf Archivieren, um ein Pop-up-Fenster Beendigung des Arbeitsverhältnisses zu öffnen.
Füllen Sie die folgenden Felder des Formulars aus:
Austrittsgrund: Wählen Sie einen Grund aus, wieso der Mitarbeiter das Unternehmen verlässt. Die Standardoptionen sind:
Entlassen: Wählen Sie diese Option, wenn ein Mitarbeiter entlassen wird und das Unternehmen die Kündigung ausgesprochen hat.
Gekündigt: Wählen Sie diese Option, wenn der Mitarbeiter nicht mehr beschäftigt werden möchte und seine Kündigung eingereicht hat.
Ausgeschieden: Im Ruhestand: Wählen Sie diese Option, wenn der Mitarbeiter in den Ruhestand geht.
Selbstständig geworden: Wählen Sie diese Option, wenn der Mitarbeiter nicht mehr für das Unternehmen arbeitet, sondern stattdessen freiberuflich tätig wird.
Einvernehmlich: Wählen Sie diese Option, wenn beide Parteien vereinbart haben, ihr Arbeitsverhältnis zu beenden.
Enddatum des Vertrags: Wählen Sie mithilfe der Kalenderauswahl den letzten Tag aus, an dem der Mitarbeiter für das Unternehmen tätig ist.
Detaillierte Begründung: Geben Sie eine kurze Beschreibung für den Austritt des Mitarbeiters in das Feld ein.
Aktivitäten schließen: Aktivieren Sie das Kontrollkästchen neben jeder Art von Aktivität, um alle damit verbundenen offenen Aktivitäten zu schließen oder zu löschen. Es wird empfohlen, alle zutreffenden Kontrollkästchen zu aktivieren. Folgende Optionen stehen zur Verfügung:
Mitarbeiterbeurteilung: storniert alle nach dem Enddatum des Vertrags geplanten Beurteilungen.
Vertrag: wendet ein Enddatum für den aktuellen Vertrag an.
Firmenwagen: entfernt den Mitarbeiter als Fahrer für den aktuellen Firmenwagen und weist den nächsten Fahrer zu (falls zutreffend).
Ausrüstung: hebt die Zuweisung des Mitarbeiters von jeglicher zugewiesenen Ausrüstung auf.
HR-Info: Kreuzen Sie das Kästchen neben Zugangslink senden an, um einen Download-Link an die persönliche E-Mail-Adresse des Mitarbeiters zu senden, der alle seine persönlichen HR-Dateien enthält.
Private E-Mail: Dieses Feld wird angezeigt, wenn das Kontrollkästchen HR Info aktiviert ist. Wenn im Mitarbeiterprofil eine private E-Mail-Adresse hinterlegt ist, wird dieses Feld automatisch ausgefüllt. Wenn keine private E-Mail-Adresse hinterlegt ist, geben Sie die private E-Mail-Adresse des Mitarbeiters ein.
Wenn das Formular vollständig ausgefüllt ist, klicken Sie auf Anwenden. Der Mitarbeiterdatensatz wird archiviert, eine E-Mail mit einem Download-Link zu den persönlichen Dokumenten des Mitarbeiters wird an die private E-Mail-Adresse des Mitarbeiters gesendet (falls ausgewählt) und in der oberen rechten Ecke des Mitarbeiterformulars erscheint ein rotes Banner mit der Aufschrift Archiviert. In den Chatter-Protokollen werden das Austrittsdatum und der Austrittsgrund sowie die Angabe, ob ein Zugriffslink per E-Mail gesendet wurde, aufgezeichnet.
Bemerkung
Beim Versuch, den Link zum Zugriff auf die Personaldokumente zu senden, kann ein Pop-up-Fenster mit der Meldung Ungültiger Vorgang angezeigt werden, in dem die folgende Fehlermeldung angezeigt wird:
Die private E-Mail-Adresse und der verbundene Benutzer des Mitarbeiters müssen für die Verwendung der Funktion „Zugangslink senden“ eingestellt sein: (Name des Mitarbeiters).
Wenn dieser Fehler angezeigt wird, klicken Sie auf Schließen, um das Pop-up-Fenster zu schließen, und aktivieren Sie dann das Kontrollkästchen Einen Zugangslink senden, um die Auswahl im Pop-up-Fenster Beendigung des Arbeitsverhältnisses aufzuheben.
Klicken Sie auf Anwenden, um den Mitarbeiter zu archivieren und die ausgewählten Aktivitäten im Pop-up-Fenster Beendigung des Arbeitsverhältnisses zu schließen und zum Mitarbeiterformular zurückzukehren.
Stellen Sie sicher, dass die folgenden Felder auf dem Mitarbeiterformular ausgefüllt sind:
Reiter Private Informationen tab: Stellen Sie sicher, dass eine E-Mail-Adresse im Feld E-Mail eingetragen ist.
Reiter HR-Einstellungen: Stellen Sie sicher, dass ein Verknüpfter Benutzer im entsprechenden Feld ausgewählt ist.
Nachdem Sie die erforderlichen Informationen eingegeben haben, senden Sie den Link für den Zugriff auf die Personaldokumente erneut.
Link für den Zugriff auf Personaldokumente versenden
Wenn der Zugriffslink nicht beim ersten Archivieren des Mitarbeiters auf dem Formular Beendigung des Arbeitsverhältnisses gesendet wurde, kann er jederzeit nach dem Archivieren des Mitarbeiters gesendet werden.
Nach der Archivierung eines Mitarbeiters ist dieser nicht mehr im Hauptdashboard der Mitarbeiterapp sichtbar. Um die archivierten Mitarbeiter anzuzeigen, navigieren Sie zum Dashboard und klicken Sie in der Suchleiste auf das Symbol (Pfeil nach unten), um ein Drop-down-Menü anzuzeigen. Wählen Sie Archiviert aus, das sich unten in der Spalte Filter befindet, und klicken Sie dann außerhalb des Drop-down-Fensters, um es zu schließen.
Jetzt werden nur archivierte Mitarbeiter auf dem Dashboard angezeigt. Klicken Sie auf den gewünschten Mitarbeiter, um sein Mitarbeiterformular zu öffnen. Klicken Sie in diesem Formular auf das Symbol (Zahnrad) in der oberen linken Ecke und dann auf Link für Zugriff auf Personaldokumente versenden im daraufhin angezeigten Drop-down-Menü. In den Chatter-Protokollen wird vermerkt, dass der Link gesendet wurde.