Offboarding
Wanneer een werknemer het bedrijf verlaat, is het belangrijk om een offboardingplan te hebben om ervoor te zorgen dat alle noodzakelijke stappen worden gevolgd, zoals het inleveren van apparatuur, het intrekken van toegang tot bedrijfssystemen, het invullen van HR-formulieren, het houden van een exitgesprek en meer. Afhankelijk van het bedrijf kunnen er verschillende offboardingplannen zijn, geconfigureerd voor specifieke afdelingen of divisies, met andere vereisten en stappen dan het algemene offboardingplan.
Naast een offboardingplan moet de werknemersrecord worden bijgewerkt om hun vertrek weer te geven, de reden waarom ze zijn vertrokken worden vastgelegd, eventuele openstaande activiteiten die aan de werknemer zijn gekoppeld worden afgesloten en moet je hen voorzien van eventuele belangrijke documenten.
Offboardingplan bekijken
Voordat offboarding kan beginnen, is het aan te raden om het standaard offboardingplan te controleren dat vooraf is geconfigureerd in de app Werknemers. Ga naar om het huidige standaardplan te bekijken. Klik op Offboarding om het gedetailleerde offboardingplanformulier te bekijken.
Stappen offboardingplan
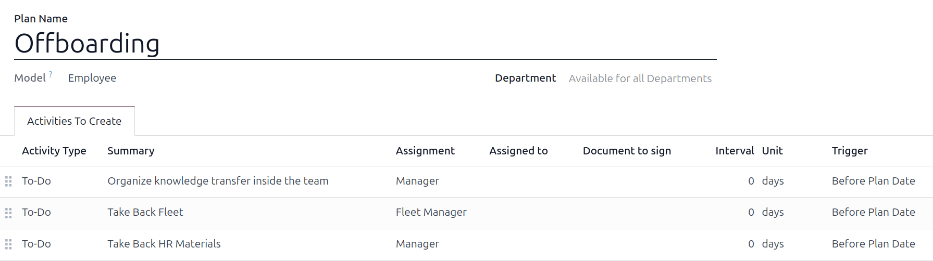
Het standaard Offboarding-plan is minimaal, met twee standaardstappen (drie als de app Wagenpark is geïnstalleerd). Alle stappen zijn To-do-activiteiten en zijn gepland voor de dag waarop het offboardingplan wordt gestart (0 dagen voor plandatum).
Organiseer kennisoverdracht binnen het team: de manager moet ervoor zorgen dat alle kennis die de werknemer heeft met betrekking tot zijn of haar functie, wordt gedocumenteerd of gedeeld met collega’s, zodat er geen kenniskloof ontstaat.
Neem voertuigen uit wagenpark terug: de wagenparkmanager zorgt ervoor dat eventuele voertuigen die aan de werknemer zijn toegewezen, worden ontoegewezen (beschikbaar voor andere werknemers) of dat de volgende bestuurder wordt toegewezen. Deze stap verschijnt alleen als de app Wagenpark is geïnstalleerd.
HR-materialen terughalen: De manager moet alle documenten en materialen verkrijgen die de HR-afdeling nodig heeft. Het wordt aanbevolen om contact op te nemen met de HR-afdeling om er zeker van te zijn dat alles wat voor deze stap vereist is, is voltooid.
Offboardingplan aanpassen
Het standaard offboardingplan is minimaal, zodat aanpassingen kunnen worden gemaakt om aan de offboardingbehoeften van elk bedrijf te voldoen. Elk bedrijf heeft andere vereisten, daarom is het noodzakelijk om de benodigde stappen aan het offboardingplan toe te voegen.
Als het offboardingplan universeel is, voeg dan het standaard offboardingplan toe of wijzig het. Als het offboardingplan alleen voor een specifieke afdeling is bedoeld, moet een nieuw plan worden aangemaakt, specifiek voor die afdeling.
Ga eerst naar om het standaardplan te wijzigen en klik vervolgens op Offboarding.
Klik op de stap om deze te wijzigen. Er verschijnt een pop-upvenster Openen: activiteiten. Breng eventuele gewenste wijzigingen aan in de stap en klik op Opslaan om de wijzigingen te accepteren en het pop-upvenster te sluiten.
Klik op Regel toevoegen onderaan de vermelde activiteiten in het tabblad Aan te maken activiteiten om een nieuwe stap toe te voegen. Er verschijnt een leeg pop-upvenster Activiteiten aanmaken. Voer alle informatie in het pop-upvenster in en klik vervolgens op Opslaan & sluiten als er geen andere stappen meer hoeven te worden toegevoegd, of klik op Opslaan & nieuw als er meer stappen nodig zijn.
Configureer alle gewenste stappen voor het offboardingplan.
Offboardingplan aanmaken
Voor sommige bedrijven kunnen specifieke offboardingplannen noodzakelijk zijn voor bepaalde afdelingen. In deze gevallen kan een nieuw afdelingsspecifiek offboardingplan nodig zijn.
Ga eerst naar om een nieuw offboardingplan aan te maken. Klik op de knop Nieuw in de linkerbovenhoek. Er wordt een leeg planformulier geladen.
Voer de volgende informatie in op het formulier:
Plannaam: de specifieke naam voor het plan.
Model: Dit veld specificeert waar dit plan kan worden gebruikt. In dit geval in de app Werknemers. Dit veld kan niet worden aangepast.
Afdeling: als dit leeg blijft (de standaardinstelling), is het plan beschikbaar voor alle afdelingen. Selecteer een afdeling via het keuzemenu om het plan afdelingsspecifiek te maken.
Voeg vervolgens de verschillende stappen voor het plan toe door op Regel toevoegen onderaan de lijst met activiteiten op het tabblad Aan te maken activiteiten te klikken. Er verschijnt een leeg pop-upvenster Activiteiten aanmaken.
Voer de volgende informatie in het pop-upvenster in:
Activiteitstype: selecteer via het keuzemenu de specifieke activiteit die moet worden gepland. De standaardopties zijn E-mail, Oproep, Afspraak, To-do of Document uploaden. Als de app Ondertekenen is geïnstalleerd, is de optie Handtekening aanvragen beschikbaar.
Samenvatting: Voer een korte beschrijving voor de stap in.
Toewijzing: Selecteer met behulp van het vervolgkeuzemenu de persoon die is toegewezen om de activiteit uit te voeren. De standaardopties zijn: Vragen bij lancering, Standaardgebruiker, Coach, Manager en Werknemer. Als de Wagenpark-app is geïnstalleerd, is een optie Wagenparkbeheerder beschikbaar.
Notitie
De selectie voor de Toewijzing-rol is in relatie tot de werknemer. Als Coach is geselecteerd, wordt de coach van de werknemer toegewezen aan de activiteit.
Als Standaardgebruiker is geselecteerd, verschijnt een veld Toegewezen aan. Selecteer met behulp van het vervolgkeuzemenu de gebruiker die altijd aan deze activiteit wordt toegewezen.
Interval: Configureer de velden op deze regel om de vervaldatum van de activiteit te bepalen. Voer een nummer in het eerste veld in en configureer vervolgens met behulp van de vervolgkeuzemenu’s in de volgende twee velden wanneer de vervaldatum moet worden aangemaakt; (
#) dagen, weken of maanden, Voor plandatum of Na plandatum.
Klik op Opslaan en sluiten als er geen andere stappen hoeven te worden toegevoegd als het invullen van Activiteiten aanmaken is voltooid, of klik op Opslaan en nieuw om indien nodig meer stappen toe te voegen.
Example
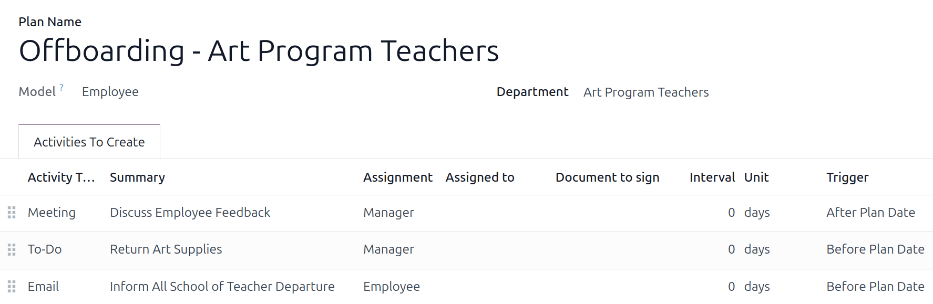
Een bedrijf gespecialiseerd in naschoolse kunstprogramma’s heeft twee afzonderlijke offboardingplannen, een voor de docenten die in het veld werken en een voor kantoormedewerkers.
Het offboardingplan voor de leraren is ingesteld voor de afdeling Art Program Teachers en omvat gespecialiseerde taken die verband houden met deze functies. Deze omvatten het catalogiseren en retourneren van alle kunstbenodigdheden, het inleveren van alle feedbackformulieren van studenten en het retourneren van alle toegangspasjes en sleutels voor de verschillende locaties.
Offboardingplan starten
Nadat een werknemer zijn of haar ontslag heeft ingediend (meestal twee weken) of zodra het bedrijf heeft besloten om de arbeidsrelatie met de werknemer te beëindigen, moet het offboardingplan worden gestart. Ga naar de en klik op het profiel van de vertrekkende werknemer. Klik op de knop Plan starten. Er wordt een leeg pop-upvenster Plan starten geladen.
Selecteer via het keuzemenu het gewenste offboardingplan in het veld Plan. Stel vervolgens met de agendakiezer een datum in het veld Plandatum in. Dit is meestal de dag waarop de werknemer ontslag heeft ingediend, maar elke datum kan worden geselecteerd.
De rechterkant van het pop-upvenster Plan starten toont alle stappen in het geselecteerde plan, gegroepeerd volgens wat is geselecteerd in de velden Toewijzing voor de verschillende planstappen.
Klik op de knop Plannen zodra de velden Plan en Plandatum zijn geconfigureerd. Odoo plant alles in het plan volgens de respectieve vervaldatums. Alle geplande activiteiten verschijnen in de chatter van het werknemersprofiel.
Werknemer archiveren
In Odoo moet een werknemer gearchiveerd worden wanneer hij het bedrijf verlaat. Deze stap moet na de volledige offboarding van de werknemer worden uitgevoerd. Om een werknemer te archiveren, navigeer je eerst naar de . Zoek vervolgens de werknemer die het bedrijf verlaat en klik op zijn werknemerskaart.
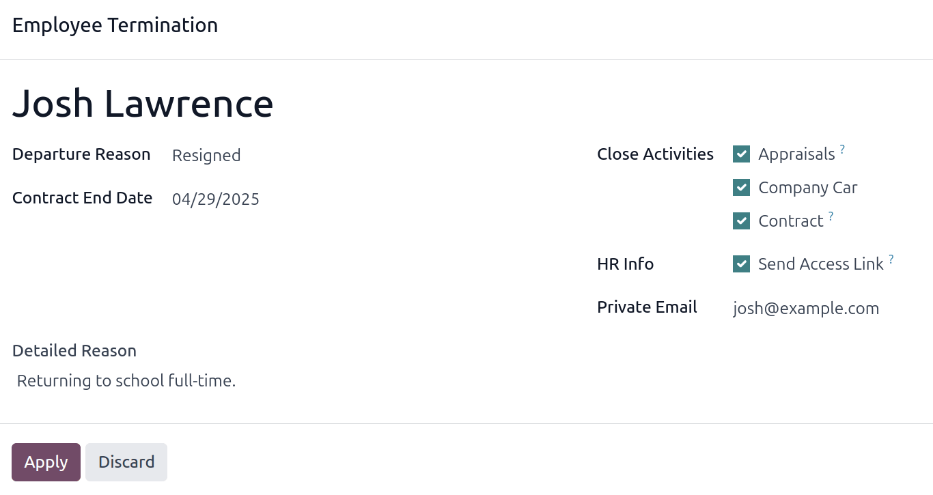
Het werknemersformulier wordt geladen en toont al hun informatie. Klik op het (tandwiel)-icoon in de linkerbovenhoek. Er verschijnt een keuzemenu. Klik op Archiveren. Er verschijnt een pop-upvenster Beëindiging dienstverband.
Vul de volgende velden op het formulier in:
Reden van vertrek: Selecteer een reden waarom de werknemer vertrekt uit het vervolgkeuzemenu. De standaardopties zijn:
Ontslagen: Selecteer deze optie wanneer een werknemer wordt ontslagen en het bedrijf opzegging heeft gegeven.
Ontslag genomen: Selecteer deze optie wanneer de werknemer niet langer in dienst wil zijn en de werknemer opzegging heeft gegeven.
Ontslagen: Met pensioen: Selecteer deze optie wanneer de werknemer met pensioen gaat.
Freelancer geworden: Selecteer deze optie wanneer de werknemer niet langer voor het bedrijf werkt, maar in plaats daarvan freelancer wordt.
Onderling goedvinden: Selecteer deze optie wanneer beide partijen zijn overeengekomen hun arbeidsrelatie te beëindigen.
Einddatum contract: Selecteer met de agendakiezer de laatste dag dat de werknemer voor het bedrijf werkt.
Gedetailleerde reden: Voer in dit veld een korte omschrijving in voor het vertrek van de werknemer.
Activiteiten sluiten: Vink het selectievakje aan naast elk type activiteit om openstaande activiteiten die ermee zijn gekoppeld te sluiten of te verwijderen. Het wordt aanbevolen alle toepasselijke selectievakjes aan te vinken. De beschikbare opties zijn:
Evaluaties: annuleert alle evaluaties die zijn gepland na de einddatum van het contract.
Contract: past een einddatum toe voor het huidige contract.
Bedrijfswagen: verwijdert de werknemer als stuurprogramma voor hun huidige bedrijfswagen en wijst de volgende stuurprogramma toe, indien van toepassing.
Apparatuur: verwijdert de toewijzing van de werknemer van alle toegewezen apparatuur.
HR-info: Vink het selectievakje aan naast Toegangslink verzenden om een downloadlink naar het persoonlijke e-mailadres van de werknemer te verzenden, met al hun persoonlijke HR-bestanden.
Privé-e-mail: Dit veld verschijnt als het selectievakje HR-info is aangevinkt. Als er een privé-e-mailadres op het werknemersprofiel staat, wordt dit veld automatisch ingevuld. Als er geen privé-e-mailadres in hun gegevens staat, voer dan het privé-e-mailadres voor de werknemer in.
Wanneer het formulier compleet is, klik op Toepassen. Het werknemersrecord wordt gearchiveerd, een e-mail met een downloadlink naar hun persoonlijke documenten wordt verzonden naar het privé-e-mailadres van de werknemer (indien geselecteerd) en er verschijnt een rode Gearchiveerd-banner in de rechterbovenhoek van het werknemersformulier. De chatter registreert de Vertrekdatum en Vertreksreden, en of er een toegangslink per e-mail is verzonden.
Notitie
Tijdens het proberen te verzenden van de toegangslink voor HR-documenten kan er een Ongeldige bewerking-pop-upvenster verschijnen met het volgende foutbericht:
Gerelateerde gebruiker en privé-e-mail van werknemer moeten zijn ingesteld om de functie “Toegangslink verzenden” te gebruiken: (Werknemersnaam)
Als deze fout verschijnt, klik op Sluiten om het pop-upvenster te sluiten, en vink vervolgens het selectievakje Toegangslink verzenden uit om de selectie op te heffen in het Werknemersbeëindiging-pop-upvenster.
Klik op Toepassen om de werknemer te archiveren en de geselecteerde activiteiten te sluiten in het Werknemersbeëindiging-pop-upvenster, en keer terug naar het werknemersformulier.
Zorg er op het werknemersformulier voor dat de volgende velden zijn ingevuld:
Tabblad Privégegevens: Zorg ervoor dat een e-mailadres is ingevoerd in het veld E-mail.
Tabblad HR-instellingen: Zorg ervoor dat een Gerelateerde gebruiker is geselecteerd in het corresponderende veld.
Nadat de benodigde informatie is ingevoerd, verzend de toegangslink voor HR-documenten opnieuw
Toegangslink voor HR-documenten verzenden
Verstuur de toegangslink wanneer je de werknemer voor het eerst archiveert op het formulier Beëindiging dienstverband. Als je dat niet hebt gedaan, kun je de link op elk gewenst moment na het archiveren alsnog versturen.
Nadat je een werknemer hebt gearchiveerd, is deze niet meer zichtbaar op het hoofddashboard van de app Werknemers. Navigeer naar het dashboard van de om gearchiveerde werknemers te bekijken, en klik op het (pijltje naar beneden) in de zoekbalk om een vervolgkeuzemenu te openen. Selecteer Gearchiveerd onderaan de kolom Filters, en klik vervolgens buiten het vervolgkeuzevenster om het te sluiten.
Nu verschijnen alleen gearchiveerde werknemers op het dashboard. Klik op de gewenste werknemer om het werknemersformulier te openen. Klik op dit formulier op het (tandwiel)-icoon linksboven, en klik vervolgens op Toegangslink HR-documenten verzenden in het vervolgkeuzemenu dat verschijnt. De chatter registreert dat de link is verzonden.