Automatisierungsregeln
Automatisierungsregeln ermöglichen die Ausführung einer oder mehrerer vordefinierter Aktionen als Reaktion auf einen bestimmten Auslöser, z. B. das Erstellen einer Aktivität, wenn ein Feld auf einen bestimmten Wert gesetzt wird, oder das Archivieren eines Datensatzes 7 Tage nach seiner letzten Aktualisierung.
Beim Erstellen einer Automatisierungsregel erlauben Domänenfilter, Bedingungen hinzuzufügen, die erfüllt sein müssen, damit die Automatisierungsregel ausgeführt wird, z. B. muss die Verkaufschance einem bestimmten Verkäufer zugewiesen sein oder der Status des Datensatzes darf nicht Entwurf sein.
Um eine Automatisierungsregel mit Odoo Studio zu erstellen, gehen Sie wie folgt vor:
Öffnen Sie Studio und klicken Sie auf Automatisierungen, dann Neu.
Geben Sie der Automatisierungsregel einen klaren, aussagekräftigen Namen, der ihren Zweck kennzeichnet.
Wählen Sie den Auslöser und füllen Sie bei Bedarf die Felder aus, die basierend auf dem gewählten Auslöser auf dem Bildschirm erscheinen.
Klicken Sie auf Eine Aktion hinzufügen, wählen Sie dann den Typ von Aktion und füllen Sie die Felder aus, die auf dem Bildschirm auf der Grundlage der von Ihnen gewählten Aktion erscheinen.
Klicken Sie auf Speichern & Schließen oder Speichern & Neu.
Example
Um die Nachverfolgung weniger zufriedener Kunden sicherzustellen, erstellt diese Automatisierungsregel 3 Monate nach der Erstellung eines Verkaufsauftrags eine Aktivität für Kunden mit einem Zufriedenheitsprozentsatz unter 30 %.

Tipp
Verwenden Sie die Registerkarte Notizen, um den Zweck und die Funktionsweise von Automatisierungsregeln zu dokumentieren. Dies erleichtert die Wartung von Regeln und fördert die Zusammenarbeit zwischen Benutzern.
Um das von der Automatisierungsregel angesprochene Modell zu ändern, wechseln Sie das Modell, bevor Sie in Studio auf Automatisierungen klicken, oder aktivieren Sie den Entwicklermodus, erstellen oder bearbeiten Sie eine Automatisierungsregel und wählen Sie das Modell im Formular Automatisierungsregeln.
Automatisierungsregeln können aus jeder Kanban-Stufe erstellt werden, indem Sie auf das -(Einstellungen)-Symbol klicken, das beim Hovern über dem Namen der Kanban-Stufe erscheint, und dann Automatisierungen auswählen. In diesem Fall ist der Auslöser standardmäßig auf Stufe ist gesetzt auf eingestellt, kann aber bei Bedarf geändert werden.

Auslöser
Der Auslöser wird verwendet, um zu definieren, welche Art von Ereignis eintreten muss, damit die Automatisierungsregel ausgeführt wird. Die verfügbaren Auslöser hängen vom Modell ab. Insgesamt sind fünf Auslöserkategorien verfügbar:
Bedingungen hinzufügen
Domänenfilter ermöglichen es, die Datensätze zu bestimmen, auf die eine Automatisierungsregel abzielen oder die sie ausschließen soll. Effiziente Filterung verbessert die Gesamtleistung, da unnötige Verarbeitung von Datensätzen vermieden wird, die von der Regel nicht betroffen sind.
Tipp
Entwicklermodus aktivieren, bevor Sie eine Automatisierungsregel erstellen, um maximale Flexibilität beim Hinzufügen von Domänenfiltern zu haben.
Abhängig vom gewählten Auslöser können eine oder mehrere Bedingungen definiert werden, die ein Datensatz vor und/oder nach dem Auftreten eines Auslösers erfüllen muss.
Die Domäne vor Aktualisierung definiert die Bedingungen, die ein Datensatz erfüllen muss, bevor das Auslöseereignis auftritt, z. B. muss der Datensatz
Typ = KundenrechnungundStatus = Gebuchthaben.Bei aktiviertem Entwicklermodus klicken Sie auf Domäne bearbeiten, falls verfügbar, dann auf Neue Regel.
Zusätzliche Bedingungen oder in einigen Fällen Anwenden auf-Filter definieren die Bedingungen, die ein Datensatz nach dem Auslöseereignis erfüllen muss, z. B. muss die Kundenrechnung
Zahlungsstatus = Teilweise bezahlthaben.Bei Bedarf mit aktiviertem Entwicklermodus klicken Sie auf Bedingungen hinzufügen oder Domäne bearbeiten, je nach Relevanz, dann auf Neue Regel.
Wenn ein Auslöser auftritt, z. B. der Zahlungsstatus einer gebuchten Kundenrechnung aktualisiert wird, prüft die Automatisierungsregel die definierten Bedingungen und führt die Aktion nur aus, wenn der Datensatz diesen Bedingungen entspricht.
Example
Wenn die automatisierte Aktion ausgeführt werden soll, wenn eine E-Mail-Adresse zum ersten Mal gesetzt wird (im Gegensatz zur Änderung einer E-Mail-Adresse) bei einem bestehenden Kontakt, der eine Einzelperson und kein Unternehmen ist, verwenden Sie E-Mail ist nicht gesetzt und Ist ein Unternehmen ist nicht gesetzt als Domäne vor Aktualisierung und E-Mail ist gesetzt als Anwenden auf Domäne.

Bemerkung
Die Domäne vor Aktualisierung wird beim Erstellen eines Datensatzes nicht geprüft.
Werte aktualisiert
Automatisierte Aktionen auslösen, wenn bestimmte Änderungen in der Datenbank auftreten. Die in dieser Kategorie verfügbaren Auslöser hängen vom Modell ab und basieren auf häufigen Änderungen, wie dem Hinzufügen eines bestimmten Tags (z. B. zu einer Aufgabe) oder dem Setzen eines Feldwerts (z. B. Setzen des Benutzer Felds).
Wählen Sie den Auslöser und wählen Sie bei Bedarf einen Wert aus.
Veranstaltungsmails
Lösen Sie automatisierte Aktionen beim Empfang oder Versand von E-Mails aus.
Zeitliche Bedingungen
Automatisierte Aktionen zu einem Zeitpunkt relativ zu einem Datumsfeld oder zur Erstellung oder Aktualisierung eines Datensatzes auslösen. Die folgenden Auslöser sind verfügbar:
Basierend auf Datumsfeld: Die Aktion wird einen festgelegten Zeitraum vor oder nach dem Datum des ausgewählten Datumsfelds ausgelöst.
Nach Erstellung: Die Aktion wird nach einem definierten Zeitraum ausgelöst, nachdem ein Datensatz erstellt und gespeichert wurde.
Nach letzter Aktualisierung: Die Aktion wird nach einem definierten Zeitraum ausgelöst, nachdem ein bestehender Datensatz bearbeitet und gespeichert wurde.
Sie können Folgendes definieren:
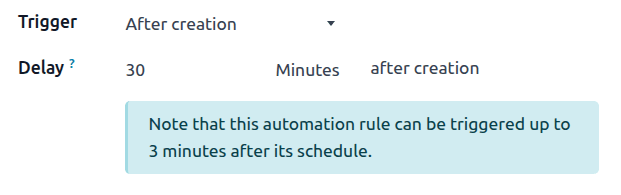
eine Verzögerung: Geben Sie die Anzahl der Minuten, Stunden, Tage oder Monate an. Um eine Aktion vor dem Auslösedatum ausführen zu lassen, geben Sie eine negative Zahl an. Wenn Sie den Auslöser Basierend auf Datumsfeld ausgewählt haben, müssen Sie auch das Datumsfeld auswählen, das zur Bestimmung der Verzögerung verwendet werden soll.
Bemerkung
Standardmäßig prüft der Scheduler alle 240 Minuten oder 4 Stunden auf zeitgesteuerte Automatisierungsregeln. Diese Häufigkeit ist im Allgemeinen ausreichend für Verzögerungen wie 3 Monate nach dem Bestelldatum oder 7 Tage nach der letzten Aktualisierung.
Bei Verzögerungen von weniger als dem Äquivalent von 2400 Minuten oder 40 Stunden berechnet das System die Häufigkeit dieser Prüfung neu, um sicherzustellen, dass feinere Verzögerungen, z. B. 1 Stunde vor dem Ereignisstartdatum und -zeit oder 30 Minuten nach der Erstellung, so genau wie möglich eingehalten werden können.
Eine Bildschirmmeldung weist auf die mögliche Verzögerung nach der geplanten Auslösung der Regel hin.
Um die Häufigkeit des Schedulers anzuzeigen oder manuell zu bearbeiten, gehen Sie bei aktiviertem Entwicklermodus zu , um alle geplanten Aktionen für Ihre Datenbank anzuzeigen.
Geben Sie
Automationin die Suchleiste ein, klicken Sie dann in der Ergebnisliste auf Automatisierungsregeln: prüfen und ausführen. Aktualisieren Sie bei Bedarf den Wert des Feldes Ausführen alle. Klicken Sie jederzeit auf Manuell ausführen, um diese geplante Aktion manuell auszulösen.Zusätzliche Bedingungen: Klicken Sie auf Bedingung hinzufügen, geben Sie dann die Bedingungen an, die erfüllt sein müssen, damit die Automatisierungsregel ausgeführt wird. Klicken Sie auf Neue Regel, um eine weitere Bedingung hinzuzufügen.
Die Aktion wird ausgeführt, wenn die Verzögerung erreicht ist und die Bedingungen erfüllt sind.
Example
Um eine Erinnerungs-E-Mail 30 Minuten vor Beginn eines Kalender-Ereignisses zu senden, wählen Sie Start (Kalender-Ereignis) als Datumsfeld für den Auslöser und setzen Sie die Verzögerung auf -30 Minuten.

Benutzerdefiniert
Automatisierte Aktionen auslösen:
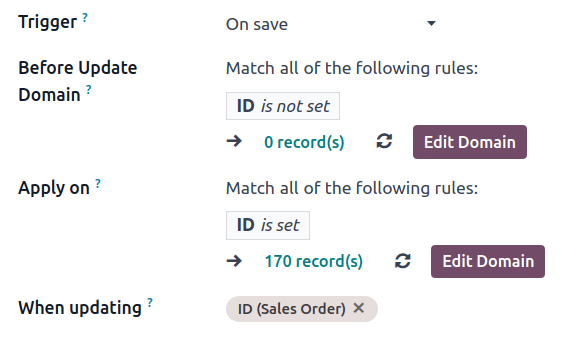
Beim Speichern: wenn ein Datensatz gespeichert wird.
Bei Löschung: wenn ein Datensatz gelöscht wird.
Bei UI-Änderung: wenn der Wert eines Feldes in der Formularansicht geändert wird, noch bevor der Datensatz gespeichert wird.
Für die Auslöser Bei Speicherung und Bei Änderung der Benutzeroberfläche müssen Sie dann im Feld Bei Aktualisierung das/die Feld(er) auswählen, die zum Auslösen der Automatisierungsregel verwendet werden sollen.
Warnung
Wenn im Feld Bei Aktualisierung kein Feld ausgewählt ist, kann die automatische Aktion mehrmals pro Datensatz ausgeführt werden.
Optional können Sie im Feld Anwenden auf auch zusätzliche Bedingungen definieren, die erfüllt sein müssen, um die Automatisierungsregel auszulösen.
Example
Um eine automatisierte Aktion bei der Erstellung eines Datensatzes auszulösen, z. B. wenn ein neuer Kontakt erstellt wird, wählen Sie den Beim Speichern-Auslöser und verwenden Sie ID ist nicht gesetzt als Domäne vor Aktualisierung und ID ist gesetzt als Anwenden auf-Domäne. Stellen Sie sicher, dass das richtige Feld im Feld Beim Aktualisieren ausgewählt ist.
Wenn ein neuer Kontakt gespeichert wird, wird ihm automatisch eine Datenbank-ID zugewiesen, wodurch die Automatisierungsregel ausgelöst wird.
Bemerkung
Der Auslöser Bei UI-Änderung kann nur mit der Aktion Code ausführen verwendet werden und funktioniert nur, wenn eine Änderung manuell vorgenommen wird. Die Aktion wird nicht ausgeführt, wenn das Feld durch eine andere Automatisierungsregel geändert wird.
Extern
Automatisierte Aktionen basierend auf einem bestimmten Ereignis in einem externen System oder einer externen Anwendung mithilfe eines Webhooks auslösen.
Nachdem der Webhook in Odoo konfiguriert wurde, wobei die URL des Webhooks generiert und der Zieldatensatz definiert wird, muss er im externen System implementiert werden.
Warnung
Es wird dringend empfohlen, sich bei der Entscheidung für die Verwendung von Webhooks und während des gesamten Implementierungsprozesses mit einem Entwickler, Lösungsarchitekten oder einem anderen technischen Experten zu beraten. Wenn Webhooks nicht richtig konfiguriert sind, können sie die Odoo-Datenbank negativ beeinträchtigen und es kann einige Zeit dauern, bis sie wiederhergestellt ist.

Bemerkung
Es ist auch möglich, eine automatisierte Aktion einzurichten, die Daten an den Webhook eines externen Systems sendet, wenn ein Ereignis in Ihrer Odoo-Datenbank auftritt.
Siehe auch
Aktionen
Sobald Sie den Auslöser der Automatisierungsregel definiert haben, klicken Sie auf Aktion hinzufügen im Tab Auszuführende Aktionen, um die auszuführende Aktion zu definieren.
Tipp
Sie können mehrere Aktionen für dieselbe Automatisierungsregel definieren. Standardmäßig werden Aktionen in der Reihenfolge ausgeführt, in der sie definiert wurden.
Das bedeutet zum Beispiel, dass, wenn Sie eine Aktion Datensatz aktualisieren und dann eine Aktion E-Mail senden definieren, bei der die E-Mail auf das aktualisierte Feld verweist, die E-Mail die aktualisierten Werte verwendet. Wenn jedoch die Aktion E-Mail senden vor der Aktion Datensatz aktualisieren definiert wird, verwendet die E-Mail die Werte, die vor der Aktualisierung des Datensatzes gesetzt wurden.
Um die Reihenfolge der definierten Aktionen zu ändern, klicken Sie auf das Symbol (Ziehgriff) neben einer Aktion und ziehen Sie sie an die gewünschte Position.
Datensatz aktualisieren
Diese Aktion aktualisiert eines der Felder des Datensatzes (oder verknüpfter Datensätze). Klicken Sie auf das Feld Aktualisieren und wählen Sie in der sich öffnenden Liste das zu aktualisierende Feld aus oder suchen Sie danach. Falls erforderlich, klicken Sie auf (Pfeil nach rechts) neben dem Feldnamen, um auf die Liste der verknüpften Felder zuzugreifen.
Wenn Sie ein many2many-Feld ausgewählt haben, wählen Sie, ob das Feld durch Hinzufügen, Entfernen oder Durch Einstellung auf den ausgewählten Wert oder durch Löschen aktualisiert werden muss.
Example
Wenn Sie möchten, dass die automatisierte Aktion ein Schlagwort vom Kundendatensatz entfernt, setzen Sie das Feld Aktualisieren auf Kunde > Schlagwörter, wählen Sie durch Entfernen und wählen Sie dann das Schlagwort aus.

Tipp
Alternativ dazu können Sie das Feld eines Datensatzes auch dynamisch mit Python-Code setzen. Wählen Sie dazu Berechnen anstelle von Aktualisieren und geben Sie dann den Code ein, der für die Berechnung des Feldwerts verwendet werden soll. Wenn Sie zum Beispiel möchten, dass die Automatisierungsregel ein benutzerdefiniertes Datetime-Feld berechnet, wenn die Priorität einer Aufgabe auf Hoch gesetzt wird (indem die Aufgabe mit einem Sternchen versehen wird), können Sie den Auslöser Priorität ist gesetzt auf auf Hoch definieren und die Aktion Datensatz aktualisieren wie folgt definieren:

Aktivität erstellen
Diese Aktion wird verwendet, um eine neue Aktivität zu planen, die mit dem Datensatz verknüpft ist. Wählen Sie einen Aktivitätstyp, geben Sie einen Titel und eine Beschreibung ein, geben Sie dann im Feld Fälligkeitsdatum in an, wann die Aktivität geplant werden soll und wählen Sie einen Benutzertyp:
Um die Aktivität immer demselben Benutzer zuzuweisen, wählen Sie Bestimmter Benutzer und fügen Sie dann den Benutzer im Feld Verantwortlich hinzu;
Um einen mit dem Datensatz dynamisch verknüpften Benutzer anzuvisieren, wählen Sie Dynamischer Benutzer (basierend auf Datensatz) und ändern Sie gegebenenfalls das Benutzerfeld.
Example
Nachdem ein Lead in eine Verkaufschance umgewandelt wurde, möchten Sie, dass die automatisierte Aktion einen Anruf für den Benutzer einrichtet, der für den Lead verantwortlich ist. Dazu setzen Sie Aktivitätstyp auf Anruf und setzen das Benutzertyp auf Dynamischer Benutzer (basierend auf Datensatz).

E-Mail versenden und SMS versenden
Diese Aktionen werden verwendet, um eine E-Mail oder eine Textnachricht an einen Kontakt zu senden, der mit einem bestimmten Datensatz verknüpft ist. Wählen oder erstellen Sie dazu eine E-Mail-Vorlage oder eine SMS-Vorlage und wählen Sie dann im Feld E-Mail senden als oder SMS senden als aus, wie Sie die E-Mail oder Textnachricht senden möchten:
E-Mail: um die Nachricht als E-Mail an die Empfänger der E-Mail-Vorlage zu senden.
Nachricht: um die Nachricht im Datensatz zu veröffentlichen und die Follower des Datensatzes zu benachrichtigen.
Notiz: um die Nachricht als interne Notiz zu versenden, die für interne Benutzer im Chatter sichtbar ist.
SMS (ohne Notiz): um die Nachricht als Textnachricht an die Empfänger der SMS-Vorlage zu senden.
SMS (mit Notiz): um die Nachricht als Textnachricht an die Empfänger der SMS-Vorlage zu senden und sie als interne Notiz im Chatter zu hinterlegen.
Nur Notiz: um die Nachricht nur als interne Notiz im Chatter zu veröffentlichen.
WhatsApp senden
Wichtig
Um das Senden von WhatsApp-Nachrichten zu automatisieren, müssen eine oder mehrere WhatsApp-Vorlagen erstellt werden.
Diese Aktion wird verwendet, um eine WhatsApp-Nachricht an einen Kontakt zu senden, der mit einem bestimmten Datensatz verknüpft ist. Wählen Sie dazu die entsprechende WhatsApp-Vorlage aus dem Dropdown-Menü aus.
Followers hinzufügen und entfernen
Diese Aktion wird verwendet, um bestehende Kontakte für den Datensatz zu abonnieren/abzubestellen.
Datensatz erstellen
Diese Aktion wird verwendet, um einen neuen Datensatz für ein beliebiges Modell zu erstellen.
Wählen Sie das gewünschte Modell im Feld Zu erstellender Datensatz; es enthält standardmäßig das aktuelle Modell. Geben Sie einen Name für den Datensatz an und wählen Sie dann, wenn Sie den Datensatz in einem anderen Modell erstellen möchten, ein Feld im Feld Feld verknüpfen aus, um den Datensatz zu verknüpfen, der die Erstellung des neuen Datensatzes ausgelöst hat.
Bemerkung
Die Dropdown-Liste für das Feld Field verknüpfen enthält nur one2many-Felder, die im aktuellen Modell vorhanden sind und mit einem many2one-Feld im Zielmodell verknüpft sind.
Tipp
Sie können eine weitere Automatisierungsregel mit Datensatz aktualisieren-Aktionen erstellen, um bei Bedarf die Felder des neuen Datensatzes zu aktualisieren. Sie können beispielsweise eine Datensatz erstellen-Aktion verwenden, um eine neue Projektaufgabe zu erstellen, und diese dann mithilfe einer Datensatz aktualisieren-Aktion einem bestimmten Benutzer zuweisen.
Code ausführen
Wichtig
Für Automatisierungsregeln, die die Ausführung von benutzerdefiniertem Code erfordern, beachten Sie, dass die Wartung von benutzerdefiniertem Code nicht in den Preisplänen Standard oder Custom enthalten ist und zusätzliche Gebühren anfallen.
Diese Aktion wird verwendet, um Python-Code auszuführen. Sie können Ihren Code im Reiter Code mithilfe der folgenden Variablen eingeben:
env: Umgebung, in der die Aktion ausgelöst wirdmodel: Modell des Datensatzes, für den die Aktion ausgelöst wird; ist ein leerer Datensatzrecord: Datensatz, für den die Aktion ausgelöst wird; möglicherweise ist er leerrecords: Datensatz aus allen Daten, für die die Aktion im Multi-Modus ausgelöst wird; möglicherweise ist er leertime,datetime,dateutil,timezone: nützliche Python-Bibliothekenfloat_compare: Utility-Funktion zum Vergleich von Zahlenkonstanten auf der Grundlage einer bestimmten Genauigkeitlog(message, level='info'): Protokollierfunktion zur Aufzeichnung von Fehlerbeseitigungsinformationen in ir.logging-Tabelle_logger.info(message): Datenspeicher zur Ausgabe von Meldungen in ServerprotokollenUserError: Ausnahmeklasse zum Auslösen von benutzerseitigen WarnmeldungenCommand: x2many-Befehlsnamensfeldaction = {...}: um eine Aktion zurückzugeben
Tipp
Die verfügbaren Variablen werden in den Reitern Code und Hilfe beschrieben.
Siehe auch
Webhook-Benachrichtigung versenden
Diese Aktion wird verwendet, um eine POST-API-Anfrage mit den Werten der ausgewählten Felder an die im Feld URL angegebene Webhook-URL zu senden.
Das Beispielnutzdaten bietet eine Vorschau auf die in der Anfrage enthaltenen Daten unter Verwendung der Daten eines zufälligen Datensatzes oder von Dummy-Daten, wenn kein Datensatz verfügbar ist.
Bemerkung
Es ist auch möglich, eine automatisierte Aktion einzurichten, die einen Webhook verwendet, um Daten von einem externen System zu empfangen, wenn ein vordefiniertes Ereignis in diesem System auftritt.
Vorhandene Aktionen ausführen
Die Aktion dient dazu, mehrere Aktionen (die mit dem aktuellen Modell verknüpft sind) gleichzeitig auszulösen. Klicken Sie dazu auf Zeile hinzufügen und dann im Pop-up-Fenster Hinzufügen: Untergeordnete Aktionen eine bestehende Aktion aus oder klicken Sie auf Neu, um eine neue Aktion zu erstellen.