Offboarding
Ketika seorang karyawan meninggalkan perusahaan, penting untuk memiliki rencana offboarding untuk memastikan semua langkah yang diperlukan diikuti, seperti mengembalikan peralatan, mencabut akses ke sistem bisnis, mengisi formulir HR, melakukan wawancara keluar, dan lainnya. Tergantung pada perusahaan, bisa ada beberapa rencana offboarding yang berbeda, dikonfigurasi untuk departemen atau divisi tertentu, yang memiliki persyaratan dan langkah berbeda dari rencana offboarding utama.
Selain rencana offboarding, catatan karyawan harus diperbarui untuk mencerminkan kepergian mereka, mencatat alasan mereka pergi, menutup aktivitas terbuka yang terkait dengan karyawan, dan menyediakan dokumen penting bagi mereka.
Lihat rencana offboarding
Sebelum offboarding dapat dimulai, disarankan untuk memeriksa rencana offboarding default yang telah dikonfigurasi sebelumnya dengan aplikasi Karyawan. Untuk melihat rencana default saat ini, navigasikan ke . Klik Offboarding untuk melihat formulir rencana offboarding terperinci.
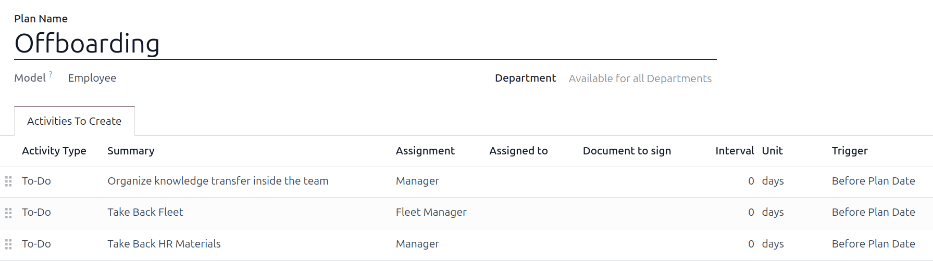
Langkah-langkah rencana offboarding
Rencana Offboarding default adalah minimal, dengan dua langkah default (tiga jika aplikasi Armada terpasang). Semua langkah adalah aktivitas To-Do, dan dijadwalkan untuk hari rencana offboarding diluncurkan (0 hari Sebelum Tanggal Rencana).
Organisir transfer pengetahuan dalam tim: Manajer harus memastikan semua pengetahuan yang dimiliki karyawan terkait posisi pekerjaan mereka, didokumentasikan atau dibagikan dengan rekan kerja sehingga tidak ada kesenjangan pengetahuan.
Ambil Kembali Armada: Manajer armada memastikan kendaraan yang ditugaskan kepada karyawan tidak ditugaskan lagi (tersedia untuk karyawan lain) atau pengemudi berikutnya ditugaskan. Langkah ini hanya muncul jika aplikasi Armada terpasang.
Ambil Kembali Materi HR: Manajer harus mendapatkan dokumen dan materi apa pun yang diperlukan departemen HR. Disarankan untuk memeriksa dengan departemen HR untuk memastikan semua yang diperlukan untuk langkah ini telah selesai.
Modifikasi rencana offboarding
Rencana offboarding default bersifat minimal, sehingga modifikasi dapat dilakukan untuk mengakomodasi kebutuhan offboarding perusahaan mana pun. Setiap perusahaan memiliki persyaratan yang berbeda, oleh karena itu perlu menambahkan langkah-langkah yang diperlukan ke rencana offboarding.
Jika rencana offboarding bersifat universal, tambahkan atau modifikasi rencana offboarding default. Jika rencana offboarding yang dibutuhkan hanya untuk departemen tertentu, maka rencana baru harus dibuat, khusus untuk departemen tersebut.
Untuk memodifikasi rencana default, pertama navigasikan ke , lalu klik Offboarding.
Untuk memodifikasi langkah, klik langkah tersebut dan jendela pop-up Buka: Aktivitas muncul. Lakukan modifikasi yang diinginkan pada langkah tersebut, lalu klik Simpan untuk menerima perubahan dan menutup jendela pop-up.
Untuk menambahkan langkah baru, klik Tambahkan baris di bagian bawah aktivitas yang terdaftar di tab Aktivitas yang Akan Dibuat, dan jendela pop-up Buat Aktivitas kosong akan muncul. Masukkan semua informasi di jendela pop-up, lalu klik Simpan & Tutup jika tidak ada langkah lain yang akan ditambahkan, atau klik Simpan & Baru jika lebih banyak langkah diperlukan.
Konfigurasikan semua langkah yang diinginkan untuk rencana offboarding.
Buat rencana offboarding
Untuk beberapa perusahaan, rencana offboarding khusus mungkin diperlukan untuk beberapa departemen. Untuk kasus ini, rencana offboarding khusus departemen yang baru mungkin diperlukan.
Untuk membuat rencana offboarding baru, pertama navigasikan ke . Klik tombol Baru di pojok kiri atas, dan formulir rencana kosong akan dimuat.
Masukkan informasi berikut pada formulir:
Nama Rencana: nama spesifik untuk rencana tersebut.
Model: Bidang ini menentukan di mana rencana ini dapat digunakan. Dalam hal ini, di aplikasi Karyawan. Bidang ini tidak dapat dimodifikasi.
Departemen: jika dibiarkan kosong (pengaturan default) rencana tersedia untuk semua departemen. Untuk membuat rencana khusus departemen, pilih departemen menggunakan menu drop-down.
Selanjutnya, tambahkan berbagai langkah untuk rencana dengan mengklik Tambahkan baris di bagian bawah aktivitas yang tercantum di tab Aktivitas untuk Dibuat, dan jendela pop-up Buat Aktivitas kosong muncul.
Masukkan informasi berikut di jendela pop-up:
Jenis Aktivitas: Menggunakan menu drop-down, pilih aktivitas spesifik yang akan dijadwalkan. Opsi default adalah Email, Panggilan, Rapat, To-Do, atau Unggah Dokumen. Jika aplikasi Sign terpasang, opsi Minta Tanda Tangan tersedia.
Ringkasan: Masukkan deskripsi singkat untuk langkah tersebut.
Penugasan: Menggunakan menu drop-down, pilih orang yang ditugaskan untuk melakukan aktivitas. Opsi default adalah: Tanyakan saat peluncuran, User default, Pelatih, Manajer, dan Karyawan. Jika aplikasi Armada diinstal, opsi Manajer Armada tersedia.
Catatan
Pemilihan untuk peran Penugasan berhubungan dengan karyawan. Jika Pelatih dipilih, pelatih karyawan ditugaskan untuk aktivitas tersebut.
Jika User default dipilih, bidang Ditugaskan ke akan muncul. Menggunakan menu drop-down, pilih user yang akan selalu ditugaskan aktivitas ini.
Interval: Konfigurasikan bidang pada baris ini untuk menentukan tanggal jatuh tempo aktivitas. Masukkan angka pada bidang pertama, lalu gunakan menu drop-down pada dua bidang berikutnya untuk mengonfigurasi kapan tanggal jatuh tempo harus dibuat; (#) hari, minggu, atau bulan, baik Sebelum Tanggal Rencana atau Setelah Tanggal Rencana.
Ketika Buat Aktivitas selesai, klik Simpan & Tutup jika tidak ada langkah lain yang perlu ditambahkan, atau klik Simpan & Baru untuk menambahkan lebih banyak langkah sesuai kebutuhan.
Example
Sebuah perusahaan yang mengkhususkan diri dalam program seni setelah sekolah memiliki dua rencana offboarding terpisah, satu untuk guru yang bekerja di lapangan, dan satu untuk pekerja kantor.
Rencana offboarding untuk guru ditetapkan untuk departemen Guru Program Seni, dan mencakup tugas-tugas khusus yang berkaitan dengan pekerjaan tersebut. Ini termasuk memastikan semua perlengkapan seni dikatalogkan dan dikembalikan, semua formulir umpan balik siswa diserahkan, dan semua lencana akses dan kunci untuk berbagai lokasi dikembalikan.

Luncurkan rencana offboarding
Setelah karyawan memberikan pemberitahuan (biasanya dua minggu) atau setelah perusahaan memutuskan untuk mengakhiri hubungan kerja dengan karyawan, rencana offboarding harus diluncurkan. Navigasikan ke dan klik profil karyawan yang akan pergi. Klik tombol Luncurkan Rencana, dan jendela pop-up Luncurkan Rencana kosong dimuat.

Menggunakan menu drop-down, pilih rencana offboarding yang diinginkan di kolom Rencana. Kemudian, menggunakan pemilih kalender, tetapkan tanggal di kolom Tanggal Rencana. Ini biasanya hari karyawan memberikan pemberitahuan, tetapi tanggal apa pun dapat dipilih.
Sisi kanan jendela pop-up Luncurkan Rencana menampilkan semua langkah dalam rencana yang dipilih, dikelompokkan berdasarkan apa yang dipilih di kolom Penugasan untuk berbagai langkah rencana.
Setelah kolom Plan dan Plan Date dikonfigurasi, klik tombol Schedule, dan Odoo akan menjadwalkan semua yang ada dalam rencana sesuai dengan tanggal jatuh tempo masing-masing. Semua aktivitas yang dijadwalkan muncul di chatter profil karyawan.
Arsipkan karyawan
Di Odoo, ketika seorang karyawan meninggalkan perusahaan, mereka harus diarsipkan. Langkah ini harus dilakukan setelah karyawan sepenuhnya di-offboard. Untuk mengarsipkan karyawan, pertama navigasikan ke . Dari sini, temukan karyawan yang meninggalkan perusahaan, dan klik kartu karyawan mereka.
Formulir karyawan dimuat, menampilkan semua informasi mereka. Klik ikon (gear) di pojok kiri atas, dan menu drop-down akan muncul. Klik Archive, dan jendela pop-up Employee Termination akan muncul.
Isi bidang berikut pada formulir:
Alasan Keberangkatan: Pilih alasan karyawan pergi dari menu drop-down. Opsi default adalah:
Dipecat: Pilih opsi ini ketika seorang karyawan diberhentikan, dan perusahaan telah memberikan pemberitahuan.
Mengundurkan Diri: Pilih opsi ini ketika karyawan tidak lagi ingin dipekerjakan, dan karyawan telah memberikan pemberitahuan.
Resigned: Retired: Pilih opsi ini ketika karyawan akan pensiun.
Became Freelance: Pilih opsi ini ketika karyawan tidak lagi bekerja untuk perusahaan, tetapi menjadi pekerja lepas.
Mutual Agreement: Pilih opsi ini ketika kedua belah pihak telah menyetujui untuk mengakhiri hubungan kerja mereka.
Tanggal Akhir Kontrak: Menggunakan pemilih kalender, pilih hari terakhir karyawan bekerja untuk perusahaan.
Alasan Rinci: Masukkan deskripsi singkat untuk keberangkatan karyawan di bidang ini.
Close Activities: Centang kotak di sebelah setiap jenis aktivitas untuk menutup atau menghapus aktivitas terbuka yang terkait dengannya. Disarankan untuk mencentang semua kotak yang berlaku. Opsi yang tersedia adalah:
Appraisals: membatalkan semua penilaian yang dijadwalkan setelah tanggal berakhirnya kontrak.
Contract: menerapkan tanggal berakhir untuk kontrak saat ini.
Company Car: menghapus karyawan sebagai pengemudi untuk mobil perusahaan mereka saat ini, dan menetapkan pengemudi berikutnya, jika berlaku.
Equipment: membatalkan penugasan karyawan dari peralatan yang ditugaskan.
HR Info: Centang kotak di sebelah Send Access Link untuk mengirim tautan unduh ke alamat email pribadi karyawan, yang berisi semua file HR pribadi mereka.
Private Email: Kolom ini muncul jika kotak centang HR Info dicentang. Jika ada email pribadi yang tercantum di profil karyawan, kolom ini akan terisi secara otomatis. Jika tidak ada alamat email pribadi dalam catatan mereka, masukkan alamat email pribadi untuk karyawan tersebut.
Ketika formulir sudah lengkap, klik Apply. Catatan karyawan akan diarsipkan, email dengan tautan unduh ke dokumen pribadi mereka dikirim ke alamat email pribadi karyawan (jika dipilih), dan spanduk merah Archived muncul di pojok kanan atas formulir karyawan. Chatter mencatat Departure Date dan Departure Reason, dan apakah tautan akses telah dikirim melalui email.

Catatan
Saat mencoba mengirim tautan akses dokumen HR, jendela pop-up Invalid Operation mungkin muncul, menampilkan pesan kesalahan berikut:
Employee's related user and private email must be set to use "Send Access Link" function: (Employee Name)
Jika kesalahan ini muncul, klik Close untuk menutup jendela pop-up, kemudian centang kotak Send Access Link untuk membatalkan pilihannya di jendela pop-up Employee Termination.
Klik Apply untuk mengarsipkan karyawan dan menutup aktivitas yang dipilih di jendela pop-up Employee Termination, kembali ke formulir karyawan.
Setelah formulir karyawan, pastikan kolom berikut telah terisi:
Tab Private Information: Pastikan alamat email dimasukkan di kolom Email.
Tab HR Settings: Pastikan Related User dipilih di kolom yang sesuai.
Setelah informasi yang diperlukan diisi, kirim ulang tautan akses dokumen HR
Kirim tautan akses dokumen HR
Jika tautan akses tidak dikirim saat pertama kali mengarsipkan karyawan pada formulir Employee Termination, tautan dapat dikirim setelah karyawan diarsipkan kapan saja.
Setelah karyawan diarsipkan, mereka tidak lagi terlihat pada dashboard utama aplikasi Karyawan. Untuk melihat karyawan yang diarsipkan, navigasikan ke dashboard aplikasi , dan klik (panah bawah) di bilah pencarian untuk menampilkan menu drop-down. Pilih Archived, di bagian bawah kolom Filters, lalu klik di luar jendela drop-down untuk menutupnya.
Sekarang, hanya karyawan yang diarsipkan yang muncul pada dashboard. Klik karyawan yang diinginkan untuk membuka formulir karyawan mereka. Pada formulir ini, klik ikon (gear) di sudut kiri atas, lalu klik Send HR Documents Access Link dari menu drop-down yang muncul. Chatter mencatat bahwa tautan telah dikirim.