
Offboarding
Khi nhân viên rời công ty, điều quan trọng là phải có kế hoạch offboarding để đảm bảo tất cả các bước cần thiết được thực hiện, chẳng hạn như trả lại thiết bị, thu hồi quyền truy cập vào hệ thống kinh doanh, điền biểu mẫu HR, phỏng vấn nghỉ việc, v.v. Tùy thuộc vào công ty, có thể có nhiều kế hoạch offboarding khác nhau, được cấu hình cho các phòng ban hoặc bộ phận cụ thể, có các yêu cầu và bước khác với kế hoạch offboarding chính.
Ngoài kế hoạch offboarding, hồ sơ nhân viên phải được cập nhật để phản ánh sự rời đi của họ, ghi lại lý do tại sao họ rời đi, đóng mọi hoạt động đang mở liên quan đến nhân viên và cung cấp cho họ bất kỳ tài liệu quan trọng nào.
Xem kế hoạch offboarding
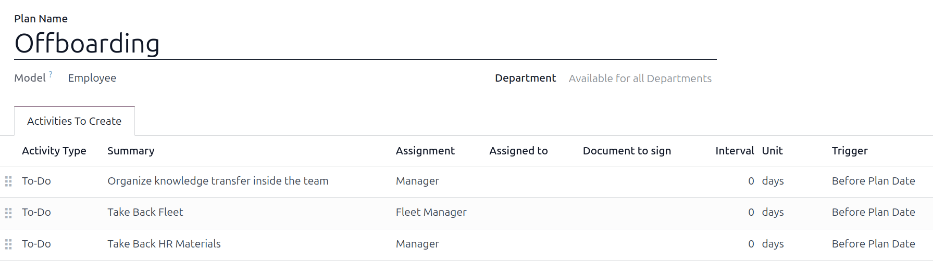
Trước khi offboarding có thể bắt đầu, nên kiểm tra kế hoạch offboarding mặc định được cấu hình sẵn với ứng dụng Nhân viên. Để xem kế hoạch mặc định hiện tại, điều hướng đến . Nhấp Offboarding để xem biểu mẫu kế hoạch offboarding chi tiết.
Các bước của kế hoạch offboarding
Kế hoạch Offboarding mặc định rất tối giản, với hai bước mặc định (ba bước nếu ứng dụng Đội xe được cài đặt). Tất cả các bước đều là hoạt động Việc cần làm, và được lên lịch cho ngày kế hoạch offboarding được khởi chạy (0 ngày Trước Ngày Kế hoạch).
Tổ chức chuyển giao kiến thức trong nhóm: Người quản lý phải đảm bảo tất cả kiến thức mà nhân viên có liên quan đến vị trí công việc của họ được ghi chép lại hoặc chia sẻ với đồng nghiệp để không có khoảng trống kiến thức.
Thu hồi Đội xe: Người quản lý đội xe đảm bảo mọi phương tiện được giao cho nhân viên đều được hủy gán (sẵn sàng cho nhân viên khác) hoặc người lái tiếp theo được chỉ định. Bước này chỉ xuất hiện nếu ứng dụng Đội xe được cài đặt.
Thu hồi tài liệu HR: Quản lý phải thu thập mọi tài liệu và vật liệu mà phòng Nhân sự yêu cầu. Bạn nên kiểm tra với phòng Nhân sự để đảm bảo mọi thứ cần thiết cho bước này đã hoàn tất.
Sửa đổi kế hoạch offboarding
Kế hoạch offboarding mặc định là tối thiểu, để có thể thực hiện các sửa đổi nhằm đáp ứng nhu cầu offboarding của bất kỳ công ty nào. Mỗi công ty có các yêu cầu khác nhau, do đó cần phải thêm các bước cần thiết vào kế hoạch offboarding.
Nếu kế hoạch offboarding là phổ quát, hãy thêm hoặc sửa đổi kế hoạch offboarding mặc định. Nếu kế hoạch offboarding cần thiết chỉ dành cho một phòng ban cụ thể, thì nên tạo một kế hoạch mới, dành riêng cho phòng ban đó.
Để sửa đổi kế hoạch mặc định, trước tiên hãy điều hướng đến , sau đó nhấp vào Offboarding.
Để sửa đổi một bước, hãy nhấp vào bước đó và cửa sổ bật lên Mở: Hoạt động xuất hiện. Thực hiện mọi sửa đổi mong muốn cho bước đó, sau đó nhấp vào Lưu để chấp nhận các thay đổi và đóng cửa sổ bật lên.
Để thêm bước mới, nhấp Thêm dòng ở cuối danh sách hoạt động trong thẻ Hoạt động cần tạo, cửa sổ bật lên Tạo hoạt động trống sẽ xuất hiện. Nhập tất cả thông tin vào cửa sổ bật lên, sau đó nhấp Lưu & Đóng nếu không có bước nào khác cần thêm, hoặc nhấp Lưu & Tạo mới nếu cần thêm bước.
Cấu hình tất cả các bước mong muốn cho kế hoạch offboarding.
Tạo kế hoạch offboarding
Đối với một số công ty, các kế hoạch offboarding cụ thể có thể cần thiết cho một số phòng ban. Trong những trường hợp này, một kế hoạch offboarding riêng cho phòng ban có thể cần được tạo.
Để tạo kế hoạch offboarding mới, trước tiên hãy điều hướng đến . Nhấp vào nút Mới ở góc trên bên trái và một biểu mẫu kế hoạch trống sẽ tải.
Nhập thông tin sau đây trên biểu mẫu:
Tên Kế hoạch: tên cụ thể cho kế hoạch.
Mô hình: Trường này xác định nơi kế hoạch này có thể được sử dụng. Trong trường hợp này, trong ứng dụng Nhân viên. Trường này không thể được sửa đổi.
Phòng ban: nếu để trống (cài đặt mặc định), kế hoạch sẽ khả dụng cho tất cả các phòng ban. Để làm cho kế hoạch dành riêng cho phòng ban, hãy chọn một phòng ban bằng menu thả xuống.
Tiếp theo, thêm các bước khác nhau cho kế hoạch bằng cách nhấp vào Thêm dòng ở cuối danh sách các hoạt động trong tab Hoạt động Cần Tạo, và cửa sổ bật lên Tạo Hoạt động trống xuất hiện.
Nhập thông tin sau vào cửa sổ bật lên:
Loại Hoạt động: Sử dụng menu thả xuống, chọn hoạt động cụ thể cần được lên lịch. Các tùy chọn mặc định là Email, Gọi, Cuộc họp, Việc cần làm, hoặc Tải lên Tài liệu. Nếu ứng dụng Sign được cài đặt, tùy chọn Yêu cầu Chữ ký sẽ khả dụng.
Tóm tắt: Nhập mô tả ngắn gọn cho bước.
Phân công: Sử dụng menu thả xuống, chọn người được chỉ định thực hiện hoạt động. Các tùy chọn mặc định là: Hỏi khi khởi chạy, Người dùng mặc định, Huấn luyện viên, Quản lý, và Nhân viên. Nếu ứng dụng Đội xe được cài đặt, tùy chọn Quản lý đội xe sẽ khả dụng.
Ghi chú
Lựa chọn cho vai trò Phân công liên quan đến nhân viên. Nếu Huấn luyện viên được chọn, huấn luyện viên của nhân viên sẽ được chỉ định cho hoạt động.
Nếu Người dùng mặc định được chọn, trường Phân công cho sẽ xuất hiện. Sử dụng menu thả xuống, chọn người dùng sẽ luôn được chỉ định hoạt động này.
Khoảng thời gian: Cấu hình các trường trong dòng này để xác định ngày đến hạn của hoạt động. Nhập một số vào trường đầu tiên, sau đó, sử dụng menu thả xuống trong hai trường tiếp theo, cấu hình khi nào ngày đến hạn sẽ được tạo; (
#) của ngày, tuần, hoặc tháng, Trước ngày kế hoạch hoặc Sau ngày kế hoạch.
Khi biểu mẫu Tạo Hoạt động được hoàn thành, hãy nhấp vào Lưu & Đóng nếu không có bước nào khác cần thêm, hoặc nhấp vào Lưu & Mới để thêm nhiều bước hơn nếu cần.
Example
Một công ty chuyên về chương trình nghệ thuật sau giờ học có hai kế hoạch offboarding riêng biệt, một cho giáo viên làm việc ngoài thực địa và một cho nhân viên văn phòng.
Kế hoạch offboarding cho giáo viên được thiết lập cho phòng ban Giáo viên Chương trình Nghệ thuật và bao gồm các nhiệm vụ chuyên biệt liên quan đến những công việc đó. Những nhiệm vụ này bao gồm đảm bảo tất cả đồ dùng nghệ thuật được lập danh mục và trả lại, tất cả biểu mẫu phản hồi của học sinh được nộp và tất cả thẻ truy cập và chìa khóa của các địa điểm khác nhau được hoàn trả.

Khởi chạy kế hoạch offboarding
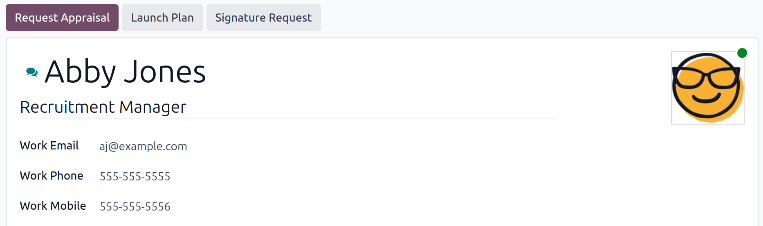
Sau khi một nhân viên đã thông báo (thường là hai tuần) hoặc khi công ty đã quyết định chấm dứt mối quan hệ làm việc với nhân viên, kế hoạch offboarding nên được khởi chạy. Điều hướng đến và nhấp vào hồ sơ nhân viên sắp rời đi. Nhấp vào nút Khởi chạy Kế hoạch, và cửa sổ bật lên Khởi chạy Kế hoạch trống sẽ tải.
Sử dụng menu thả xuống, chọn kế hoạch offboarding mong muốn trong trường Kế hoạch. Sau đó, sử dụng bộ chọn lịch, đặt một ngày trong trường Ngày Kế hoạch. Đây thường là ngày nhân viên thông báo, nhưng có thể chọn bất kỳ ngày nào.
Phía bên phải của cửa sổ bật lên Khởi chạy Kế hoạch hiển thị tất cả các bước trong kế hoạch đã chọn, được nhóm theo những gì đã được chọn trong các trường Phân công cho các bước kế hoạch khác nhau.
Sau khi các trường Kế hoạch và Ngày Kế hoạch được cấu hình, hãy nhấp vào nút Lên lịch, và Odoo sẽ lên lịch mọi thứ trong kế hoạch, theo ngày đến hạn tương ứng của chúng. Tất cả các hoạt động đã lên lịch sẽ xuất hiện trong chatter của hồ sơ nhân viên.
Lưu trữ một nhân viên
Trong Odoo, khi nhân viên rời công ty, họ phải được lưu trữ. Bước này nên được thực hiện sau khi nhân viên đã hoàn tất quá trình offboarding. Để lưu trữ nhân viên, trước tiên hãy điều hướng đến ứng dụng . Từ đây, xác định vị trí nhân viên đang rời công ty và nhấp vào thẻ nhân viên của họ.
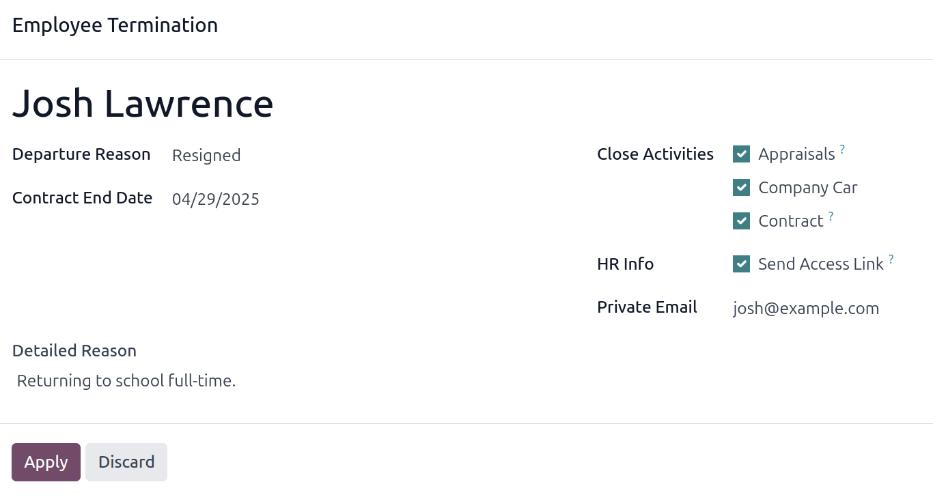
Biểu mẫu nhân viên tải, hiển thị tất cả thông tin của họ. Nhấp vào biểu tượng (bánh răng) ở góc trên bên trái và menu thả xuống xuất hiện. Nhấp vào Lưu trữ, và cửa sổ bật lên Chấm dứt Nhân viên xuất hiện.
Điền các trường sau vào biểu mẫu:
Lý do Nghỉ việc: Chọn lý do nhân viên rời đi từ menu thả xuống. Các tùy chọn mặc định là:
Bị Sa thải: Chọn tùy chọn này khi nhân viên bị cho thôi việc và công ty đã thông báo.
Từ chức: Chọn tùy chọn này khi nhân viên không còn mong muốn làm việc và nhân viên đã thông báo.
Đã từ chức: Nghỉ hưu: Chọn tùy chọn này khi nhân viên nghỉ hưu.
Trở thành Freelance: Chọn tùy chọn này khi nhân viên không còn làm việc cho công ty, nhưng thay vào đó trở thành một freelancer.
Thỏa thuận Chung: Chọn tùy chọn này khi cả hai bên đã đồng ý chấm dứt mối quan hệ làm việc của họ.
Ngày Kết thúc Hợp đồng: Sử dụng công cụ chọn lịch, chọn ngày làm việc cuối cùng của nhân viên tại công ty.
Lý do Chi tiết: Nhập mô tả ngắn gọn về việc nhân viên rời đi trong trường này.
Đóng hoạt động: Đánh dấu vào ô bên cạnh mỗi loại hoạt động để đóng hoặc xóa bất kỳ hoạt động nào đang mở liên quan đến nó. Khuyến nghị đánh dấu tất cả các ô được áp dụng. Các tùy chọn có sẵn là:
Đánh giá: hủy tất cả các đánh giá được lên lịch sau ngày kết thúc hợp đồng.
Hợp đồng: áp dụng ngày kết thúc cho hợp đồng hiện tại.
Xe công ty: xóa nhân viên khỏi vị trí lái xe công ty hiện tại của họ và chỉ định tài xế tiếp theo, nếu có.
Thiết bị: hủy chỉ định nhân viên khỏi bất kỳ thiết bị nào đã được giao.
Thông tin nhân sự: Đánh dấu vào ô bên cạnh Gửi liên kết truy cập để gửi liên kết tải xuống đến địa chỉ email cá nhân của nhân viên, chứa tất cả các tệp nhân sự cá nhân của họ.
Email cá nhân: Trường này xuất hiện nếu ô Thông tin nhân sự được đánh dấu. Nếu có email cá nhân được liệt kê trong hồ sơ nhân viên, trường này sẽ tự động được điền. Nếu không có địa chỉ email cá nhân trong hồ sơ của họ, hãy nhập địa chỉ email cá nhân cho nhân viên.
Khi hoàn thành biểu mẫu, nhấp Áp dụng. Hồ sơ nhân viên sẽ được lưu trữ, một email chứa liên kết tải tài liệu cá nhân sẽ được gửi đến địa chỉ email riêng của nhân viên (nếu được chọn), và biểu ngữ màu đỏ Đã lưu trữ sẽ xuất hiện ở góc trên bên phải biểu mẫu nhân viên. Cửa sổ trò chuyện sẽ ghi lại Ngày nghỉ việc và Lý do nghỉ việc, cùng với việc liên kết truy cập đã được gửi email hay chưa.
Ghi chú
Trong khi cố gắng gửi liên kết truy cập tài liệu nhân sự, cửa sổ bật lên Thao tác không hợp lệ có thể xuất hiện, hiển thị thông báo lỗi sau:
Người dùng liên quan và email cá nhân của nhân viên phải được thiết lập để sử dụng chức năng "Gửi liên kết truy cập": (Tên nhân viên)
Nếu lỗi này xuất hiện, nhấp Đóng để đóng cửa sổ bật lên, sau đó đánh dấu vào ô Gửi liên kết truy cập để bỏ chọn nó trên cửa sổ bật lên Chấm dứt nhân viên.
Nhấp Áp dụng để lưu trữ nhân viên và đóng các hoạt động đã chọn trên cửa sổ bật lên Chấm dứt nhân viên, quay lại biểu mẫu nhân viên.
Sau khi vào biểu mẫu nhân viên, đảm bảo các trường sau được điền:
Tab Thông tin cá nhân: Đảm bảo địa chỉ email được nhập vào trường Email.
Tab Cài đặt nhân sự: Đảm bảo Người dùng liên quan được chọn trong trường tương ứng.
Sau khi thông tin cần thiết được nhập, gửi lại liên kết truy cập tài liệu nhân sự
Gửi liên kết truy cập tài liệu nhân sự
Nếu liên kết truy cập không được gửi khi lần đầu lưu trữ nhân viên trên biểu mẫu Chấm dứt nhân viên, nó có thể được gửi sau khi nhân viên được lưu trữ vào bất kỳ thời điểm nào.
Sau khi một nhân viên được lưu trữ, thì nhân viên đó sẽ không còn hiển thị trên trang chủ chính của ứng dụng Nhân viên. Để xem các nhân viên đã lưu trữ, đi đến trang chủ và nhấp vào biểu tượng (mũi tên xuống) trên thanh tìm kiếm để hiển thị menu thả xuống. Chọn Đã lưu trữ ở cuối cột Bộ lọc, sau đó nhấp ra ngoài cửa sổ thả xuống để đóng nó.
Bây giờ, chỉ các nhân viên đã lưu trữ xuất hiện trên bảng điều khiển. Nhấp vào nhân viên mong muốn để mở biểu mẫu nhân viên của họ. Trên biểu mẫu này, nhấp vào biểu tượng (bánh răng) ở góc trên bên trái, sau đó nhấp Gửi liên kết truy cập tài liệu nhân sự từ menu thả xuống hiển thị. Chatter ghi lại rằng liên kết đã được gửi.