Salida
Cuando un empleado abandona la empresa, es importante tener un plan de desvinculación para asegurar que se sigan todos los pasos necesarios, como devolver equipos, revocar el acceso a los sistemas empresariales, rellenar formularios de RRHH, realizar una entrevista de salida y más. Dependiendo de la empresa, puede haber varios planes de desvinculación diferentes, configurados para departamentos o divisiones específicos, que tienen requisitos y pasos diferentes del plan principal de desvinculación.
Además de un plan de salida, el registro del empleado debe actualizarse para reflejar su partida, registrar el motivo por el que se fue, cerrar cualquier actividad pendiente asociada con el empleado y proporcionarle cualquier documento importante.
Ver plan de desvinculación
Antes de que pueda comenzar el proceso de salida, se recomienda comprobar el plan de salida predeterminado que viene preconfigurado con la aplicación Empleados. Para ver el plan predeterminado actual, ve a . Haz clic en Salida para ver el formulario detallado del plan de salida.
Pasos del plan de desvinculación
El plan Salida predeterminado es mínimo, con dos pasos predeterminados (tres si la aplicación Flota está instalada). Todos los pasos son actividades Actividades pendientes, y están programados para el día en que se lance el plan de salida (0 días antes de la fecha del plan).
Organizar la transferencia de conocimiento dentro del equipo: el responsable debe asegurarse de que todo el conocimiento que el empleado tiene relacionado con su puesto de trabajo esté documentado o compartido con los compañeros para que no haya pérdida de conocimiento.
Recuperar la flota: el responsable de la flota se asegura de que cualquier vehículo asignado al empleado esté sin asignar (disponible para otros empleados) o de que el próximo conductor esté asignado. Este paso solo aparece si la aplicación Flota está instalada.
Recuperar materiales de RRHH: El responsable debe obtener cualquier documento y material que requiera el departamento de RRHH. Se recomienda consultar con el departamento de RRHH para asegurar que todo lo necesario para este paso esté completado.

Modificar plan de desvinculación
El plan de desvinculación predeterminado es mínimo, para que se puedan hacer modificaciones que se adapten a las necesidades de desvinculación de cualquier empresa. Cada empresa tiene requisitos diferentes, por lo que es necesario añadir los pasos necesarios al plan de desvinculación.
Si el plan de salida es universal, añade o modifica el plan de salida predeterminado. Si el plan de salida necesario es solo para un departamento específico, entonces se debe crear un nuevo plan, específicamente para ese departamento.
Para modificar el plan predeterminado, primero ve a , y luego haz clic en Salida.
Para modificar un paso, haz clic en el paso y aparece una ventana emergente Abrir: Actividades. Realiza las modificaciones deseadas en el paso, luego haz clic en Guardar para aceptar los cambios y cerrar la ventana emergente.
Para añadir un nuevo paso, haz clic en Añadir una línea al final de las actividades listadas en la pestaña Actividades a crear, y aparecerá una ventana emergente en blanco de Crear actividades. Introduce toda la información en la ventana emergente y luego haz clic en Guardar y cerrar si no hay más pasos que añadir, o haz clic en Guardar y nuevo si se necesitan más pasos.
Configura todos los pasos deseados para el plan de desvinculación.
Crear plan de desvinculación
Para algunas empresas, pueden ser necesarios planes de desvinculación específicos para algunos departamentos. Para estos casos, puede ser necesario un nuevo plan de desvinculación específico del departamento.
Para crear un nuevo plan de salida, primero ve a . Haz clic en el botón Nuevo en la esquina superior izquierda, y se carga un formulario de plan en blanco.
Proporcione la siguiente información en el formulario:
Nombre del plan: el nombre específico para el plan.
Modelo: Este campo especifica dónde se puede usar este plan. En este caso, en la aplicación de Empleados. Este campo no se puede modificar.
Departamento: si se deja en blanco (la configuración predeterminada), el plan está disponible para todos los departamentos. Para hacer el plan específico de un departamento, selecciona un departamento usando el menú desplegable.
A continuación, añade los diversos pasos para el plan haciendo clic en Añadir una línea en la parte inferior de las actividades listadas en la pestaña Actividades a crear, y aparece una ventana emergente Crear actividades en blanco.
Introduce la siguiente información en la ventana emergente:
Tipo de actividad: usando el menú desplegable, selecciona la actividad específica que se programará. Las opciones predeterminadas son Correo electrónico, Llamada, Reunión, Actividades pendientes, o Subir documento. Si la aplicación Firma electrónica está instalada, está disponible una opción Solicitar firma.
Resumen: Introduce una breve descripción del paso.
Asignación: Usa el menú desplegable para seleccionar la persona asignada a realizar la actividad. Las opciones predeterminadas son: Preguntar al iniciar, Usuario predeterminado, Coach, Responsable y Empleado. Si la aplicación Flota está instalada, está disponible la opción Responsable de flota.
Nota
La selección del rol Asignación es en relación al empleado. Si se selecciona Coach, el coach del empleado es asignado a la actividad.
Si se selecciona Usuario predeterminado, aparece un campo Asignado a. Usa el menú desplegable para seleccionar el usuario que siempre será asignado a esta actividad.
Intervalo: Configura los campos de esta línea para determinar la fecha de vencimiento de la actividad. Introduce un número en el primer campo y luego, usando los menús desplegables en los dos campos siguientes, configura cuándo debe crearse la fecha de vencimiento; (#) de días, semanas o meses, ya sea Antes de la fecha planificada o Después de la fecha planificada.
Cuando el formulario Crear actividades esté completado, haz clic en Guardar y cerrar si no hay más pasos que añadir, o haz clic en Guardar y nuevo para añadir más pasos, según sea necesario.
Example
Una empresa especializada en programas de arte extraescolares tiene dos planes de salida separados, uno para los profesores que trabajan en el campo y uno para los trabajadores de oficina.
El plan de salida para los profesores está configurado para el departamento Profesores del programa de arte e incluye tareas especializadas relacionadas con esos trabajos. Estas incluyen asegurar que todos los materiales de arte estén catalogados y devueltos, que todos los formularios de retroalimentación de estudiantes sean entregados y que todas las tarjetas de acceso y llaves de las distintas ubicaciones sean devueltas.

Iniciar plan de salida
Después de que un empleado haya presentado su dimisión (típicamente dos semanas) o una vez que la empresa haya decidido terminar la relación laboral con el empleado, se debe lanzar el plan de salida. Ve a la y haz clic en el perfil del empleado que se va. Haz clic en el botón Lanzar plan, y se carga una ventana emergente Lanzar plan en blanco.
Usando el menú desplegable, selecciona el plan de salida deseado en el campo Plan. Luego, usando el selector de calendario, establece una fecha en el campo Fecha del plan. Normalmente este es el día en que el empleado presentó su dimisión, pero se puede seleccionar cualquier fecha.
El lado derecho de la ventana emergente Lanzar plan muestra todos los pasos del plan seleccionado, agrupados por lo que se seleccionó en los campos Asignación para los diversos pasos del plan.
Una vez que los campos Plan y Fecha del plan estén configurados, haz clic en el botón Programar, y Odoo programa todo lo del plan, según sus respectivas fechas de vencimiento. Todas las actividades programadas aparecen en el chatter del perfil del empleado.
Archivar un empleado
En Odoo, cuando un empleado deja la empresa debe ser archivado. Este paso debe realizarse después de que el empleado haya completado su salida. Para archivar un empleado, primero navega a la . Desde aquí, localiza al empleado que está dejando la empresa y haz clic en su ficha.
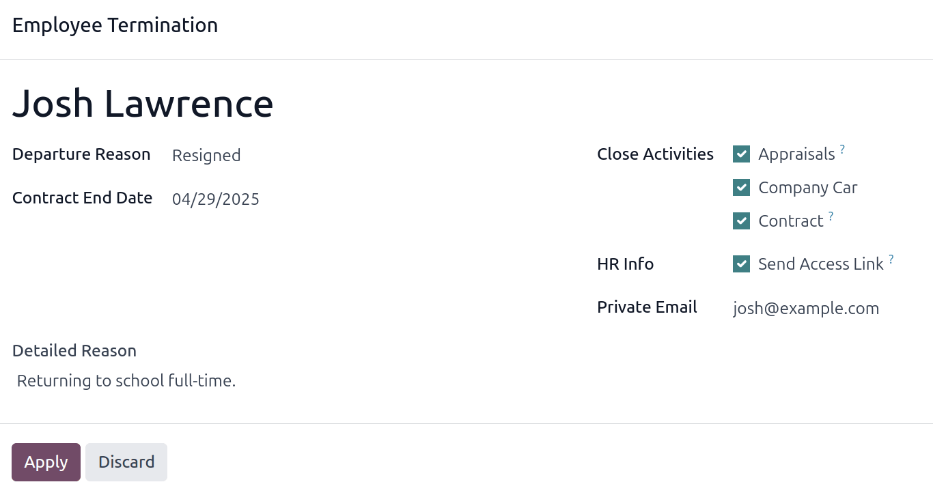
Se carga el formulario del empleado, mostrando toda su información. Haz clic en el icono (engranaje) en la esquina superior izquierda, y aparece un menú desplegable. Haz clic en Archivar, y aparece una ventana emergente de Terminación de empleado.
Complete los siguientes campos del formulario:
Motivo de salida: Selecciona un motivo por el que el empleado se va del menú desplegable. Las opciones predeterminadas son:
Despedido: Selecciona esta opción cuando un empleado es despedido y la empresa ha dado el aviso.
Renunció: Selecciona esta opción cuando el empleado ya no desea estar empleado y el empleado ha dado el aviso.
Dimitió: Jubilado: Selecciona esta opción cuando el empleado se jubile.
Se hizo autónomo: Selecciona esta opción cuando el empleado ya no trabaje para la empresa, pero se convierta en trabajador autónomo.
Mutuo acuerdo: Selecciona esta opción cuando ambas partes hayan acordado terminar su relación laboral.
Fecha de fin de contrato: Usa el selector de calendario para seleccionar el último día que el empleado trabaja para la empresa.
Motivo detallado: Introduce una breve descripción de la salida del empleado en este campo.
Cerrar actividades: Marca la casilla junto a cada tipo de actividad para cerrar o eliminar cualquier actividad abierta asociada con ella. Se recomienda marcar todas las casillas que sean aplicables. Las opciones disponibles son:
Evaluación: cancela todas las evaluaciones programadas después de la fecha de finalización del contrato.
Contrato: aplica una fecha de finalización para el contrato actual.
Coche de empresa: elimina al empleado como conductor de su coche de empresa actual, y asigna al siguiente conductor, si procede.
Equipo: desasigna al empleado de cualquier equipo asignado.
Información de RRHH: Marca la casilla junto a Enviar enlace de acceso para enviar un enlace de descarga a la dirección de correo electrónico personal del empleado, que contiene todos sus archivos personales de RRHH.
Correo electrónico privado: Este campo aparece si se marca la casilla Información de RRHH. Si hay un correo electrónico privado en el perfil del empleado, este campo se completa automáticamente. Si no hay ninguna dirección de correo electrónico privado en su registro, introduce la dirección de correo electrónico privado del empleado.
Cuando el formulario esté completo, haz clic en Aplicar. El registro del empleado se archiva, se envía un correo electrónico con un enlace de descarga a sus documentos personales a la dirección de correo electrónico privado del empleado (si se seleccionó), y aparece un banner rojo Archivado en la esquina superior derecha del formulario del empleado. El chatter registra la Fecha de salida y el Motivo de salida, y si se envió un enlace de acceso por correo electrónico.
Nota
Al intentar enviar el enlace de acceso a los documentos de RRHH, puede aparecer una ventana emergente de Operación inválida, mostrando el siguiente mensaje de error:
El usuario relacionado del empleado y el correo electrónico privado deben establecerse para usar la función «Enviar enlace de acceso»: (Nombre del empleado)
Si aparece este error, haz clic en Cerrar para cerrar la ventana emergente, luego marca la casilla Enviar enlace de acceso para deseleccionarla en la ventana emergente de Terminación de empleado.
Haz clic en Aplicar para archivar al empleado y cerrar las actividades seleccionadas en la ventana emergente de Terminación de empleado, volviendo al formulario del empleado.
Una vez en el formulario del empleado, asegúrate de que los siguientes campos estén completados:
Pestaña Información privada: Asegúrate de que haya una dirección de correo electrónico introducida en el campo Correo electrónico.
Pestaña Configuración de RRHH: Asegúrate de que haya un Usuario relacionado seleccionado en el campo correspondiente.
Después de introducir la información necesaria, reenvía el enlace de acceso a los documentos de RRHH
Enviar enlace de acceso a documentos de RRHH
Si el enlace de acceso no se envió al archivar por primera vez al empleado en el formulario de Terminación de empleado, se puede enviar después de que el empleado esté archivado en cualquier momento.
Después de archivar a un empleado, ya no es visible en el tablero principal de la aplicación Empleados. Para ver los empleados archivados, navega al tablero de la aplicación y haz clic en (flecha hacia abajo) en la barra de búsqueda para mostrar un menú desplegable. Selecciona Archivado, hacia la parte inferior de la columna Filtros, y luego haz clic fuera de la ventana desplegable para cerrarla.
Ahora, solo aparecen empleados archivados en el tablero. Haz clic en el empleado deseado para abrir su formulario de empleado. En este formulario, haz clic en el icono (engranaje) en la esquina superior izquierda y luego haz clic en Enviar enlace de acceso a documentos de RRHH del menú desplegable resultante. El chatter registra que se envió el enlace.