Katalog
Der E-Commerce-Katalog präsentiert Produkte, die Kunden durchsuchen können. Er ist nach Produktkategorien, verfügbaren Optionen, Sortierung und Navigationspfaden organisiert. Im Wesentlichen ist der E-Commerce-Katalog die Shop-Seite Ihrer Website.
The product catalog includes a top bar, a side panel, and a product listing area. With Odoo, you can customize the layout, filter by categories and attributes, and use additional features according to your needs.
You can customize the shop page using the website editor. To access it, go to the shop page, click Edit in the upper-right corner, and navigate to the Customize tab.
Obere Leiste
The top bar can include a search bar, a currency selector, sort-by and display options, and category quick access.
Sort-by search and display options
You can toggle the Search Bar, display categories and/or attributes, and enable or disable the Sort-By as well as the Layout buttons in the Top Bar.
The Sort-by button is toggled by default, and customers can choose between the following Default Sort options:
None
Featured
Newest Arrivals
Name (A-Z)
Price - Low to High
Price - High to Low
The default sort applies to all categories.
Tipp
If you don’t want to display a top bar or side panel, you can disable all related options in the website editor.
Seitenleiste
The side panel provides advanced filtering tools to organize your product categories. To further categorize the shop page, you can activate various filters, such as the attribute filter.
You can also add a Datepicker option to display a date range calendar to check the availability of rental products over a specific period. The Rental app must be installed to use this feature.
It is also possible to toggle the Collapsible sidebar switch to make the side panel manually collapsible.
Tipp
To use a price range or tags filter, you have to enable attributes first.
Product categorization in catalog
eCommerce categories are used to organize products into groups, making it easier for customers to browse the online store.
To create eCommerce categories, go to , and click New. On the category form, add a Name, optionally enter a Parent Category, and write a Category Description, if needed.
To use eCommerce categories, go to , select the product you wish to modify, go to the Sales tab, navigate to the Ecommerce shop section, and select the Categories it belongs to.
Bemerkung
A single product can belong to multiple eCommerce categories.
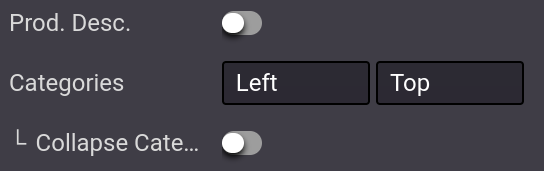
Once the categories are configured and assigned to the relevant products, go to the main shop page and open the website editor. In the Categories option, you can either enable a menu on the Left, i.e., in the side panel, or on the Top, i.e., in the top bar, or both. If you select the Left category, the option Collapsible Category Recursive appears, allowing you to collapse the category in the side panel.
Siehe auch
Attribute
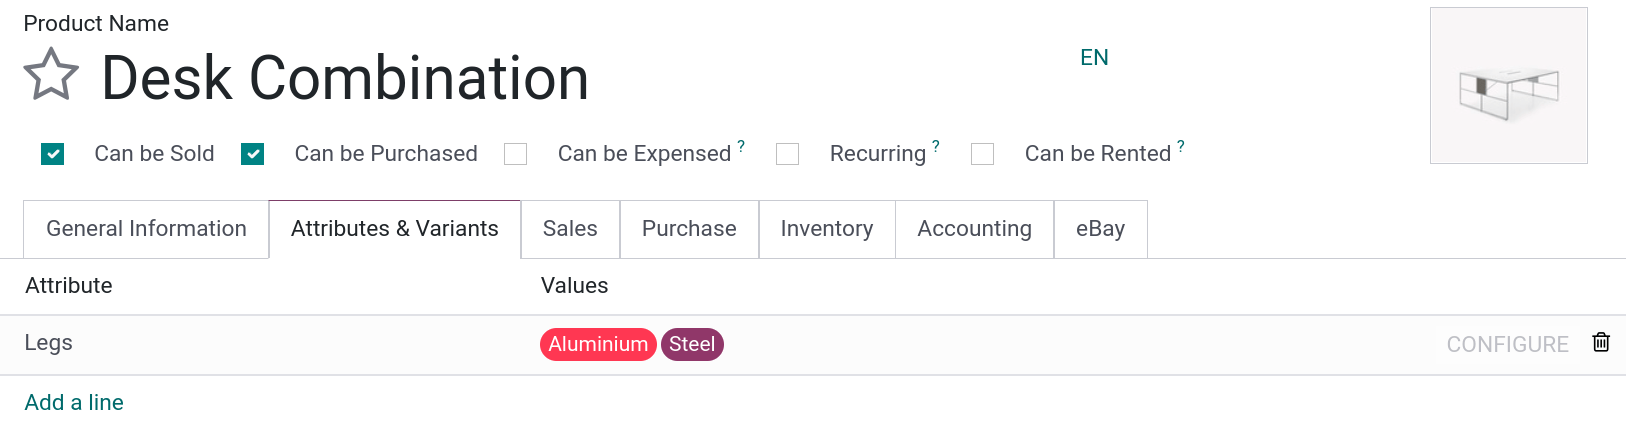
Attributes refer to characteristics of a product, such as the color or material, whereas variants are the different combinations of attributes. To configure attributes and variants, go to , select a product, and click the Attributes & Variants tab. Add as many attributes as desired.
Siehe auch
To enable attribute filtering, go to your main shop page, then open the website editor, and set the Attributes field to Left (side panel) and/or Top (top bar).
Tipp
When attribute filtering is enabled in the top bar, customers must click the (dropdown toggle) button to access it.
When enabling Attributes, more options become available:
Preisfilter: Schalten Sie den Schalter um, um eine Leiste für die Preisspanne anzuzeigen, die es Kunden ermöglicht, Produkte nach einer bestimmten Preisspanne zu filtern, indem sie einstellbare Ziehpunkte verwenden.
Product Tags Filter: Toggle the switch to display the Product Tags on the shop page, and allow customers to filter products using those tags by going to the Tags section in the side panel.
Tipp
If you want to use tags on your e-commerce, go to and click New. In the Product Templates tab of the product tags form, add the products to link to the given tag. You can also add product variants in the Product Variants tab and view a summary of all selected products in the All Products tab.
Price filtering works independently from attributes and, therefore, can be enabled on its own, if desired.
Product listing area
You can customize the layout of the entire shop page, as well as that of individual category pages.
Tipp
It is also possible to customize individual product pages.
In the website editor, choose the layout, and set the default layout to either Grid or List view.
Use the following options to further adjust the layout:
Größe: Legen Sie die Anzahl der Produkte pro Seite und Zeile fest.
Gap: Define the gap between the products.
Stil: Select Standard, Karten, Miniaturbilder oder Raster.
Image Size: Choose the aspect ratio for the product images: Landscape (4/3), Default (1/1), Portrait (4/5), or Vertical (2/3). You can also adjust the display by changing the Fill options to fit your design preferences best.
Toggle the Prod. Desc. switch to display the product description below the product’s name.
Tipp
Sie können die Größe des Rasters wählen, aber beachten Sie, dass die Anzeige zu vieler Produkte die Leistung und die Ladegeschwindigkeit der Seite beeinträchtigen kann.
In addition, you can manually change a product’s position on the shop page. To do so, go to the
main shop page, click the product, and open the website editor. In the Product section,
you can reorder the products by using the arrows. The << >> buttons allow to move the product to
the extreme left or right, and < > allow to move it one row to the left or right.
Tipp
It is also possible to change the products‘ positions on the shop page by going to , switching to the list view, and dragging and dropping the products within the list.
Produkte hervorheben
You can highlight products to make them more visible on the shop page. To do so, go to the website editor and click the product to highlight. In the Product section, you can choose the size of the product image by clicking the grid, and you can also add a Ribbon. This displays a banner across the product’s image, such as Sale, Sold out, Out of stock or New!.

To create a new ribbon, click the green (Create) icon next to the Ribbon field. Then add a Ribbon name, define its Position, and choose a Background and a Text label. To edit the ribbon, click the (Edit) icon next to the Ribbon label.

The ribbon is now available for all the eCommerce products.
Tipp
There are other ways to create a new ribbon:
Go to and click New.
Activate the developer mode, access the product form, and under the Sales tab, change or create the ribbon in the Ribbon field.
Es ist auch möglich, Bänder für bestimmte Produktvarianten hinzuzufügen. Gehen Sie dazu zu und wählen Sie ein Produkt aus. Klicken Sie auf die Schaltfläche Varianten, wählen Sie eine Variante aus und fügen Sie im Feld Variantenband des Abschnitts Verkauf ein Band hinzu.
Shop and category page design
Use building blocks to add content on the shop and/or category page.
You can customize the top and/or bottom section of the catalog, either for the entire shop page or for a specific category. In the latter case, the block appears only when filtering by that category. To do so, move the block to the far top or bottom section to display it on the general shop page or to the area below the category’s name at the top or beneath the product list to display it only when filtering by that specific category.

Tipp
Adding content to an eCommerce category page helps improve the SEO strategy. Using keywords linked to the products or the eCommerce categories can also increase organic traffic. Additionally, each category has its own specific URL that can be pointed to and is indexed by search engines.
eCommerce categories can also be added as mega menu items for quick access.
Zusätzliche Funktionen
You can access and enable additional feature buttons such as a Add to cart or Wishlist button or a Comparison list. To do so, open the website editor, click the desired feature buttons. All three buttons appear when hovering the mouse over a product’s image.
(Add to cart): adds a button to add the product to the cart;
(Compare): adds a button to compare products based on their price, variant, etc.;
(Wishlist): adds a button to wishlist the product.
Siehe auch