Offboarding
Lorsqu’un employé quitte l’entreprise, il est important d’avoir un plan de départ pour s’assurer que toutes les étapes nécessaires sont suivies, telles que le retour du matériel, la révocation de l’accès aux systèmes de l’entreprise, le remplissage des formulaires RH, un entretien de sortie, et plus encore. Selon l’entreprise, il peut y avoir plusieurs plans de départ différents, configurés pour des départements ou divisions spécifiques, ayant des exigences et des étapes différentes du plan de départ principal.
En plus d’un plan de départ, la fiche de l’employé doit être mise à jour pour refléter son départ, enregistrer la raison de son départ, clôturer toutes les activités ouvertes associées à l’employé et lui fournir tous les documents importants.
Consulter le plan de départ
Avant de commencer le processus de départ, il est recommandé de vérifier le plan de départ par défaut qui est préconfiguré avec l’application Employés. Pour afficher le plan par défaut actuel, naviguer vers . Cliquer sur Départ pour afficher le formulaire détaillé du plan de départ.
Étapes du plan de départ
Le plan Départ par défaut est minimal, avec deux étapes par défaut (trois si l’application Parc automobile est installée). Toutes les étapes sont des activités To-Do, et sont planifiées pour le jour du lancement du plan de départ (0 jours avant la date du plan).
Organiser le transfert de connaissances au sein de l’équipe : le responsable doit s’assurer que toutes les connaissances que l’employé possède concernant son poste sont soit documentées, soit partagées avec des collègues afin qu’il n’y ait aucun manque de connaissances.
Récupérer le véhicule : le gestionnaire de parc automobile s’assure que tous les véhicules attribués à l’employé sont soit non attribués (disponibles pour d’autres employés), soit que le prochain conducteur est attribué. Cette étape n’apparaît que si l’application Parc automobile est installée.
Récupérer le matériel RH : Le responsable doit récupérer tous les documents et le matériel requis par le département RH. Il est recommandé de vérifier avec le département RH que tout le nécessaire pour cette étape est bien complété.

Modifier le plan de départ
Le plan de départ par défaut est minimal, afin de pouvoir être modifié pour s’adapter aux besoins de départ de n’importe quelle entreprise. Chaque entreprise a des exigences différentes, il est donc nécessaire d’ajouter les étapes requises au plan de départ.
Si le plan de départ est universel, ajouter ou modifier le plan de départ par défaut. Si le plan de départ nécessaire concerne uniquement un département spécifique, un nouveau plan doit être créé, spécifiquement pour ce département.
Pour modifier le plan par défaut, naviguer d’abord vers , puis cliquer sur Départ.
Pour modifier une étape, cliquer sur l’étape et une fenêtre contextuelle Ouvrir : Activités apparaît. Apporter les modifications souhaitées à l’étape, puis cliquer sur Enregistrer pour accepter les modifications et fermer la fenêtre contextuelle.
Pour ajouter une nouvelle étape, cliquer sur Ajouter une ligne en bas de la liste des activités dans l’onglet Activités à créer. Une fenêtre contextuelle vierge Créer des activités apparaît. Saisir toutes les informations dans la fenêtre contextuelle, puis cliquer sur Enregistrer & Fermer s’il n’y a pas d’autres étapes à ajouter, ou cliquer sur Enregistrer & Nouveau si d’autres étapes sont nécessaires.
Configurer toutes les étapes souhaitées pour le plan de départ.
Créer un plan de départ
Pour certaines entreprises, des plans de départ spécifiques peuvent être nécessaires pour certains départements. Dans ces cas, un nouveau plan de départ spécifique au département peut être requis.
Pour créer un nouveau plan de départ, naviguer d’abord vers . Cliquer sur le bouton Nouveau en haut à gauche, et un formulaire de plan vierge se charge.
Saisir les informations suivantes dans le formulaire :
Nom du plan : le nom spécifique du plan.
Modèle : Ce champ spécifie où ce plan peut être utilisé. Dans ce cas, dans l’application Employés. Ce champ ne peut pas être modifié.
Département : si laissé vide (paramètre par défaut), le plan est disponible pour tous les départements. Pour rendre le plan spécifique à un département, sélectionner un département à l’aide du menu déroulant.
Ensuite, ajouter les différentes étapes du plan en cliquant sur Ajouter une ligne en bas de la liste des activités dans l’onglet Activités à créer, et une fenêtre contextuelle vierge Créer des activités apparaît.
Saisir les informations suivantes dans la fenêtre contextuelle :
Type d’activité : à l’aide du menu déroulant, sélectionner l’activité spécifique à planifier. Les options par défaut sont Email, Appel, Réunion, To-Do, ou Télécharger un document. Si l’application Signature est installée, une option Demander une signature est disponible.
Résumé : Saisir une brève description de l’étape.
Affectation : À l’aide du menu déroulant, sélectionner la personne chargée d’effectuer l’activité. Les options par défaut sont : Demander au lancement, Utilisateur par défaut, Coach, Responsable et Employé. Si l’application Parc automobile est installée, une option Responsable du parc automobile est disponible.
Note
La sélection pour le rôle Affectation est relative à l’employé. Si Coach est sélectionné, le coach de l’employé est affecté à l’activité.
Si Utilisateur par défaut est sélectionné, un champ Assigné à apparaît. À l’aide du menu déroulant, sélectionner l’utilisateur qui sera toujours affecté à cette activité.
Intervalle : Configurer les champs de cette ligne pour déterminer la date d’échéance de l’activité. Saisir un nombre dans le premier champ, puis, à l’aide des menus déroulants dans les deux champs suivants, configurer quand la date d’échéance doit être créée : (#) de jours, semaines ou mois, soit Avant la date du plan, soit Après la date du plan.
Lorsque le formulaire Créer des activités est complété, cliquer sur Enregistrer & Fermer s’il n’y a pas d’autres étapes à ajouter, ou cliquer sur Enregistrer & Nouveau pour ajouter d’autres étapes, selon les besoins.
Example
Une entreprise spécialisée dans les programmes artistiques périscolaires dispose de deux plans de départ distincts, un pour les enseignants travaillant sur le terrain et un pour les employés de bureau.
Le plan de départ pour les enseignants est défini pour le département Enseignants du programme artistique et inclut des tâches spécialisées relatives à ces emplois. Celles-ci comprennent s’assurer que toutes les fournitures artistiques sont cataloguées et retournées, que tous les formulaires de retour d’expérience des élèves sont remis et que tous les badges d’accès et clés pour les différents sites sont restitués.

Lancer le plan de départ
Après qu’un employé a donné son préavis (généralement deux semaines) ou une fois que l’entreprise a décidé de mettre fin à la relation de travail avec l’employé, le plan de départ doit être lancé. Naviguer vers l” et cliquer sur le profil de l’employé partant. Cliquer sur le bouton Lancer le plan, et une fenêtre contextuelle vierge Lancer le plan se charge.
À l’aide du menu déroulant, sélectionner le plan de départ souhaité dans le champ Plan. Ensuite, à l’aide du sélecteur de calendrier, définir une date dans le champ Date du plan. Il s’agit généralement du jour où l’employé a donné son préavis, mais n’importe quelle date peut être sélectionnée.
Le côté droit de la fenêtre contextuelle Lancer le plan affiche toutes les étapes du plan sélectionné, regroupées selon ce qui a été sélectionné dans les champs Attribution pour les différentes étapes du plan.
Une fois que les champs Plan et Date du plan sont configurés, cliquer sur le bouton Planifier, et Odoo planifie tout ce qui se trouve dans le plan, selon leurs dates d’échéance respectives. Toutes les activités planifiées apparaissent dans le fil de discussion du profil de l’employé.
Archiver un employé
Dans Odoo, lorsqu’un employé quitte l’entreprise, il doit être archivé. Cette étape doit être effectuée après que l’employé a été entièrement accompagné dans son départ. Pour archiver un employé, accéder d’abord à l’application . À partir de là, localiser l’employé qui quitte l’entreprise et cliquer sur sa fiche employé.
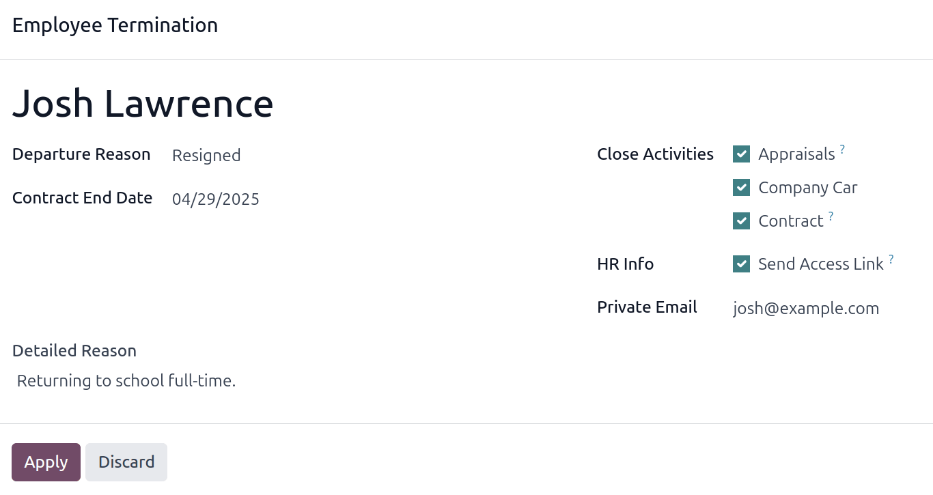
Le formulaire de l’employé se charge, affichant toutes ses informations. Cliquer sur l’icône (engrenage) en haut à gauche, et un menu déroulant apparaît. Cliquer sur Archiver, et une fenêtre contextuelle Fin de contrat de l’employé apparaît.
Remplir les champs suivants sur le formulaire :
Raison du départ : Sélectionner une raison du départ de l’employé dans le menu déroulant. Les options par défaut sont :
Licencié : Sélectionner cette option lorsqu’un employé est licencié et que l’entreprise a donné un préavis.
Démission : Sélectionner cette option lorsque l’employé ne souhaite plus être employé et qu’il a donné un préavis.
Démission : Retraite : Sélectionner cette option lorsque l’employé part à la retraite.
Devenu Indépendant : Sélectionner cette option lorsque l’employé ne travaille plus pour l’entreprise, mais devient travailleur indépendant.
Accord Mutuel : Sélectionner cette option lorsque les deux parties ont convenu de mettre fin à leur relation de travail.
Date de fin de contrat : À l’aide du sélecteur de calendrier, sélectionner le dernier jour où l’employé travaille pour l’entreprise.
Raison détaillée : Saisir une brève description du départ de l’employé dans ce champ.
Clôturer les Activités : Cocher la case à côté de chaque type d’activité pour clôturer ou supprimer toutes les activités ouvertes qui y sont associées. Il est recommandé de cocher toutes les cases applicables. Les options disponibles sont :
Évaluations : annule toutes les évaluations planifiées après la date de fin du contrat.
Contrat : applique une date de fin au contrat en cours.
Voiture de Société : retire l’employé en tant que conducteur de sa voiture de société actuelle, et attribue le prochain conducteur, le cas échéant.
Équipement : désattribue l’employé de tout équipement assigné.
Infos RH : Cocher la case à côté de Envoyer le Lien d’Accès pour envoyer un lien de téléchargement à l’adresse e-mail personnelle de l’employé, contenant tous ses fichiers RH personnels.
E-mail Privé : Ce champ apparaît si la case Infos RH est cochée. Si un e-mail privé figure sur le profil de l’employé, ce champ est automatiquement rempli. Si aucune adresse e-mail privée n’est enregistrée, saisir l’adresse e-mail privée de l’employé.
Lorsque le formulaire est complet, cliquer sur Appliquer. La fiche employé est archivée, un e-mail avec un lien de téléchargement vers ses documents personnels est envoyé à l’adresse e-mail privée de l’employé (si sélectionné), et une bannière rouge Archivé apparaît dans le coin supérieur droit du formulaire employé. Le chatter enregistre la Date de Départ et le Motif de Départ, ainsi que l’envoi éventuel d’un lien d’accès par e-mail.
Note
Lors de la tentative d’envoi du lien d’accès aux documents RH, une fenêtre contextuelle Opération Invalide peut apparaître, affichant le message d’erreur suivant :
L’utilisateur associé à l’employé et l’e-mail privé doivent être définis pour utiliser la fonction « Envoyer le Lien d’Accès » : (Nom de l’Employé)
Si cette erreur apparaît, cliquer sur Fermer pour fermer la fenêtre contextuelle, puis cocher la case Envoyer le Lien d’Accès pour la décocher sur la fenêtre contextuelle Cessation d’Emploi.
Cliquer sur Appliquer pour archiver l’employé et clôturer les activités sélectionnées sur la fenêtre contextuelle Cessation d’Emploi, en revenant au formulaire employé.
Une fois sur le formulaire employé, s’assurer que les champs suivants sont remplis :
Onglet Informations Privées : S’assurer qu’une adresse e-mail est saisie dans le champ E-mail.
Onglet Paramètres RH : S’assurer qu’un Utilisateur Associé est sélectionné dans le champ correspondant.
Une fois les informations nécessaires saisies, renvoyer le lien d’accès aux documents RH
Envoyer le lien d’accès aux documents RH
Si le lien d’accès n’a pas été envoyé lors de l’archivage initial de l’employé sur le formulaire Fin de contrat de l’employé, il peut être envoyé après l’archivage de l’employé à tout moment.
Après l’archivage d’un employé, il n’est plus visible sur le tableau de bord principal de l’application Employés. Pour afficher les employés archivés, accéder au tableau de bord de l”, et cliquer sur (flèche vers le bas) dans la barre de recherche pour afficher un menu déroulant. Sélectionner Archivé, vers le bas de la colonne Filtres, puis cliquer en dehors de la fenêtre déroulante pour la fermer.
Désormais, seuls les employés archivés apparaissent sur le tableau de bord. Cliquer sur l’employé souhaité pour ouvrir sa fiche employé. Sur cette fiche, cliquer sur l’icône (engrenage) dans le coin supérieur gauche, puis cliquer sur Envoyer le lien d’accès aux documents RH depuis le menu déroulant qui apparaît. Le chatter enregistre que le lien a été envoyé.