Multiple websites
Odoo ช่วยให้คุณสร้างเว็บไซต์หลายเว็บไซต์จากฐานข้อมูลเดียวกันได้ ซึ่งอาจมีประโยชน์ เช่น หากคุณมีแบรนด์ต่างๆ มากมายที่ดำเนินการภายใต้องค์กรของคุณ หรือเพื่อสร้างเว็บไซต์แยกกันสำหรับผลิตภัณฑ์/บริการที่แตกต่างกัน หรือกลุ่มเป้าหมายที่แตกต่างกัน ในกรณีเช่นนี้ การมีเว็บไซต์ที่แตกต่างกันจะช่วยหลีกเลี่ยงความสับสนและทำให้ปรับแต่งกลยุทธ์การเข้าถึงทางดิจิทัลและเข้าถึงกลุ่มเป้าหมายของคุณได้ง่ายขึ้น
Each website can be designed and configured independently with its own domain name, theme, pages, menus, languages, products, assigned sales team, etc. They can also share content and pages.
Tip
Duplicate content (i.e., pages and content shared between multiple websites) can have a negative impact on Search Engine Optimization (SEO).
Website creation
To create a new website, proceed as follows:
Go to .
Click + New Website.

Specify the Website Name and Website domain. Each website must be published under its own domain.
Adapt the Company name, Languages and Default language if needed.
Click the Create button.
You can then start building your new website.
Note
By default, all website-related apps that you have installed (e.g. eCommerce, Forum, Blog, etc.) and their related website pages are also available on the new website. You can remove them by amending the website's menu.
Switching websites
To switch from one website to another, click the menu next to the +New button in the top right corner and select the website you want to switch to.

Note
When you switch websites, you are redirected to the homepage of the other website.
Website-specific configuration
การตั้งค่าเว็บไซต์ส่วนใหญ่จะเป็นแบบเฉพาะเว็บไซต์ ซึ่งหมายความว่าสามารถเปิด/ปิดใช้งานได้ในแต่ละเว็บไซต์ หากต้องการปรับเปลี่ยนการตั้งค่าสำหรับเว็บไซต์ ให้ไปที่ เลือกเว็บไซต์ที่ต้องการในช่อง การตั้งค่าเว็บไซต์ ที่ด้านบนของหน้า การตั่งค่า ในแบนเนอร์ สีเหลือง จากนั้นปรับเปลี่ยนตัวเลือกสำหรับเว็บไซต์เฉพาะนั้น
Note
Websites are created with the default settings; the settings are not copied from one website to the other.
In a multi-company environment, each website can be linked to a specific company in your database so that only company-related data (e.g., products, jobs, events, etc.) is displayed on the website. To display company-specific data, set the desired company in the Company field.
Content availability
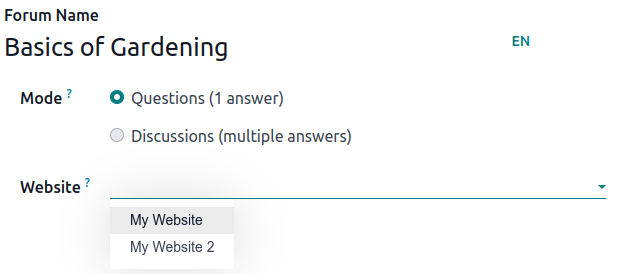
ตามค่าเริ่มต้น เพจ ผลิตภัณฑ์ กิจกรรม และอื่นๆ ที่สร้างจากส่วนหน้า (โดยใช้ปุ่ม +สร้าง) จะพร้อมใช้งานบนเว็บไซต์ที่ถูกสร้างขึ้นเท่านั้น อย่างไรก็ตาม บันทึกที่สร้างจากส่วนหลังจะพร้อมใช้งานบนเว็บไซต์ทั้งหมดตามค่าเริ่มต้น ความพร้อมใช้งานของเนื้อหาสามารถเปลี่ยนแปลงได้ในแบ็กเอนด์ในฟิลด์ เว็บไซต์ ตัวอย่างเช่น สำหรับผลิตภัณฑ์ ไปที่ จากนั้นเลือกผลิตภัณฑ์และไปที่แท็บ การขาย สำหรับฟอรัม ให้ไปที่ จากนั้นเลือกฟอรัม

Records and features can be made available:
On all websites: leave the Website field empty;
Only on one website: set the Website field accordingly;
On some websites: in this case, you should duplicate the item and set the Website field.
Website pages
To modify the website on which a page is to be published, proceed as follows:
Go to .
Open the search panel and select the website on which the page is currently published.

Tick the check box next to the page(s) you want to change.
Click the Website field and select the website, or empty it to publish the page on all websites.
Note
Each website must have its own homepage; you may not use the same homepage for several websites.
eCommerce features
eCommerce features such as products, eCommerce categories, pricelists, discounts, payment providers, etc. can be restricted to a specific website.
Customer accounts
You can allow your customers to use the same account on all of your websites by enabling the Shared Customer Accounts check box in the website settings.
กำหนดราคา
Products can be priced differently based on the website using pricelists. The following configuration is required:
Go to .
Scroll down to the Shop - Products section and select the Pricelists option Multiple prices per product.
Click Pricelists to define new pricelists or edit existing ones.
Select the pricelist or click New to create a new one, then select the Configuration tab and set the Website field.
การรายงาน
การวิเคราะห์
Each website has its own analytics. To switch between websites, click the buttons in the upper right corner.

Other reporting data
Other reporting data such as eCommerce dashboard data, online sales analyses and visitors can be grouped by website if necessary. Open the search panel and select Group by --> Website.