Regler för automatisering
Automation rules allow the execution of one or more predefined actions in response to a specific trigger, e.g., create an activity when a field is set to a specific value, or archive a record 7 days after its last update.
When creating an automation rule, it is possible to add conditions that must be met for the automation rule to run, e.g., the opportunity must be assigned to a specific salesperson, or the state of the record must not be Draft.
To create an automation rule with Odoo Studio:
Open Studio and click Automations, then New.
Give the automation rule a clear, meaningful name that identifies its purpose.
Select the Trigger and, if necessary, fill in the fields that appear on the screen based on the chosen trigger.
Click Add an action in the Actions To Do tab.
Select the Type of action and complete the relevant fields based on the chosen action.
Click Save & Close or, to define additional actions, Save & New.
Example
To ensure follow-up on less satisfied clients, this automation rule creates an activity 3 months after a sales order is created for clients with a satisfaction percentage lower than 30%.

Tips
Use the Notes tab to document the purpose and functioning of automation rules. This makes rules easier to maintain and facilitates collaboration between users.
To modify the model targeted by the automation rule, switch models before clicking Automations in Studio, or activate developer mode, create or edit an automation rule, and select the Model in the Automation Rules form.
Automation rules can be created from any kanban stage by clicking the (Settings) icon that appears when hovering over the kanban stage name, then selecting Automations. In this case, the Trigger is set to Stage is set to by default, but it can be changed if necessary.

Utlösare
The Trigger is used to define what kind of event needs to occur for the automation rule to run. The available triggers depend on the model. Five trigger categories are available overall:
Adding conditions
Domain filters allow you to determine the records an automation rule should target or exclude. Efficient filtering enhances overall performance as it avoids unnecessary processing on records that are not impacted by the rule.
Tips
Activate developer mode before creating an automation rule to have the most flexibility in adding domain filters.
Depending on the trigger chosen, it is possible to define one or more conditions a record must meet before and/or after a trigger occurs.
The Before Update Domain defines the conditions a record must meet before the trigger event occurs, e.g., the record must have
Type = Customer InvoiceandStatus = Posted.With developer mode activated, click Edit Domain, if available, then New Rule.
The Apply on domain defines the conditions a record must meet after the trigger event occurs, e.g., the customer invoice must have
Payment Status = Partially Paid.With developer mode activated, click Edit Domain then New Rule.
Tips
If developer mode is not activated, to define an Apply on domain, click Add condition. Complete or delete the suggested condition. To add a condition, click New Rule.
When a trigger occurs, e.g., the payment status of a posted customer invoice is updated, the automation rule checks the defined conditions and only executes the action if the record matches those conditions.
Example
If the automated action should be executed when an email address is set for the first time (in
contrast to modifying an email address) on an existing contact that is an individual rather than
a company, use Email is not set and Is a Company is not set as the Before Update
Domain and Email is set as the Apply on domain.

Observera
The Before Update Domain is not checked upon the creation of a record.
Värden uppdaterade
Trigger automated actions when specific changes happen in the database. The triggers available in this category depend on the model and are based on common changes, such as adding a specific tag (e.g., to a task) or setting a field’s value (e.g., setting the User field).
Select the trigger, then select a value if required.
E-post evenemang
Utlösa automatiska åtgärder när du tar emot eller skickar e-post.
Villkor för tidsinställning
Trigger automated actions at a point in time relative to a date field or to the creation or update of a record. The following triggers are available:
Based on date field: The action is triggered a defined period of time before or after the date of the selected date field, e.g., 30 days before the contract end date.
After creation: The action is triggered a defined period of time after a record is created and saved.
After last update: The action is triggered a defined period of time after an existing record is edited and saved.
To configure a Timing Conditions trigger, with developer mode activated:
Select the appropriate Trigger from the Timing Conditions category. If you select the Based on date field trigger, select the relevant date field.
Configure the Delay to determine the execution date time of the action(s). To do so, enter the number of Minutes, Hours, Days, or Months after which the action should be triggered. If you selected the Based on date field trigger, the action can be triggered After or Before the selected date field.
Optionally, add conditions that the record must meet before and/or after the rule is triggered.
Click Save manually.
Click Scheduled action to open the Automation Rules: check and execute scheduled action.
Observera
This scheduled action checks for execution date times that have been reached since its previous run, and executes the related action(s), if relevant. By default, the scheduled action is set to Execute Every 4 hours, which is generally sufficient for delays such as 3 months after the order date or 7 days after the last update.
If any automation rule has a time-based trigger with a delay of less than the equivalent of 40 hours, e.g., 3 hours before the event start date time, the frequency of the scheduled action is automatically increased, e.g., to Execute Every 18 minutes. This allows the action to be executed closer to its scheduled execution date time.
Click Run manually at the top left.
Varning
This step is critical to prevent the rule from running retroactively on historical records. Running the scheduled action manually initializes the timestamp of its last run in the automation rule, which is a key element of the rule’s execution logic.
Click the automation rule name in the breadcrumbs to return to the automation rule setup.
Add the action(s) to be executed then, when all actions have been defined, click Save manually.
The action is executed the first time the Automation Rules: check and execute scheduled action runs after the execution date time is reached, and when the conditions are met.
Execution logic
When using a time-based trigger, an action is only executed when the execution date time falls between the last run of the scheduled action and the current run (whether scheduled or run manually), i.e.:
last run –> execution date and time –> current run
Observera
Running the Automation Rules: check and execute scheduled action manually does not necessarily result in a rule’s action being executed. When testing an automation rule with a time-based trigger, ensure that this sequence is true, then check if the action has been executed.
Example
On the morning of October 15, you create an automation rule that triggers the sending of an email 30 days before the Contract end date; contracts end at 11:59 pm on their contract end date. During the creating of the rule, the Automation Rules: check and execute scheduled action was run manually at 11:00 am and is set to run every four hours thereafter.
This new automation rule will apply for contracts whose end date is at least 30 days after the creation of the rule, i.e., an end date of November 14 or later.
For a contract with an end date of November 14, the execution date time of the action is 11:59 pm on October 15. The action will therefore be executed the first time the Automation Rules: check and execute scheduled action runs after that date and time has passed, i.e.,:
last run of the scheduled action: 11:00 pm on October 15
execution date time: 11:59 pm on October 15
current run of the scheduled action: 3:00 am on October 16
Anpassad
Utlösa automatiserade åtgärder:
On create: when a record is saved for the first time.
On create and edit: when a record is saved for the first time and any subsequent time.
On deletion: when a record is deleted.
On UI change: when a field’s value is changed on the Form view, even before the record is saved.
For the On create and edit and On UI change triggers, you must then select the field(s) to be used to trigger the automation rule in the When updating field.
Varning
Om inget fält har valts i fältet When updating kan den automatiska åtgärden utföras flera gånger per post.
Alternativt kan du också definiera ytterligare villkor som ska uppfyllas för att utlösa automatiseringsregeln i fältet Apply on.
Observera
The On UI change trigger can only be used with the Execute Code action and only works when a modification is made manually. The action is not executed if the field is changed through another automation rule.
Extern
Trigger automated actions based on a specific event in an external system or application using a webhook.
After the webhook is configured in Odoo, where the webhook’s URL is generated and the target record defined, it needs to be implemented in the external system.
Varning
It is highly recommended to consult with a developer, solution architect, or another technical role when deciding to use webhooks and throughout the implementation process. If not properly configured, webhooks may disrupt the Odoo database and can take time to revert.

Observera
It is also possible to set up an automated action that sends data to a external system’s webhook when an event occurs in your Odoo database.
Se även
Åtgärder
Once you have defined the automation rule’s trigger, click Add an action in the Actions To Do tab to define the action(s) to be executed.
Tips
If no explicit name is entered, the name of the action will be automatically generated based on the action you define; the name can be updated at any time.
You can define multiple actions for the same automation rule. By default, actions are executed in the order in which they were defined.
This means, for example, that if you define an Update record action and then a Send email action where the email references the field that was updated, the email uses the updated values. However, if the Send email action is defined before the Update record action, the email uses the values set before the record is updated.
To change the order of defined actions, click the (drag handle) icon beside an action and drag it to the desired position.
Uppdatera rekord
This action is used to update one of the record’s (related) fields. The following options are available:
Update: updates the selected field with the specified value.
Update with AI: updates the selected field dynamically based on the AI prompt provided. This option requires the Odoo AI app to be installed.
Sequence: update the selected field with a defined sequence.
Compute: updates the selected field dynamically using Python code.
To define the action:
With the Update, Update with AI, Sequence or Compute option selected, as relevant, select or search for the field to be updated or computed. If needed, click the (right arrow) next to the field name to access the list of related fields.
Provide the relevant information based on the option selected.
Uppdatera
Select or enter the updated value for the field.
If a many2many field is being updated, choose whether the field must be updated by Adding, Removing, or Setting it to the selected value or by Clearing it.
Example
If you want the automated action to remove a tag from the customer record, set the Update field to Customer > Tags, select by Removing, then select the tag to be removed.

Update with AI
Enter a prompt to instruct Odoo AI how to update the field. Type / to open the AI
prompt tools; use Field Selector to tell Odoo AI which related fields to check for
context, and Records Selector to provide possible values for the updated field.
Example
If you want the automation rule to update the Assignees field of a newly created task based on the employees’ expertise, you can write a prompt to instruct Odoo AI to check the Display Name field of the task for the context, then to assign the most suitable employee.

Sekvens
Select an existing sequence or, to create a new sequence:
Click Search more, then click New.
In the window that opens, enter the Name of the sequence.
In the Sequence tab, configure the sequence:
Prefix: characters added before the next number in the sequence.
Suffix: characters added after the next number in the sequence.
Sequence Size: determines the number of digits in every number in the sequence. If needed, leading zeros are added before the number to achieve the indicated sequence size, e.g., for a sequence size of
5, the first number in the sequence is00001.Step: determines the increments between the numbers in the sequence.
Next Number: the next number that will be used in the sequence, without leading zeros.
Tips
Use dynamic placeholders like
%(year)sor%(month)sas a Prefix and/or Suffix to create sequences with elements like current year, month, etc. Possible placeholders are shown at the bottom of the window.To use sub-sequences, e.g., to have the sequence restart each year or each month, enable Use subsequences per date_range, then Add a line for each date range and indicate the Next Number for the range.
Klicka på Spara.
Example
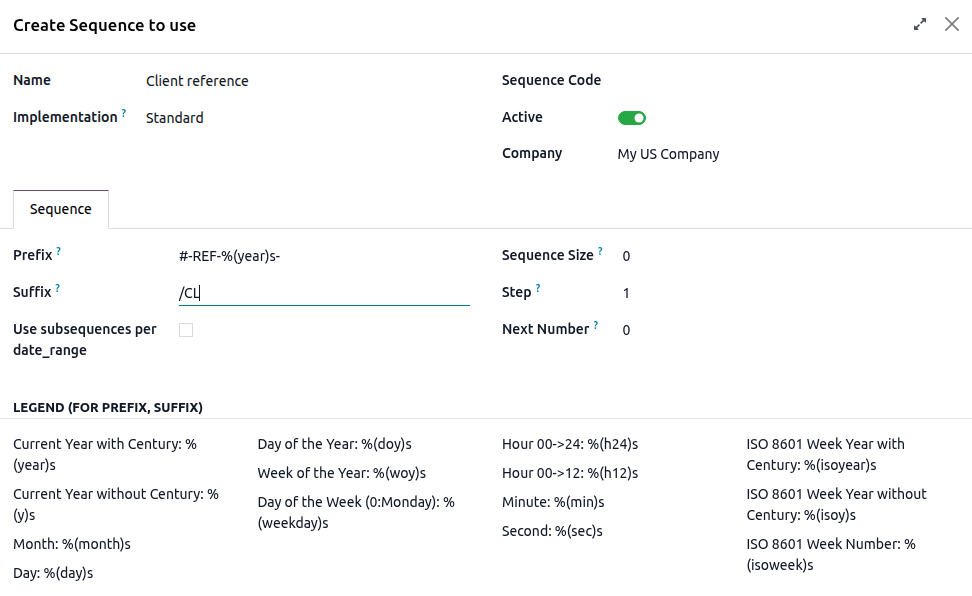
If you want the automated action to create a sequential customer reference each time a new customer is created, set the Sequence field to Reference, then, in the dropdown, click Search more. Click New to create a new sequence.
In the example, each new customer receives a sequential reference with the prefix
#-REF-%(year)s-, where %(year)s is the current year including the century, and the suffix
/CL, e.g., #-REF-2025-00001/CL, #-REF-2025-00002/CL, etc.
Beräkna
Enter the code to be used for computing the field’s value.
Example
If you want the automation rule to compute a custom datetime field, Escalated on, when a task’s priority is set
to Very high (three stars), you can define the trigger Priority is set to to Very
High and define the Update Record action as follows:

Create Record and Duplicate Record
These actions are used to create a new or duplicated record on any model.
To define the action:
With Create Record or Duplicate Record selected as the Type of action, as relevant, select the required model in the Record to Create field; the field contains the current model by default.
Specify a Name for the record, or, if the action duplicates a record, indicate the record being duplicated in the Duplicate from field.
If the new or duplicated record is being created on another model, select a field in the Link Field field to link the record that triggered the creation of the new or duplicated record.
Tips
The Link Field dropdown menu only contains one2many fields existing on the current model that are linked to a many2one field on the target model.
Example
If you want the automation rule to duplicate a project, e.g. a project template with predefined
tasks, when an opportunity is set to Won, add a custom Related opportunity many2one
field field on the Project model and a custom
Related project one2many field field on the
Lead model, then provide the following details about the record being duplicated:

Tips
You can create another automation rule with Uppdatera rekord actions to update the fields of the new or duplicated record if necessary. For example, you can use a Create Record action to create a new project task and then assign it to a specific user using an Update Record action.
Skapa aktivitet
This action is used to schedule a new activity linked to the record.
To define the action:
With Create Activity selected as the Type of action, select the appropriate Activity Type from the dropdown menu.
Enter a Title.
Indicate by when the activity should be completed by specifying a number of Days, Weeks, or Months in the Due Date In field.
Select a User type:
To always assign the activity to the same user, select Specific User, then add the user in the Responsible field.
To target a user linked to the record dynamically, select Dynamic User (based on record). If needed, change the User Field by clicking on the placeholder field name then selecting or searching for the user field in the list that appears. Clicking the (right arrow) next to the field name allows you to access related fields if needed.
Optionally, add a Note to provide more information about the activity.
Example
After a proposition is sent to a opportunity with a high expected revenue, you want to create an activity for the salesperson’s team leader to call the potential client to increase the chances of closing the deal.
To do so, set the Activity Type to Call and the User Type to Dynamic User (based on record). Click on the placeholder field and select Sales Team, then click the (right arrow) and select Team Leader.

Skicka e-post och skicka SMS
These actions are used to send an email or a text message to a contact linked to a specific record.
To define the action:
With Send Email or Send SMS selected as the Type of action, as relevant, select or create an Email Template or SMS Template.
In the Send Email As or Send SMS As field, choose how you want to send the email or text message.
For an email, select:
Email: för att skicka meddelandet som ett e-postmeddelande till mottagarna i Email Template.
Message: för att lägga upp meddelandet på posten och meddela postens följare.
Note: för att skicka meddelandet som en intern anteckning som är synlig för interna användare i chatten.
For a text message, select:
SMS (utan anteckning): för att skicka meddelandet som ett textmeddelande till mottagarna av SMS-mallen.
SMS (med anteckning): för att skicka meddelandet som ett textmeddelande till mottagarna av SMS-mallen och lägga upp det som en intern anteckning i chatten.
Note only: för att endast lägga upp meddelandet som en intern anteckning i chatten.
Send WhatsApp
Viktigt
To automate the sending of WhatsApp messages, one or more WhatsApp templates must be created.
This action is used to send a WhatsApp message to a contact linked to a specific record.
With Send WhatsApp selected as the Type of action, select the appropriate WhatsApp Template from the dropdown menu.
Lägg till följare och ta bort följare
This action is used to subscribe/unsubscribe existing contacts as followers of the record.
With Add Followers or Remove Followers selected as the Type of action, as relevant, select a Followers Type:
To always add/remove the same contact(s), select Specific Followers then select the contact(s) from the dropdown menu. Multiple contacts can be added/removed.
To add/remove a contact linked to the record dynamically, select Dynamic Followers. If needed, change the Followers Field by clicking on the placeholder field name then selecting or searching for the partner field in the list that appears. Clicking the (right arrow) next to the field name allows you to access related fields if needed.
Example
To keep customers informed of progress on a project, this automated action adds the relevant
customer as a follower when a project task is set to In progress.

Utför kod
Viktigt
For automation rules that require the execution of custom code, note that maintenance of custom code is not included in the Standard or Custom pricing plans and incurs additional fees.
Denna åtgärd används för att exekvera Python-kod. Du kan skriva din kod i fliken Code med hjälp av följande variabler:
env: miljö där åtgärden utlösesmodel: modell av den post där åtgärden utlöses; är en void recordsetpost: post där åtgärden utlöses; kan vara ogiltig
records: postmängd av alla poster som åtgärden utlöses på i multiläge; detta kan lämnas tomttime,datetime,dateutil,timezone: användbara Python-bibliotekfloat_compare: verktygsfunktion för att jämföra flyttal baserat på specifik precisionlog(message, level='info'): loggningsfunktion för att registrera felsökningsinformation i ir.logging-tabellen_logger.info(message): logger för att skicka meddelanden i serverloggarUserError: undantagsklass för varningsmeddelanden riktade till användarenCommand: x2many kommandon namnområdeaction = {...}: för att returnera en åtgärd
Tips
De tillgängliga variablerna beskrivs både i flikarna Code och Help.
Se även
Skicka Webhook-avisering
This action is used to send a POST API request with the values of the selected Fields
to the webhook URL specified in the URL field.
Sample Payload ger en förhandsvisning av de data som ingår i begäran med hjälp av data från en slumpmässig post eller dummydata om ingen post finns tillgänglig.
Observera
It is also possible to set up an automated action that uses a webhook to receive data from an external system when a predefined event occurs in that system.
Flera åtgärder
This action is used to trigger multiple actions (linked to the current model) at the same time.
To define the actions:
With Multi Actions selected as the Type of action, click Add an action.
In the Add: Child Actions pop-up:
select one or more existing actions and click Select; or
click New, define the action to be executed, then click Save & Close or, to create additional actions, Save & New .
Repeat as many times as needed.
