Tilldelningar
Allocations are amounts of time off given to employees, either granted immediately or earned as the employee works, through an accrual plan.
När fritidstyper och periodiseringsplaner har konfigurerats är nästa steg att allokera, eller ge, ledig tid till de anställda.
Sidan Allokeringar i programmet Time Off är endast synlig för användare som har antingen Time Off Officer eller Administrator åtkomsträttigheter för programmet Time Off. Mer information om åtkomsträttigheter finns i dokumentationen access rights.
Tilldela ledig tid
För att skapa en ny tilldelning, navigera till .
Här visas en lista över alla aktuella tilldelningar, inklusive deras respektive status.
Click New to allocate time off, and a blank Allocation form appears.
Efter att ha angett ett namn för tilldelningen i det första tomma fältet i formuläret, ange följande information:
Name: Enter a name for the allocation, typically containing the type of time off, and the period of time it is available (example:
Annual Vacation Time Off - 2025).Typ av ledighet: Använd rullgardinsmenyn för att välja vilken typ av ledighet som ska tilldelas de anställda.
Allocation Type: Select how the allocation is granted. Choose Regular Allocation if the time off is given immediately, or Accrual Allocation if the time off is earned through an accrual plan.
Accrual Plan: If Accrual Allocation is selected for the Allocation Type, the Accrual Plan field appears. Using the drop-down menu, select the accrual plan associated with the allocation. An accrual plan is required when using the Accrual Allocation type.
Giltighetsperiod/Startdatum: Om Regular Allocation är valt för Allocation Type, är detta fält märkt Validity Period. Om Accrual Allocation är valt för Allocation Type, är detta fält märkt Start Date.
Det aktuella datumet fylls i det första datumfältet som standard. Om du vill välja ett annat datum klickar du på det förifyllda datumet för att visa ett popover-kalenderfönster. Navigera till önskat startdatum för tilldelningen och klicka på datumet för att välja det.
If the allocation expires, select the expiration date in the next date field. If the time off does not expire, leave the second date field blank.
Om Accrual Allocation har valts för Allocation Type, har detta andra fält beteckningen Run until.
Allokering: Ange hur mycket tid som ska tilldelas de anställda. I det här fältet visas tiden i antingen Hours eller Days, beroende på hur den valda Time Off Type är konfigurerad.
Employee: Using the drop-down menu, select the employee being allocated the time off.
Lägg till en anledning…: Om det behövs någon beskrivning eller anteckning för att förklara ledigheten, ange den i detta fält längst ned i formuläret.

Accrual start date behavior
If the Start Date is in the middle of an accrual period, Odoo adjusts it to the start or end of that period based on the Accrued Gain Time entered on the accrual plan.
Example
At the start of the accrual period: A Start Date of
06/16/25applies from06/01/25At the end of the accrual period: A Start Date of
06/18/25applies from07/01/25
Automatic adjustments on the start date to either the begining or end of an accural period ensures accruals align with the defined period boundaries, rather than the exact date entered.
Multiple requests
When allocating time off, it is common to allocate time to several employees at once. This is done using the Multiple Requests feature.
To allocate time to multiple employees in a single allocation, navigate to . Then, click the (Actions) icon in the upper-left corner, then click Multiple Requests. This reveals a Multiple Requests pop-up window.
This form is identical to the Allocation form, with an additional Mode field. The Mode field determines how multiple employees are selected.
Using the drop-down menu, select a Mode from one of the following options:
By Employee: This option allows for the selection of multiple individual employees that are unrelated in terms of department, company, or tags. Selecting this reveals an Employees field. Select the employees to receive the allocation in the Employees field. There is no limit to the amount of employees that can be selected.
By Company: This option allows for the selection of all employees within a specific company. Selecting this reveals a Company field. Select the Company to assign the allocation to. Only one company can be assigned in the Company field. When a company is selected, all employees within the company receive the allocation.
By Department: This option allows for the selection of all employees within a specific department. Selecting this reveals a Department field. Select the Department to assign the allocation to. Only one department can be assigned in the Department field. When a department is selected, all employees within the department receive the allocation.
By Employee Tag: This option allows for the selection of all employees with a specific tag. Selecting this reveals an Employee Tag field. Select the desired Employee Tag to select all employees with that tag. Only one tag can be assigned in the Employee Tag field. When a tag is selected, all employees with that tag receive the allocation.
Next, select the Time Off Type using the drop-down menu. Once a Time Off Type is selected, the placeholder name, ’Allocation Request’, changes to the name of the selected Time Off Type, including the amount of days. Change the name of the allocation, if desired.
Fill out the remainder of the Multiple Requests form, then click Create Allocations when done.
Example
A company hosts an annual picnic, including a raffle. There are five raffle prizes for a free
vacation day, which must be redeemed by the end of the year. The winners of this raffle all have
the tag Raffle Winner - 2025 Employee Picnic Prize added to their employee profiles.
The time off officer creates multiple allocations, and configures the Multiple Requests form as follows:
The name for the allocation is Vacation Day - Raffle Prize - 2025 Picnic. The Mode is set to By Employee Tag, and the Tag identified is Raffle Winner - 2025 Employee Picnic Prize.
The Time Off Type is set to Vacation Time Off, with the Allocation Type set to Regular Allocaiton, since the time off is given up front, and is not earned.
The Validity Period is set to 07/18/2025 12/31/2025, since the compnay picnic was that day, and the earned vacation day expires at the end of the year.
The Allocation is set to 1.00 Days, and A bonus vacation day won at the
annual Company Picnic. appears in the details at the bottom.

Begär tilldelning
Om en anställd har använt all sin lediga tid eller kommer att få slut på ledig tid kan han eller hon begära en tilldelning av ytterligare tid. Tilldelningar kan begäras på två sätt, antingen från vyn Dashboard eller My Allocations.
För att skapa en ny tilldelningsbegäran klickar du antingen på knappen New Allocation Request på huvudpanelen Time Off eller på knappen New i listvyn My Allocations. Båda knapparna öppnar ett nytt formulär för tilldelningsbegäran.
Observera
Both options open a new allocation request form, but when requested from the Dashboard, the form appears in a pop-up window, and the Validity Period field does not appear.
When requested from the My Allocations list view, the screen navigates to a new allocation request page, instead of presenting a pop-up window.
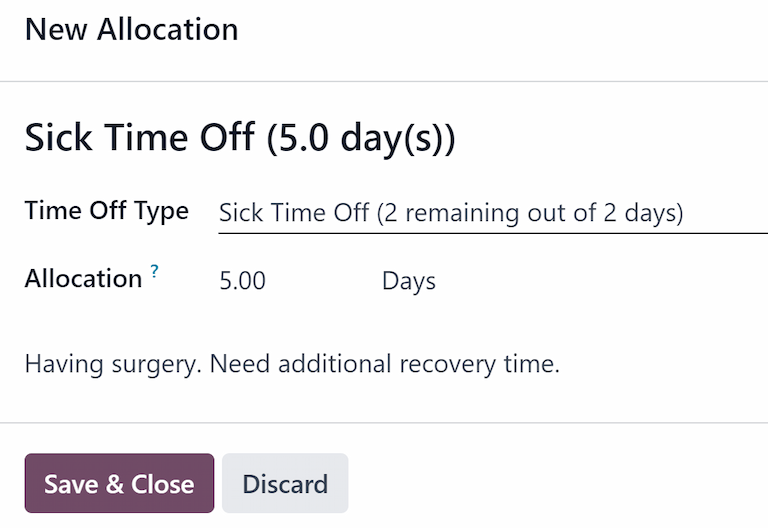
Ange följande information på blanketten för begäran om ny tilldelning:
Time Off Type: Using the drop-down menu, select the type of time off being requested for the allocation. After a selection is made, the title updates with the time off type.
Validity Period: By default, the current date populates this field, and it is not able to be modified. This field only appears when requesting an allocation from the My Allocations view ().
Allokering: Ange den tid som begärs i det här fältet. Formatet presenteras antingen i Days eller Hours, beroende på hur Time Off Type är konfigurerad. När det här fältet har fyllts i uppdateras namnet på allokeringsbegäran så att det innehåller den tid som begärs.
Lägg till en anledning…: Ange en beskrivning av tilldelningsbegäran i det här fältet. Det bör innehålla alla detaljer som godkännare kan behöva för att godkänna begäran.
Om begäran skapades från Dashboard klickar du på knappen Save & Close i popup-fönstret New Allocation för att spara informationen och skicka in begäran.
If the form was completed from the My Allocations list view, the information is automatically saved as it is entered.