Leverantörer
Before products can be added to the Lunch app, the restaurants that provide the food needs to be configured.
To add a new vendor, first navigate to . Here, all currently configured vendors for the Lunch app appear in a default Kanban view. To change to a list view, click the (List) icon in the top-right corner.
Observera
No vendors are preconfigured in the Lunch app, so all vendors must be added to the database.
A placeholder Lunch Supplier card appears on the Vendors dashboard, by default. Click on this card, and configure the following fields on the vendor form:
Tillgänglighet
Beställningar
After the first vendor is configured, add more vendors by clicking the New button in the top-left corner, and configure the new lunch supplier form. Repeat for all needed vendors.
Information om leverantörer
Vendor: Enter a name for the vendor in this field.
Vendor (beneath the line for vendor name): Using the drop-down menu, select the corresponding vendor in the Contacts app. If the vendor has not already been created, type in the vendor name, and click Create ”new vendor name” to add them. Alternatively, click Create and edit… to create the vendor and edit the vendor contact form. The vendor contact form allows for more details to be entered, such as contact information.
Observera
Om ett val görs i listrutan Vendor uppdateras textfältet Vendor (ovan, för leverantörens namn) med namnet på den leverantör som valts i listrutan.
The list of vendors that is presented in the drop-down menu is pulled from the Contacts application.
Address: Enter the vendor’s address in the various fields.
Email: Enter the vendor’s email in this field.
Phone: Enter the vendor’s phone number in this field.
Company: If this vendor is only available to a specific company, select the company from the drop-down menu. If this field is left blank, the vendor’s items are available to all companies. This field only appears in a multi-company database.

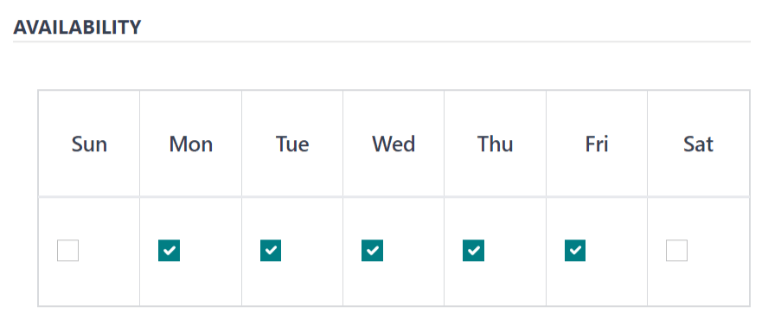
Tillgänglighet
Avsnittet AVAILABILITY visar en tabell med två rader. Veckodagarna fyller i den övre raden och den nedre raden har kryssrutor. Kryssa i motsvarande kryssruta för varje veckodag som säljaren är tillgänglig.
Som standard är måndag till fredag markerade.
Order
I avsnittet ORDERS på säljarformuläret anges vilka platser säljaren är tillgänglig för, samt hur och när beställningar görs och tas emot.
Delivery: Using the drop-down menu, select Delivery if the vendor delivers to the office, or select No Delivery if orders must be picked up.
Location: Select which locations are able to order from this vendor. Multiple locations can be selected. If this field is left blank, all locations can order from the vendor.
Observera
En
HQ Office-plats skapas som standard när en databas skapas och kan väljas från listan.Send Order By: Click the radio button to select how orders are sent to the vendor. The available options are Phone or Email.
Order Time: This field only appears if Email is selected in the Send Order By field. Enter the time that an order must be emailed for it to be accepted. Enter the time in the following format:
HH:MM. Then select either AM or PM from the drop-down menu, next to the time field.

Extramaterial
When ordering an item in the Lunch app, optional extra items, sometimes referred to as add-ons, can be shown. These can be configured in any manner that suits the products being offered.
Som standard tillåter Odoo tre typer av extra objekt, som kan betraktas som kategorier. Som standard är den första typen (eller kategorin) av tillägg märkt Extras, den andra är märkt Beverages och den tredje är märkt Extra Label 3.
Viktigt
När du konfigurerar tilläggstjänsterna är det viktigt att komma ihåg att alla tilläggstjänster som konfigureras visas för alla produkter som erbjuds av säljaren. Det innebär att endast artiklar som gäller för alla produkter från säljaren ska läggas till.
Konfigurera extrafunktioner
Ange följande information för var och en av de tre tillgängliga extra sektionerna:
Extra (#) Label: Enter a name for the type of extra, such as
Toppings. This can be thought of as a category.Extra (#) Quantity: Select how the extras are selected. The options are:
None or More: Select this option if the user is not required to make a selection.
One or More: Select this option to require the user to make at least one selection.
Only One: Select this option to require the user to make only one selection.
Lägg till extrafunktioner
Efter att etiketter och kvantiteter har konfigurerats för en extra kategori måste de enskilda extra artiklarna läggas till för varje kategori.
Klicka på Lägg till rad längst ner i listan som visas till höger om den extra kategorin. Ange Namn och Pris för varje artikel som ska läggas till. Priset kan förbli $0.00 om det inte finns någon kostnad. Detta är vanligt för artiklar som engångssilver eller kryddor.
Example
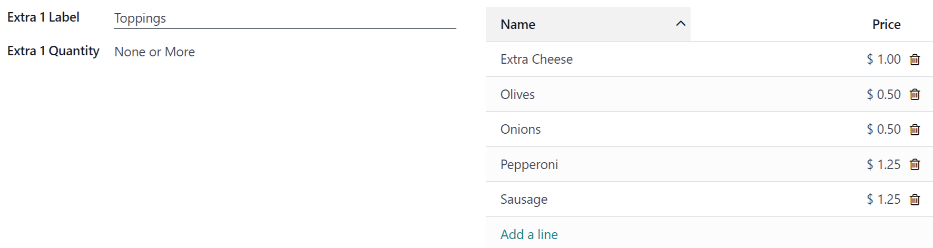
För en pizzeria som endast erbjuder personliga pizzor, se deras extrautrustning konfigurerad enligt följande:
Den första extra är konfigurerad för de olika toppings som de erbjuder. Extra 1 Label sätts till Toppings, och Extra 1 Quantity sätts till None or More. De olika påläggen läggs sedan till, med sina motsvarande kostnader.
The pizzeria also offers a free beverage with any purchase. To set this up, the Extra
2 Label is set to Beverages, and the Extra 2 Quantity is set to Only
One. The various beverage choices are added, and the cost for each remains zero.
