Ajouter un nouvel employé
When a new employee is hired, the first step is to create a new employee form. Starting in the app default view, click the Create button to access a new employee form. Fill out the required information (underlined in bold) and any additional details, then click Save.

Note
Le numéro de téléphone et le nom de l’entreprise actuelle sont indiqués dans les champs Téléphone professionnel et Société.
Informations générales
Champs obligatoires
Nom : Saisissez le nom de l’employé.
Société : Sélectionnez la société dans le menu déroulant qui a engagé le nouvel employé ou créez une nouvelle société en saisissant le nom dans le champ.
Working Hours: In the Work Information tab, select the desired Working Hours from the drop-down menu.

Note
Les Heures de travail sont liées à l’horaire de la société et les heures de travail d’un employé ne peuvent pas être situées en dehors de l’horaire de l’entreprise.
Chaque horaire individuel est propre à l’entreprise, de sorte que pour les bases de données multi-sociétés, chaque entreprise doit avoir son propre horaire.
Si les heures de travail d’un employé ne sont pas configurées en tant qu’heures de travail de l’entreprise, il est possible d’ajouter de nouvelles heures de travail ou de modifier des heures de travail existantes. Pour ajouter ou modifier un horaire, allez à l’application , ajoutez un nouveau temps de travail ou éditez-en un existant.
Après avoir créé le nouveau temps de travail, définissez les heures de travail de l’employé.
Champs optionnels
Photo : Dans la zone d’image en haut à droite de la fiche employé, cliquez sur l’icône d’édition ✏️ (crayon) pour sélectionner une photo à charger.
Poste de travail : Saisissez l’intitulé de la fonction de l’employé.
Étiquettes : Cliquez sur une étiquette dans le menu déroulant pour ajouter toute étiquette applicable à l’employé. Il est possible de créer n’importe quelle étiquette dans ce champ en la saisissant. Une fois créée, la nouvelle étiquette est disponible pour toutes les fiches employés. Il n’y a pas de limite au nombre d’étiquettes pouvant être ajoutées.
Coordonnées professionnelles : Saisissez le Téléphone portable professionnel, le Téléphone professionnel et l”Adresse email professionnelle de l’employé et/ou le nom de la Société.
Département : Sélectionnez le département de l’employé dans le menu déroulant.
Manager : Sélectionnez le manager de l’employé dans le menu déroulant.
Mentor : Sélectionnez le mentor de l’employé dans le menu déroulant.
Note
Après avoir sélectionné un Manager, si le champ Mentor est laissé vide, le manager sélectionné est automatiquement complété dans le champ Mentor.
Astuce
Pour apporter des modifications aux champs Département, Manager, Mentor, ou Société sélectionnés, cliquez sur le bouton Lien externe à côté de la sélection respective. Le bouton Lien externe ouvre le formulaire sélectionné, ce qui permet d’y apporter des modifications. Cliquez sur Enregistrer une fois les modifications enregistrées.
Onglet des informations supplémentaires
Onglet CV
CV
Next, the employee’s work history is entered in the Resumé tab. Each previous experience must be entered individually. Click Create a New Entry, and the Create Resumé lines form appears. Enter the following information, then click the Save & Close button if there is only one entry to add, or click the Save & New button to save the current entry and create another line.

Name: Type in the name of the previous work experience.
Type : Dans le menu déroulant, sélectionnez Expérience, Éducation, Certification interne, Formation interne, ou saisissez une nouvelle entrée.
Type d’affichage : Sélectionnez Classique, Certification, ou Cours dans le menu déroulant.
Date de début et Date de fin : Saisissez les dates de début et de fin de l’expérience professionnelle. Pour sélectionner une date, utilisez les icônes fléchées < (gauche) et > (droite) pour aller au mois souhaité, puis cliquez sur le jour pour sélectionner la date.
Description : Saisissez tous les détails pertinents dans le champ.
Compétences
An employee’s skills can be entered in the Resumé tab in the same manner a resumé line is created. Click the Create a New Entry button under Skills and a Create Skills form appears. Fill in the information, then click the Save & Close button if there is only one entry to add, or click the Save & New button to save the current entry and immediately create a new entry.
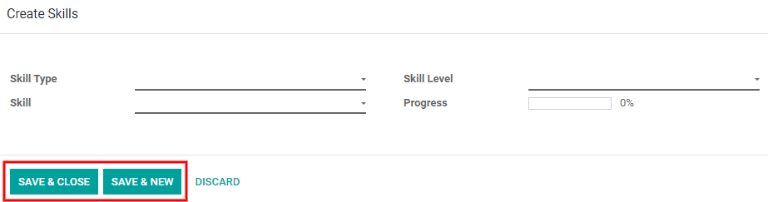
Skill Type: Select from the drop-down menu either Languages, Dev, Music, Marketing, or type in a new skill type. After entering the new skill type, an option to Create the skill or Create and Edit the skill appears. Click Create and Edit, and a pop-up for the specific skill type appears. This can also be accessed with the External Link button next to the new skill. This form allows for the creation of specific skills and levels. Click Add a line and enter the information for the new skill, then repeat for all other added skills. Repeat this process for the Levels section. Click Add a line to add each level and progress.

Example
To add a math skill set, enter
Mathin the Name field. In the Skills field, enterAlgebra,Calculus, andTrigonometry. And, in the Levels field enterbeginner,intermediate, andexpert. Then, either click Save & Close or Save & New.Compétence : Les compétences associées au Type de compétence sélectionné apparaissent dans un menu déroulant. Par exemple, si vous sélectionnez Langue en tant que Type de compétence, vous avez le choix entre plusieurs langues dans le champ Compétences. Sélectionnez la compétence prédéfinie appropriée ou saisissez-en une nouvelle.
Skill Level: Pre-defined skill levels associated with the selected Skill Type appear in a drop-down menu. Select a level or create a new skill level by typing it in.
Progress: Progress is automatically selected based on the selected Skill Level. Skill levels and progress can be modified in the Skill Type pop-up form, which is accessed via the External Link button next to Skill Type field.
To delete any line from the Resumé tab, click the 🗑️ (trash can) delete icon to delete the entry. Add a new line by clicking the ADD button next to the corresponding section.
Onglet des informations professionnelles
Location: Select the Work Address from the drop-down menu. The External Link button opens up the selected company form in a window, and allows for editing. The Work Location is where any specific location details should be noted, such as a floor, or building.
Approvers: Using the drop-down menus, select the employees responsible for approving Time Off, Expenses, and Timesheets for the employee. The External Link button opens a form with the approver’s Name, Email Address, Company, Phone, and Mobile fields. These can be modified, if needed. Click Save after making any edits.
Schedule: Select the Working Hours (required) and Timezone for the employee. The External Link button opens up a detailed view of the specific daily working hours. Working hours can be created, modified, or deleted here. Global time off (such as holidays) can be entered in the Global Time Off tab. Click Add a line to add a new global time off.
Planning: Click on a planning role from the drop-down menu for both the Default Planning Role and the Planning Roles fields to add a role. There is no limit to the amount of Planning Roles that can be selected for an employee, but there can only be one Default Planning Role. The default is the typical role that the employee performs, where the Planning Roles are all the specific roles the employee is able to perform.

Onglet des informations privées
Aucune information n’est obligatoire dans l’onglet Informations privées. Toutefois, certaines informations dans cette section peuvent être essentielles pour le département de paie de l’entreprise. Afin de traiter correctement les fiches de paie et s’assurer que toutes les déductions sont prises en compte, il est important de saisir les informations professionnelles de l’employé.
Ici vous pouvez saisir les informations relatives au Coordonnées privées, à l”État civil, au Contact d’urgence, à l”Éducation, à la Citoyenneté, aux Personnes à charge et au Permis de travail de l’employé. Les champs sont complétés à l’aide d’un menu déroulant, en cochant une case ou en saisissant les informations.
Private Contact: Enter the Address for the employee. The selection can be made with the drop-down menu. If the information is not available, type in the name for the new address. To edit the new address, click the External Link button to open the address form. On the address form, enter the necessary details, then click Save. Some other information in the Private Contact section may auto-populate, if the address is already listed in the drop-down menu.
État civil : Sélectionnez Célibataire, Marié(e), Cohabitant légal, Veuf(ve) ou Divorcé(e) dans le menu déroulant.
Emergency Contact: Type in the name and phone number of the employee’s emergency contact.
Éducation : Sélectionnez le niveau d’études le plus élevé atteint par l’employé dans le menu déroulant Niveau du certificat. Les options incluent Graduat, Bachelier, Master, Docteur ou Autre. Saisissez le Champ d’étude et le nom de l”Établissement scolaire dans les champs respectifs.
Citizenship: This section houses all the information relevant to the citizenship of the employee. Some selections use a drop-down menu, as does the Nationality (Country), Gender, and Country of Birth sections. The Date of Birth uses a calendar module to select the date. First, click on the name of the month, then the year, to access the year ranges. Use the < (left) and > (right) arrow icons, navigate to the correct year range, and click on the year. Next, click on the month. Last, click on the day to select the date. Type in the information for the Identification No, Passport No, and Place of Birth fields. If the employee is Disabled or a Nonresident, click the check box next to the respective fields.
Dependant: If the employee has any dependants, that information is entered here. Type in the number of children the employee has, and check the boxes next to Disabled Children and/or Other Dependent People if applicable.
Work Permit: If the employee has a work permit, enter the information in this section. Type in the Visa No and/or Work Permit No in the corresponding fields. Using the calendar module, select the Visa Expire Date to enter the expiration date.

Onglet des paramètres RH
Cet onglet propose plusieurs champs pour différentes informations, en fonction du pays où l’entreprise se situe. Différents champs sont configurés en fonction de la localisation, mais certaines sections apparaissent de toute manière.
Status: If applicable, select a Related User, Job Position, and Language with the drop-down menus. Type in the Registration Number of the Employee, and the NIF Country Code if available.
Fleet: If the employee has access to a company car, enter the Mobility Card information here.
Timesheets: Enter the employee’s cost per hour in a $XX.XX format. This is factored in when the employee is working at a work center. This value affects the employee’s pay, and may also affect manufacturing costs for a product, if the value of the manufactured product is not a fixed amount.
Attendance: This section may only appear for Belgian companies. Enter the INSZ or BIS number if applicable. Badge ID and a PIN Code can be entered here, if the employee needs/has one. Click Generate next to the Badge ID to create a badge ID.

Personal documents tab
The Personal Documents tab is only displayed for certain countries. If this tab is not visible, it is not applicable to the company’s location.
Add a file for the employee’s ID Card Copy, Driving License,
Mobile Subscription Invoice, SIM Card Copy, and Internet
Subscription Invoice by clicking the Upload Your File button next to the corresponding
field. File types that can be accepted are .jpg, .png, and .pdf.
