添加一名新员工
When a new employee is hired, the first step is to create a new employee form. Starting in the app default view, click the Create button to access a new employee form. Fill out the required information (underlined in bold) and any additional details, then click Save.

注解
当前公司的电话号码及名称将自动填充至 工作电话 和 公司 字段。
一般信息
必填字段
Name:输入员工姓名。
Company:从下拉菜单中选择新员工受雇的公司,或在字段中输入名称以新建公司。
Working Hours: In the Work Information tab, select the desired Working Hours from the drop-down menu.

注解
Working Hours are related to a company’s working times, and an employee cannot have working hours that are outside of a company’s working times.
个人的工作时间因公司而异,因此对于多公司数据库,每个公司都需要设置自己的工作时间。
如果员工的工作时间未配置为公司的工作时间,则可以添加新的工作时间,或修改现有的工作时间。要添加或修改工作时间,请前往 ,添加工作时间或编辑现有工作时间。
创建新的工作时间后,为员工设置工作时长。
可选字段
照片:在员工卡右上方的图片框中,单击 ✏️ (铅笔) 编辑图标,然后选择要上传的照片。
guilabel:
工作职位:输入员工的职位名称。标签:单击下拉菜单中的标签,添加适用于该员工的所有标签。在该字段中输入标签名称,即可创建新标签。创建后,所有员工卡均可使用新标签。除此,可添加的标签数量不受限制。
工作联系信息:输入员工的 工作电话、工作手机、工作邮箱 和/或 公司 名称。
部门:从下拉菜单中选中员工所在部门。
经理:从下拉菜单中选择员工经理。
导师:从下拉菜单中选择员工导师。
注解
选择 经理 后,若 导师 字段为空,则所选经理将自动填充 导师 字段。
小技巧
要编辑已选定的 部门、 经理 、 导师 或 公司,请单击相应选项旁边的 外部链接 按钮,即可打开所选表单,以便进行修改。编辑完成后,单击 保存 。
其他信息标签
简历选项卡
简历
Next, the employee’s work history is entered in the Resumé tab. Each previous experience must be entered individually. Click Create a New Entry, and the Create Resumé lines form appears. Enter the following information, then click the Save & Close button if there is only one entry to add, or click the Save & New button to save the current entry and create another line.

Name: Type in the name of the previous work experience.
类型:从下拉菜单中选择 经历、 教育、:guilabel:内部认证`、内部培训 或输入新条目。
显示类型:从下拉菜单中选择 经典、认证 或 课程。
开始日期 和 结束日期:输入工作经历的开始和结束日期。要选择日期,请使用 < (左) 和 > (右) 箭头图标滚动至欲选月份,然后单击日期进行选择。
描述:在该字段中输入任何相关详细信息。
技能
An employee’s skills can be entered in the Resumé tab in the same manner a resumé line is created. Click the Create a New Entry button under Skills and a Create Skills form appears. Fill in the information, then click the Save & Close button if there is only one entry to add, or click the Save & New button to save the current entry and immediately create a new entry.

Skill Type: Select from the drop-down menu either Languages, Dev, Music, Marketing, or type in a new skill type. After entering the new skill type, an option to Create the skill or Create and Edit the skill appears. Click Create and Edit, and a pop-up for the specific skill type appears. This can also be accessed with the External Link button next to the new skill. This form allows for the creation of specific skills and levels. Click Add a line and enter the information for the new skill, then repeat for all other added skills. Repeat this process for the Levels section. Click Add a line to add each level and progress.

Example
To add a math skill set, enter
Mathin the Name field. In the Skills field, enterAlgebra,Calculus, andTrigonometry. And, in the Levels field enterbeginner,intermediate, andexpert. Then, either click Save & Close or Save & New.技能:与所选 技能类型 相关的技能均将显示在下拉菜单中。例如,选中`技能类型`中的`语言`类型后, 技能 字段下方将显示多种语言以供选择。请选择适当的预配置技能,或输入名称以创建新技能。
Skill Level: Pre-defined skill levels associated with the selected Skill Type appear in a drop-down menu. Select a level or create a new skill level by typing it in.
Progress: Progress is automatically selected based on the selected Skill Level. Skill levels and progress can be modified in the Skill Type pop-up form, which is accessed via the External Link button next to Skill Type field.
To delete any line from the Resumé tab, click the 🗑️ (trash can) delete icon to delete the entry. Add a new line by clicking the ADD button next to the corresponding section.
工作信息选项卡
Location: Select the Work Address from the drop-down menu. The External Link button opens up the selected company form in a window, and allows for editing. The Work Location is where any specific location details should be noted, such as a floor, or building.
Approvers: Using the drop-down menus, select the employees responsible for approving Time Off, Expenses, and Timesheets for the employee. The External Link button opens a form with the approver’s Name, Email Address, Company, Phone, and Mobile fields. These can be modified, if needed. Click Save after making any edits.
Schedule: Select the Working Hours (required) and Timezone for the employee. The External Link button opens up a detailed view of the specific daily working hours. Working hours can be created, modified, or deleted here. Global time off (such as holidays) can be entered in the Global Time Off tab. Click Add a line to add a new global time off.
Planning: Click on a planning role from the drop-down menu for both the Default Planning Role and the Planning Roles fields to add a role. There is no limit to the amount of Planning Roles that can be selected for an employee, but there can only be one Default Planning Role. The default is the typical role that the employee performs, where the Planning Roles are all the specific roles the employee is able to perform.

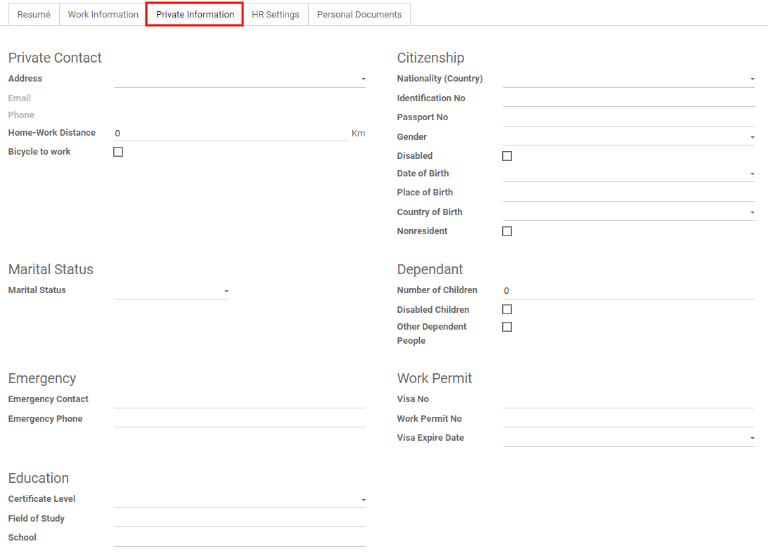
个人信息选项卡
个人信息 选项卡中的所有信息都不是必需的,但其中某些信息可能对公司的工资部门至关重要。为了正确处理工资单并确保所有扣款都已入账,应输入员工的个人信息。
在此处输入员工的 个人联系方式、婚姻状态、紧急联系方式、教育状况、公民身份、部门 以及:guilabel:工作许可证 信息。可通过下拉菜单、单击复选框或输入信息来填写这些字段。
Private Contact: Enter the Address for the employee. The selection can be made with the drop-down menu. If the information is not available, type in the name for the new address. To edit the new address, click the External Link button to open the address form. On the address form, enter the necessary details, then click Save. Some other information in the Private Contact section may auto-populate, if the address is already listed in the drop-down menu.
婚姻状态:从下拉菜单中选择 单身、已婚、合法同居、丧偶`或 :guilabel:`离婚。
Emergency Contact: Type in the name and phone number of the employee’s emergency contact.
教育状况:从 文凭 下拉菜单中选择员工完成的最高教育级别。选项包括 应届毕业生、学士、硕士、博士`或 :guilabel:`其他。在相应的字段中输入 研究领域 和 学校 名称。
Citizenship: This section houses all the information relevant to the citizenship of the employee. Some selections use a drop-down menu, as does the Nationality (Country), Gender, and Country of Birth sections. The Date of Birth uses a calendar module to select the date. First, click on the name of the month, then the year, to access the year ranges. Use the < (left) and > (right) arrow icons, navigate to the correct year range, and click on the year. Next, click on the month. Last, click on the day to select the date. Type in the information for the Identification No, Passport No, and Place of Birth fields. If the employee is Disabled or a Nonresident, click the check box next to the respective fields.
Dependant: If the employee has any dependants, that information is entered here. Type in the number of children the employee has, and check the boxes next to Disabled Children and/or Other Dependent People if applicable.
Work Permit: If the employee has a work permit, enter the information in this section. Type in the Visa No and/or Work Permit No in the corresponding fields. Using the calendar module, select the Visa Expire Date to enter the expiration date.
人力资源设置选项卡
根据公司所在国家的不同,该选项卡提供了不同的信息字段。不同的区域配置不同的字段,但有些字段将始终显示。
Status: If applicable, select a Related User, Job Position, and Language with the drop-down menus. Type in the Registration Number of the Employee, and the NIF Country Code if available.
Fleet: If the employee has access to a company car, enter the Mobility Card information here.
Timesheets: Enter the employee’s cost per hour in a $XX.XX format. This is factored in when the employee is working at a work center. This value affects the employee’s pay, and may also affect manufacturing costs for a product, if the value of the manufactured product is not a fixed amount.
Attendance: This section may only appear for Belgian companies. Enter the INSZ or BIS number if applicable. Badge ID and a PIN Code can be entered here, if the employee needs/has one. Click Generate next to the Badge ID to create a badge ID.

Personal documents tab
The Personal Documents tab is only displayed for certain countries. If this tab is not visible, it is not applicable to the company’s location.
Add a file for the employee’s ID Card Copy, Driving License,
Mobile Subscription Invoice, SIM Card Copy, and Internet
Subscription Invoice by clicking the Upload Your File button next to the corresponding
field. File types that can be accepted are .jpg, .png, and .pdf.
