Using Routes and Pull/Push Rules
In inventory management, the supply chain strategy determines when products should be fabricated, delivered to distribution centers, and made available in the retail channel.
This kind of strategic process can be configured using Routes, featuring Pull and Push Rules. Once everything is properly configured, the inventory app can automatically generate transfers following the instructions given by the rules. Yes, Odoo simplifies your life.
À l’intérieur de l’entrepôt
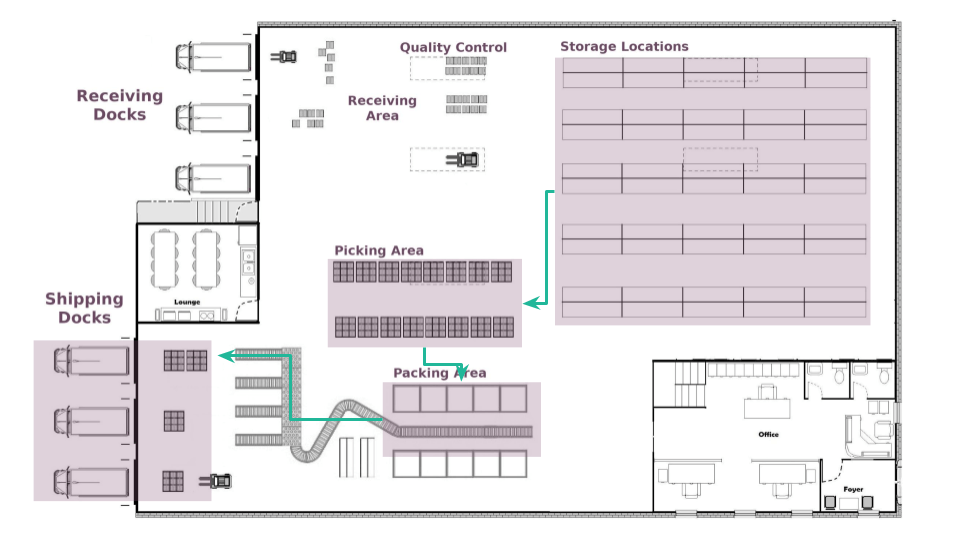
Let’s imagine a generic warehouse plan, where you can find receiving docks, a quality control area, storage locations, picking and packing areas, and shipping docks. All products go through all these locations, which also trigger all the route’s rules.

In this example, vendor trucks unload pallets of ordered goods at receiving docks. Operators then scan the products in the receiving area. Some of these products are sent to a quality control area (those devoted to being used during the manufacturing process, for example), while others are directly stored in their respective locations.

Voici un exemple d’une route d’exécution. Au matin, les articles sont préparés pour toutes les commandes qui doivent être préparées pendant la journée. Ces articles sont prélevés de leur emplacement de stockage et déplacés vers la zone de préparation, à proximité de l’endroit où les commandes sont emballées. Ensuite, les commandes sont emballées dans leurs boîtes respectives et des convoyeurs les amènent près des quais d’expédition, prêts à être livrés aux clients.
Comment cela fonctionne-t-il ?
Pull Rules
Avec les Règles de flux tiré, une demande pour certains produits déclenche des approvisionnements, tandis que les Règles de flux poussé sont déclenchées par l’arrivée de produits à un endroit spécifique.
We can say that Pull Rules are used to fulfill a customer order, a sale order. So, Odoo generates a need at the Customer Location for each product in the order. Because Pull Rules are triggered by a need, Odoo looks for a Pull Rule defined on the Customer Location. In our case, a delivery order pull rule that transfers products from the Shipping Area to the Customer Location is found, and a transfer between the two locations is created.
Then, Odoo finds another pull rule that tries to fulfill the need for the Shipping Area: the Packing Rule that transfers products from the Packing Area to the Shipping Area. And, finally, other rules are triggered until a transfer between the Stock and the Picking Area is created.
Note
All these transfers are pre-generated by Odoo, starting from the end and going backwards. While working, the operator process these transfers in the opposite order: first the picking, then the packing, then the delivery order.
Règles de flux poussés
On the other hand, Push Rules are much easier to understand. Instead of pre-generating documents based on needs, they are live-triggered when products arrive in a specific location. Push Rules basically say: « when a product arrives at a specific location, move it to another location. »
A simple example would be: when a product arrives in the Receipt Area, move them to the Storage Location. As different rules can be applied to different products, you can assign different storage locations for different products.
Another rule could be: when products arrive at a location, move them to the Quality Control Area. Then, once the quality check is done, move them to their Storage Location.
Note
Push Rules can be triggered only if no Pull Rule pre-generated the upstream transfers.
Important
Sets of rules like those are called routes. The grouping on the rule defines how products are grouped in the same transfer or not. For example, during the picking operation, all orders are grouped in one transfer, whereas the packing operation respects the grouping per customer order.
Use Routes and Rules
Since Routes are a collection of Push and Pull Rules, Odoo helps you manage advanced routes configuration such as:
Manage product manufacturing chains;
Gérer les emplacements par défaut par produit;
Define routes within your warehouse according to business needs, such as quality control, after-sales services, or supplier returns;
Aider la gestion des locations en générant des retours automatisés pour les produits loués.
To configure a route such as one of those above, open the Inventory Application and go to . Then, enable the Multi-Step Routes feature.

Note
The Storage Locations feature is automatically activated with the Multi-Step Routes.
Once this first step is completed, you have the choice between pre-configured routes or custom ones. Both are explained below.
Pre-configured Routes
Odoo’s pre-configured routes are available in the warehouses’ menu. To find it, go to . There, open your warehouse and edit it to see the pre-configured routes for incoming and outgoing shipments.

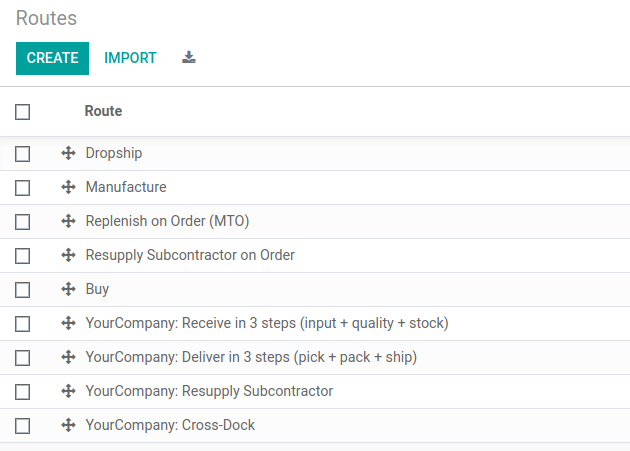
Some more advanced routes, such as pick-pack-ship, are already configured to make your life easier. Those are based on your choice for shipments. Once you made your choice, head to to see the routes Odoo generated for you.
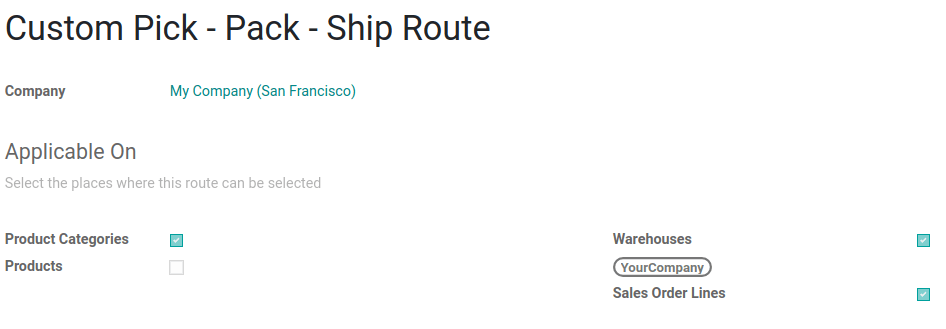
Opening one of those routes allows you to see on what you can apply the route. Here, all the selected product categories in the YourCompany warehouse are set up to follow the 3-steps route.

Easier for many businesses, this process might not fit yours. Thus, you can configure custom routes in which you can define your own rules, but also the source and destination location of each action. As an example, here are the rules for the pre-configured route.

Routes personnalisées
To create a custom route, go to , click on create, and choose the places where this route can be selected. Of course, combinations are available.
Each place has a different behavior, so it is important to tick only the useful ones and adapt each route accordingly.
When applying the route on a product category (), all the rules configured in the route are applied to every product of the category. For example, this can be useful if you use the dropshipping process for all the products from the same category.

The same behavior applies to the warehouses. If you tick Warehouses, all the transfers occurring inside the chosen warehouse, and meeting the conditions of the linked rules, then follow that route.

For the Sales Order Lines, it is more or less the opposite. You have to choose the route yourself when creating a quotation. This is pretty useful if some products go through different routes.

If you work with this kind of route, it is important to keep in mind that it must be selected on the sales order, such as below.

Then, the route can be chosen on each line of the document.

Finally, there are routes that can be applied to products. Those work more or less like the product categories: once selected, you have to manually set on which product it must be applied.

To do so, go to and open the one on which you want to apply the route. Then go to the Inventory tab and select the route you’ve created.

If, prima facie, the routes’ configuration can appear quite easy, don’t forget that we haven’t set up any rule yet. If not harder to set up, those are vital to have working routings.
Règles
The rules are to be defined on the routes. To do so, go to , then to the Rules section, and click on Add a line button.

The available rules trigger various actions. If Odoo offers Push and Pull rules, others are also available. Here are some explanations for all of them:
Pull From: this rule is triggered by a need for the product in a specific location. The need can come from a sale order which has been validated or from a manufacturing order which requires a specific component. When the need appears in the destination location, Odoo generates a picking to fulfill this need.
Push To: this rule is triggered by the arrival of some products in the defined source location. In the case you move products to the source location, Odoo generates a picking to move those products to the destination location.
Pull & Push: this rule allows generating pickings in the two situations explained above. This means that when products are required at a specific location, a transfer is created from the previous location to fulfill that need. This creates a need in the previous location and a rule is triggered to fulfill it. Once the second need is fulfilled, the products are pushed to the destination location and all the needs are fulfilled.
Buy: when products are needed at the destination location, a request for quotation is created to fulfill the need.
Manufacture: when products are needed in the source location, a manufacturing order is created to fulfill the need.
You must also define the Operation Type. This operation allows defining which kind of picking is created from the rule. With our above screenshot, the created picking is, for example, an internal transfer.
On the other hand, the Supply Method, allows defining what happens at the source location:
Take From Stock: the products are taken from the available stock of the source location;
Trigger Another Rule: the system tries to find a stock rule to bring the products to the source location. The available stock is ignored.
Take From Stock, if Unavailable, Trigger Another Rule: the products are taken from the available stock of the source location. If there is no stock available, the system tries to find a rule to bring the products to the source location.
In the Scheduling section, you can determine how Odoo behaves when one of the chain’s pickings is rescheduled. In case you decide to Propagate Rescheduling, the next move is also to be rescheduled. If you prefer having the choice to reschedule the next move, you can decide to receive an alert in the form of a next activity.
What about a full flow?
Do you remember our Pick - Pack - Ship custom route? Let’s use it to try a full flow with an advanced custom route.
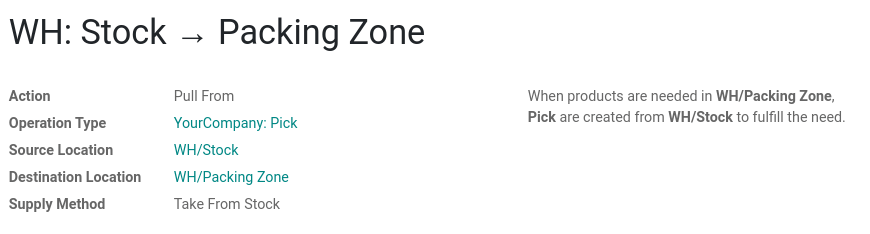
First, a quick look at our rules and their supply methods: we have three rules, all Pull From rules. The supply methods are the following:
Take From Stock: When products are needed in WH/Packing Zone, Picks (internal transfers from WH/Stock to WH/Packing Zone) are created from WH/Stock to fulfill the need.
Trigger Another Rule: When products are needed in WH/Output, Packs (internal transfers from WH/Packing Zone to WH/Output) are created from WH/Packing Zone to fulfill the need.
Trigger Another Rule: When products are needed in Partner Locations/Customers, Delivery Orders are created from WH/Output to fulfill the need.

This means that, when a customer orders products, a delivery order is created to fulfill the order.

Note
If the source document is the same sale order, the status is not the same. In fact, the status is Waiting Another Operation if the previous transfer in the list is not done yet.

To prepare the order, conveyors need products packed at the output area, so an internal transfer is requested from the packing zone.

Bien évidemment, la zone de colisage a besoin de produits qui sont prêts à être emballés. Donc, un transfert interne est nécessaire vers le stock pour que les employés puissent rassembler les produits nécessaires dans l’entrepôt.

As explained in this documentation introduction, the last step in the process (here the delivery order) is the first to be triggered, which then triggers other rules until we reach the first step in the process (here, the internal transfer from to stock to the packing area). Now, everything is ready to be processed so the customer can get the ordered items.
In our case, the product is delivered to the customer when all the rules have been triggered and the transfers done.
