Agregar un nuevo empleado
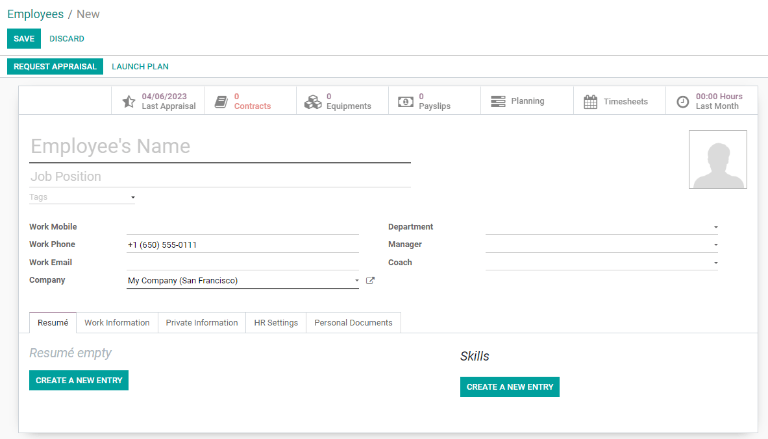
When a new employee is hired, the first step is to create a new employee form. Starting in the app default view, click the Create button to access a new employee form. Fill out the required information (underlined in bold) and any additional details, then click Save.
Nota
El número de teléfono y el nombre de la empresa actual se completan en los campos Teléfono laboral y Empresa.
Información general
Campos necesarios
Nombre: escriba el nombre del empleado.
Empresa: en el menú desplegable, seleccione la empresa que contrató al empleado. También puede crear una nueva empresa si escribe el nombre en el campo.
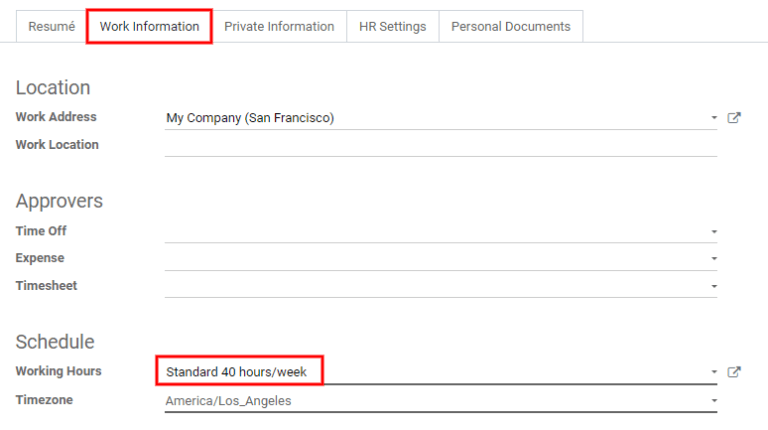
Working Hours: In the Work Information tab, select the desired Working Hours from the drop-down menu.
Nota
Las horas laborables están relacionadas al horario en el que opera una empresa. Las horas laborables de un empleado no pueden estar fuera del horario de la empresa.
Cada empresa tiene sus propio horario laboral, así que para las bases de datos de varias empresas, cada empresa debe tener sus horas laborables.
Si las horas laborables de un empleado no están configuradas dentro del horario de la empresa, puede agregar algunas nuevas o modificar las que ya existen. Para agregar o modificar las horas laborables, vaya a la aplicación y agregue o edite según sea necesario.
Después de crear las horas laborables, proporcióneselas al empleado.
Campos opcionales
Fotografía: haga clic en el icono editar ✏️ (representado con un lápiz) del cuadro de imagen ubicado en la parte superior derecha de la tarjeta del empleado para seleccionar la fotografía correspondiente.
Puesto de trabajo: escriba el título del puesto de trabajo del empleado.
Etiquetas: haga clic en una etiqueta del menú desplegable para agregar la que corresponda al empleado. Puede crear cualquier etiqueta si la escribe en este campo. Una vez creada, la nueva etiqueta está disponible para todas las tarjetas de empleado y puede agregar tantas como necesite.
Información de contacto del trabajo: escriba el teléfono celular laboral, teléfono laboral, correo electrónico laboral y el nombre de la empresa del empleado.
Departamento: seleccione el departamento del empleado en el menú desplegable.
Gerente: seleccione al gerente del empleado en el menú desplegable.
Instructor: seleccione al instructor del empleado en el menú desplegable.
Nota
Si después de seleccionar un gerente el campo instructor está vacío, entonces este instructor también se asignará como instructor.
Truco
Para editar el departmento, gerente, instructor o empresa que seleccionó, haga clic en el botón enlace externo junto al campo correspondiente. Este botón abrirá el formulario de su selección y podrá realizar modificaciones. Haga clic en Guardar para aplicar los cambios.
Pestañas de información adicional
Pestaña de currículo
Curriculum vitae
Next, the employee’s work history is entered in the Resumé tab. Each previous experience must be entered individually. Click Create a New Entry, and the Create Resumé lines form appears. Enter the following information, then click the Save & Close button if there is only one entry to add, or click the Save & New button to save the current entry and create another line.
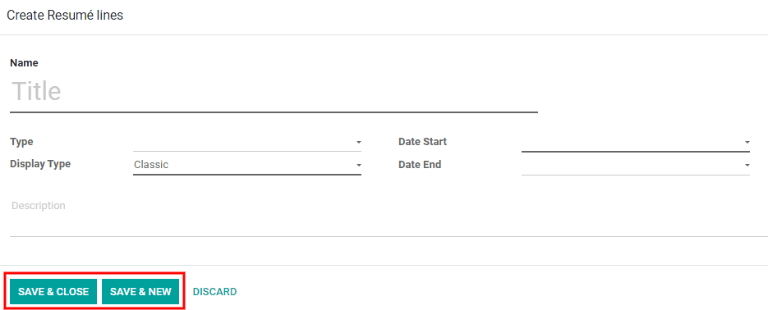
Name: Type in the name of the previous work experience.
Tipo: seleccione expreriencia, educación, certificación interna, capacitación interna en el menú desplegable o escriba una nueva entrada.
Tipo de visualización: seleccione clásico, certificación o curso en el menú desplegable.
Fecha de inicio y Fecha de finalización: seleccione las fechas de inicio y fin de la experiencia laboral. Para elegir las fechas, utilice los iconos de flecha < (izquierda) y > (derecha) para desplazarse al mes correspondiente, luego haga clic en el día para terminar su selección.
Descripción: escriba cualquier detalle relevante en este campo.
Habilidades
An employee’s skills can be entered in the Resumé tab in the same manner a resumé line is created. Click the Create a New Entry button under Skills and a Create Skills form appears. Fill in the information, then click the Save & Close button if there is only one entry to add, or click the Save & New button to save the current entry and immediately create a new entry.

Skill Type: Select from the drop-down menu either Languages, Dev, Music, Marketing, or type in a new skill type. After entering the new skill type, an option to Create the skill or Create and Edit the skill appears. Click Create and Edit, and a pop-up for the specific skill type appears. This can also be accessed with the External Link button next to the new skill. This form allows for the creation of specific skills and levels. Click Add a line and enter the information for the new skill, then repeat for all other added skills. Repeat this process for the Levels section. Click Add a line to add each level and progress.

Example
To add a math skill set, enter
Mathin the Name field. In the Skills field, enterAlgebra,Calculus, andTrigonometry. And, in the Levels field enterbeginner,intermediate, andexpert. Then, either click Save & Close or Save & New.Habilidad: las habilidades correspondientes asociadas con el tipo de habilidad que seleccionó aparecen en un menú desplegable. Por ejemplo, si selecciona idioma como tipo de habilidad aparecerán varios idiomas que podrá seleccionar en el campo Habilidad. Seleccione la habilidad preconfigurada apropiada o escriba una nueva.
Skill Level: Pre-defined skill levels associated with the selected Skill Type appear in a drop-down menu. Select a level or create a new skill level by typing it in.
Progress: Progress is automatically selected based on the selected Skill Level. Skill levels and progress can be modified in the Skill Type pop-up form, which is accessed via the External Link button next to Skill Type field.
To delete any line from the Resumé tab, click the 🗑️ (trash can) delete icon to delete the entry. Add a new line by clicking the ADD button next to the corresponding section.
Pestaña de información del trabajo
Location: Select the Work Address from the drop-down menu. The External Link button opens up the selected company form in a window, and allows for editing. The Work Location is where any specific location details should be noted, such as a floor, or building.
Approvers: Using the drop-down menus, select the employees responsible for approving Time Off, Expenses, and Timesheets for the employee. The External Link button opens a form with the approver’s Name, Email Address, Company, Phone, and Mobile fields. These can be modified, if needed. Click Save after making any edits.
Schedule: Select the Working Hours (required) and Timezone for the employee. The External Link button opens up a detailed view of the specific daily working hours. Working hours can be created, modified, or deleted here. Global time off (such as holidays) can be entered in the Global Time Off tab. Click Add a line to add a new global time off.
Planning: Click on a planning role from the drop-down menu for both the Default Planning Role and the Planning Roles fields to add a role. There is no limit to the amount of Planning Roles that can be selected for an employee, but there can only be one Default Planning Role. The default is the typical role that the employee performs, where the Planning Roles are all the specific roles the employee is able to perform.

Pestaña de información privada
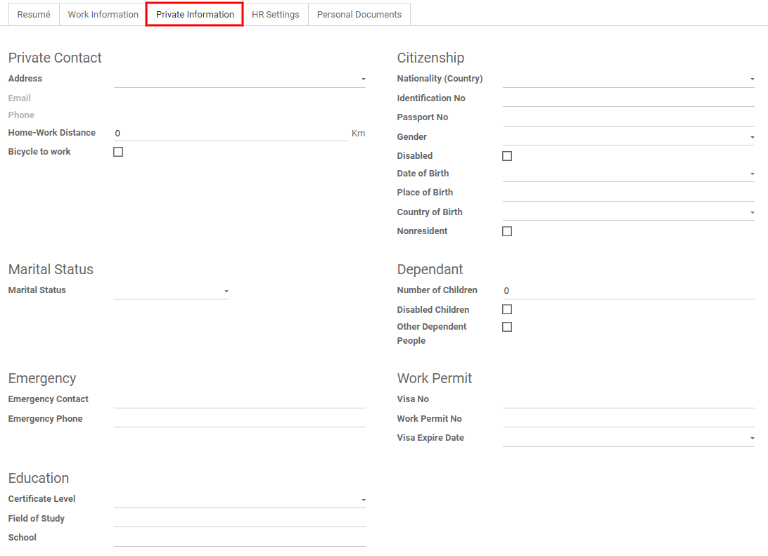
No es necesario que complete los datos de la pestaña Información privada, sin embargo, es posible que algunos sean importantes para el Departamento de Nóminas de la empresa. Con el fin de procesar los recibos de nómina de forma correcta y garantizar que se contabilizan todas las deducciones, debe proporcionar la información personal del empleado.
Aquí puede proporcionar la información relacionada con el contacto privado, estado civil, contacto de emergencia, educación, ciudadanía, dependendientes y permiso de trabajo del empleado. Puede completar los campos mediante el menú desplegable, al hacer clic en una casilla o si escribe la información.
Private Contact: Enter the Address for the employee. The selection can be made with the drop-down menu. If the information is not available, type in the name for the new address. To edit the new address, click the External Link button to open the address form. On the address form, enter the necessary details, then click Save. Some other information in the Private Contact section may auto-populate, if the address is already listed in the drop-down menu.
Estado civil: seleccione soltero(a), casado(a), cohabitante legal, viudo(a) o divorciado(a) en el menú desplegable.
Emergency Contact: Type in the name and phone number of the employee’s emergency contact.
Educación: seleccione el nivel más alto de educación que completó el empleado en el menú desplegable Nivel de certificado. Las opciones incluyen egresado, licenciatura, maestro, doctor u otro. Escriba el campo de estudio y el nombre de la escuela en los campos correspondientes.
Citizenship: This section houses all the information relevant to the citizenship of the employee. Some selections use a drop-down menu, as does the Nationality (Country), Gender, and Country of Birth sections. The Date of Birth uses a calendar module to select the date. First, click on the name of the month, then the year, to access the year ranges. Use the < (left) and > (right) arrow icons, navigate to the correct year range, and click on the year. Next, click on the month. Last, click on the day to select the date. Type in the information for the Identification No, Passport No, and Place of Birth fields. If the employee is Disabled or a Nonresident, click the check box next to the respective fields.
Dependant: If the employee has any dependants, that information is entered here. Type in the number of children the employee has, and check the boxes next to Disabled Children and/or Other Dependent People if applicable.
Work Permit: If the employee has a work permit, enter the information in this section. Type in the Visa No and/or Work Permit No in the corresponding fields. Using the calendar module, select the Visa Expire Date to enter the expiration date.
Pestaña de ajustes de RR. HH.
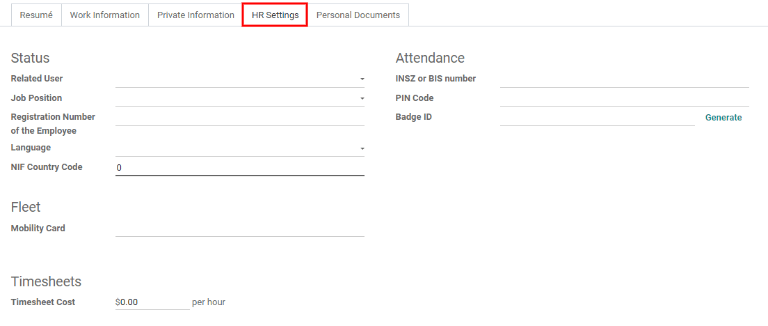
Esta pestaña proporciona varios campos que se completan con información que varía según el país donde se encuentre la empresa. Se configuran diferentes campos dependiendo de la ubicación, sin embargo, puede que algunas secciones sigan apareciendo.
Status: If applicable, select a Related User, Job Position, and Language with the drop-down menus. Type in the Registration Number of the Employee, and the NIF Country Code if available.
Fleet: If the employee has access to a company car, enter the Mobility Card information here.
Timesheets: Enter the employee’s cost per hour in a $XX.XX format. This is factored in when the employee is working at a work center. This value affects the employee’s pay, and may also affect manufacturing costs for a product, if the value of the manufactured product is not a fixed amount.
Attendance: This section may only appear for Belgian companies. Enter the INSZ or BIS number if applicable. Badge ID and a PIN Code can be entered here, if the employee needs/has one. Click Generate next to the Badge ID to create a badge ID.
Personal documents tab
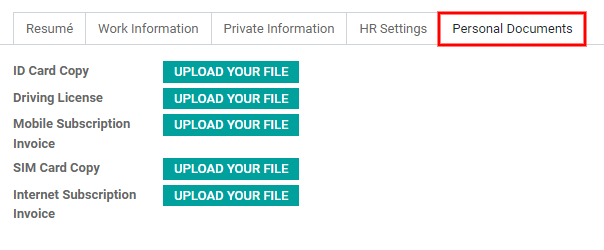
The Personal Documents tab is only displayed for certain countries. If this tab is not visible, it is not applicable to the company’s location.
Add a file for the employee’s ID Card Copy, Driving License,
Mobile Subscription Invoice, SIM Card Copy, and Internet
Subscription Invoice by clicking the Upload Your File button next to the corresponding
field. File types that can be accepted are .jpg, .png, and .pdf.
