Compte Authorize.Net
First, choose a plan and create an Authorize.Net account.
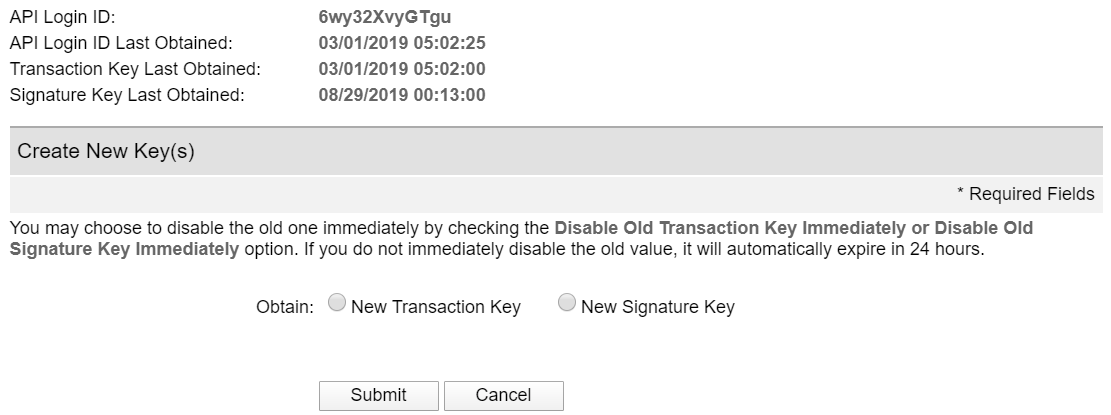
Odoo needs the Authorize.Net account’s API credentials and keys to connect to it, which comprises the:
API login ID,
Transaction key, and
Signature key.
To retrieve them, log in to Authorize.Net and go to . While the API Login ID is displayed, both keys need to be generated.
To do so, select New Transaction Key and click Submit. Copy the key and store it somewhere secure as it will not be displayed afterward. Repeat the same process for the Signature Key.
Pour plus d'infos
Configuration
Pour plus d'infos
Refer to the payment acquirers documentation for more information about general configuration options.
To activate Authorize.Net as a payment acquirer in Odoo, go to . Find Authorize.Net, click the Activate button, and change the State to Enabled.
Identifiants
Fill in the API Login Id, API Transaction Key, and API Signature Key fields with the values displayed or generated on Authorize.Net’s API Credentials & Keys page, and Save.
Note
An API Client Key is only necessary if the Payment from Odoo option is selected as Payment Flow.
Important
To test Authorize.Net with a sandbox account, first change the State field to Test Mode. It is recommended to do so on a test Odoo database, rather than on a production database.
Note
If the Test Mode is used with the credentials of a non-sandbox account, it will result in the following error: The merchant login ID or password is invalid or the account is inactive.
Flux de paiement
It is possible either to redirect users to Authorize.Net’s portal to authenticate the payment or to keep users on the current page and authenticate the payment from Odoo.
To configure the payment flow, go to . Under Payment Flow, select Redirection to the acquirer website or Payment from Odoo and Save.
Paiement d’Odoo
If Payment from Odoo is selected, an API Client Key is needed. To generate one, go to . Click Generate Client Key to automatically fill in the API Client Key field and Save.
Redirection vers le site de l’intermédiaire
If Redirection to the acquirer website is selected, a Default Receipt URL and Default Relay Response URL should be added to the Authorize.Net account.
To do so, log in to Authorize.Net, and go to . Click Add URL, enter the URL following the format below, and click Submit:
Default Receipt URL: add
/payment/authorize/returnafter the main website URL.Example
https://example.odoo.com/payment/authorize/returnDefault Relay Response URL: add
/shop/confirmationafter the main website URL.Example
https://example.odoo.com/shop/confirmation

Note
Failing to complete this step results in the following error: The referrer, relay response or receipt link URL is invalid.
Capture payments after delivery
To reserve funds for 30 days on the customer’s card without charging them yet, go to , enable Capture Amount Manually, and Save.
To capture the payment, go to the related sales order and click Capture Transaction. If the order is canceled, click Void Transaction to unlock the funds from the customer’s card.

Avertissement
After 30 days, transactions are voided automatically by Authorize.Net.
Exporter depuis Authorize.Net
Pour exporter un relevé :
Connectez-vous à Authorize.Net.
Allez à .
Définissez une plage d’exportation en utilisant un règlement par lot d”ouverture et de clôture. Toutes les transactions comprises dans les deux règlements par lot seront exportées vers Odoo.
Sélectionnez toutes les transactions dans la plage souhaitée, copiez-les et collez-les dans la feuille Report 1 Download du modèle d’importation Excel.

Example

Dans ce cas, le premier lot (01/01/2021) de l’année correspond au règlement du 31/12/2020, donc le règlement d”ouverture date du 31/12/2020.
Une fois que les données se trouvent dans la feuille Report 1 Download :
Allez à l’onglet Recherche de transaction sur Authorize.Net.
Dans la section Date de règlement, sélectionnez la plage de dates de règlement par mot précédemment utilisée dans les champs Du : et Au : et cliquez sur Rechercher.
Lorsque la liste a été générée, cliquez sur Télécharger vers fichier.
Dans la fenêtre contextuelle, sélectionnez Champs élargis avec réponse CAVV/séparés par des virgules, activez Inclure les en-têtes de colonne et cliquez sur Soumettre.
Ouvrez le fichier texte, sélectionnez Tout, copiez les données et collez-les dans la feuille Report 2 Download du modèle d’importation Excel.
Les lignes de transit sont automatiquement complétées et mises à niveau dans les feuilles transit for report 1 et transit for report 2 du modèle d’importation Excel. Assurez-vous que toutes les écritures s’y trouvent et si ce n’est pas le cas, copiez la formule des lignes complétées précédemment des feuilles transit for report 1 ou 2 et collez-les dans les lignes vides.
Important
Pour obtenir le bon solde de clôture, ne supprimez aucune ligne dans les feuilles Excel.
Importer dans Odoo
Pour importer les données dans Odoo :
Ouvez le modèle d’importation Excel.
Copiez les données de la feuille transit for report 2 et utilisez le collage spécial pour uniquement coller les valeurs dans la feuille Odoo Import to CSV.
Recherchez les cellules bleues dans la feuille Odoo Import to CSV. Ce sont des écritures de rétrofacturation sans numéro de référence. Étant donné qu’elles ne peuvent pas être importées en tant que telles, allez à .
Recherchez Charge transaction/rétrofacturation et cliquez dessus.
Copiez la description de la facture, copiez-la dans la cellule Libellé de la feuille Odoo Import to CSV et ajoutez
Rétrofacturation /devant la description.S’il y a plusieurs factures, ajoutez une ligne dans le modèle d’importation Excel pour chaque facture et copiez/collez la description dans chaque ligne de Libellé respective.
Note
Pour les rétrofacturations/retours combinés dans les paiements, créez une nouvelle ligne dans le modèle d’importation Excel pour chaque facture.
Example

Ensuite, supprimez les lignes transaction nulle et transaction annulée et modifiez le format de la colonne Montant de la feuille Odoo Import to CSV en Nombre.
Retournez à et recherchez à nouveau les dates de règlement par lot précédemment utilisées.
Vérifiez que les dates de règlement des lots sur eCheck.Net correspondent aux dates des paiements associés trouvées dans la colonne Date de la feuille Odoo Import to CSV.
Si ce n’est pas le cas, remplacez la date par celle d’eCheck.Net. Triez la colonne par date et assurez-vous que le format est
MM/DD/YYYY.Copiez les données - y compris les en-têtes de colonne - de la feuille Odoo Import to CSV, collez-les dans un nouveau fichier Excel et enregistrez-les en utilisant le format CSV.
Ouvrez l’application Comptabilité, allez à , cochez la case Authorize.Net et cliquez sur . Sélectionnez le fichier CSV et chargez-le dans Odoo.
Astuce
Liste des codes de retour eCheck.Net