Outlook-Kalender-Synchronisierung
Die Synchronisierung des Outlook-Kalenders eines Benutzers mit Odoo ist nützlich, um den Überblick über seine Aufgaben und Termine in allen verbundenen Anwendungen zu behalten.
Microsoft-Azure-Einrichtung
Um Outlook Kalender mit dem Kalender von Odoo zu synchronisieren, benötigen Sie ein Microsoft-Azure-Konto. Das Erstellen eines Kontos ist für Benutzer, die Azure noch nie ausprobiert oder dafür bezahlt haben, kostenlos. Für weitere Informationen schauen Sie sich die Kontenoptionen auf der Azure-Website an.
Lesen Sie in der `Dokumentation von Microsoft https://learn.microsoft.com/de-de/entra/identity-platform/quickstart-create-new-tenant`_, wie Sie eine Microsoft Entra ID (formell Microsoft Azure Active Directory (Azure AD) genannt). Dies ist eine API-Konsole zur Verwaltung und Registrierung von Microsoft-Anwendungen.
Bestehende Microsoft-Entra-ID-Benutzer sollten sich beim Microsoft-Azure-Entwicklerportal anmelden. Wählen Sie dann View (Ansicht) unter dem Abschnitt mit der Bezeichnung Manage Microsoft Entra ID (Microsoft Entra ID verwalten).
App registrieren
Nachdem Sie sich mit der Microsoft Entra ID angemeldet haben, registrieren Sie eine App.
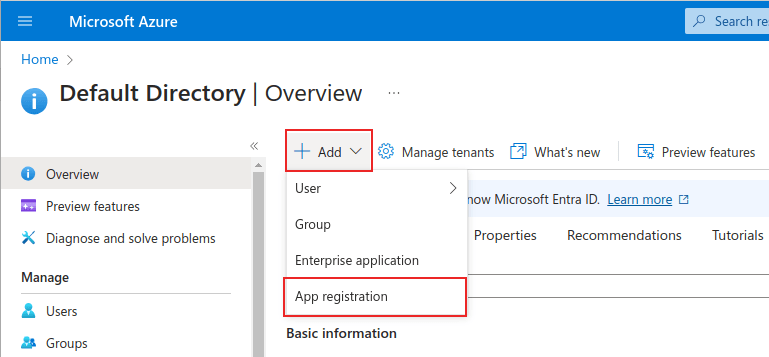
Um eine App zu erstellen, klicken Sie im oberen Menü auf + Add (Hinzufügen). Wählen Sie aus dem daraufhin angezeigten Dropdown-Menü die Option App Registration (App-Registrierung).
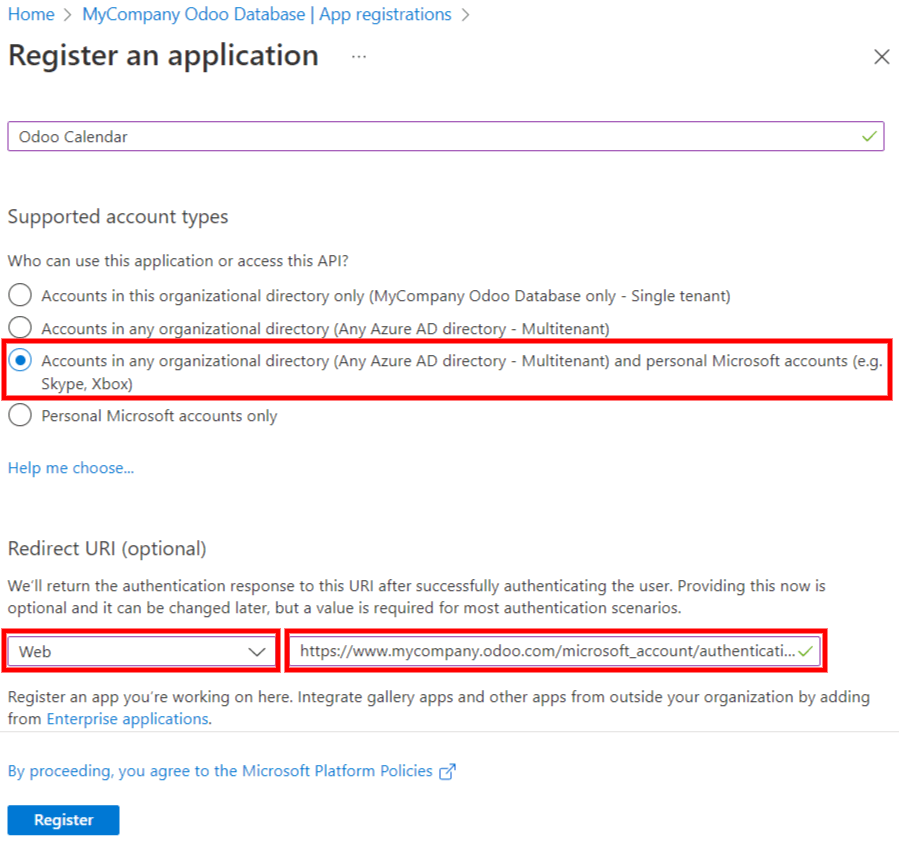
Geben Sie einen eindeutigen Name (Namen) für die verbundene App an.
Die Wahl des richtigen Supported account type (unterstützter Kontotyp) ist wichtig, da die verbundene App sonst nicht funktioniert. Benutzer, die ihren Outlook-Kalender mit Odoo verbinden möchten, sollten die Option Konten in einem beliebigen Organisationsverzeichnis (Jedes Microsoft-Entra-ID-Verzeichnis - mandantenfähig) und persönliche Microsoft-Konten (z. B. Skype, Xbox) für Unterstützte Kontotypen wählen.
Bei der Konfiguration der Redirect URI (Umleitungs-URI) wählen Sie Web aus dem ersten Dropdown-Menü. Geben Sie dann die Odoo-Datenbank-URI (URL) gefolgt von /microsoft_account/authentication ein.
Example
Geben Sie https://yourdbname.odoo.com/microsoft_account/authentication für die Redirect URI (Umleistungs-URI) ein. Ersetzen Sie Ihrdbname.odoo.com durch die URL.
Tipp
Vergewissern Sie sich, dass die im URI verwendete URL (Domain) der Datenbank genau die gleiche Domain ist, die im Systemparameter web.base.url konfiguriert ist.
Greifen Sie auf die web.base.url zu, indem Sie den Entwicklermodus aktivieren und zu navigieren. Wählen Sie ihn dann aus der Liste Schlüssel auf der Seite Systemparameter.
Weitere Informationen zu den Beschränkungen und Einschränkungen von URIs finden Sie auf dieser Microsoft-Seite `Einschränkungen für Umleitungs-URI/Antwort-URL.
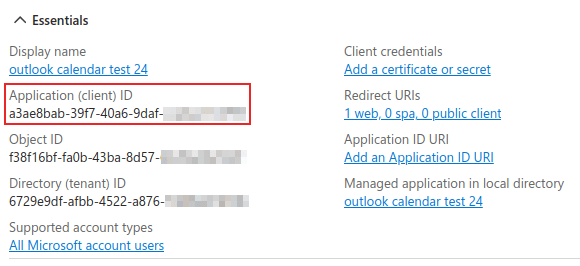
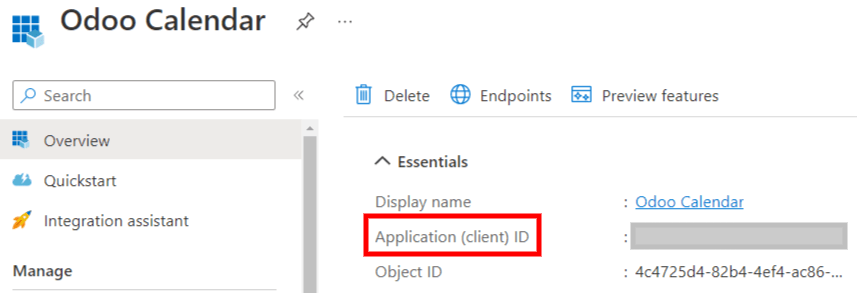
Klicken Sie schließlich auf der Seite für die App-Registrierung auf die Schaltfläche Register (Registrieren). um die Registrierung der App abzuschließen. Die Application (client) ID (App-(Client-)ID` wird erstellt. Kopieren Sie diesen Wert, da er später in der Konfiguration in Odoo benötigt wird.
Client-Geheimnis erstellen
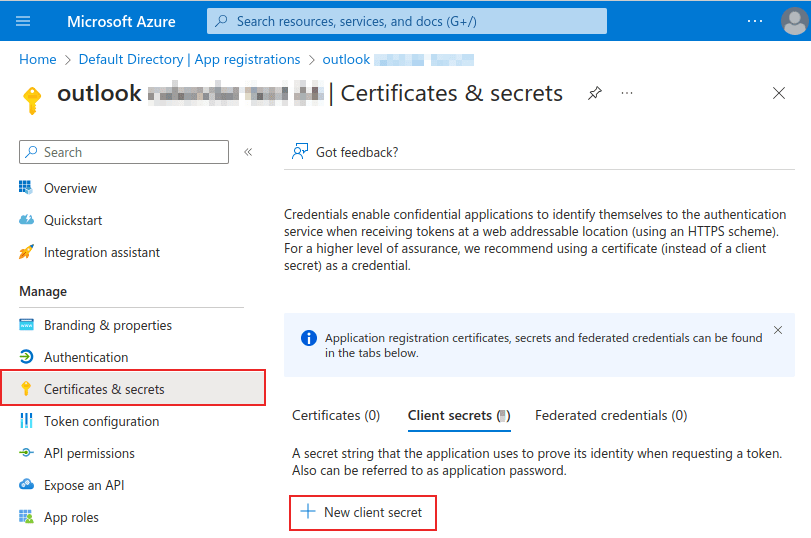
Der zweite Berechtigungsnachweis, der für die Synchronisierung des Microsoft-Outlook-Kalenders benötigt wird, ist das Client-Geheimnis. Der Benutzer muss ein Client-Geheimnis hinzufügen, da dies Odoo erlaubt, sich selbst zu authentifizieren und keine Interaktion von Seiten des Benutzers erfordert. Zertifikate sind optional.
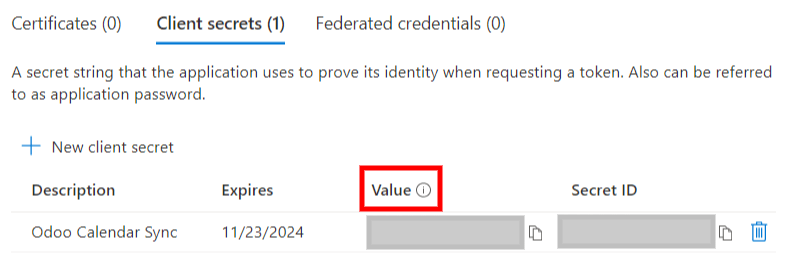
Um ein Client-Geheimnis hinzuzufügen, klicken Sie im linken Menü auf (Zertifikate & Geheimnisse). Klicken Sie dann auf + New client secret (+ Neues Client-Geheimnis), um das Client-Geheimnis zu erstellen.
Geben Sie als nächstes eine Description (Beschreibung) ein und wählen Sie aus, wann das Client-Geheimnis Expires (Abläuft). Verfügbare Optionen sind: 90 days (3 months) (90 Tage (3 Monate)), 365 days (12 months) (365 Tage (12 Monate)), 545 days (18 months) (545 Tage (18 Monate)), 730 days (24 months) (730 Tage (24 Monate)) oder Custom (Benutzerdefiniert). Mit der Option Custom (Benutzerdefiniert) kann der Administrator ein Start- und End-Datum festlegen.
Klicken Sie schließlich auf Add (Hinzufügen), um ein Client-Geheimnis hinzuzufügen.
Tipp
Da es schwierig sein kann, die Synchronisierung zurückzusetzen, empfiehlt Odoo, das maximal zulässige Ablaufdatum für das Client-Geheimnis (24 Monate oder benutzerdefiniert) einzustellen, damit Sie nicht bald eine neue Synchronisierung vornehmen müssen.
Kopieren Sie den Value (Wert)zur Verwendung im nächsten Abschnitt.
Warnung
Die Werte des Client-Geheimnisses können nicht eingesehen werden, außer unmittelbar nach der Erstellung. Stellen Sie sicher, dass Sie das Geheimnis nach der Erstellung speichern, bevor Sie die Seite verlassen.
Konfiguration in Odoo
Gehen Sie in der Odoo-Datenbank zu , und aktivieren Sie das Kontrollkästchen neben der Einstellung Outlook-Kalender. Vergessen Sie nicht, auf Speichern zu klicken, um die Änderungen zu übernehmen.
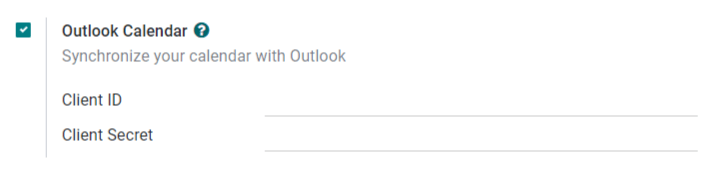
Kopieren Sie im Portal von Microsoft Azure unter dem Abschnitt Overview (Übersicht) der Anwendung die Application (Client) ID (App-(Client)ID), wenn sie nicht bereits kopiert wurde, und fügen Sie sie in das Feld Client-ID in Odoo ein.
Kopieren Sie den zuvor erworbenen Valuie (Wert) (Client-Geheimniswert), und fügen Sie ihn in das Feld Client-Geheimnis in Odoo ein.
Klicken Sie schließlich auf der Odoo-Seite auf Speichern.
Mit Outlook synchronisieren
Warnung
Odoo empfiehlt dringend, die Outlook-Kalender-Synchronisierung mit einer Testdatenbank und einer Test-E-Mail-Adresse (die nicht für andere Zwecke verwendet wird) zu testen, bevor Sie versuchen, den gewünschten Outlook-Kalender mit der Produktionsdatenbank des Benutzers zu synchronisieren.
Wenn der Benutzer vor der Synchronisierung seines Outlook-Kalenders vergangene, aktuelle oder zukünftige Ereignisse in seinem Odoo-Kalender hat, behandelt Outlook die während der Synchronisierung aus dem Odoo-Kalender gezogenen Ereignisse als neue Ereignisse und sendet eine E-Mail-Benachrichtigung von Outlook an alle Teilnehmer des Termins.
Um zu vermeiden, dass unerwünschte E-Mails an alle vergangenen, aktuellen und zukünftigen Terminteilnehmer gesendet werden, muss der Benutzer vor der ersten Synchronisierung die Ereignisse aus dem Odoo-Kalender zum Outlook-Kalender hinzufügen, die Ereignisse aus Odoo löschen und dann die Synchronisierung starten.
Sogar nach der Synchronisierung des Odoo-Kalenders mit dem Outlook-Kalender sendet Outlook jedes Mal eine Benachrichtigung an alle Teilnehmer, wenn ein Termin bearbeitet wird (erstellt, gelöscht, nicht archiviert oder Datum/Uhrzeit des Termins geändert), und zwar ohne Ausnahme. Dies ist eine Einschränkung, die von Odoo aus nicht behoben werden kann.
Zusammengefasst: Sobald ein Benutzer seinen Outlook-Kalender mit dem Odoo-Kalender synchronisiert hat, ist Folgendes möglich:
Wenn Sie einen Termin in Odoo erstellen, sendet Outlook eine Einladung an alle Teilnehmer des Termins.
Wenn Sie einen Termin in Odoo löschen, sendet Outlook eine Stornierung an alle Teilnehmer des Termins.
Wenn Sie die Archivierung eines Termins in Odoo aufheben, sendet Outlook eine Einladung an alle Teilnehmer des Termins.
Wenn Sie einen Termin in Odoo archivieren, sendet Outlook eine Stornierung an alle Teilnehmer des Termins.
Wenn Sie in Odoo einem Termin einen Kontakt hinzufügen, sendet Outlook eine Einladung an alle Teilnehmer des Termins.
Wenn Sie in Odoo einen Kontakt aus einem Termin entfernen, sendet Outlook eine Stornierung an alle Teilnehmer des Termins.
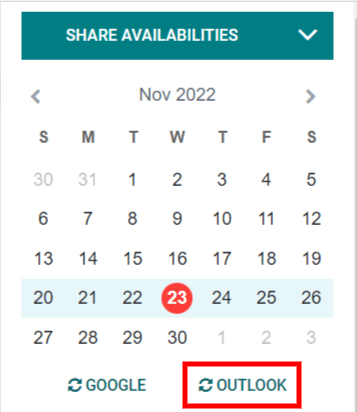
Odoo-Kalender und Outlook synchronisieren
Öffnen Sie in der Odoo-Datenbank das Modul Kalender, und klicken Sie auf die Synchronisierungsschaltfläche Outlook auf der rechten Seite, unterhalb des Monatskalenders.
Die Synchronisierung erfolgt in beide Richtungen, d. h. die Ereignisse werden in beiden Konten (Outlook und Odoo) abgeglichen. Die Seite leitet zu einer Microsoft-Anmeldeseite weiter, und der Benutzer wird aufgefordert, sich bei seinem Konto anzumelden, falls er dies noch nicht getan hat. Schließlich erteilen Sie die erforderlichen Berechtigungen, indem Sie auf Accept (Akzeptieren) klicken.

Bemerkung
Alle Benutzer, die die Synchronisierung nutzen möchten, müssen lediglich ihren Kalender mit Outlook synchronisieren. Die Konfiguration des Azure-Kontos von Microsoft erfolgt nur einmal, da die Client-IDs und Client-Geheimnisse der Entra ID Tenants von Microsoft eindeutig sind dem Benutzer hilft, eine bestimmte Instanz von Microsoft Cloud Services für seine internen und externen Benutzer zu verwalten.
Synchronisierung der Fehlerbehebung
Es kann vorkommen, dass das Microsoft-Outlook-Konto nicht korrekt mit Odoo synchronisiert wird. Synchronisierungsprobleme können in den Datenbankprotokollen angezeigt werden.
In diesen Fällen ist eine Fehlerbehebung für das Konto erforderlich. Sie können das Konto über die Schaltfläche Konto zurücksetzen zurücksetzen, indem Sie zu navigieren. Wählen Sie dann den Benutzer aus, der den Kalender ändern soll, und klicken Sie auf den Reiter Kalender.
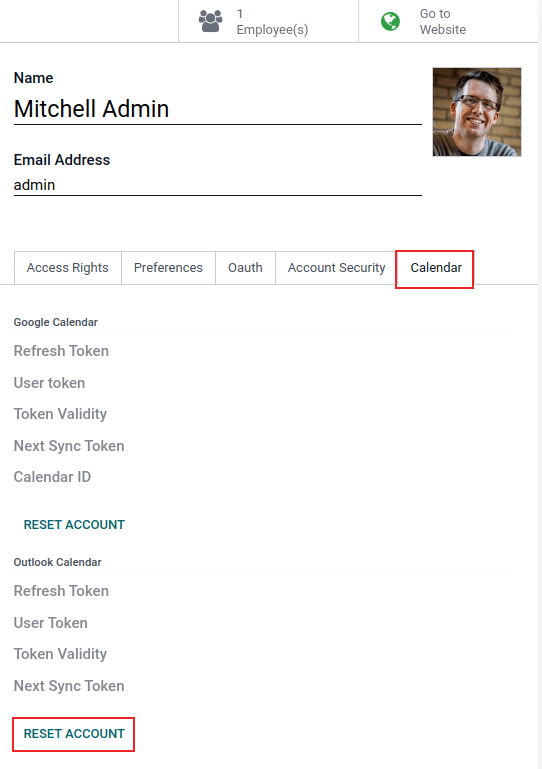
Klicken Sie dann auf Konto zurücksetzen unter dem richtigen Kalender.
Zurücksetzungsoptionen
Für die Fehlerbehebung bei der Synchronisierung des Outlook-Kalenders von Microsoft mit Odoo stehen Ihnen die folgenden Rücksetzungsoptionen zur Verfügung:
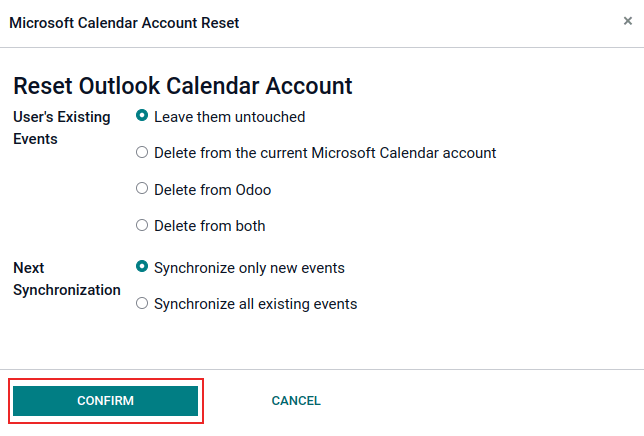
Bestehende Termine des Benutzerss:
Unangetastet lassen: keine Änderungen an Terminen.
Aus dem aktuellen Microsoft-Kalender-Konto löschen: Die Termine von Microsoft-Outlook-Kalender werden gelöscht.
Aus Odoo löschen: Die Termine werden aus dem Odoo-Kalender gelöscht.
Aus beiden löschen: Die Termine werden sowohl aus Microsoft-Outlook-Kalender und dem Odoo-Kalender gelöscht.
Nächste Synchronisierung:
Nur neue Termine synchronisieren: Synchronisieren Sie neue Ereignisse mit Microsoft-Outlook-Kalender und/oder Odoo Kalender.
Alle bestehenden Termine sychronisieren: Synchronisieren Sie neue Ereignisse mit Microsoft-Outlook-Kalender und/oder Odoo Kalender.
Klicken Sie auf Bestätigen, nachdem Sie die Auswahl getroffen haben, um die Termine des Benutzers und die Kalendersynchronisation zu ändern.