Kolumbien
Das kolumbianische Lokalisierungspaket von Odoo bietet buchhalterische, steuerliche und rechtliche Funktionen für Datenbanken in Kolumbien wie Kontenplan, Steuern und elektronische Rechnungsstellung.
Darüber hinaus ist eine Reihe von Videos zu diesem Thema verfügbar. In diesen Videos erfahren Sie, wie Sie bei Null anfangen, Konfigurationen einrichten, gängige Arbeitsabläufe abschließen und auch einige spezielle Anwendungsfälle eingehend betrachten können.
Konfiguration
Modulinstallation
Installieren Sie die folgenden Module, um alle Funktionen der kolumbianischen Lokalisierung zu erhalten:
Name |
Technische Bezeichnung |
Beschreibung |
|---|---|---|
Kolumbien - Buchhaltung |
|
Standardmäßige steuerliche Lokalisierungspaket. Dieses Modul fügt die grundlegenden Buchhaltungsfunktionen für die kolumbianische Lokalisierung hinzu: Kontenplan, Steuern, Einbehaltungen und Identifikationsbelegart. |
Kolumbien - Buchhaltungsberichte |
|
Enthält Buchhaltungsberichte für den Versand von Zertifizierungen an Lieferanten für angewandte Einbehaltungen. |
Elektronische Rechnungsstellung für Kolumbien mit Carvajal |
|
Dieses Modul enthält die Funktionen, die für die Integration mit Carvajal erforderlich sind, und generiert die elektronischen Rechnungen und Belegen für die Lieferantenrechnungen auf der Grundlage der DIAN-Vorschriften. |
Kolumbien - Kassensystem |
|
Enthält die Kassenbons für kolumbianische Lokalisierung. |
Bemerkung
Wenn für ein Unternehmen die Option Kolumbien für die Steuerliche Lokalisierung ausgewählt wird, installiert Odoo automatisch bestimmte Module.
Unternehmenskonfiguration
Um Ihre Unternehmensinformationen zu konfigurieren, gehen Sie zur App und suchen Sie Ihr Unternehmen.
Alternativ können Sie den Entwicklermodus aktivieren und zu navigieren. Bearbeiten Sie dann das Kontaktformular und konfigurieren Sie die folgenden Informationen:
Unternehmensname.
Adresse: einschließlich der Stadt, der Bezirk und PLZ.
Identifikationsnummer: Wählen Sie die Identifikationsart (
NIT,Cédula de Ciudadanía,Registro Civil, etc.) aus. Wenn der Identifikationsart istNIT, die Identifikationsnummer muss die Prüfzahl am Ende der ID mit einem Bindestrich-Präfix (-).
Konfigurieren Sie nun das Feld Steuerinformation im Reiter Verkauf & Einkauf:
Obligaciones y Responsabilidades: Wählen Sie die steuerliche Verantwortung für das Unternehmen (
O-13Gran Contribuyente,O-15Autorretenedor,O-23Agente de retención IVA,O-47Regimen de tributación simple,R-99-PNNo Aplica).Gran Contribuyente: Wenn das Unternehmen ein Gran Contribuyente ist, sollte diese Option ausgewählt werden.
Steuerregelung: Wählen Sie den Tributnamen für das Unternehmen (
IVA,INC,IVA e INCoderNo Aplica)Handelsname: Wenn das Unternehmen einen bestimmten Handelsnamen verwendet und dieser in der Rechnung angezeigt werden muss.
Konfiguration von Carjaval-Anmeldedaten
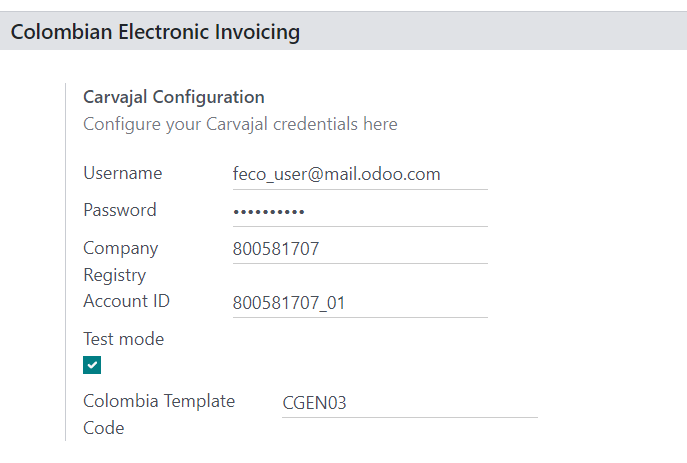
Sobald die Module installiert sind, müssen die Benutzeranmeldedaten konfiguriert werden, um eine Verbindung mit dem Carvajal-Webservice herzustellen. Navigieren Sie dazu zu und scrollen Sie zum Abschnitt Kolumbianische elektronische Rechnungsstellung. Geben Sie dann die von Carvajal bereitgestellten Konfigurationsinformationen ein.
Benutzername und Passwort: Benutzername und Passwort des Unternehmens (zugeordnet von Carvajal).
Unternehmensregister: Die NIT-Nummer des Unternehmens ohne die Prüfziffer.
Konto-ID: NIT-Nummer des Unternehmens gefolgt von by
_01.Kolumbien Vorlagencode: Wählen Sie eine der beiden verfügbaren Vorlagen (
CGEN03oderCGNE04), die im PDF-Format der elektronischen Rechnung verwendet werden soll.
Aktivieren Sie das Kontrollkästchen Testmodus, um eine Verbindung mit der Carvajal-Testumgebung herzustellen.
Sobald Odoo und Carvajal vollständig konfiguriert und für die Produktion bereit sind, deaktivieren Sie das Kontrollkästchen Testmodus, um die Produktionsdatenbank zu verwenden.
Wichtig
Testmodus darf nur auf duplizierten Datenbanken verwendet werden, nicht in der Produktionsumgebung.
Konfiguration der Berichtsdaten
Die Berichtsdaten können für den Steuerabschnitt und die Bankinformationen in der PDF-Datei als Teil der konfigurierbaren Informationen definiert werden, die in der XML-Datei gesendet werden.
Navigieren Sie zu , und scrollen Sie zum Abschnitt Kolumbianische elektronische Rechnungsstellung, um die Felder Berichtskonfiguration zu finden. Hier können Sie die Kopfzeilendaten für jeden Berichtstyp konfigurieren.
Gran Contribuyente
Tipo de Régimen
Retenedores de IVA
Autorretenedores
Resolución Aplicable
Actividad Económica
Bankdaten
Konfiguration der Stammdaten
Partner
Partnerkontakte können in der Kontakte-App erstellt werden. Navigieren Sie dazu zu , und klicken Sie auf die Schaltfläche Erstellen.
Benennen Sie dann den Kontakt und wählen Sie über die Optionsfelder den Kontakttyp aus, entweder Einzelperson oder Unternehmen.
Geben Sie die vollständige Adresse an, einschließlich der Stadt, Bundesland und PLZ. Vervollständigen Sie dann die Identifikations- und Steuerinformationen.
Identifikationsinformationen
Die durch DIAN definierten Identifikationsarten sind im Partnerformular als Teil der kolumbianischen Lokalisierung verfügbar. Kolumbianische Partner müssen ihre Identifikationsnummer (MwSt.) und Belegart eingestellt haben.
Tipp
Wenn die Belegart NIT ist, muss die Identifikationsnummer in Odoo konfiguriert werden, einschließlich der Prüfziffer am End der ID, mit einem Bindestrich-Präfix (`-`).
Steuerinformation
Die Verantwortungscodes des Partners (Abschnitt 53 im RUT-Dokument) sind Teil des elektronischen Rechnungsstellungsmoduls, da sie von der DIAN gefordert werden.
Die erforderlichen Felder finden Sie unter .
Obligaciones y Responsabilidades: Wählen Sie die steuerliche Verantwortung für das Unternehmen (
O-13Gran Contribuyente,O-15Autorretenedor,O-23Agente de retención IVA,O-47Regimen de tributación simple oderR-99-PNNo Aplica).Gran Contribuyente: Wenn das Unternehmen ein Gran Contribuyente ist, sollte diese Option ausgewählt werden.
Steuerregelung: Wählen Sie den Tributnamen für das Unternehmen (
IVA,INC,IVA e INCoderNo Aplica)Handelsname: Wenn das Unternehmen einen bestimmten Handelsnamen verwendet und dieser in der Rechnung angezeigt werden muss.
Produkte
Um Produkte zu verwalten, navigieren Sie zu , und klicken Sie dann auf ein Produkt.
Wenn Sie im Produktformular allgemeine Informationen hinzufügen, muss entweder das Feld UNSPSC-Kategorie (Reiter Buchhaltung) oder Interne Referenz (Reiter Allgemeine Informationen) konfiguriert sein. Stellen Sie sicher, dass Sie das Produkt nach der Konfiguration Speichern.
Steuern
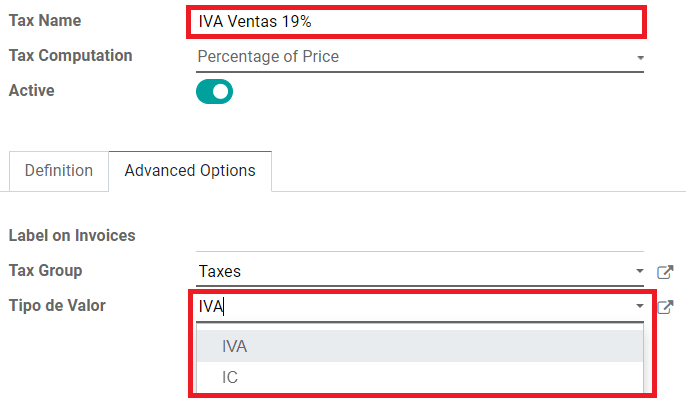
Um Steuern zu bearbeiten oder zu erstellen, gehen Sie zu und wählen Sie die entsprechende Steuer aus.
Wenn Verkaufstransaktionen Produkte mit Steuern enthalten, muss das Feld Werttyp im Reiter Erweiterte Optionen pro Steuer konfiguriert werden. Steuerrückbehaltsarten (ICA, IVA, Fuente) sind ebenfalls enthalten. Diese Konfiguration wird verwendet, um die Steuern in der PDF-Datei der Rechnung korrekt anzuzeigen.
Verkaufsjournale
Sobald die DIAN die offizielle Sequenz und das Präfix für die elektronische Rechnungsresolution zugewiesen hat, müssen die Verkaufsjournale für Ihre Rechnungsdokumente in Odoo aktualisiert werden. Navigieren Sie dazu zu und wählen Sie ein bestehende Verkaufsjournal aus oder erstellen Sie ein neues über die Schaltfläche Neu.
Geben Sie im Verkaufsjournalformular im Reiter Journalbuchungen den Journalnamen, den Typ und einen eindeutigen Kurzcode ein. Konfigurieren Sie dann die folgenden Daten im Reiter Erweiterte Einstellungen:
Elektronische Rechnungsstellung: UBL 2.1 (Kolumbien) aktivieren.
Rechnungsresulotion: Von der DIAN für das Unternehmen ausgestellte Resolutionsnummer.
Resolutionsdatum: Ursprüngliches Datum des Inkrafttretens der Resolution.
Enddatum der Resolution: Enddatum der Gültigkeit der Resolution.
Nummernkreis (Minimum): Erste autorisierte Rechnungsnummer.
Nummernkreis (Maximum): Letzte autorisierte Rechnungsnummer.
Bemerkung
Die Sequenz und Resolution des Journals muss mit der in Carvajal konfigurierten und der DIAN übereinstimmen.
Rechnungssequenz
Die Rechnungssequenz und das Präfix müssen korrekt konfiguriert sein, wenn das erste Dokument erstellt wird.
Bemerkung
Odoo weist folgenden Rechnungen automatisch ein Präfix und eine Sequenz zu.
Einkaufsjournale
Sobald die DIAN die offizielle Sequenz und das Präfix für den Referenzbeleg im Zusammenhang mit den Lieferantenrechnungen zugewiesen hat, müssen die Einkaufsjournale im Zusammenhang mit ihren Supportdokumenten in Odoo aktualisiert werden. Der Prozess ist ähnlich wie bei der Konfiguration der Verkaufsjournale.
Kontenplan
Der Kontenplan wird standardmäßig als Teil des Lokalisierungsmoduls installiert. Die Konten werden automatisch in ihren entsprechenden Steuern und den Standardfdebitoren- und -kreditorenkonten abgebildet. Der Kontenplan für Kolumbien basiert auf dem PUC (Plan Unico de Cuentas).
Hauptarbeitsablauf
Elektronische Rechnungen
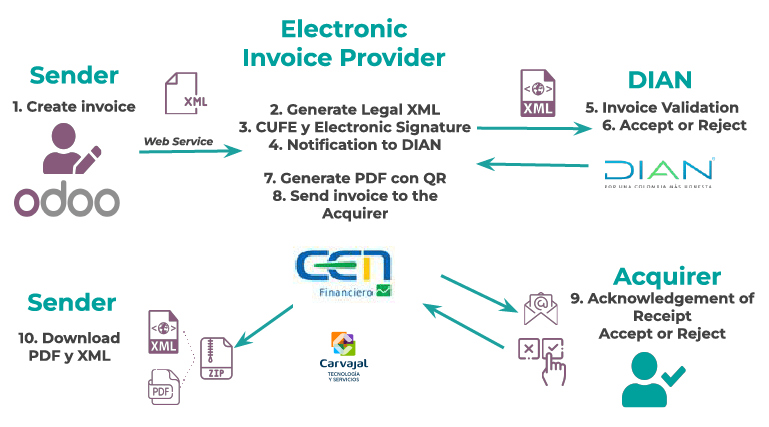
Im Folgenden finden Sie eine Aufschlüsselung des wichtigsten Arbeitsablaufs für elektronische Rechnungen in der kolumbianischen Lokalisierung:
Absender erstellt eine Rechnung.
Der Anbieter der elektronischen Rechnung erstellt die legale XML-Datei.
Der Anbieter der elektronischen Rechnung erstellt den CUFE (Elektronischen Rechnungscode) mit der elektronischen Signatur.
Der Anbieter der elektronischen Rechnung sendet eine Benachrichtigung an DIAN.
DIAN validiert die Rechnung.
DIAN akzeptiert die Rechnung oder lehnt sie ab.
Der Anbieter der elektronischen Rechnung generiert die PDF-Rechnung mit einem QR-Code.
Der Anbieter der elektronischen Rechnung sendet eine Rechnung an den Dienstleister.
Die abrechnende Bank sendet eine Empfangsbestätigung und akzeptiert die Rechnung oder lehnt sie ab.
Der Absender lädt eine
.zip-Datei mit dem PDF und XML herunter.
Erstellung von Rechnungen
Bemerkung
Der funktionale Arbeitsablauf, der vor einer Rechnungsvalidierung stattfindet, ändert nicht die wichtigsten Änderungen, die mit der elektronischen Rechnung eingeführt werden.
Elektronische Rechnungen werden über die Webservice-Integration von Carvajal erstellt und sowohl an den DIAN als auch an den Kunden gesendet. Diese Dokumente können aus Ihrem Verkaufsauftrag oder manuell generiert werden. Um eine neue Rechnung zu erstellen, gehen Sie zu und klicken Sie auf Neu. Konfigurieren Sie auf dem Rechnungsformular folgende Felder:
Kunde: Kundeninformationen.
Journal: Journal für elektronische Rechnungen.
Elektronische Rechnungstyp: Wählen Sie die Art des Dokuments. Standardmäßig ist Factura de Venta ausgewählt.
Rechnungszeilen: Geben Sie die Produkte mit den richtigen Steuern an.
Wenn Sie fertig sind, klicken Sie auf Bestätigen.
Rechnungsvalidierung
Nach der Rechnungsbestätigung wird eine XML-Datei erstellt und automatisch an Carvajal gesendet. Die Rechnung wird dann asynchron durch den Service für elektronische Rechnungsstellung UBL 2.1 (Kolumbien) verarbeitet. Die Datei wird auch im Chatter angezeigt.

Das Feld Name der elektronischen Rechnung wird jetzt im Reiter EDI-Dokumente mit dem Namen der XML-Datei angezeigt. Außerdem wird das Feld Status der elektronischen Rechnung mit dem Anfangswert Zu versenden angezeigt. Um die Rechnung manuell zu verarbeiten, klicken Sie auf die Schaltfläche Jetzt verarbeiten.
Empfang von legalen XMLs und PDFs
Der Lieferant der elektronischen Rechnung (Carvajal) empfängt die XML-Datei und validiert ihre Struktur und Informationen.
Nachdem Sie die elektronische Rechnung validiert haben, generieren Sie eine legale XML-Datei, die eine digitale Signatur und einen eindeutigen Code (CUFE) enthält. Außerdem wird eine PDF-Rechnung generiert, die einen QR-Code und den CUFE enthält. Wenn alles korrekt ist, ändert sich der Wert des Feldes Elektronische Rechnungsstellung in Gesendet.
Eine .ZIP-Datei, die die legale elektronische Rechnung in XML- und PDF-Format und die Rechnung in PDF-Format enthält, wird heruntergeladen und im Chatter der Rechnung angezeigt:
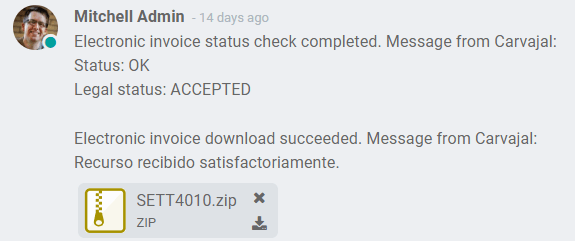
Der Status der elektronischen Rechnung ändert sich in Akzeptiert.
Gutschriften
Der Prozess für Gutschriften ist derselbe wie für Rechnungen. Um eine Gutschrift mit Bezug auf eine Rechnung zu erstellen, gehen Sie zu . Klicken Sie in der Rechnung auf Gutschrift hinzufügen und füllen Sie die folgenden Informationen aus:
Kreditmethode: Wählen Sie die Art der Kreditmethode.
Teilrückerstattung: Verwenden Sie diese Option, wenn es eine Teilrückerstattung ist.
Vollständige Rückerstattung: Verwenden Sie diese Option, wenn es sich um eine Gutschrift über den Gesamtbetrag handelt.
Komplette Rückerstattung und neuer Rechnungsentwurf: Verwenden Sie diese Option, wenn die Gutschrift automatisch validiert und mit der Rechnung abgestimmt wird. Die ursprüngliche Rechnung wird als neuer Entwurf dupliziert.
Begründung: Geben Sie den Grund für die Gutschrift ein.
Stornodatum: Wählen Sie, ob Sie ein bestimmtes Datum für die Gutschrift wünschen oder ob es das Datum der Journalbuchung ist.
Spezifisches Journal verwenden: Wählen Sie das Journal für Ihre Gutschrift oder lassen Sie das Feld leer, wenn Sie dasselbe Journal wie die Originalrechnung verwenden möchten.
Erstattungsdatum: Wenn Sie ein bestimmtes Datum gewählt haben, wählen Sie das Datum für die Erstattung.
Nach der Überprüfung klicken Sie auf die Schaltfläche Stornieren.
Lastschriften
Der Prozess für Lastschriften ist derselbe wie für Gutschriften. Um eine Lastschrift mit Bezug auf eine Rechnung zu erstellen, gehen Sie zu . Klicken Sie in der Rechnung auf Gutschrift hinzufügen und füllen Sie die folgenden Informationen aus:
Begründung: Geben Sie den Grund für die Lastschrift ein.
Datum der Lastschrift: Wählen Sie die spezifischen Optionen aus.
Zeilen kopieren: Wählen Sie diese Option, wenn Sie eine Lastschrift mit denselben Rechnungszeilen registrieren möchten.
Spezifisches Journal verwenden: Wählen Sie die Druckstelle für Ihre Lastschrift oder lassen Sie das Feld leer, wenn Sie dasselbe Journal wie die Originalrechnung verwenden möchten.
Wenn Sie fertig sind, klicken Sie auf Lastschrift erstellen.
Belege für Lieferantenrechnungen
Wenn Sie Stammdaten, Anmeldedaten und das Einkaufsjournal für Belege zu Lieferantenrechnungen konfiguriert haben, können Sie mit der Verwendung von Referenzbelegen beginnen.
Belege für Lieferantenrechnungen können aus Ihrem Einkaufsauftrag oder manuell erstellt werden. Gehen Sie zu und geben Sie die folgenden Daten ein:
Lieferant: Geben Sie die Daten des Lieferanten ein.
Rechnungsdatum: Wählen Sie das Rechnungsdatum aus.
Journal: Wählen Sie das Journal für Belege im Zusammenhang mit den Lieferantenrechnungen.
Abgerechnete Zeilen: Geben Sie die Produkte mit den richtigen Steuern an.
Nach der Überprüfung klicken Sie auf die Schaltfläche Bestätigen. Nach der Bestätigung wird eine XML-Datei erstellt und automatisch an Carvajal gesendet.
Häufige Fehler
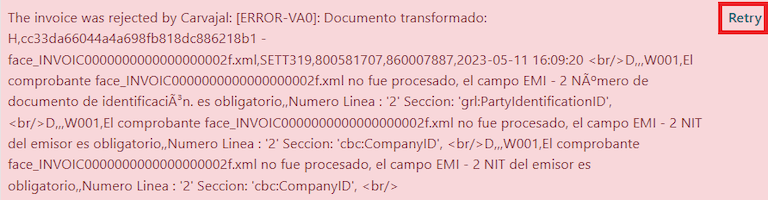
Bei der XML-Validierung sind die häufigsten Fehler in der Regel auf fehlende Stammdaten (Ust-IdNr. des Kontakts, Adresse, Produkte, Steuern) zurückzuführen. In solchen Fällen werden die Fehlermeldungen nach der Aktualisierung des elektronischen Rechnungsstatus im Chatter angezeigt.
Nachdem die Stammdaten korrigiert wurden, ist es möglich, die XML-Datei mit den neuen Daten erneut zu verarbeiten und die aktualisierte Version über die Wiederholen-Schaltfläche zu versenden.
Finanzberichte
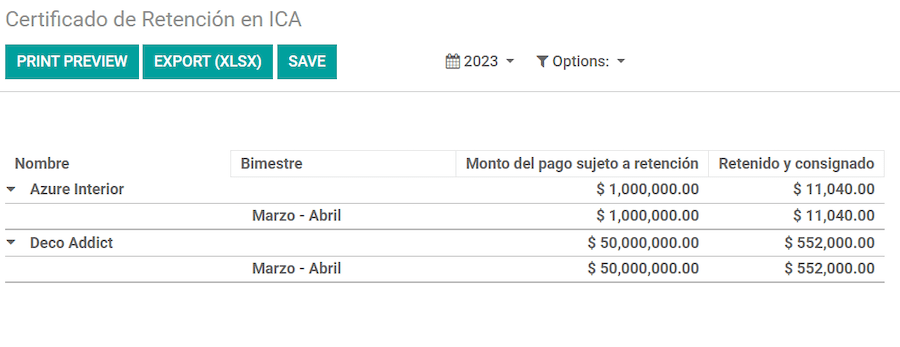
Certificado de Retención en ICA
Bei diesem Bericht handelt es sich um eine Bescheinigung für Lieferanten über die Einbehaltung der kolumbianischen Industrie- und Handelssteuer (ICA). Den Bericht finden Sie unter .
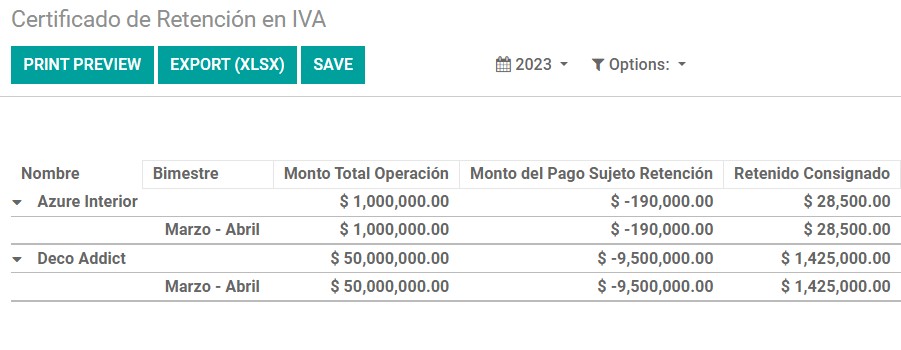
Certificado de Retención en IVA
Bei diesem Bericht handelt es sich um ein Zertifikat über den von Lieferanten einbehaltenen Betrag für MwSt.-Einbehaltung. Den Bericht finden Sie unter .
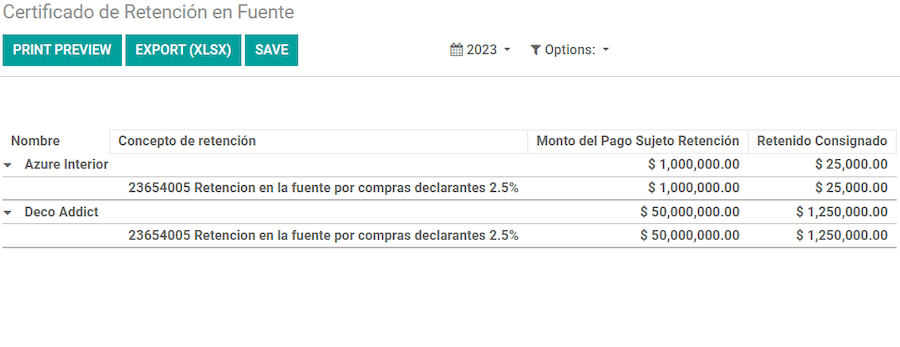
Certificado de Retención en la Fuente
Dieses Zertifikat wird den Partnern für die von ihnen geleistete Quellensteuer ausgestellt. Den Bericht finden Sie unter .