Benutzer in Axivox verwalten
Die Verwaltung der VoIP-Axivox-Benutzer ist ein wichtiger Bestandteil der Einrichtung von VoIP in einer Odoo-Datenbank. Jeder Axivox-Benutzer hat einen eindeutigen Namen, eine Telefonnummer und/oder Durchwahl und eine Voicemail. Auf diese Weise können Sie ihn auf verschiedene Weise erreichen.
Axivox-Benutzer sind in der Axivox-Konsole einfach und übersichtlich organisiert, sodass ein Administrator die Benutzer schnell und einfach verwalten kann.
Bemerkung
Diese Dokumentation beschreibt, wie Sie alles über einen Anbieter namens Axivox konfigurieren. Je nach gewähltem VoIP-Anbieter können die Prozesse zur Verwaltung der Benutzer unterschiedlich sein.
Übersicht
Beginnen Sie in der Axivox-Verwaltungskonsole, indem Sie zu https://manage.axivox.com navigieren. Melden Sie sich mit den entsprechenden Administrator-Anmeldedaten an.
Bemerkung
Aktionen in der Axivox-Verwaltungskonsole müssen doppelt gespeichert werden, damit die Änderungen wirksam werden. Um die Änderungen zu speichern, klicken Sie auf Save (Speichern) im Bildschirm mit den individuellen Änderungen. Um die Änderungen zu übernehmen, klicken Sie dann auf die Schaltfläche Apply Changes (Änderungen übernehmen) in der oberen rechten Ecke der Konsole.
Eingehende Nummern
Eingehende Nummern sind alle Nummern, für deren Nutzung ein Unternehmen bezahlt, um Anrufe zu erhalten.
Klicken Sie auf (Eingehende Nummern) aus dem Menü auf der linken Seite der Axivox Verwaltungskonsole. Sie gelangen dann auf die Seite Incoming numbers (Eingehende Nummern), auf der alle eingehenden Nummern zusammen mit dem Destination (Ziel) und den SMS-Informationen aufgelistet sind.
Das Destination (Ziel) bestimmt die Aktion, die durchgeführt wird, oder den Weg, dem der Anrufer folgt, wenn er diese Nummern wählt.
Um das Destination (Ziel) zu bearbeiten, klicken Sie auf die Schaltfläche Edit (Bearbeiten) ganz rechts neben der zu ändernden Zeile der eingehenden Nummer. Auf der daraufhin angezeigten Seite Edit number (Nummer bearbeiten) können Sie den Destination type for voice call (Zieltyp für Sprachanruf) ändern.
Folgende Optionen stehen im Dropdown-Menü Destination type for voice call (Zieltyp für Sprachanruf) zur Verfügung:
Not configured (nicht konfiguriert)
Extension (Durchwahl)
Dial plan (Wählplan)
Voicemail
Hang up (Auflegen)
Conference (Konferenz)
Abhängig von der Auswahl im Dropdown-Menü Destination type for voice call (Zieltyp für Sprachanruf) wird ein zweites, auswahlspezifisches Dropdown-Menü mit weiteren Konfigurationsoptionen eingeblendet. Außerdem werden je nach Auswahl im Dropdown-Menü Destination type for voice call (Zieltyp für Sprachanruf) weitere Felder angezeigt.
Sobald die gewünschten Konfigurationen abgeschlossen sind, klicken Sie auf Save (Speichern) und dann auf Apply changes (Änderungen übernehmen) in der oberen rechten Ecke, um sie umzusetzen.
Neue Benutzer
Jeder Mitarbeiter, der VoIP im Unternehmen verwendet, muss ein Axivox-Benutzerkonto haben, das ihm zugeordnet ist.
Um die vorhandenen Benutzer in der Axivox-Verwaltungskonsole anzuzeigen, klicken Sie im Menü auf der linken Seite der Konsole auf User (Benutzer). Jeder Benutzer hat eine Number (Nummer), einen Name (Namen), die Option für eine Voicemail und eine Outgoing number (Ausgehende Nummer) angegeben.
Um einen neuen Benutzer in der Axivox-Konsole anzulegen, klicken Sie auf Add a user (Benutzer hinzufügen), um das Formular New user (Neuer Benutzer) aufzurufen. Für die Konfiguration des neuen Benutzers stehen Ihnen die folgenden Reiter zur Verfügung:
General (Allgemein): Grundlegende Informationen, einschließlich der Benutzer, können eingerichtet werden.
Forwardings (Weiterleitungen): Interne Weiterleitungen bei „keiner Antwort“ und Besetzt-Signalen.
Follow Me (Mir folgen): externe Weiterleitungskonfiguration.
Keys (Tasten): Legen Sie Tastenkombinationen innerhalb des VoIP-Systems fest.
SIP Identifiers (SIP-Kennungen): SIP-Benutzername und -Passwort zur externen Konfiguration.
Permissions (Berechtigungen): Richten Sie Zugriffsrechte für Benutzer in der Axivox-Verwaltungskonsole ein.
Reiter „Allgemein“
Geben Sie im Formular New user (Neuer Benutzer) im Reiter General (Allgemein) im Feld Extension (Durchwahl) eine Durchwahl ein, die für den Benutzer eindeutig ist. Dies ist die Nummer, die interne Benutzer wählen, um einen bestimmten Mitarbeiter zu erreichen.
Geben Sie im Feld Name den Namen des Mitarbeiters ein.
Füllen Sie als Nächstes das Feld Email address of the user (E-Mail-Adresse des Benutzers) aus. Hier sollte eine gültige E-Mail-Adresse des Mitarbeiters hinzugefügt werden, unter der der Benutzer geschäftliche E-Mails erhält.
Geben Sie im Feld GSM number (GSM-Nummer) eine alternative Nummer ein, unter der der Benutzer erreichbar ist. Achten Sie darauf, die Landesvorwahl anzugeben.
Bemerkung
Eine Landesvorwahl ist ein Code, der den Zugang zum Telefonsystem des gewünschten Landes ermöglicht. Die Landesvorwahl wird zuerst gewählt, vor der Zielnummer. Jedes Land der Welt hat seine eigene spezifische Landesvorwahl.
Eine Liste mit umfassenden Ländervorwahlen finden Sie unter: https://countrycode.org.
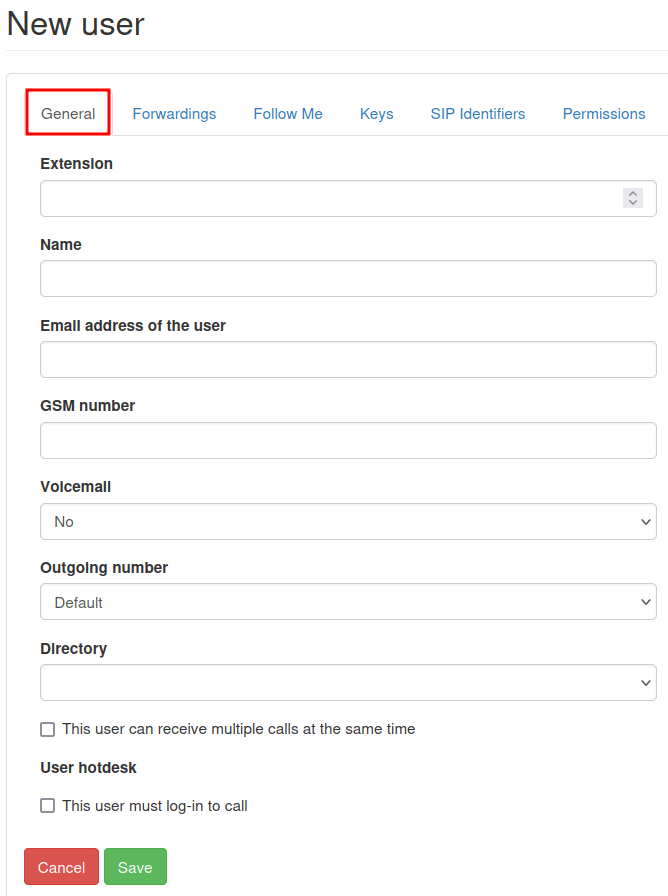
Wählen Sie im Feld Voicemail entweder Yes (Ja) oder No (Nein) aus dem Drop-down-Menü aus.
Im Feld Directory (Verzeichnis) hat der Administrator die Möglichkeit, es leer zu lassen, indem er keine Änderungen vornimmt, oder Default (Standard) aus dem Drop-down-Menü auszuwählen. Das Directory (Verzeichnis) wird im Funktionselement des Digitalen Rezeptionisten eines Wählplans verwendet.
Unten auf dem Reiter General (Allgemein) befinden sich zwei separate Optionen mit Auswahlfeldern.
Die erste Option ist This user can receive multiple calls at the same time (Dieser Benutzer kann mehrere Anrufe gleichzeitig entgegennehmen). Durch Auswahl dieser Option können Benutzer Anrufe entgegennehmen, während sie ein anderes Gespräch führen.
Die zweite Option, This user must log-in to call (Dieser Benutzer muss sich anmelden, um anzurufen), bietet die Möglichkeit, die Anmeldung für den Benutzer obligatorisch zu machen.
Bemerkung
Wenn ein Unternehmen physische VoIP-Telefone auf Schreibtischen verwendet und möchte, dass sich seine Mitarbeiter von jedem Telefon oder Schreibtisch im Büro aus anmelden können, würde es die Auswahl für This user must log-in to call (Dieser Benutzer muss sich anmelden, um anrufen zu können) treffen.
Sobald die gewünschten Konfigurationen abgeschlossen sind, klicken Sie auf Save (Speichern) und dann auf Apply changes (Änderungen übernehmen) in der oberen rechten Ecke.
Reiter „Forwardings“ (Umleitungen)
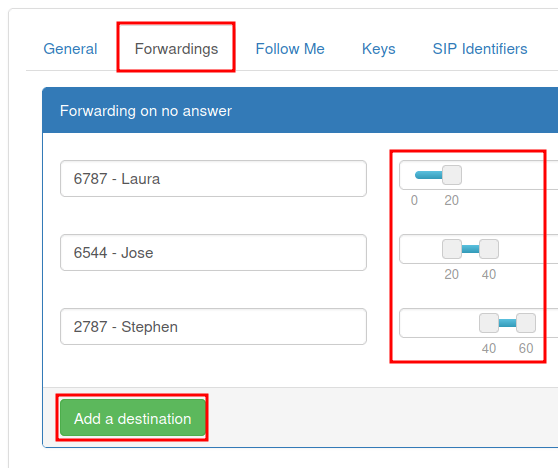
im Reiter Forwardings (Weiterleitungen) des Formulars New user (Neuer Benutzer) kann ein Unternehmen festlegen, was passiert, wenn jemand einen Benutzer anruft und der Anruf nicht entgegengenommen wird.
Wichtig
Weiterleitungen sind deaktiviert, wenn die Option Follow Me (Mir folgen) aktiviert ist.
Wenn beispielsweise im Feld Forwarding on no answer (Weiterleitung bei Nichtannahme) die Schaltfläche Add a destination (Ziel hinzufügen) ausgewählt wird, wird die Option zum Hinzufügen eines bestimmten Benutzers oder einer bestimmten Telefonnummer angezeigt. Nach der Eingabe des Ziels (Destination) kann ein bestimmter Zeitrahmen ausgewählt werden, indem der Sekundenbalken auf die gewünschte Klingeldauer verschoben wird.
Es können weitere Ziele (Destinations) mit unterschiedlichen Klingeldauern hinzugefügt werden.
Bemerkung
Die Klingeldauer kann gestaffelt werden, sodass der Anruf an einen anderen Benutzer weitergeleitet wird, nachdem der erste Benutzer den Anruf nicht entgegengenommen hat. Die Option Send to voicemail as a last resort (Als letzte Lösung an Voicemail senden) steht dem Administrator zur Verfügung, falls die Ziele nicht abnehmen.
Im Feld Forwarding on busy (Weiterleitung bei Besetzt) kann ein Administrator ein Ziel hinzufügen (Add a destination). Nach dem Klicken kann er das Ziel (Destination ) (Benutzer) und den Zeitrahmen festlegen. Sollte die VoIP-Durchwahl des ursprünglichen Benutzers oder die eingehende Nummer besetzt sein, wird der Anruf an das Ziel bzw. die Ziele weitergeleitet.
Sobald die gewünschten Konfigurationen abgeschlossen sind, klicken Sie auf Save (Speichern) und dann auf Apply changes (Änderungen übernehmen) in der oberen rechten Ecke der Seite.
Reiter „Follow me” (Mir folgen)
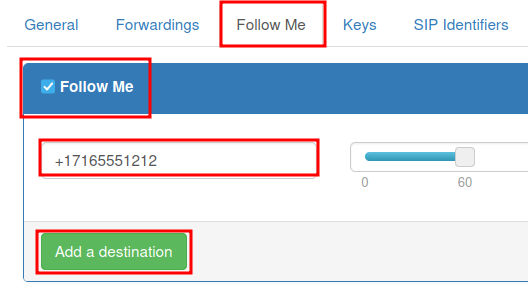
Wenn die Option Follow Me (Mir folgen) ausgewählt ist, können im Reiter Follow Me (Mir folgen) des Formulars New user (Neuer Benutzer) keine Weiterleitungen vorgenommen werden.
Wenn die Option Follow Me (Mir folgen) ausgewählt ist, kann auch die Schaltfläche Add a destination (Ziel hinzufügen) ausgewählt werden, um Benutzer oder eine Zielrufnummer zum Konto des ursprünglichen Benutzers hinzuzufügen. Auf diese Weise klingeln diese hinzugefügten Nummern, wenn ein Anruf eingeht.
Nach der Eingabe des Ziels (Destination) kann ein bestimmter Zeitrahmen festgelegt werden, indem der Sekundenbalken auf die gewünschte Klingeldauer verschoben wird. Es können weitere Ziele (Destinations) mit unterschiedlichen Klingeldauern hinzugefügt werden.
Bemerkung
Die VoIP-Nummer des ursprünglichen Benutzers klingelt nicht, wenn diese Option ausgewählt ist. Die Klingeldauer kann auch gestaffelt werden, sodass der Anruf an einen anderen Benutzer weitergeleitet wird, wenn der erste Benutzer den Anruf nicht entgegennimmt.
Wichtig
Die mobile Odoo-App oder ein anderer SIP-Mobile Client ermöglicht das gleichzeitige Klingeln der Durchwahl des Benutzers oder der eingehenden Nummer. Weitere Informationen finden Sie in der Dokumentation :doc:`Mobile VoIP-Integrationen.
Sobald alle gewünschten Konfigurationen abgeschlossen sind, klicken Sie auf Save (Speichern) und dann auf Apply changes (Änderungen übernehmen) in der oberen rechten Ecke.
Reiter „Keys“ (Schlüssel)
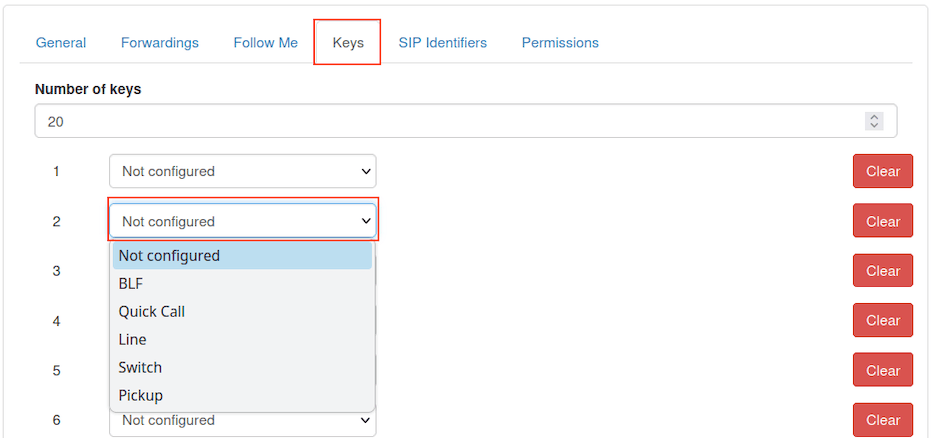
Im Reiter Keys (Schlüssel) des Formulars New user (Neuer Benutzer) können Kurzwahlaktionen für den Benutzer konfiguriert werden. Es stehen auch einige erweiterte Optionen zur Verfügung.
Die folgenden Optionen stehen für die Einstellung numerischer Werte 1-20 zur Verfügung:
Diese Aktionen können für jede Nummer festgelegt werden:
Not configured (Nicht konfiguriert): die Standardaktion, die nichts bewirkt.
BLF (Busy lamp fields) (Besetztlampenfelder): Diese Aktion zeigt den Status der Telefone anderer Benutzer an, die mit dem Axivox-Telefonsystem verbunden sind. Dies wird hauptsächlich auf einem Tischtelefon verwendet.
Quick Call (Schnellwahl): Diese Aktion ermöglicht die Kurzwahl einer externen Nummer.
Line (Leitung): Mit dieser Aktion kann der Benutzer einen anderen Benutzer anrufen.
Switch (Wechseln): Mit dieser Aktion kann der Benutzer von einem Tischtelefon aus zwischen Anrufen wechseln.
Pickup (Annehmen): Mit dieser Aktion kann der Benutzer einen eingehenden Anruf von einem Tischtelefon annehmen.
Sobald alle gewünschten Konfigurationen abgeschlossen sind, klicken Sie auf Save (Speichern) und dann auf Apply changes (Änderungen übernehmen) in der oberen rechten Ecke.
Wichtig
Für viele der oben genannten Optionen stehen auch sekundäre Optionen zur Verfügung, die zur Verknüpfung eines Benutzers oder einer externen Telefonnummer verwendet werden können. Diese müssen in Verbindung mit der ersten Aktion ausgefüllt werden.
Bemerkung
Das Feld Number of keys (Anzahl der Schlüssel) kann geändert werden, indem Sie den gewünschten numerischen Wert in das Feld Number of keys (Anzahl der Schlüssel) eingeben, das sich oben auf dem Reiter Keys (Schlüssel) des Formulars New user (Neuer Benutzer) befindet.
Reiter „SIP Identifiers“ (SIP-Kennung)
SIP, was für Telefonie für Session Initiation Protocol (Sitzungsinitiierungsprotokoll) steht, ermöglicht das Tätigen und Empfangen von Anrufen über eine Internetverbindung. Der Reiter SIP Identifiers (SIP-Kennung) im Formular New user (Neuer Benutzer) enthält die Anmeldedaten, die für die Konfiguration von Axivox-Benutzern in Odoo und/oder einem anderen mobilen SIP-Client erforderlich sind.
Siehe auch
Siehe die Dokumentation zur Konfiguration von Axivox unter Verwendung der SIP-Kennung:
Im Reiter SIP Identifiers (SIP-Kennung) stellt das Feld SIP username (SIP-Benutzername) die Informationen des Benutzers dar, die im Feld Extension (Durchwahl) im Reiter General (Allgemein) eingegeben wurden.
Das Feld Domain wird dem Unternehmen vom Axivox-Vertreter zugewiesen.
Der Wert im Feld SIP Password (SIP-Passwort) ist für jeden Axivox-Benutzer eindeutig. Dieser Wert wird verwendet, um sich bei Axivox in Odoo und für alle mobilen SIP-Clients anzumelden.
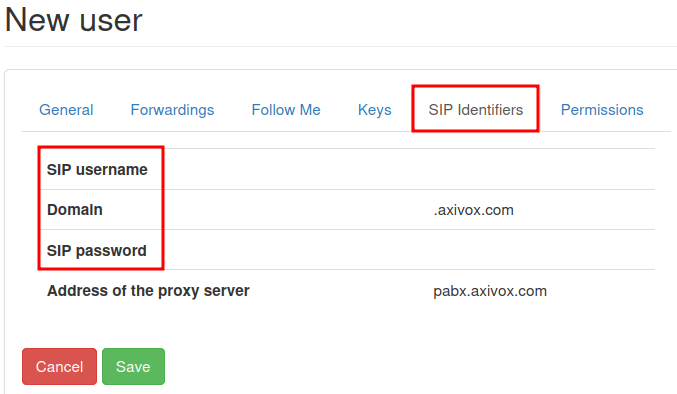
Der im Feld Address of the proxy server (Adresse des Proxy-Servers) aufgeführte Wert lautet normalerweise: pabx.axivox.com, kann jedoch von Axivox geändert werden. Überprüfen Sie daher unbedingt den Reiter SIP Identifiers (SIP-Kennung), um den genauesten Wert zu erhalten.
Sobald alle gewünschten Konfigurationen abgeschlossen sind, klicken Sie auf Save (Speichern) und dann auf Apply changes (Änderungen übernehmen) in der oberen rechten Ecke.
Reiter „Permissions“ (Genehmigungen)
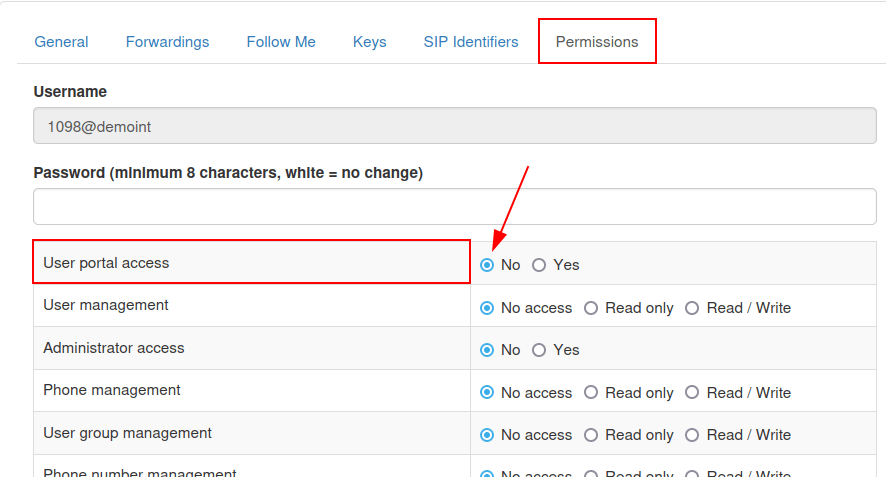
Im Reiter Permissions (Berechtigungen) eines Formulars für New user (Neue Benutzer) können ein Username (Benutzername) und ein Password (Passwort) für den Benutzer eingegeben werden.
Unter diesen Feldern können folgende Berechtigungen an Axivox-Benutzer für Portalzugriff gewährt werden:
User portal access (Benutzerportalzugriff)
User management (Benutzerverwaltung)
Administrator access (Administratorzugriff(
Phone management (Telefonverwaltung)
User group management (Verwaltung von Benutzergruppen)
Phone number management (Verwaltung von Telefonnummern)
Dial plan management (Verwaltung des Wählplans)
Pickup group management (Verwaltung der Annahmegruppe)
Switch management (Verwaltung beim Wechseln der Anrufe)
Conference management (Konferenzverwaltung)
Queue management (Warteschlangenverwaltung)
Voicemail management (Voicemail-Verwaltung)
Audio messages management (Verwaltung von Sprachnachrichten)
Music on hold management (Verwaltung der Warteschlangenmusik)
Directory management (Verwaltung des Telefonbuchs)
Call list (Anrufsliste)
Connected user list (Liste verbundener Benutzer)
Global settings (Allgemeine Einstellungen)
Apply changes button (Schaltfläche zur Übernahme von Änderungen)
Invoice download (Rechnungsdownload)
Invoice details (Rechnungsdetails)
Blacklist management (Verwaltung der schwarzen Liste)
Conference participant management (Verwaltung der Konferenzteilnehmer)
Um auf die Anmeldedaten für das Axivox-Benutzerportal zuzugreifen, navigieren Sie zum oberen Rand des Reiters (Berechtigungen). Kopieren Sie dann den Username (Benutzernamen) und geben Sie das richtige Password (Passwort) für den einzelnen Benutzer ein. Das Passwort eines Benutzers muss mindestens 8 Zeichen lang sein.
Bemerkung
Dies sind die gleichen Berechtigungen, die dem Axivox-Administrator gewährt werden und die im Menü links in der Axivox-Verwaltungskonsole aufgeführt sind. Wenn eine Auswahl No (Nein) oder No access (Kein Zugriff) lautet, wird die Menüoption für den Benutzer nicht angezeigt.
Sobald alle gewünschten Konfigurationen abgeschlossen sind, klicken Sie auf Save (Speichern) und dann auf Apply changes (Änderungen übernehmen) in der oberen rechten Ecke.
Nach der Einrichtung eines neuen Benutzers kann die Eingehende Nummern verknüpft werden.
Benutzergruppen
Eine Benutzergruppe ist eine Gruppierung von Avivox-Benutzern, die mit einer Warteschlange in Call-Centern verknüpft werden kann.
Um Benutzergruppen zu verwenden, gehen Sie zu https://manage.axivox.com.
Melden Sie sich dann mit den entsprechenden Administrator-Anmeldedaten an. Klicken Sie im Menü links im Axivox-Verwaltungsbereich auf User Groups (Benutzergruppen).
Um über die Seite User Groups (Benutzergruppen) eine Benutzergruppe hinzuzufügen, klicken Sie auf Add a group (Eine Gruppe hinzufügen).
Geben Sie als Nächstes der Gruppe einen Namen, indem Sie Text in das Feld Name eingeben. Fügen Sie dann ein Mitglied zur Gruppe hinzu, indem Sie die ersten Buchstaben des Benutzernamens in das Feld Members (Mitglieder) eingeben. Der Benutzer wird in einem Drop-down-Menü unter dem Feld angezeigt. Klicken Sie dann auf den gewünschten Benutzer, um ihn zur Benutzergruppe hinzuzufügen.
Wiederholen Sie diesen Vorgang, um weitere Benutzer zur Gruppe hinzuzufügen.
Sobald alle gewünschten Konfigurationen abgeschlossen sind, klicken Sie auf Save (Speichern) und dann auf Apply changes (Änderungen übernehmen) in der oberen rechten Ecke.