Personalabrechnung
Odoo Persomalabrechnung wird verwendet, um Arbeitseinträge zu verarbeiten und Gehaltsabrechnungen für Mitarbeiter zu erstellen, sowohl für reguläre Gehälter als auch für Provisionen. Die Personalabrechnung arbeitet mit anderen Odoo-Apps wie Mitarbeiter, Zeiterfassung, Abwesenheiten und Anwesenheiten zusammen.
Die Personalabrechnungsapp stellt sicher, dass es bei der Validierung von Arbeitseinträgen keine Probleme oder Konflikte gibt. Sie kümmert sich um länderspezifische Lokalisierungen, um sicherzustellen, dass die Gehaltsabrechnungen den lokalen Vorschriften und Steuern entsprechen, und ermöglicht die Zuweisung von Gehältern. Die Konfiguration der Personalabrechnung ist entscheidend für eine genaue und rechtzeitige Verarbeitung der Gehaltsabrechnungen.
Einstellungen
Um auf die Einstellungen zuzugreifen, gehen Sie auf . Hier können Sie festlegen, ob die Gehaltsabrechnungen in der Buchhaltung gebucht werden sollen und ob SEPA-Zahlungen erstellt werden sollen oder nicht.
Auf dem Bildschirm Einstellungen werden die Lokalisierungseinstellungen konfiguriert. Lokalisierungen sind länderspezifische Einstellungen, die bei der Erstellung der Datenbank in Odoo vorkonfiguriert werden und alle Steuern, Gebühren und Zuschläge für das jeweilige Land berücksichtigen. Der Abschnitt Lokalisierung der Einstellungen enthält eine detaillierte Übersicht über alle Leistungen, die den Mitarbeitern gewährt werden.

Alle länderspezifischen Lokalisierungen werden im Abschnitt Lokalisierung des Bildschirms Einstellungen eingerichtet. Alle Lokalisierungspunkte werden vorausgefüllt, wenn das Land bei der Erstellung der Datenbank angegeben wird. Es wird nicht empfohlen, die Lokalisierungseinstellungen zu ändern, wenn dies nicht absolut notwendig ist.
Bemerkung
Odoo can handle a multi-company configuration. This is generally done when there is a main company or office location, such as a headquarters, and there are other offices/branches around the country or globe, that fall under that main company or headquarters. In Odoo, each company, including the headquarters, would be setup as their own company/branch using the multi-company method.
Each individual company can have a different localization setting configured for that specific company, since company locations can vary and be located anywhere in the world, where rules and laws differ. For more information on companies refer to this documentation on setting up companies.
Arbeitseinträge
Ein Arbeitseintrag ist ein einzelner Datensatz auf dem Zeiterfasssungsbogen eines Mitarbeiters. Arbeitseinträge können so konfiguriert werden, dass sie alle Arten von Arbeit und Abwesenheit berücksichtigen, z. B. Anwesenheit, Krankheit, Schulung oder Gesetzlicher Feiertag.
Siehe auch
Arbeitseintragsarten
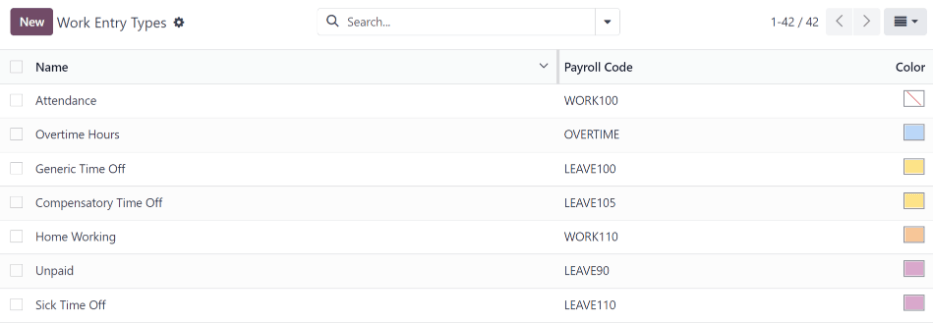
Wenn Sie einen Arbeitseintrag in der Personalabrechnungsapp erstellen oder wenn ein Mitarbeiter Informationen in der Zeiterfassungsapp eingibt, muss eine Arbeitseintragsart ausgewählt werden. Die Liste der Arbeitseintragsarten wird automatisch anhand der in der Datenbank festgelegten Lokalisierungseinstellungen erstellt.
To view the current work entry types available, go to .
Jede Arbeitseintragsart hat einen Code, der die Erstellung von Gehaltsabrechnungen erleichtert und sicherstellt, dass alle Steuern und Gebühren korrekt eingegeben werden.
Neue Arbeitseintragsart
Um eine neue Arbeitseintragsart zu erstellen, klicken Sie auf die Schaltfläche Neu und füllen Sie die Informationen für die folgenden Abschnitte auf dem Formular aus.
Reiter „Allgemeine Informationen“
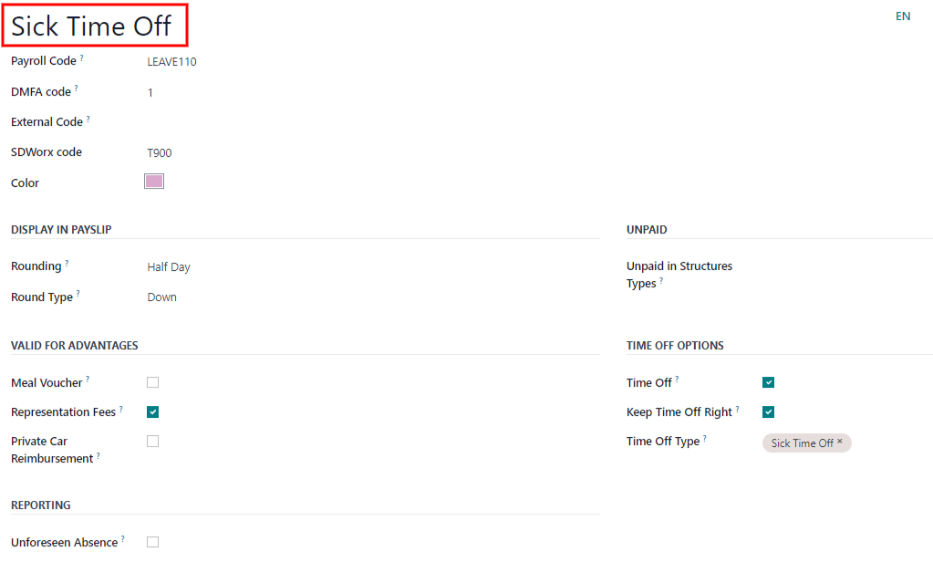
Name der Arbeitseintragsart: Der Name sollte kurz und aussagekräftig sein, z. B.
KrankheitoderGesetzlicher Feiertag.Payroll Code: This code appears with the work entry type on timesheets and payslips. Since the code is used in conjunction with the Accounting application, it is advised to check with the accounting department for a code to use.
DMFA code: This code is used to identify DMFA entries on a corresponding DMFA report. The DMFA report is a quarterly report that Belgian-based companies are required to submit for social security reporting purposes. This report states the work done by the employees during the quarter, as well as the salaries paid to those employees.
External Code: This code is used for exporting data to a third-party payroll service. Check with the third-party being used in order to determine the External Code to enter for the new work entry type.
SDWorx code: This code is only for companies that use SDWorx, a payroll service provider.
Color: Select a color for the particular work entry type.
In Gehaltsabrechnungsabschnitt anzeigen
Rounding: The rounding method selected determines how quantities on timesheet entries are displayed on the payslip.
Keine Rundung: Ein Zeiterfassungseintrag wird nicht geändert.
Halber Tag: Ein Zeiterfassungseintrag wird auf den nächsten halben Tag gerundet.
Tag: Ein Zeiterfassungseintrag wird auf den nächsten vollen Tag gerundet.
Example
Wenn die Arbeitszeit auf einen 8-Stunden-Arbeitstag (40-Stunden-Woche) festgelegt ist und ein Mitarbeiter eine Zeit von 5,5 Stunden auf einem Zeiterfassungsbogen eingibt und Rundung auf Keine Rundung gesetzt ist, bleibt der Eintrag bei 5,5 Stunden. Wenn Rundung auf Halber Tag eingestellt ist, wird der Eintrag auf 4 Stunden geändert. Wenn Tag eingestellt ist, wird er auf 8 Stunden geändert.
Abschnitt „Unbezahlt“
Unpaid in Structures Types: If the work entry is for work that is not paid, specify which pay structure the unpaid work entry applies to from the drop-down menu. Some situations where work would be logged on a timesheet but no compensation given would be for unpaid internships, unpaid training, or volunteer work.
Abschnitt „Gültig für Vorteile“
Meal Voucher: If the work entry should count towards a meal voucher, check the box.
Representation Fees: If the work entry should count towards representation fees, check the box.
Private Car Reimbursement: If the work entry should count towards a private car reimbursement, check the box.
Abschnitt „Anwesenheitsoptionen“
Time Off: Check this box if the work entry type can be selected for a time off request or entry in the Time Off application. If Time Off is checked, a Time Off Type field appears. This field has a drop-down menu to select the specific type of time off, such as
Paid Time Off,Sick Time Off, orExtra Hoursfor example. A new type of time off can be entered in the field if the listed types of time off in the drop-down menu do not display the type of time off needed.Keep Time Off Right: This is for Belgian-specific companies only, and will not appear for other localizations. Check this box if the work entry is for time off that will affect the time off benefits for the following year. Workers are given time off each year according to the government, and in some cases, time-off taken during a specific time period can affect how much time off the employee will receive or accrue the following year.
Abschnitt „Berichtswesen“
Unforeseen Absence: If the work entry should be visible on the unforeseen absences report, check this box.
Arbeitspläne
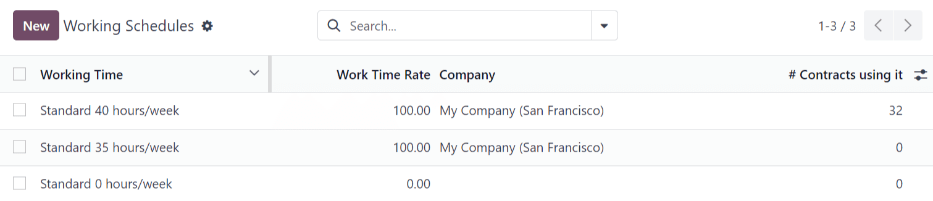
To view the currently configured working schedules, go to . The working schedules that are available for an employee’s contracts and work entries are found in this list.
Working schedules are company-specific. Each company must identify each type of working schedule they use.
Example
Eine Odoo-Datenbank mit mehreren Unternehmen, die eine 40-Stunden-Woche verwenden, muss beispielsweise für jedes Unternehmen, das die 40-Stunden-Woche verwendet, einen eigenen Arbeitszeiteintrag haben.
In einer Datenbank mit fünf Unternehmen, die alle eine 40-Stunden-Woche haben, müssen fünf verschiedene 40-Stunden-Arbeitszeitpläne konfiguriert werden.
Neuer Arbeitsplan
Um einen neuen Arbeitsplan zu erstellen, klicken Sie auf die Schaltfläche Neu. Geben Sie die Informationen in das Formular ein.
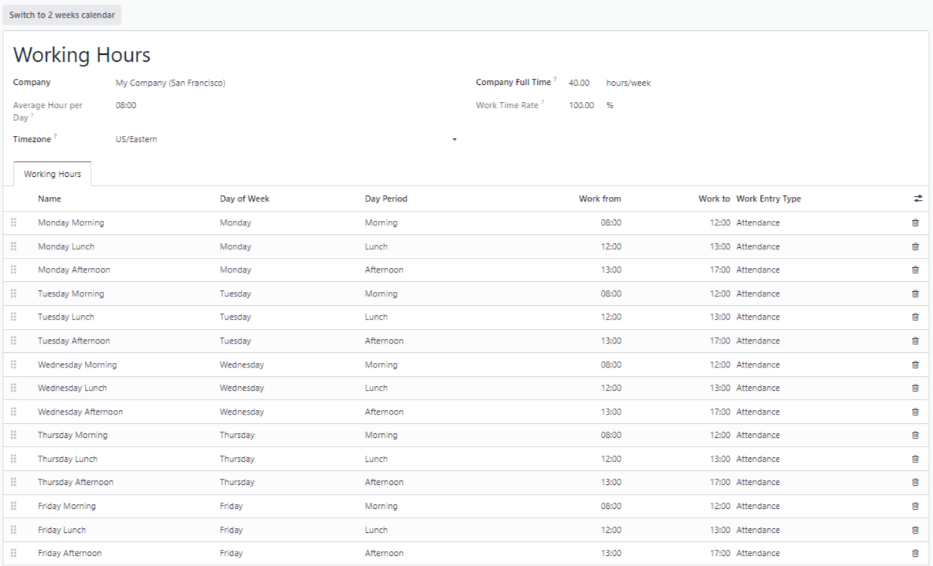
Die Felder werden für eine normale 40-Stunden-Woche automatisch ausgefüllt, können aber geändert werden. Ändern Sie zunächst den Namen der Arbeitszeit, indem Sie den Text im Feld Name ändern. Als nächstes nehmen Sie die Anpassungen an den Tagen und Uhrzeiten vor, die für die neue Arbeitszeit gelten.
Im Reiter Arbeitsstunden ändern Sie die Auswahlen Wochentag, Tageszeitraum und Arbeitseintragsart, indem Sie auf die Drop-down-Menüs in jeder Spalte klicken und die gewünschte Auswahl treffen. Die Spalten Arbeitszeit von und Arbeitszeit bis werden durch Eingabe der Uhrzeit geändert.
Bemerkung
Die Zeiten Arbeitszeit von und Arbeitszeit bis müssen im 24-Stunden-Format angegeben werden. Zum Beispiel würde 2:00 nachmittags als 14:00 eingegeben werden.
If the working time should be in a two-week configuration, click the Switch to 2 weeks calendar button in the top left. This creates entries for an Even week and an Odd week.
Gehalt
Strukturtypen
In Odoo basiert die Gehaltsabrechnung eines Mitarbeiters auf Strukturen und Strukturtypen, die sich beide darauf auswirken, wie ein Mitarbeiter Zeiterfassungen eingibt. Jeder Strukturtyp ist ein individueller Satz von Regeln für die Verarbeitung einer Zeiterfassung, die aus verschiedenen darin verschachtelten Strukturen besteht. Strukturtypen legen fest, wie oft ein Mitarbeiter bezahlt wird, wie viele Stunden er arbeitet und ob der Lohn auf einem Gehalt basiert (fest) oder wie viele Stunden der Mitarbeiter gearbeitet hat (variabel).
Ein Strukturtyp könnte z. B. Mitarbeiter sein, und dieser Strukturtyp könnte zwei verschiedene Strukturen enthalten: eine Struktur für Reguläres Gehalt, die alle separaten Regeln für die Verarbeitung des regulären Gehalts enthält, sowie eine Struktur für einen Jahresendbonus, die nur die Regeln für den Jahresendbonus enthält. Sowohl die Struktur für Reguläres Gehalt als auch die Struktur für Jahresendbonus sind Strukturen innerhalb des Strukturtyps Mitarbeiter.
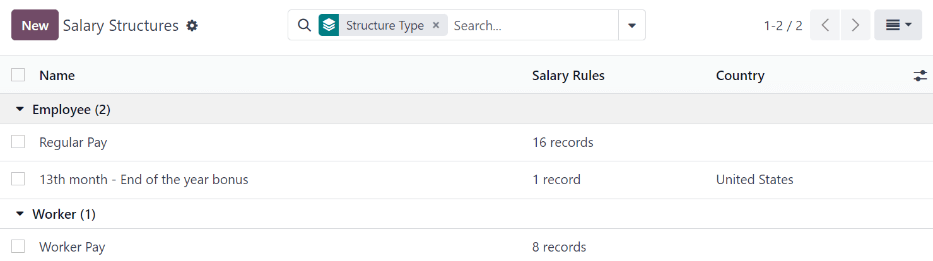
The different structure types can be seen by going to .
In Odoo sind zwei Standard-Strukturtypen konfiguriert: Mitarbeiter und Arbeiter. In der Regel wird Mitarbeiter für Angestellte verwendet, weshalb die Lohnart Monatliches Festgehalt lautet, und Arbeiter wird in der Regel für Mitarbeiter verwendet, die nach Stunden bezahlt werden, weshalb die Lohnart Stundenlohn lautet.

Neuer Strukturtyp
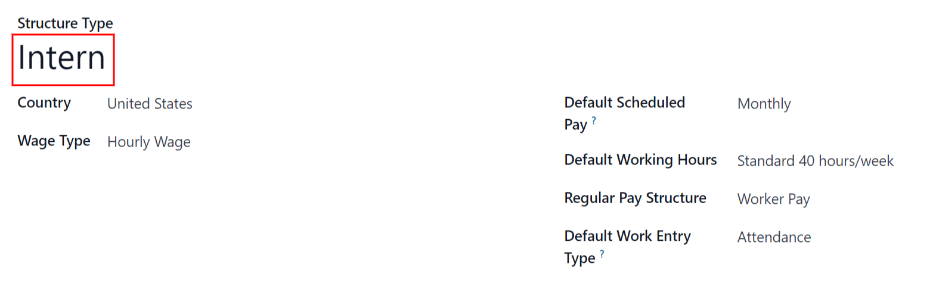
To make a new structure type, click the New button and a structure type form appears. Enter the information in the fields. Most fields are pre-populated, but all the fields can be modified.
Structure Type: Enter the name for the new structure type, such as ‚Employee‘ or ‚Worker‘.
Country: Select the country that the new structure type applies to from the drop-down menu.
Wage Type: Select what type of wage the new structure type will use, either Monthly Fixed Wage or Hourly Wage. If the wage type is going to be used for salaried employees who receive the same wage every pay period, select Monthly Fixed Wage. If the wage type is going to be used for employees who receive wages based on how many hours they worked during a pay period, select Hourly Wage.
Default Scheduled Pay: Select the typical pay schedule for the new structure type from the drop-down menu. Options are Monthly, Quarterly, Semi-annually, Annually, Weekly, Bi-weekly, Bi-monthly. This indicates how often this type of structure type is paid out.
Default Working Hours: Select the default working hours for the new structure type from the drop-down menu. All available working hours for the currently selected company appear in the drop-down menu. The default working hours that are pre-configured in Odoo is the Standard 40 hours/week option. If the needed working hours do not appear in the list, a new set of default working hours can be created.
Regular Pay Structure: Type in the name for the regular pay structure.
Default Work Entry Type: Select the default type of work entry the new structure type will fall under from the drop-down menu. Options include Attendance, Overtime Hours, Generic Time Off, Compensatory Time Off, Home Working, Unpaid, Sick Time Off, Paid Time Off, and Out Of Contract.
Neue Standardarbeitszeiten
To make new default working hours, type the name for the new working hours in the Default Working Hours field on the new structure type form. Click Create and edit. A default working hours form will pop up. The default working hours form has two sections, a general information section and a tab listing out all the individual working hours by day and time. When the form is filled out, click Save & Close.
Name: Type in the name for the new default working hours. This should be descriptive and clear to understand, such as
Standard 20 Hours/Week.Company: Select the company that can use these new default working hours from the drop-down menu. Keep in mind, working hours are company-specific and cannot be shard between companies. Each company needs to have their own working hours set.
Average Hour Per Day: The average hours per day field will be auto-populated based on the working hours configured in the Working Hours tab. This entry affects resource planning, since the average daily hours affect what resources can be used, and in what quantity, per work day.
Timezone: Select the timezone that the new default working hours will be used for from the drop-down menu.
Company Full Time: Enter the number of hours per week an employee would need to work in order to be considered a full-time employee. Typically, this is approximately 40 hours, and this number affects what types of benefits an employee can receive based on their employment status (full-time vs part-time).
Work Time rate: This percentage is auto-generated based on the entry for the Company Full Time and the working hours configured in the Working Hours tab. This number should be between
0.00%and100%, so if the percentage is above100%, it is an indication that the working times and/or Company Full Time hours need adjustment.Working Hours Tab: This tab is where each day’s specific working hours are listed. When a new default working hour form is created, the working hours tab is pre-populated with a default 40-hour week, with each day divided into three timed sections. Every day has morning (8:00-12:00), lunch (12:00-13:00), and evening (13:00-17:00) hours configured using a 24 hour time format. To adjust any of these hours, click on the specific field to adjust, and make the adjustment using the drop-down menus, or in the specific case of the times, type in the desired time.
Bemerkung
If the working hours are not consistent each week, and the hours are on a bi-weekly schedule instead, click the Switch to 2 week calendar button at the top of the new default working hours form. This will change the working hours tab to display two weeks of working times that can be adjusted.
Strukturen
Gehaltsstrukturen sind die verschiedenen Arten, wie ein Mitarbeiter innerhalb einer bestimmten Struktur bezahlt wird, und werden durch verschiedene Regeln definiert.
Die Anzahl der Strukturen, die ein Unternehmen für jeden Strukturtyp benötigt, hängt davon ab, wie viele verschiedene Arten der Bezahlung an Mitarbeiter es gibt und wie die Bezahlung berechnet wird. Eine gängige Struktur, deren Hinzufügung nützlich sein könnte, ist zum Beispiel ein Bonus.
To view all the various structures for each structure type, go to .
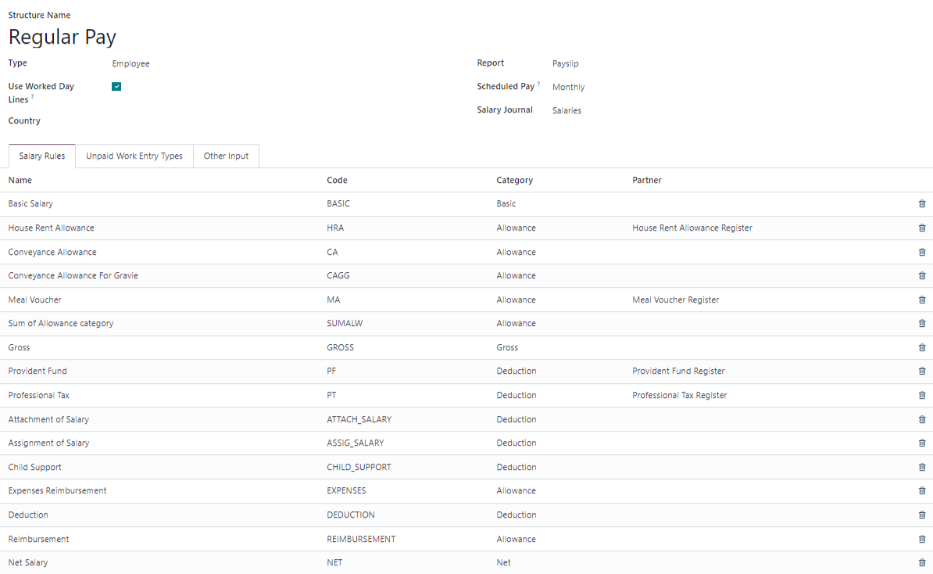
Jeder Strukturtyp listet die verschiedenen damit verbundenen Strukturen auf. Jede Struktur enthält eine Reihe von Regeln, die sie definieren.
Klicken Sie auf eine Struktur, um deren Gehaltsregeln anzuzeigen. Anhand dieser Regeln wird die Gehaltsabrechnung für den Mitarbeiter berechnet.
Regeln
Jede Struktur verfügt über eine Reihe von Gehaltsregeln, die für Buchhaltungszwecke zu befolgen sind. Diese Regeln werden durch die Lokalisierung konfiguriert und wirken sich auf die Buchhaltungsapp aus, sodass Änderungen an den Standardregeln oder die Erstellung neuer Regeln nur bei Bedarf vorgenommen werden sollten.
Um alle Regeln anzuzeigen, gehen Sie zur . Klicken Sie auf eine Struktur (z. B. Reguläres Gehalt), um alle Regeln zu sehen.
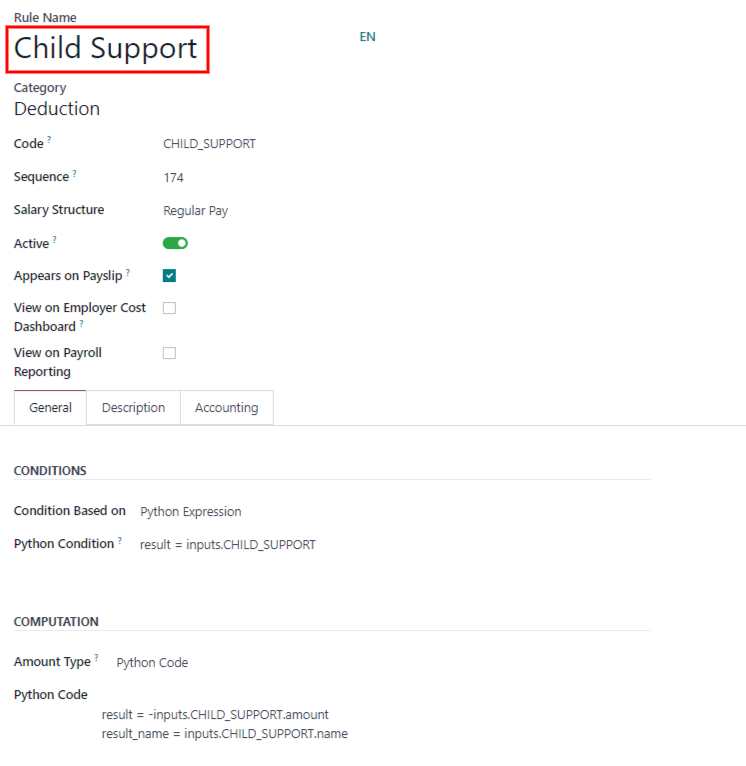
To make a new rule, click New. A new rule form appears. Enter the information in the fields.
Die erforderlichen Felder für eine Regel sind:
Name: Geben Sie einen Namen für die Regel ein.
Kategorie: Wählen Sie aus dem Drop-down-Menü eine Kategorie aus, für die die Regel gelten soll, oder geben Sie eine neue Kategorie ein.
Code: Enter a code to be used for this new rule. It is recommended to coordinate with the accounting department for a code to use as this will affect accounting reports and payroll processing.
Gehaltsstruktur: Wählen Sie aus dem Drop-down-Menü eine Gehaltsstruktur aus, für die die Regel gelten soll, oder geben Sie eine neue ein.
Bedingung basiert auf: Im Reiter Allgemein wählen Sie aus dem Drop-down-Menü aus, ob die Regel Immer wahr (gilt immer), ein Bereich (gilt für einen bestimmten Bereich, der unterhalb der Auswahl eingegeben wird) oder ein Python-Ausdruck (der Code wird unterhalb der Auswahl eingegeben) ist.
Betragsart: Wählen Sie im Reiter Allgemein aus dem Drop-down-Menü aus, ob es sich um einen Festen Betrag, einen Prozentsatz (%) oder einen Python-Code handelt. Je nachdem, was ausgewählt wurde, muss als nächstes der feste Betrag, der Prozentsatz oder der Python-Code eingegeben werden.
Regelparameter
Bemerkung
Derzeit befindet sich die Funktion Regelparameter im Menü noch in der Entwicklung und dient nur einem speziellen Anwendungsfall für belgische Märkte. Die Dokumentation wird aktualisiert, wenn dieser Bereich für weitere Märkte ausgereift ist.
Andere Eingabetypen
When creating payslips, it is sometimes necessary to add other entries for specific circumstances, like expenses, reimbursements, or deductions. These other inputs can be configured by going to .
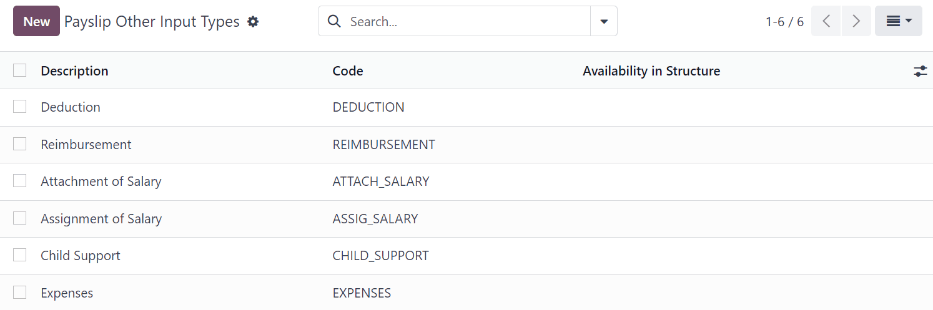
Um einen neuen Eingabetyp zu erstellen, klicken Sie auf die Schaltfläche Neu. Geben Sie die Beschreibung, den Code und die Struktur, für die er gilt, in das Feld Verfügbarkeit in Struktur ein.
Wichtig
Der Code wird in den Gehaltsregeln zur Berechnung der Gehaltsabrechnungen verwendet. Wenn das Feld Verfügbarkeit in Struktur leer bleibt, bedeutet dies, dass der neue Eingabetyp für alle Gehaltsabrechnungen verfügbar ist und nicht nur für eine bestimmte Struktur.

Gehaltspaket-Konfigurator
The various options under the Salary Package Configurator section of the menu all affect an employee’s potential salary. These sections (Advantages, Personal Info, Resume, and Offers) specify what benefits can be offered to an employee in their salary package.
Je nachdem, welche Informationen ein Mitarbeiter eingibt (z. B. Abzüge, Personen zu Lasten usw.), wird sein Gehalt entsprechend angepasst. Wenn sich ein Bewerber auf der Unternehmenswebsite um eine Stelle bewirbt, wirken sich die Abschnitte unter Gehaltspaket-Konfigurator direkt darauf aus, was der Bewerber sieht und was bei der Eingabe von Informationen ausgefüllt wird.
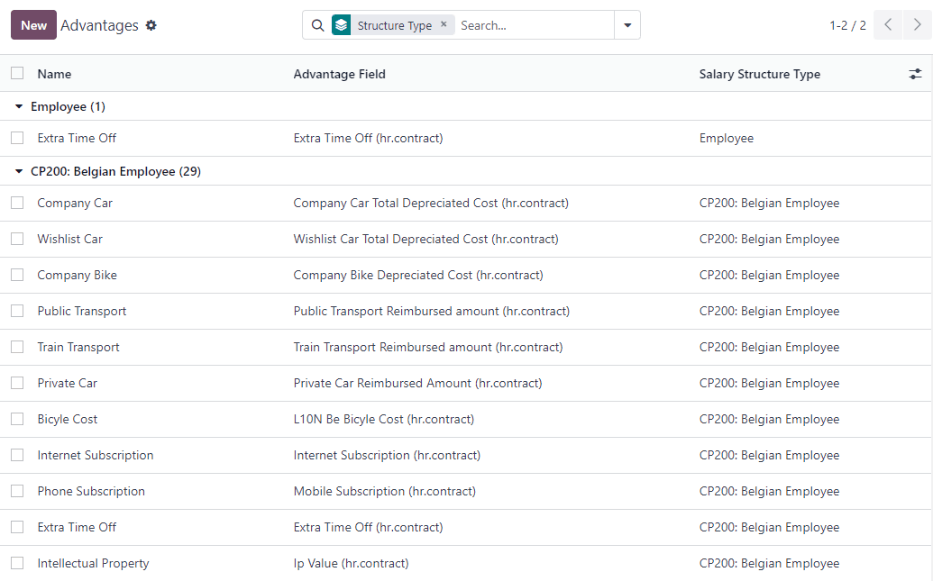
Vorteile
When offering potential employees a position, there can be certain advantages or benefits set in Odoo in addition to the salary to make an offer more appealing (such as extra time off, the use of a company car, reimbursement for a phone or internet, etc.).
To see the advantages, go to . Advantages are grouped by Structure type, and the advantage listed for a particular structure type is only available for that specific structure.
Example
A company has two structure types, one labeled Employee, and anther labeled Intern. The Employee structure type contains an advantage of using a company car, while the Intern structure type does not. Instead, the Intern structure type has a meal voucher advantage available, while the Employee structure type does not.
A person hired under the Employee structure type can use a company car, but cannot have meal vouchers. The opposite is true for someone hired under the Intern structure type. They would have meal vouchers available to them, not the use of a company car.
To make a new advantage, click the New button, and enter the information in the fields. The required fields for an advantage are:
Name: Geben Sie einen Namen für den Vorteil ein.
Vorteilsfeld: Wählen Sie aus dem Drop-down-Menü aus, in welchem Feld der Gehaltsabrechnung dieser Vorteil erscheint.
Vorteilstyp: Wählen Sie aus dem Drop-down-Menü aus, um welche Art von Vorteil es sich handelt. Wählen Sie aus Monatliche Sachleistung, Monatsvorteile in Netto, Monatsvorteile in Bargeld oder Jahresvorteile in Bargeld.
Art der Gehaltsstruktur: Wählen Sie aus dem Drop-down-Menü aus, für welche Gehaltsstrukturart dieser Vorteil gilt.
Display Type: Select from the drop-down menu how this advantage is displayed.

Persönliche Informationen
Jeder Mitarbeiter in Odoo hat eine Mitarbeiterkarte, die erstellt wird, wenn ein Bewerber ein Mitarbeiter wird. Diese Karte enthält alle persönlichen Informationen, den Lebenslauf, Arbeitsinformationen und Dokumente.
Die persönlichen Informationen stammen aus dem Abschnitt Gehaltspaket-Konfigurator, den ein Bewerber ausfüllt, nachdem er eine Stelle erhalten hat. Diese persönlichen Informationen werden dann auf die Mitarbeiterkarte übertragen, wenn der Bewerber eingestellt wird.
Um die Karte eines Mitarbeiters anzuzeigen, gehen Sie zum Hauptdashboard der -App und klicken Sie auf die Karte des Mitarbeiters.
Bemerkung
Eine Mitarbeiterkarte kann als eine Art Personalakte betrachtet werden.
The Personal Information section lists all of the fields that are available to enter on the employee’s card. To access this section, go to .
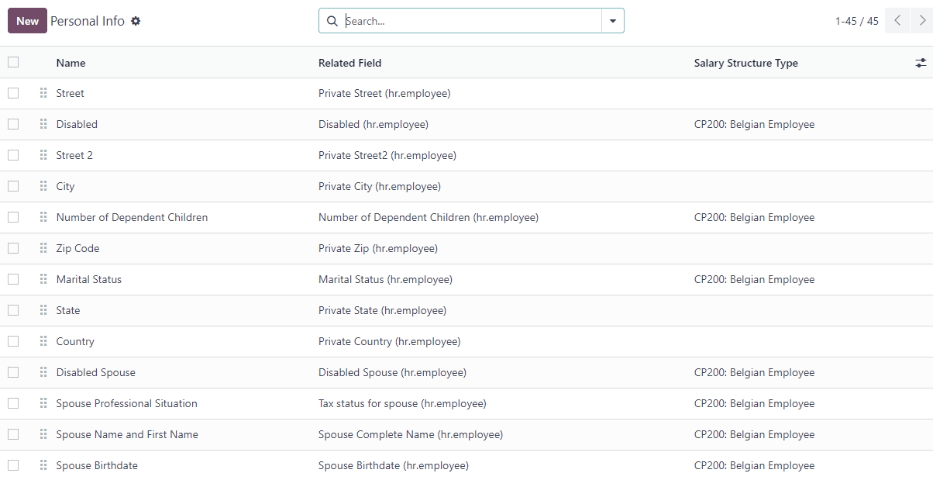
To edit a personal info entry, select the entry from the list, and modify the personal info. To create a new personal info entry, click the New button.
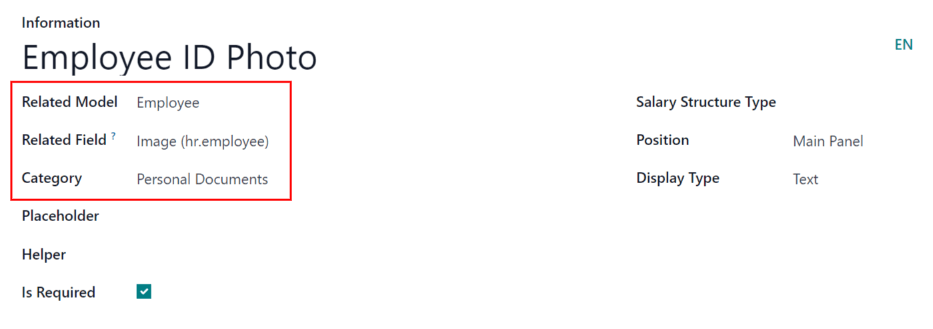
The required fields, aside from entering the Information name, are Related Model, Related Field, and Category. Select a Related Model from the drop-down menu. Employee populates the field by default, but the Bank Account option is also available if the information is related to a bank account instead. Select a Related Field from the drop-down menu that best describes what kind of personal information this entry is, and where it is going to be stored in the backed. Then, select a Category from the drop-down menu that the personal information should be under, such as Address or Personal Documents.
The two most important fields on the personal info form are Is Required and Display Type. Checking the Is Required box makes the field mandatory on the employee’s card. The Display Type drop-down menu allows for the information to be entered in a variety of ways, from a Text box, to a customizable Radio button, a Checkbox, a Document, and more.
Lebenslauf
Bemerkung
Currently, the Resume feature found inside the menu is still in development and only serves a specific use case for Belgian markets. The documentation will be updated when this section has matured to more markets.
Angebote
When a candidate is offered a position, there are several items that need to be tracked in order for a business to stay organized, such as where in the offer process the candidate is, how long the offer is valid for, as well as all the offer details. These details are all stored in each offers record.
To view all offers, go to . All offers that have been sent to either potential candidates or current employees appears in this list. The status, offer start date and expiration date, amount of the contract, and more, can all be found in this list. Offers sent via the Recruitment application appear here, but there is an option to create a new offer from the Payroll application as well.
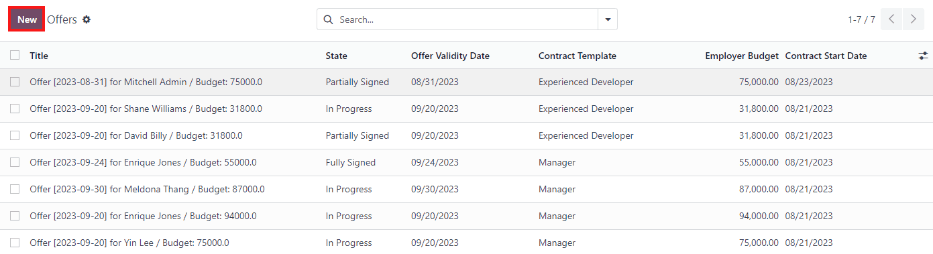
To create a new offer, click the New button. The two required fields are the Contract Template, and the Company. Select the Contract Template and Company from the drop-down menus. Fill in any other details for the offer, such as the Job Title, Department, the Contract Start Date and the Offer Validity Date.