Erweiterte Wählpläne
In der Regel gehen in Unternehmen täglich viele Anrufe ein, aber viele möchten nicht, dass ihre Teams rund um die Uhr und sieben Tage die Woche Anrufe entgegennehmen.
Durch die Verwendung der erweiterten Wählplanfunktionen von Axivox kann der Prozess automatisiert und die Weiterleitung für alle Szenarien eingerichtet werden. Auf diese Weise müssen Kunden niemals warten oder sich ärgern, weil sie niemanden erreichen können.
Durch die Nutzung der erweiterten Funktionen in Wählplänen können Unternehmen die Anrufweiterleitung für bestimmte Tage oder Zeiten, beispielsweise an Feiertagen, automatisieren. Unternehmen können Anrufern auch die Möglichkeit geben, selbst Durchwahlnummern einzugeben, und sie mithilfe einer digitalen Rezeption automatisch weiterleiten lassen. Auf diese Weise muss kein administratives Team rund um die Uhr verfügbar sein.
Es besteht sogar die Möglichkeit, Anrufer je nach ihrem Standort weltweit weiterzuleiten, um die Effizienz zu maximieren.
Wichtig
Weitere Informationen zu grundlegenden Wählplänen und zum Hinzufügen von Elementen finden Sie unter Grundlagen des Wählschemas.
Warnung
Die Verwendung eines Browser-Add-ons für die Rechtschreibung kann die Verwendung des visuellen Editors in Wählplänen behindern. Verwenden Sie keinen Übersetzer mit der Axivox-Verwaltungskonsole.
Erweiterte Elemente
In Axivox-Wählplänen (wie in Grundlagen des Wählschemas beschrieben) stehen zwei erweiterte Elemente zur Verfügung.
Record (Aufzeichnung): Die Aufzeichnungsfunktion ist aktiviert (erfordert eine Planänderung, aktiviert in den Axivox-Einstellungen).
Caller ID (Anrufer-ID): Ersetzen Sie die Anrufer-ID durch die angerufene Nummer oder einen beliebigen Text.
Um eines dieser Elemente hinzuzufügen, navigieren Sie zur Seite Dial plans (Wählpläne), die sich im Menü auf der linken Seite der Axivox-Verwaltungskonsole befindet.
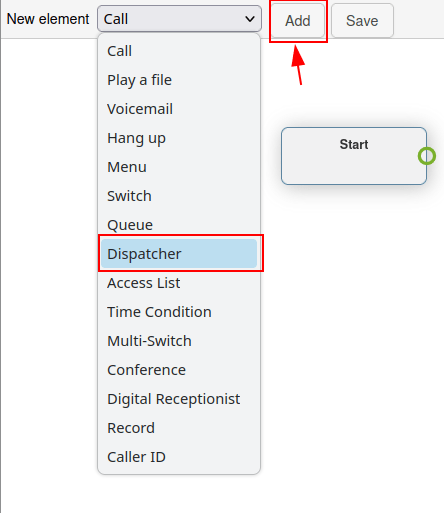
Klicken Sie anschließend auf die Schaltfläche Visual Editor (Visueller Editor) rechts neben dem gewünschten Wählplan, um diesen zu bearbeiten. Öffnen Sie abschließend das Drop-down-Menü New element (Neues Element), wählen Sie das Element aus und klicken Sie auf Add (Hinzufügen).
Weitere Informationen finden Sie unter Wählpläne.
Wichtig
Das Element Record (Aufzeichnung) zeichnet Aufrufe auf, die über dieses Element weitergeleitet werden, und erfordert eine zusätzliche Planänderung in Axivox.
Um die Aufzeichnung auf Axivox zu aktivieren, navigieren Sie zu Settings (Einstellungen) in der Axivox-Verwaltungskonsole. Gehen Sie anschließend zum Drop-down-Menü Recording (Aufzeichnung) am unteren Rand der Seite. Wählen Sie dort im Drop-down-Menü die Option Enabled (Aktiviert), um die Aufzeichnung über das Element Record (Aufzeichnung) in einem Wählplan zu aktivieren.
Tipp
Wenn das Drop-down-Menü Recording (Aufzeichnung) nicht verfügbar ist und nicht geändert werden kann, wenden Sie sich bitte an Axivox, um die Funktion zu aktivieren.
Das Element Caller ID (Anrufer-ID) ermöglicht das Ersetzen der Anrufer-ID nach der Weiterleitung.
Wenn Sie das Element Caller ID (Anrufer-ID) zum Wählplan hinzufügen und zur Konfiguration darauf doppelklicken, werden zwei Optionen angezeigt.
Die erste Option ist ein Feld mit der Bezeichnung Free text (Freitext), in das beliebiger Text eingegeben werden kann, um die Anrufer-ID zu ersetzen. Die zweite Option lautet Anrufer-ID durch die angerufene Nummer ersetzen. Diese Option ersetzt die Anrufer-ID durch die Incoming number (Eingehende Nummer).
Tipp
Ein Unternehmen kann das Element Caller ID (Anrufer-ID) verwenden, um die Incoming number (Eingehende Nummer) zu ersetzen, sodass Mitarbeiter oder externe Anrufer die Nummer nicht sehen können und die Informationen vertraulich bleiben.
Grundlegende Routing-Elemente
Die grundlegenden Routing-Elemente in Axivox-Wählplänen bieten eine erweiterungsbasierte Weiterleitung. Dies kann entweder durch Hinzufügen eines Menüs erfolgen, um die Wählnummern numerisch mit einer Aktion zu verknüpfen, oder durch Verwendung einer digitalen Rezeption, die anhand einer Tasteneingabe des Anrufers automatisch eine Durchwahl weiterleitet oder abhört.
Der Hauptunterschied zwischen den beiden Elementen besteht darin, dass den Digitalen Rezeptionisten nicht numerisch mit Aktionen vorkonfiguriert werden muss.
Menu (Menü): Fügen Sie ein Nummernverzeichnis und konfigurierte nachgelagerte Aktionen (nicht Terminal) hinzu. Eine Nummernwahlfunktion könnte beispielsweise ein Element enthalten, bei dem der Anrufer durch Klicken auf „2“ zu dem Element weitergeleitet wird, das mit „2“ im Menüelement des Wählplans verknüpft ist.
Digital Receptionist (Digitaler Rezeptionist) Fügen Sie einen virtuellen Dispatcher hinzu, der auf Durchwahlen hört.
Um eines dieser Elemente hinzuzufügen, navigieren Sie zur Seite Dial plans (Wählpläne) im Menü auf der linken Seite der Axivox-Verwaltungskonsole. Klicken Sie anschließend auf die Schaltfläche Visual Editor (Visueller Editor) rechts neben dem Wählplan, um den Wählplan zu bearbeiten. Öffnen Sie dann das Drop-down-Menü New element (Neues Element), wählen Sie das Element aus und klicken Sie auf Add (Hinzufügen).
Weitere Informationen finden Sie unter Wählpläne.
Szenario eines digitalen Rezeptionisten
Das Element Digitaler Rezeptionist ist eine Abhörfunktion, die Anrufer anhand der über die Tastatur eingegebenen Durchwahlnummer präzise über einen Wählplan weiterleitet.
Richten Sie einen Digitalen Rezeptionist ein, um die ständige Bereitschaft eines Teams oder einer Live-Rezeptionistin zu vermeiden. Mit diesem Element erreichen Anrufe nun ihr Ziel, ohne dass eine reale Person eingreift.
Nachdem Sie das Element Digital Receptionist (Digitaler Rezeptionist) zu einem Wählplan hinzugefügt haben, verbinden Sie die entsprechenden Endpunkte und doppelklicken Sie auf das Element, um die Timeout (Zeitüberschreitung) im Pop-up-Fenster Receptionist (Rezeptionist) festzulegen.
Die Timeout (Zeitüberschreitung) kann in Schritten von 5 Sekunden von 5 Sekunden bis 60 Sekunden
Wichtig
Das Element Digital Receptionist (Digitaler Rezeptionist) erfordert ein Element Play a file (Datei abspielen) auf einer der beiden Seiten, um zu erklären, welche Aktion ausgeführt werden soll, wenn eine falsche Dateiendung eingegeben wird.
Example
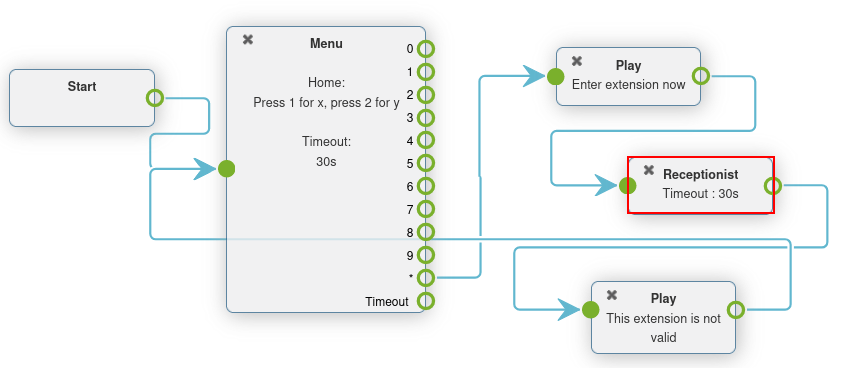
Fügen Sie beim Anpassen eines Wählplans im Pop-up-Fenster Dialplan Editor (Wählplan-Editor) ein Element Menu (Menü) hinzu, mit einer Greeting message (Begrüßungsnachricht), die beispielsweise lauten könnte: Press star to dial an extension (Drücken Sie die Stern-Taste, um eine Durchwahl anzurufen.)
Verknüpfen Sie dann im Element Menu (Menü) für die Option * (Stern) ein Element Play a file (Datei abspielen), das eine Audio message (Sprachnachricht) mit dem Inhalt: ‚Enter the extension of the person you are trying to reach‘ (Geben Sie die Durchwahl der Person ein, die Sie erreichen möchten)
Fügen Sie nach dem ersten Element Play a file (Datei abspielen) das Element Digital Receptionist (Digitaler Rezeptionist) hinzu, gefolgt von einem weiteren Element Play a file (Datei abspielen) , das die Meldung That is not a valid extension (Das ist keine gültige Durchwahl) wiedergibt.
Dieses letzte Element dient dazu, die Schleife zu schließen, falls der Anrufer keine korrekte Durchwahl eingibt.
Schließlich wird dieses letzte Element Play a file (Datei abspielen) wieder in das Element Menu (Menü) eingefügt.
Wichtig
Die Elemente des Wählplans können durch Doppelklick konfiguriert werden, indem verschiedene Aspekte der Axivox-Konsole mit ihnen verknüpft werden.
Eine Audio message (Sprachnachricht) muss z. B. gemacht werden und dann in den Elementen Play a file (Datei abspielen) oder Menu (Menü) ausgewählt werden.
Weitere Informationen finden Sie in dieser Dokumentation: Sprachnachrichten.
Erweiterte Routing-Elemente
Erweiterte Routing-Elemente leiten Anrufe automatisch weiter, sobald sie unter der/den eingehenden Nummer(n) eingehen. Dies kann mithilfe von Geolokalisierung, Whitelisting oder zeitbasierten Variablen konfiguriert werden. Anrufe durchlaufen vor ihrem endgültigen Ziel einen Filter und werden auf Grundlage der festgelegten Variablen weitergeleitet.
Es gibt folgende erweiterte Routing-Elemente:
Dispatcher: einen Anruffilter erstellen, um den Datenverkehr basierend auf dem geografischen Standort der Anrufer-ID zu leiten.
Access List (Zugriffsliste): eine maßgeschneiderte Zugriffsliste mit VIP-Kundenpräferenzen erstellen.
Time Condition (Zeitbedingung): Erstellen Sie Zeitbedingungen, um eingehenden Datenverkehr um Feiertage oder andere sensible Zeiträume herum zu leiten.
Tipp
Whitelisting oder auch Weiße Liste ist ein Fachbegriff für die Erstellung einer Liste zulässiger Nummern. Umgekehrt wird Blacklisting oder Schwarze Liste verwendet, um eine Liste unzulässiger Nummern zu erstellen.
Um eines dieser Elemente hinzuzufügen, navigieren Sie zur Seite Dial plans (Wählpläne) im Menü auf der linken Seite der Axivox-Verwaltungskonsole. Klicken Sie anschließend auf die Schaltfläche Visual Editor (Visueller Editor) rechts neben dem Wählplan, um den Wählplan zu bearbeiten. Öffnen Sie dann das Drop-down-Menü New element (Neues Element), wählen Sie das Element aus und klicken Sie auf Add (Hinzufügen). Weitere Informationen finden Sie unter Wählpläne.
Szenario mit Dispatcher
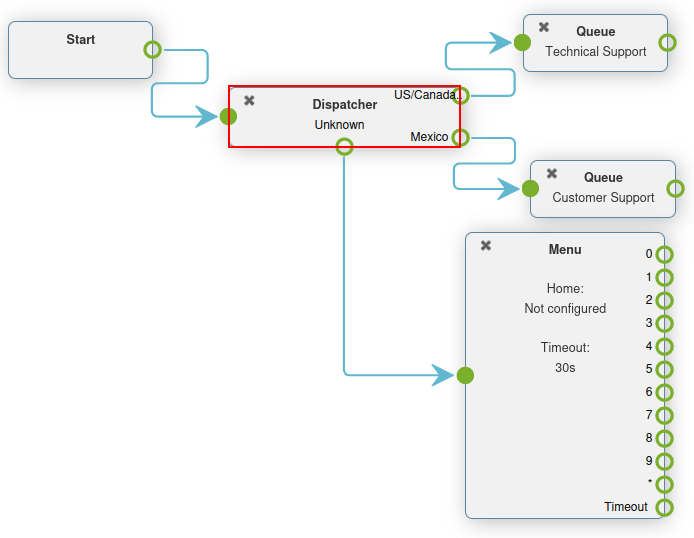
Ein Dispatcher-Element ist eine Funktion des Wählplans, die Anrufe basierend auf der Region oder dem Standort weiterleitet. In den meisten Fällen ist das Dispatcher-Element in einem Wählplan mit dem Start-Element verknüpft, um Anrufe zu filtern oder zu überprüfen, wenn sie an einer eingehenden Nummer eingehen.
Doppelklicken Sie auf das Dispatcher-Element im Pop-up-Fenster Dialplan Editor (Wählplan-Editor), um es zu konfigurieren.
Dieses Element überprüft Nummern (die über dieses Element weitergeleitet werden) anhand regulärer Ausdrücke. Um einen regulären Ausdruck hinzuzufügen, klicken Sie unten im Pop-up-Fenster Dispatcher auf Add a line (Zeile hinzufügen).
Geben Sie dann unter Name einen eindeutigen Namen ein, um diesen Ausdruck zu identifizieren. Dieser Name wird im Element Dispatcher im Wählplan angezeigt, der im Pop-up-Fenster Dialplan Editor (Wählplan-Editor) angezeigt wird.
Geben Sie im Feld Regular expression (Regulärer Ausdruck) die Ländervorwahl oder Vorwahl ein, die Axivox für eingehende Anrufe weiterleiten soll. Dies ist besonders hilfreich, wenn ein Unternehmen seine Kunden anhand ihres Standorts in bestimmte Warteschlangen oder Benutzergruppen filtern möchte.
Um alle Nummern hinter einer bestimmten Ländervorwahl oder Vorwahl anzugeben, fügen Sie d+ nach der Ländervorwahl oder Ländervorwahl + Vorwahl ein.
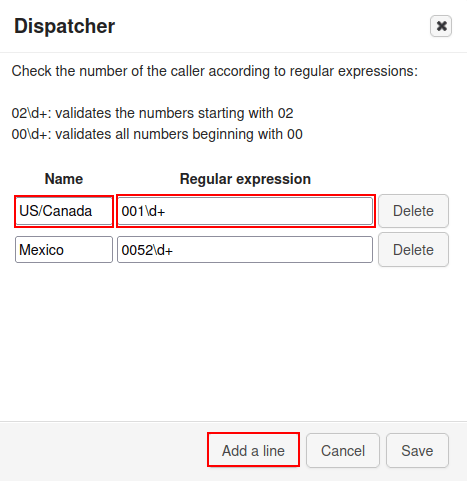
Example
02\d+: validiert alle Nummern, die mit02beginnen00\d+: validiert alle Nummern, die mit00beginnen0052\d+validiert alle Nummern, die mit0052beginnen (Ländercode für Mexiko)001716\d+: validiert alle Nummern, die mit001716(USA-Ländercode + Vorwahl für den Westen New Yorks)
Tipp
Ein regulärer Ausdruck (abgekürzt „Regex“ oder „Regexp“) wird manchmal auch „rationaler Ausdruck“ genannt. Es handelt sich um eine Folge von Zeichen, die ein Übereinstimmungsmuster im Text angibt. In anderen Worten: Eine Übereinstimmung wird innerhalb des angegebenen Zahlenbereichs hergestellt.
Wenn die gewünschten Konfigurationen im Pop-up-Fenster Dispatcher (Umschalter) abgeschlossen sind, klicken Sie unbedingt auf Save (Speichern).
Dadurch erscheint das Dispatcher-Element mit unterschiedlichen Routen, die konfiguriert werden können, je nach eingestellen Regular Expressions (Regulären Ausdrücken).
Hängen Sie diesen Route ein beliebiges neues Element (New element) im Pop-up-Fenster Dialplan Editor (Wählplan-Editor) an.
Standardmäßig gibt es einen unbekannten Pfad (Unknown) im Dispatcher-Element, nachdem mindestesn ein regulärer Ausdruck (Regular Expression) festgelegt wurde.
Anrufe folgen dieser Route bzw. diesem Pfad, wenn ihre Nummer mit keinem regulären Ausdruck (Regular Expression) im Dispatcher-Element übereinstimmen.
Szenario mit zeitlichen Bedingungen
Wenn ein Element mit zeitlicher Bedingung (Time Condition) zu einem Wählplan hinzugefügt wird, hat es ein einfaches True- und False-Routing.
Nach Hinzufügen des Elements Time Condition (Zeitliche Bedingung) zu einem Wählplan, doppelklicken Sie darauf, um die Variablen zu konfigurieren. Hour/Minute (Stunde/Minute), Days of the week (Tage der Woche), Day of the month (Tag des Monats) und Month (Monat) können konfiguriert werden
Wenn der Zeitpunkt, zu dem der Anrufer die eingehende Nummer kontaktiert, mit den festgelegten zeitlichen Bedingungen übereinstimmt, wird der Pfad True verfolgt, andernfalls der Pfad False.
Example
Für ein Unternehmen, das jährlich am amerikanischen Unabhängigkeitstag (4. Juli) geschlossen ist, sollten die folgenden zeitlichen Bedingungen festgelegt werden:
Hour/Minute (Stunde/Minute) -
0:0 to 23:59(0:0 bis 23:59)Day of the week (Tag der Woche) -
All to All(Alle bis alle)Tag des Monats -
Von 4 bis 4Monat -
Juli
Das Element Time Condition (Zeitliche Bedingung) ist vor allem hilfreich für Feiertage, Wochenenden und festen Öffnungszeiten. Wenn ein Anrufer eine Stelle erreicht, an der ihm geholfen werden kann, sei es durch einen realen Ansprechpartner oder eine Voicemail, werden Zeitverschwendung und aufgegebene Anrufe reduziert.

Wichtig
Um die Zeitzone (Timezone) festzulegen, in die die zeitliche Bedingung (Time Condition) fällt, gehen Sie zur Axivox-Verwaltungskonsole und klicken Sie links im Menü auf Settings (Einstellungen). Legen Sie dann die Zeitzone (Timezone) fest, indem Sie das zweite Feld unten verwenden und auf das Drop-down-Menü klicken.
Szenario für Zugangsliste
Ein Element einer „Zugangsliste“ in einem Wählplan ermöglicht die Weiterleitung bestimmter Nummern und lehnt andere Nummern ab.
Nachdem Sie ein Element Access List (Zugnagsliste) zu einem Wählplan hinzugefügt haben, können Sie es konfigurieren, indem Sie direkt im Pop-up-Fenster Dialplan Editor (Wählplan-Editor) auf das Element doppelklicken.
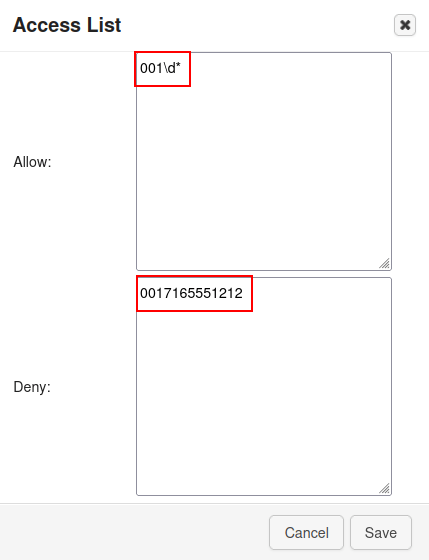
Es werden zwei Felder angezeigt, in denen Sie reguläre Ausdrücke in den Feldern Allow (Zulassen) und Deny (Ablehnen) des Pop-up-Fensters Access List (Zugangsliste) eingeben können.
Example
Für einen sehr wichtigen Kunden können Sie dessen Nummer im Feld Allow (Zulassen) festlegen, sodass Anrufe von diesem Kunden direkt an die Geschäftsleitung weitergeleitet werden.
Tipp
Ein regulärer Ausdruck (abgekürzt „Regex“ oder „Regexp“) wird manchmal „rationaler Ausdruck“ genannt. Es handelt sich um eine Folge von Zeichen, die ein Übereinstimmungsmuster im Text angibt.
Example
2\d\d: validiert Nummern von200 bis 29902\d*: validiert alle Nummern, die mit02beginnen0017165551212: validiert die Nummer (0017165551212)
Nachdem Sie die Felder Allow (Zulassen) und Deny (Ablehnen) mit regulären Ausdrücken oder Zahlen festgelegt haben, klicken Sie im Pop-up-Fenster Access List (Zugangsliste) auf Save (Speichern).
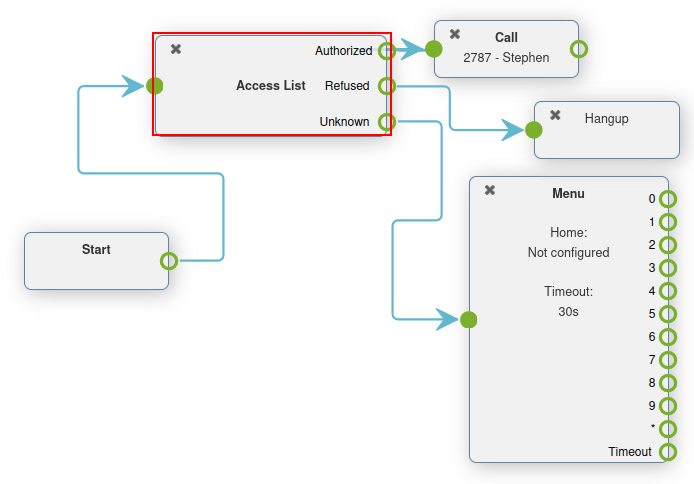
Anschließend stehen im Element Access List (Zugangsliste) des Wählplans drei Pfade (oder Routen) zur Verfügung, um weitere Aktionen zu verknüpfen.
Unbekannte Anrufe können über den regulären Menüablauf weitergeleitet werden, indem Sie ein neues Element zum Menu (Menü) hinzufügen und es mit dem Pfad Unknown (Unbekannt) verbinden. Abgelehnte (Refused) Anrufe können an das Element Hang up (Auflegen) weitergeleitet werden. Zuletzt können autorisierte (Authorized) Anrufer an eine bestimmte Durchwahl oder Warteschlange weitergeleitet werden.
Umschaltungen
Eine Umschaltung in Axivox ist eine einfache aktivierbare/deaktivierbare Routenaktion.
Diese können schnell aktiviert oder ausgewählt werden, was schnelle Routenänderungen ermöglicht, ohne den Wählplan zu verändern.
Es können alternative Routen konfiguriert werden, sodass innerhalb weniger Augenblicke auf diese umgeschaltet werden kann. Dies kann beispielsweise bei neuer Verfügbarkeit oder zur Anpassung des Anruferflusses aus einer Vielzahl von Gründen erforderlich sein.
Axivox ermöglicht einen einfachen Ein-/Aus-Schalter und einen Mehrfachschalter, bei dem mehrere Pfade zur Auswahl stehen.
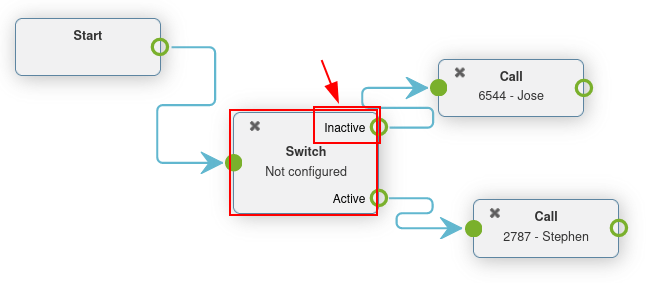
Switch (Umschaltung): Eine manuelle Ein-/Aus-Steuerung, die den Datenverkehr je nach Status (offen (ein) oder geschlossen (aus)) umleitet.
Multi-Switch (Mehfachumschaltung): Ein Mechanismus zum Erstellen von Pfaden und zum Ein- und Ausschalten dieser Pfade, um eingehende Anrufe umzuleiten.
Einfache Umschaltung
Eine Switch (Umschaltung) kann in der Axivox-Verwaltungskonsole eingestellt werden, indem Sie im linken Menü zu Switches (Umschaltungen) navigieren. Um eine neue Umschaltung zu erstellen, klicken Sie im Dashboard Switches (Umschaltungen) auf Add a switch (Umschaltung hinzufügen), konfigurieren Sie einen Namen (Name) dafür und klicken Sie auf Save (Speichern).
Schalten Sie dann die gewünschte Umschaltung in der Spalte State (Status) im Dashboard Switches (Umschaltungen) entweder auf On (Ein) oder On (Aus).
Dieser Status On / Off (Ein/Aus) leitet den Verkehr automatisch in einem Wählplan weiter, in dem diese Umschaltung eingestellt ist.
Der Verkehr wird an die Active (Aktive) Route weitergeleitet, wenn in der Umschaltung On (Ein) ausgewählt ist. Der Anrufdatenverkehr wird an die Inactive (Inaktive) Route weitergeleitet, wenn im Schalter Off (Aus) ausgewählt ist.
Änderungen können sofort vorgenommen werden. Klicken Sie lediglich auf Apply changes (Änderungen übernehmen), um sie zu implementieren.
Eine Umschaltung zum Wählplan hinzufügen
Um eine Umschaltung (Switch) zu einem Wählplan hinzuzufügen, navigieren Sie zur Axivox-Verwaltungskonsole und klicken Sie im linken Menü auf Dial plans (Wählpläne). Klicken Sie anschließend neben dem gewünschten Wählplan auf Visual Editor (Visueller Editor), um das Pop-up-Fenster Dialplan Editor (Wählplan-Editor) zu öffnen.
Wählen Sie dann aus dem Drop-down-Menü New element (Neues Element) die Option Switch (Umschaltung) aus und klicken Sie anschließend auf Add (Hinzufügen). Doppelklicken Sie auf das Element, um das Element Switch (Umschaltung) weiter zu konfigurieren.
Mehrfachumschaltung
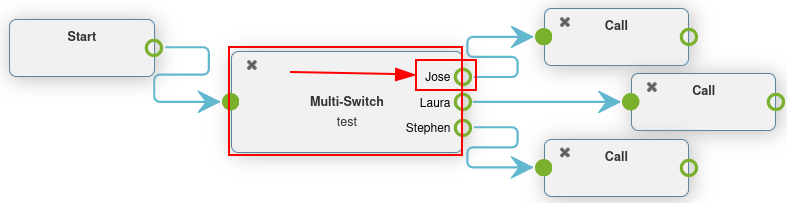
Eine Mehrfachumschaltung in Axivox ist eine Umschaltung, bei der mehrere Pfade konfiguriert und zwischen diesen umgeschaltet werden können.
Um eine Mehrfachumschaltung (Multi-Switch) zu konfigurieren und einzustellen, navigieren Sie zur Axivox-Verwaltungskonsole. Klicken Sie anschließend im linken Menü auf den Menüpunkt Switches (Umschaltungen).
Wechseln Sie zum Reiter Multi-switch (Mehfachumschaltung), um eine vorkonfigurierte Multi-switch (Mehfachumschaltung) zu erstellen oder festzulegen.
Um eine neue Mehrfachumschaltung (Multi-Switch) zu erstellen, klicken Sie auf Create new (Neu erstellen). Geben Sie dann einen Namen (Name) für das Element ein und wählen Sie die verfügbare Option (Available choice) aus. Geben Sie pro Zeile eine verfügbare Option (Available choice) ein. Duplizieren Sie keine Einträge.
Vergessen Sie nicht, auf Save (Speichern) zu klicken, wenn Sie fertig sind.
Um den Status (State) der Mehfachumschaltung (Multi-Switch) auszuwählen, klicken Sie auf das Drop-down-Menü neben dem Namen der Mehfachumschaltung (:guilabel:`Multi-Switch) im Reiter Multi-Switch (Mehfachumschaltung) im Dashboard Switches (Umschaltungen).
Der ausgewählte Status (State) ist die Route, die im Wählplan befolgt wird. Der Status (State) kann jederzeit bearbeitet werden. Klicken Sie dazu einfach auf Apply changes (Änderungen übernehmen).
Eine Mehrfachumschaltung zum Wählplan hinzufügen
Um eine Mehrfachumschaltung (Multi-Switch) zu einem Wählplan hinzuzufügen, navigieren Sie zur Axivox-Verwaltungskonsole und klicken Sie anschließend im linken Menü auf den Menüpunkt Dial plans (Wählpläne).
Wählen Sie anschließend einen Wählplan aus oder erstellen Sie einen neuen. Klicken Sie dann im gewünschten Wählplan auf Visual Editor (Visueller Editor).
Klicken Sie im Pop-up-Fenster Dialplan Editor (Wählplan-Editor) auf das Drop-down-Menü :guilabel:`New element (Neues Element) und wählen Sie die Option Multi-Switch (Mehrfachumschaltung) aus und klicken Sie anschließend auf Add (Hinzufügen). Doppelklicken Sie auf das Element, um das Element Switch (Umschaltung) weiter zu konfigurieren.