Personalempfehlungen
Odoo’s Referrals application is a centralized place where all information regarding referrals is housed, from points earned, coworkers hired, and rewards selected. Users can recommend people they know for job positions, then earn referral points as those people progress through the recruitment pipeline. Once enough referral points are earned, they can be exchanged for prizes. The Referrals application integrates with the Employees, Recruitment, and Website applications, all of which must be installed in order for the Referrals application to function.
The only configuration needed for the Referrals application after it is installed are the rewards; everything else is pre-configured when Odoo Referrals is installed.
Any user with either Referral User, Officer, or Administrator rights for the Recruitment application has access to the Referrals application. Only user’s with Administrator rights for the Recruitment application have access to the reporting and configurations menus. For more information on users and access rights, refer to these documents: Benutzer and Zugriffsrechte.
Einführung
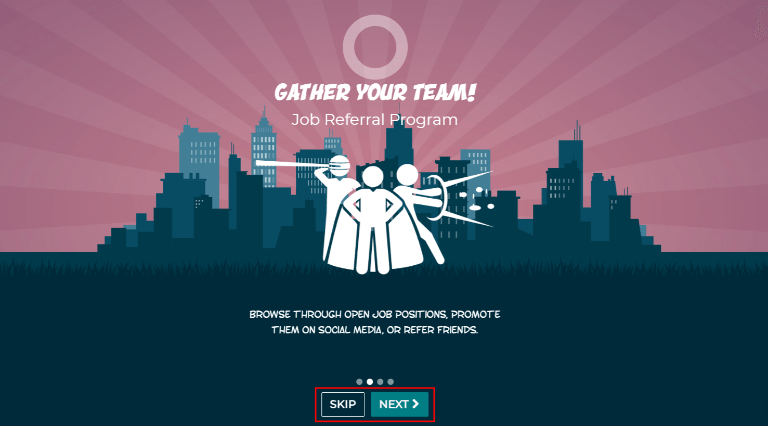
When opening the Referrals application for the first time, a pre-configured onboarding script appears. This is in the form of four slides, each explaining the different parts of the Referrals application. At the top of the dashboard, the following message is displayed throughout all the onboarding slides: GATHER YOUR TEAM! Job Referral Program. Behind this main message is an image, and beneath it some more explanatory text.
Jede der Einführungsfolien enthält ein entsprechendes Bild und eine Meldung, die angezeigt werden. Klicken Sie nach dem Lesen jeder Nachricht auf die Schaltfläche Weiter, um zur nächsten Folie zu gelangen.
Der Text erscheint wie folgt auf jeder Folie:
Oh nein! Schurken lauern in der Stadt! Helfen Sie uns, ein Team von Superhelden zu rekrutieren, um den Tag zu retten!
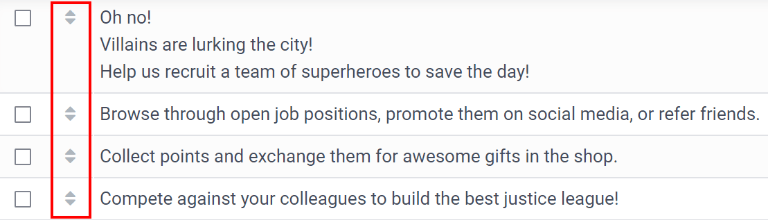
Stöbern Sie in den offenen Stellen, werben Sie für sie in den sozialen Medien oder empfehlen Sie sie Freunden.
Sammeln Sie Punkte und tauschen Sie sie im Shop gegen tolle Geschenke ein.
Treten Sie gegen Ihre Kollegen an, um das besten Superheldenteam aufzubauen!
Bemerkung
The onboarding slides will appear every time the Referrals application is opened, until all the slides have been viewed and the Start Now button has been clicked. If the onboarding is exited at any point, or if the Start Now button has not been clicked, the onboarding slides will begin again when the Referrals application is opened. Once the Start Now button has been clicked, the onboarding slides will not be seen again, and the main dashboard will load when the Referrals application is opened from that point on.
At any point during onboarding, the Skip button may be clicked. This exits the onboarding, and the main Referrals dashboard loads. If Skip is clicked, onboarding slides will not load anymore when opening the Referrals application.
Bemerkung
Wenn Kandidaten eingestellt werden, die der Benutzer vor dem Öffnen der Personalempfehlungsapp empfohlen hat (d. h. die Einführungsfolien wurden noch nicht angezeigt), erscheint beim Klicken auf Jetzt loslegen am Ende der Einführung anstelle des Hauptdashboards der Bildschirm Eingestellt.
Einfühurngsfolien bearbeiten
Onboarding slides can be modified if desired. Only users with Administrator rights for the Recruitment application can modify onboarding slides. To edit a slide, navigate to Each line displays the text for the individual onboarding slide. To edit an onboarding slide, click on an individual slide line to open the slide’s onboarding form, then click Edit.
Make any changes to the message in the Text box. To change the order the slide appear in the onboarding, the Sequence can be modified. Type in the corresponding number to indicate the order in which the slides should be displayed. A Company may be selected, however, if this field is populated, that slide will only be displayed for that particular company.
The image can be modified as well. Hover over the image thumbnail in the top right corner of the form. A ✏️ (pencil) icon and 🗑️ (garbage can) icon appear. Click the ✏️ (pencil) icon to change the image. A file navigator window loads. Navigate to the desired image, select it, then click Open. The new image appears in the thumbnail. To delete an image, click the 🗑️ (garbage can) icon, then select a new image using the ✏️ (pencil) icon.
To save any changes, click Save, or click Discard to delete any changes and revert to the original content.

The order of the slides can also be changed directly in the Onboarding dashboard, without having to edit an individual onboarding slide. Click the up and down arrow symbol that appears after the checkbox and before the slide text, and drag the slide to the desired position. The Sequence automatically changes on all the slide’s onboarding forms, reflecting the new sequence.
Eingestellte Personalempfehlungen
Wenn ein Kandidat, der von einem Benutzer empfohlen wurde, eingestellt wird, „vergrößert“ der Benutzer sein Superhelden-Team und fügt seinem Personalempfehlungsdashboard Superhelden-Avatare hinzu.
Wenn ein Nutzer nach der Einstellung eines empfohlenen Benutzers die Personalempfehlungsapp öffnet, wird anstelle des Hauptdashboards eine Einstellungsseite geladen. Der Text (Name der empfohlenen Person) wurde eingestellt! Wählen Sie einen Avatar für Ihren neuen Freund! wird angezeigt.
Below this message are five avatar thumbnails to choose from. If an avatar has already been assigned to a referral, the thumbnail is greyed out, and the name the avatar has been chosen for appears beneath the avatar. Click on an available avatar to select it.
If more than one referral was hired since opening the Referrals application, after selecting the first avatar, the user is prompted to select another avatar for the subsequent hired referral. Once all avatars have been selected, the dashboard loads and all the avatars are now visible. Mouse over each avatar and their name is displayed above them.
Freunde bearbeiten
Friend avatars are able to be modified in the same manner that levels are modified. Only users with Administrator rights for the Recruitment application can make modifications to friends. The pre-configured friends can be seen and modified by navigating to . Each friend avatar appears in the Dashboard Image column, and the corresponding name appears in the Friend Name column. The default images are a motley group of hero characters, ranging from robots to dogs.
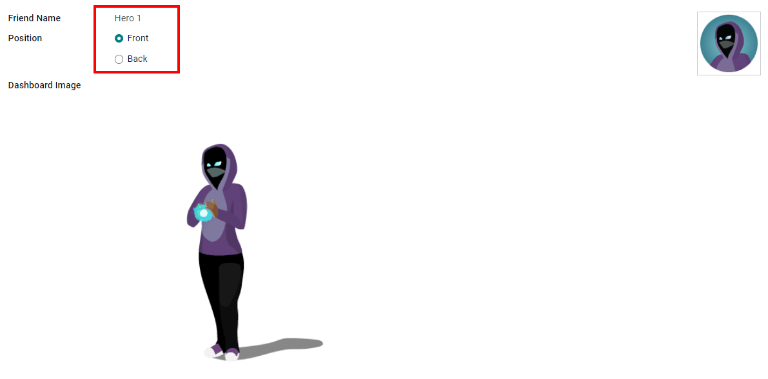
To modify a friend’s dashboard image, thumbnail, name, or position, click on an individual friend to open the referral friend form. Click Edit to make modifications. Type the name in the Friend Name field. The name is solely to differentiate the friends in the configuration menu; the friend’s name is not visible anywhere else in the Referrals application.
Die Stelle kann entweder auf Vorne oder Hinten eingestellt werden. Dadurch wird die Stelle des Freundes im Verhältnis zum Superhelden-Avatar des Benutzers bestimmt. Klicken Sie auf das Optionsfeld neben der gewünschten Auswahl, und der Freund erscheint bei Aktivierung entweder vor oder hinter dem Avatar des Benutzers.
If desired, both the thumbnail Image and the Dashboard Image can be modified. Hover over the image being replaced to reveal a ✏️ (pencil) icon and 🗑️ (garbage can) icon. Click the ✏️ (pencil) icon and a file explorer window appears. Navigate to the desired image file then click Open to select it.
Once all changes have been made, click the Save button to save the changes, or click the Discard button to revert to the original information.
Warnung
It is not advised to edit the images. An image file must have a transparent background in order for it to render properly. Only users with knowledge about transparent images should attempt adjusting any images in the Referrals application.
Once an image is changed and the friend is saved, it is not possible to revert to the original image. To revert to the original image, the Referrals application must be uninstalled then reinstalled.
Empfehlungspunkte
The referral program is based on earning points that are then exchanged for rewards. On the main Referrals application dashboard, the top displays a summary of the user’s current points. The left side of the summary displays the total points earned, and the right side displays the points that are available to spend.
To see the various referrals and the points earned for each, click on one of the buttons directly beneath the avatars. The options are Referrals, Ongoing, and Successful.
The current number of referrals who are still active in the recruitment pipeline, and have not yet been hired or refused, appear above the Ongoing button. The number of referrals who have been hired appear above the Successful button. The total number of referrals (both the ongoing and successful referrals combined) appear above the Referrals button.
Bemerkung
To view the referrals associated with each of the categories, Referrals, Ongoing, and Successful, click on the corresponding button. All the referrals for that specific category are displayed.
Meine Empfehlungen
To see all the referrals (both ongoing and successful) click the Referrals button. A My Referral window loads. This screen displays all the referrals, with each referral in its own referral card.
A successful referral has a green line down the left side of the card, and displays a ✓ Hired image in the top right corner of the card. Referrals that are in process display an In Progress image in the top right corner.
Each referral card lists the name of the applicant, the department the job position is in, the name of the job position, the person responsible for filling the role (recruiter), and the points earned.
Punkte
Die Punkte, die für eine Empfehlung verdient werden können, sind für alle Stellen gleich. Jeder Phase des Einstellungsverfahrens sind entsprechende Punkte zugeordnet. Die aufgeführten Phasen entsprechen den in der Personalbeschaffungsapp konfigurierten Phasen.
On each individual referral card, beneath the points earned is a bar chart that displays how many points have been earned out of the total possible points that can be earned if the applicant is hired.
Beneath the bar chart is a list of the various recruitment stages and the points earned when the referral moves to that stage. If a stage has been achieved and the points have been earned, a green check mark appears next to the stage.
Example
The pre-configured point structure for referrals is as follows:
Erstqualifikation: 1 Punkt
Erstes Bewerbungsgespräch: 20 Punkte
Zweites Bewerbungsgespräch: 9 Punkte
Vertragsvorschlag: 5 Punkte
Vertrag unterzeichnet: 50 Punkte
The total points earned for a referral that is hired is 85 points. Modifications of the points earned for each stage is done in the Recruitment application. Refer to the Recruitment documentation to modify the points for each stage.
Belohnungen
Belohnungen erstellen
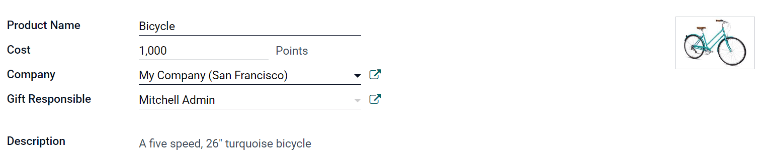
The rewards are the only configurations needed when setting up the Referrals application. Only users with Administrator rights for the Recruitment application can create or modify rewards. To add rewards, navigate to . Click Create and a reward form loads. Enter the following information on the form:
Product Name: Enter the name as it should appear for the reward.
Cost: Enter the amount of points required to redeem the reward.
Company: Using the drop-down menu, select the company the reward will appear for. If a reward is to be used for several companies, each company needs to have a record of the reward, with the company listed on the form.
Gift Responsible: Select the person who will be responsible for procuring and delivering the reward to the recipient, using the drop-down menu. This person is alerted when the reward is purchased, so they know when to deliver the reward to the recipient.
Description: Type in the description for the reward. This will be visible on the reward card, beneath the title.
Photo: Add a photo of the reward, which appears on the rewards page. Hover over the image square, and two icons appear, a ✏️ (pencil) and a 🗑️ (garbage can). Click the ✏️ (pencil) icon and a file explorer appears. Navigate to the photo file, then click Open to select it.
The only required fields are the Product Name, Company, and Description.
Wichtig
It is advised to enter a Cost and add a Photo. If a cost is not entered, the default cost will be listed as zero, which would list the reward as free in the reward shop. If a photo is not selected, a placeholder icon will be displayed on the rewards page.
Belohnungen einlösen
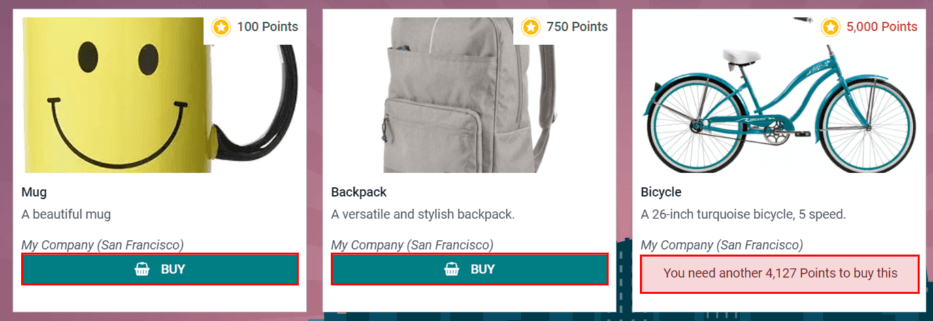
To redeem points for a reward, click the Rewards button on the main Referrals dashboard. All the configured rewards are listed in individual reward cards. The points required to purchase the reward is listed in the top right corner of the card. If the user has enough points to purchase a reward, a 🧺 (basket) Buy button appears at the bottom of the reward card. If they do not have enough points for a reward, the reward card displays You need another (x) points to buy this instead of a buy button.
Click the 🧺 (basket) Buy button on a reward to purchase it. A confirmation pop-up appears, asking if the user is sure they want to purchase the reward. Click OK to purchase the item, or Cancel to close the window and cancel the purchase.
Nachdem OK angeklickt wurde, schließt sich das Pop-up-Fenster, und die für den Kauf der Belohnung verwendeten Punkte werden von den verfügbaren Punkten des Benutzers abgezogen. Die angezeigten Belohnungen werden nun aktualisiert und spiegeln die aktuell verfügbaren Punkte des Benutzers wider.
Level
The referrals application has pre-configured levels that are reflected in the user’s avatar on the Referrals dashboard. As a user refers potential employees and earns points, they can level up, much like in a video game.
Die Level haben keine funktionalen Auswirkungen auf die Leistung der App. Sie dienen ausschließlich dazu, Leistungslevel hinzuzufügen, die die Teilnehmer anstreben können, und machen die Empfehlungen für den Benutzer spielerisch.
The user’s current level is displayed at the top of the main Referrals application dashboard, directly beneath their photo, in a Level: X format. In addition, a colored ring appears around the user’s photo, indicating how many points the user currently has, and how many additional points they need to level up. The cyan colored portion of the ring represents points earned, while the white colored portion represents the points still needed before they can level up.
Level bearbeiten
Only users with Administrator rights for the Recruitment application can modify levels. The pre-configured levels can be seen and modified by navigating to . Each avatar appears in the Image column, and the corresponding level number appears in the Level Name column. The default images are of Odoo superheroes, and each level adds an additional element to their avatar, such as capes and shields.
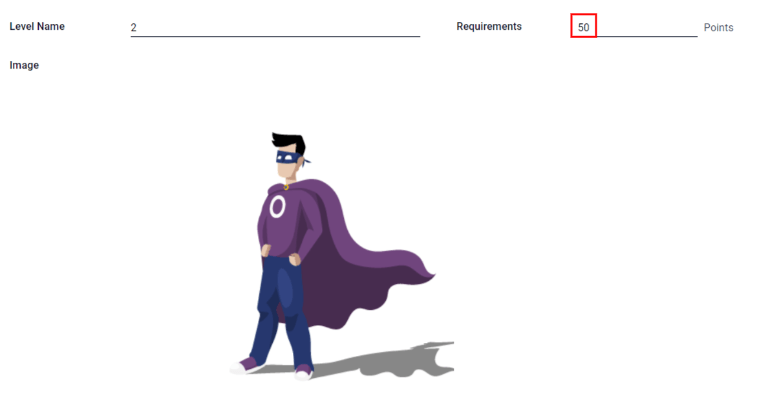
To modify a level’s image, name, or points required to reach the level, click on an individual level in the list to open the level form. Click Edit to make modifications.
Type in the name or number of the level in the Level Name field. What is entered is displayed beneath the user’s photo on the main dashboard when they reach that level. Enter the number of referral points needed to reach that level in the Requirements field. The points needed to level up are the total accumulated points earned over the lifetime of the employee, not additional points from the previous level that must be earned.
If desired, the Image can also be modified. Hover over the image to reveal a ✏️ (pencil) icon and 🗑️ (garbage can) icon. Click the ✏️ (pencil) icon and a file explorer window appears. Navigate to the desired image file then click Open to select it.
Once all changes have been made, click the Save button to save the changes, or click the Discard button to revert to the original information.
Warnung
It is not advised to edit the images. An image file must have a transparent background in order for it to render properly. Only users with knowledge about transparent images should attempt adjusting any images in the Referrals application.
Once an image is changed and the level is saved, it is not possible to revert to the original image. To revert to the original image, the Referrals application must be uninstalled then reinstalled.
Aufsteigen
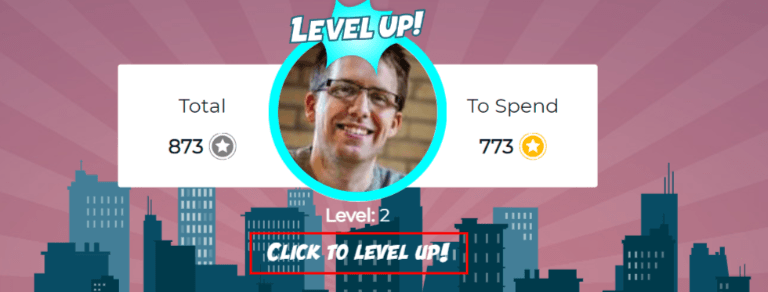
Sobald genügend Punkte für den Aufstieg auf das nächste Level gesammelt wurden, wird der Kreis um das Foto des Benutzers vollständig mit einer cyanfarbenen Farbe ausgefüllt, über dem Foto erscheint ein großes Bild mit der Aufschrift Level up!, und unter dem Foto des Benutzers und dem aktuellen Level erscheint der Satz Klicken, um aufzusteigen!.
Klicken Sie auf die Grafik LEVEL UP!, das Foto des Benutzers oder den Text Klicken, um aufzusteigen! unter dem Foto des Benutzers, um den Benutzer ein Level aufsteigen zu lassen. Der Avatar des Benutzers ändert sich entsprechend dem aktuellen Level und der Ring um das Foto wird aktualisiert, um die aktuelle Punktzahl anzuzeigen.
Das Aufsteigen auf ein höheres Level kostet den Benutzer keine Punkte, er muss lediglich die erforderliche Punktzahl erreichen.
Bemerkung
Sobald ein Benuzer das höchste konfigurierte Level erreicht hat, sammelt er weiter Punkte, die gegen Belohnungen eingetauscht werden kann, aber er kann nicht mehr aufsteigen. Der Ring um das Foto bleibt einfarbig türkis.
Warnungen
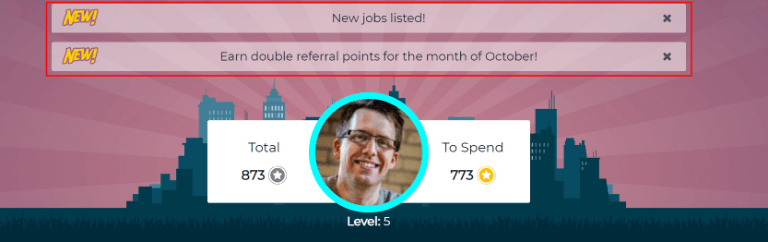
In the Referrals application, it is possible to post a message, also referred to as an alert, at the top of the dashboard to share important information with users. These alerts appear as a thin semi-transparent banner, with the word New! appearing on the far left. The text for the alert is in the center of the banner, and on the far right side is an X.
Alerts appear on the main dashboard for the specified time configured on the individual alert. If a user does not wish to see a specific alert again, click the X in the far right side of the alert. This removes the alert from the dashboard and will not appear again, even when opening the Referrals application for the first time in a new session.
Einen Alarm erstellen
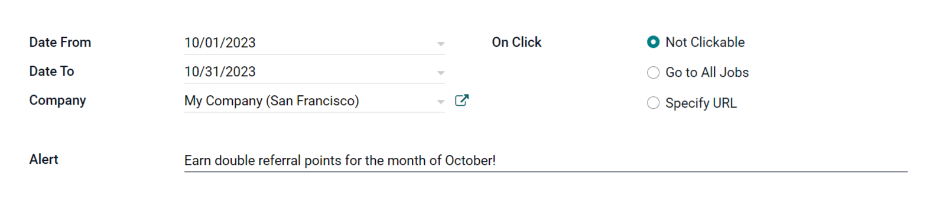
Only users with Administrator rights for the Recruitment application can create alerts. To add a new alert, navigate to the .
Click Create and a blank alert form loads. Enter the following information on the form:
Date From: The date the alert starts. On this date, the alert will be visible on the dashboard.
Date To: The date the alert ends. After this date, the alert will be hidden from view.
Company: The current company populates this field by default. To modify the company the alert should be displayed for, select the company from the drop-down menu. If this field remains blank, the alert is visible to everyone with access to the Referrals application. If a company is specified, only user’s within that company (who also have access to the Referrals application) will see the alert.
Alert: Enter the text for the alert. This message appears inside the alert banner on the main dashboard.
On Click: There are three options for the alert. Click the radio button next to the desired selection. The options are:
Not Clickable: The alert only displays text, there is no link to click.
Go to All Jobs: The alert contains a link that when clicked, navigates to the website with all the currently posted job positions.
Specify URL: The alert contains a link to a specific URL, that when clicked, navigates to that URL. When selected, a URL field appears below the On Click section. Enter the URL in the field.
Berichtswesen
Only users with Administrator rights for the Recruitment application have access to the Reporting feature in Referrals. To access the reports, click . The main view is the Reporting Dashboard view, which contains three sections.
Im oberen Teil des Fensters zeigt der Bericht in einem Balkendiagramm an, wie viele empfohlene Kandidaten eingestellt wurden und wie viele sich noch in der Einstellungspipeline befinden. Die Kandidaten werden weiter nach Kanal unterteilt, wobei genau angegeben wird, woher die Empfehlung kam, wie z. B. eine direkte Empfehlung, Facebook, usw. Wenn ein Kanal nicht im Bericht erscheint, bedeutet dies, dass es keine Empfehlungen aus diesem bestimmten Kanal gibt.
The middle third provides all the specific data that has been tracked. This includes how many total points have been earned across all referrals, how many applicants were referred, hired, or refused, how many applicants the current logged-in user referred, how many total points were earned, and how many points were given for refused applicants.
The bottom third displays a pivot table. This table can be inserted into a new or existing spreadsheet. To do so, click the Insert in Spreadsheet button right above the chart. A pop-up appears, asking which spreadsheet to insert the pivot chart into. Select the desired spreadsheet from the drop-down menu, or select New Spreadsheet. Click Confirm and the selected spreadsheet loads, with the new table in it.
Bemerkung
The spreadsheet is stored in the Documents application. This application needs to be installed in order to use the Insert in Spreadsheet option.
Siehe auch