Outlook-Plugin
Outlook ermöglicht die Verbindung mit Apps von Drittanbietern, um Datenbankaktionen aus E-Mails heraus durchzuführen. Odoo verfügt über ein Plugin für Outlook, mit dem Sie aus dem E-Mail-Panel heraus eine Verkaufschance erstellen können.
Konfiguration
Das Mail-Plugin von Outlook muss sowohl in Odoo als auch in Outlook konfiguriert werden.
Mail-Plugin aktivieren
Zuerst müssen Sie die Funktion Mail-Plugin in Ihrer Datenbank aktivieren. Gehen Sie zu , aktivieren Sie Mail-Plugin, und Speichern Sie die Konfiguration.
Das Outlook-Plugin installieren
Laden Sie () folgende XML-Datei herunter, um sie später hochzuladen: https://download.odoocdn.com/plugins/outlook/manifest.xml.
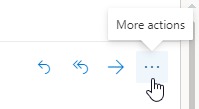
Als nächstes öffnen Sie das Outlook-Postfach und wählen eine beliebige E-Mail aus. Klicken Sie anschließend auf die Schaltfläche More actions (Weitere Aktionen) in der oberen rechten Ecke und wählen Sie Get Add-ins (Add-Ins erhalten).
Tipp
Bei lokal installierten Versionen von Microsoft Outlook rufen Sie den Menüpunkt Get Add-ins (Add-ins erhalten) auf, während Sie sich im Vorschaumodus befinden (nicht mit einer geöffneten Nachricht). Klicken Sie zunächst auf das Symbol … (Ellipse) oben rechts in der Vorschau der Nachricht, scrollen Sie dann nach unten und klicken Sie auf Get Add-ins (Add-ins erhalten).
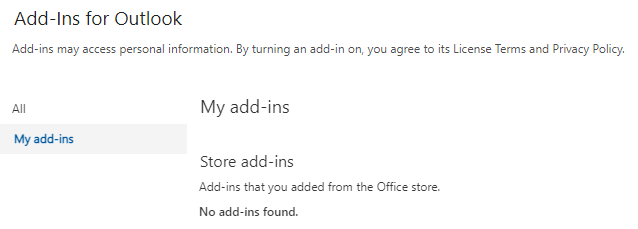
Nach diesem Schritt wählen Sie auf der linken Seite den Reiter My add-ins (Meine Add-ins).
Klicken Sie unter Custom add-ins (Benutzerdefinierte Add-Ins) auf + Add a custom add-in (Benutzerdefiniertes Add-In hinzufügen) und auf Add from URL… (Aus URL hinzufügen…).
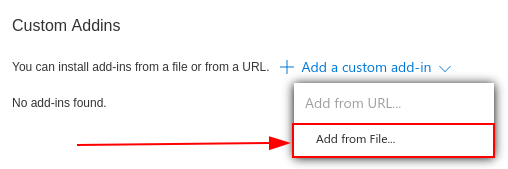
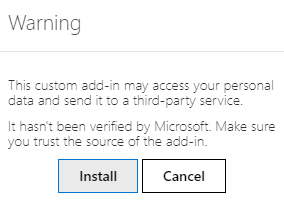
Hängen Sie im nächsten Schritt die oben heruntergeladene Datei manifest.xml an und drücken Sie OK. Lesen Sie dann die Warnung und klicken Sie auf Installieren.
Die Datenbank verbinden
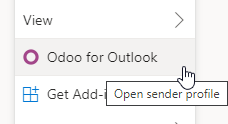
Jetzt wird Outlook mit der Odoo-Datenbank verbunden. Öffnen Sie zunächst eine beliebige E-Mail in Ihrem Outlook-Postfach, klicken Sie oben rechts auf die Schaltfläche More actions (Weitere Aktionen) und wählen Sie Odoo for Outlook (Odoo für Outlook).
Auf der rechten Seite können Sie nun Unternehmensdetails anzeigen. Klicken Sie unten auf Login (Anmelden).
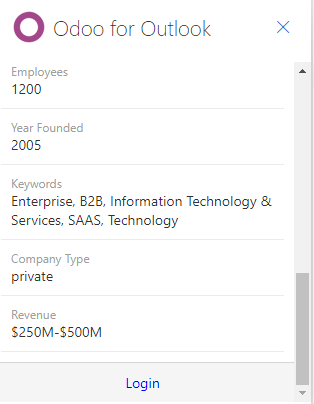
Bemerkung
Nur eine begrenzte Anzahl von Anfragen von Unternehmensdetails (Lead-Anreicherung) sind als Testdatenbank verfügbar. Diese Funktion erfordert Im Voraus erworbenes Guthaben.
Tipp
Wenn das Panel nach kurzer Zeit immer noch leer ist, kann es sein, dass die Cookie-Einstellungen des Browsers das Laden des Panels verhindert haben. Beachten Sie, dass sich diese Einstellungen auch ändern, wenn Sie sich im „Inkognito“-Modus des Browsers befinden.
Um dieses Problem zu beheben, konfigurieren Sie den Browser so, dass er Cookies auf der Odoo-Plugin-Seite immer zulässt.
Ändern Sie die Coorkie-Einstellungen des Browsers für Google Chrome, indem Sie der folgenden Anleitung https://support.google.com/chrome/answer/95647 folgen und download.odoo.com zur Liste der Seiten, die Cookies immer benutzen dürfen hinzufügen.
Danach muss das Outlook-Panel erneut geöffnet werden.
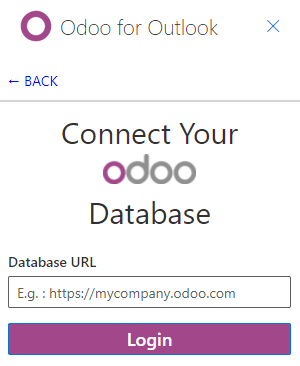
Geben Sie die URL der Odoo-Datenbank ein und klicken Sie auf Login (Anmelden).
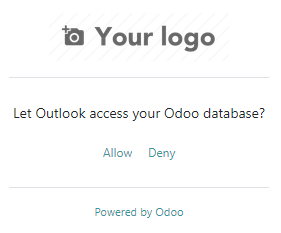
Klicken Sie auf Allow (Erlauben), um das Pop-up-Fenster zu öffnen.
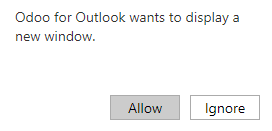
Wenn der Benutzer nicht bei der Datenbank angemeldet ist, geben Sie die Anmeldedaten ein. Klicken Sie auf Allow (Erlauben), damit das Outlook-Plugin eine Verbindung zur Datenbank herstellen kann.
Ein Tastenkürzel zum Plugin hinzufügen
Standardmäßig kann das Outlook-Plugin über das Menü More actions (Weitere Aktionen) geöffnet werden. Um Zeit zu sparen, können Sie es jedoch neben den anderen Standardaktionen hinzufügen.
Klicken Sie in Ihrem Outlook-Postfach auf Settings (Einstellungen), dann auf View all Outlook settings (Alle Outlook-Einstellungen anzeigen).

Wählen Sie unter Mail (E-Mail) Customize actions (Benutzerdefinierte Aktionen), klicken Sie auf Odoo for Outlook (Odoo für Outlook) und Save (Speichern) Sie anschließend.
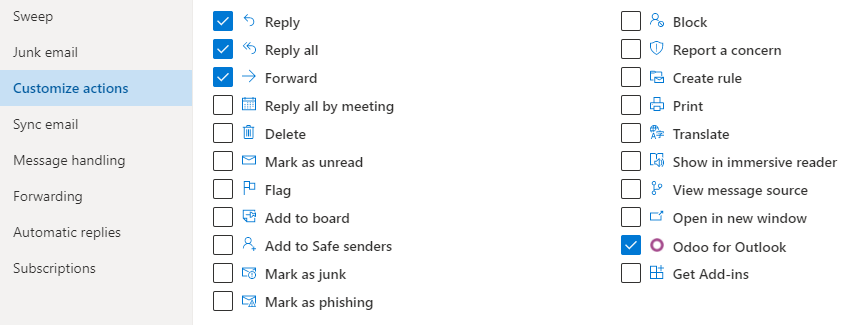
Öffnen Sie nach diesem Schritt eine beliebige E-Mail. Die Abkürzungsschaltfläche sollte angezeigt sein.
Das Plugin verwenden
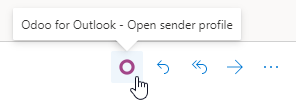
Now that the plug-in is installed and operational, all that needs to be done to create a lead is to
click on the O [Odoo icon] or navigate to More actions and click on Odoo
for Outlook. The side panel will appear on the right-side, and under Opportunities
click on New. A new window with the created opportunity in the Odoo database will
populate.