Nachbestellregeln
Nachbestellregeln werden verwendet, um die prognostizierten Lagerbestände über einem bestimmten Schwellenwert zu halten, ohne eine bestimmte Obergrenze zu überschreiten. Dies wird erreicht, indem eine Mindestmenge festgelegt wird, die der Bestand nicht unterschreiten darf, und eine Höchstmenge, die der Bestand nicht überschreiten darf.
Nachbestellregeln können für jedes Produkt auf der Grundlage der Route konfiguriert werden, über die es nachbestellt wird. Wenn ein Produkt die Einkaufen-Route verwendet, wird eine Angebotsanfrage erstellt, wenn die Nachbestellregel ausgelöst wird. Wenn ein Produkt die Route Fertigung verwendet, wird stattdessen ein Fertigungsauftrag (FA) erstellt. Dies ist unabhängig von der gewählten Auffüllroute der Fall.
Produkte für Nachbestellregeln konfigurieren
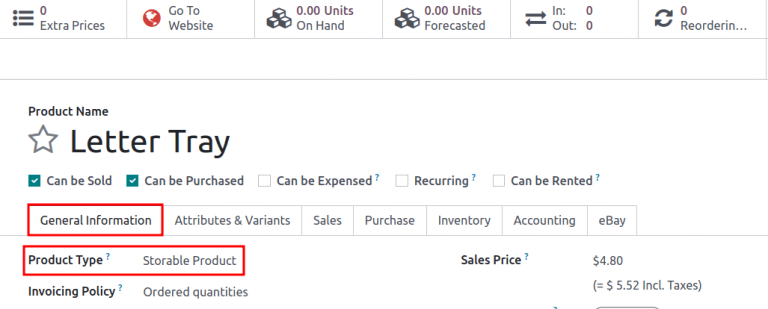
In order to use reordering rules for a product, it must first be correctly configured. Begin by navigating to , then select an existing product, or create a new one by clicking New.
On the product form, under the General Information tab, make sure that the Product Type is set to Storable Product. This is necessary because Odoo only tracks stock quantities for storable products, and this number is used to trigger reordering rules.
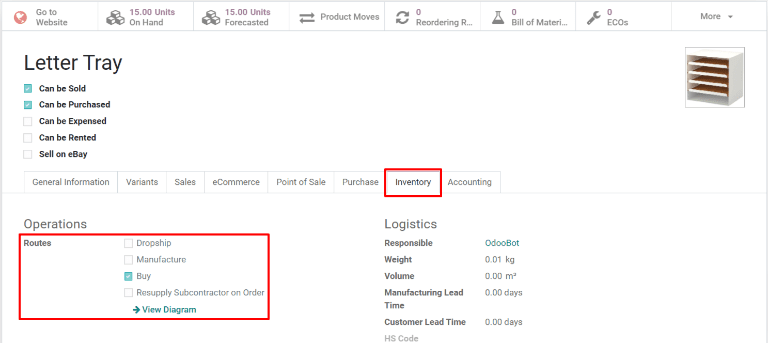
Klicken Sie dann auf den Reiter Lager und wählen Sie eine oder mehrere Routen aus dem Abschnitt Routen. Damit teilen Sie Odoo mit, über welche Route das Produkt aufgefüllt werden soll.
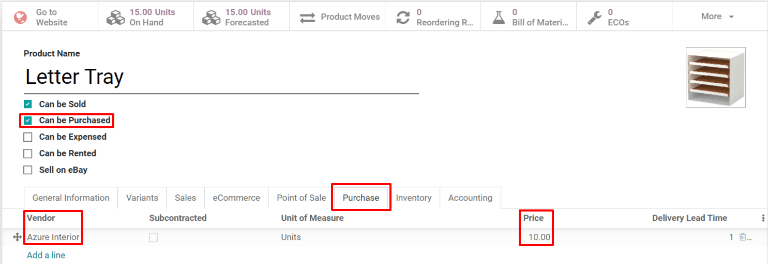
Wenn das Produkt über die Route Einkaufen nachbestellt wird, vergewissern Sie sich, dass das Kontrollkästchen Kann eingekauft werden unter dem Produktnamen aktiviert ist. Daraufhin wird der Reiter Einkauf angezeigt. Klicken Sie auf den Reiter Einkauf und geben Sie mindestens einen Lieferanten und den Preis an, zu dem er das Produkt verkauft, damit Odoo weiß, von welchem Unternehmen das Produkt gekauft werden soll.
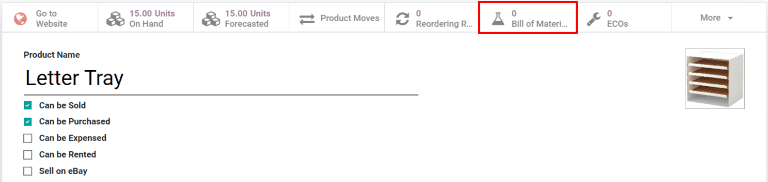
Wenn das Produkt über die Route Fertigung aufgefüllt wird, muss ihm mindestens eine Stückliste zugeordnet sein. Dies ist notwendig, da Odoo nur für Produkte mit einer Stückliste Fertigungsaufträge erstellt.
If a BoM does not already exist for the product, select the Bill of Materials smart button at the top of the product form, then click New to configure a new BoM.
Eine neue Nachbestellregel erstellen
To create a new reordering rule, navigate to , then click New, and fill out the new line as follows:
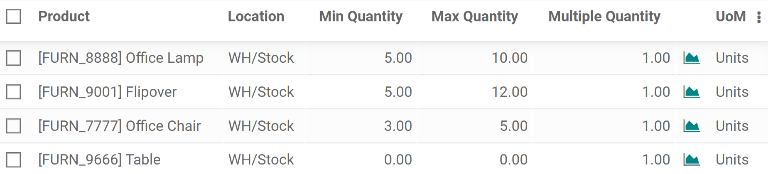
Produkt: Das Produkt, das durch die Regel aufgefüllt wird.
Lagerort: Der Standort, an dem das Produkt gelagert wird.
Min. Menge: Die Mindestmenge, die prognostiziert werden kann, ohne dass die Regel ausgelöst wird. Wenn der prognostizierte Bestand unter diese Zahl fällt, wird ein Nachbestellauftrag für das Produkt erstellt.
Max. Menge: Die maximale Menge, bis zu der der Bestand wieder aufgefüllt wird.
Mehrfache Menge: Geben Sie an, ob das Produkt in Stapeln mit einer bestimmten Menge aufgefüllt werden soll (z. B. könnte ein Produkt in Stapeln von 20 Stück aufgefüllt werden).
Maßeinheit: Die Maßeinheit, die für die Nachbestellung des Produkts verwendet wird. Dieser Wert kann einfach
Einheit(en)oder eine spezifische Maßeinheit für Gewicht, Länge usw. sein.
Tipp
Reordering rules can also be created from each product form. To do so, navigate to , then select a product. Click on , then fill out the new line, as detailed above.
For advanced usage of reordering rules, learn about the following reordering rule fields:
Bemerkung
The fields above are not available by default, and must be enabled by selecting the (slider) icon in the far-right corner, and selecting the desired column from the drop-down menu.
Trigger
When stock falls below the reordering rule’s minimum, set the reordering rule’s trigger to automatic to automatically create purchase or manufacturing orders to replenish stock.
Alternatively, setting the reordering rule’s trigger to manual displays the product and forecasted stock on the replenishment dashboard, where the procurement manager can review the stock levels, lead times, and forecasted dates of arrival.
Siehe auch
Tipp
The Replenishment dashboard is accessible by going to .
To enable the Trigger field, go to . Then, click the (slider) icon, located to the far-right of the column titles, and enable the Trigger option from the additional options drop-down menu that appears.
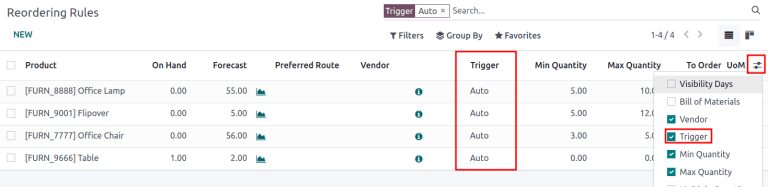
In the Trigger column, select Auto or Manual. Refer to the sections below to learn about the different types of reordering rules.
Auto
Automatic reordering rules, enabled by setting the reordering rule’s Trigger field to Auto, generate purchase or manufacturing orders when:
the scheduler runs, and the On Hand quantity is below the minimum
a sales order is confirmed, and lowers the Forecasted quantity of the product below the minimum
Tipp
The scheduler is set to run once a day, by default.
To manually trigger a reordering rule before the scheduler runs, ensure developer mode is enabled, and then select . Then, select the green Run Scheduler button on the pop-up window that appears.
Be aware that this also triggers any other scheduled actions.
Example
The product, Office Lamp, has an automatic reordering rule set to trigger when the forecasted
quantity falls below the Min Quantity of 5.00. Since the current
Forecast is 55.00, the reordering rule is not triggered.

If the Buy route is selected, then an RFQ is generated. To view and manage RFQs, navigate to .
If the Manufacture route is selected, then an MO is generated. To view and manage MOs, navigate to .
When no route is selected, Odoo selects the Route specified in the Inventory tab of the product form.
Manual
Manual reordering rules, configured by setting the reordering rule’s Trigger field to Manual, list a product on the replenishment dashboard when the forecasted quantity falls below a specified minimum. Products on this dashboard are called needs, because they are needed to fulfill upcoming sales orders, for which the forecasted quantity is not enough.
The replenishment dashboard, accessible by navigating to , considers sales order deadlines, forecasted stock levels, and vendor lead times. It displays needs only when it is time to reorder items.
Bemerkung
If the one-day window for ordering products is too short, skip to the visibility days section to make the need appear on the replenishment dashboard a specified number of days in advance.

Visibility days
Wichtig
Ensure lead times are understood before proceeding with this section.
When manual reordering rules are assigned to a product, visibility days make the product appear on the replenishment dashboard () a certain number of days in advance.
Example
A product has a manual reordering rule set to trigger when the stock level falls below four units. The current on-hand quantity is ten units.
The current date is February twentieth, and the delivery date on a sales order (in the Other Info tab) is March third — twelve days from the current date.
The vendor lead time is four days, and the purchase security lead time is one day.
When the Visibility Days field of the reordering rule is set to zero, the product appears on the replenishment dashboard five days before the delivery date, which, in this case, is February twenty-seventh.
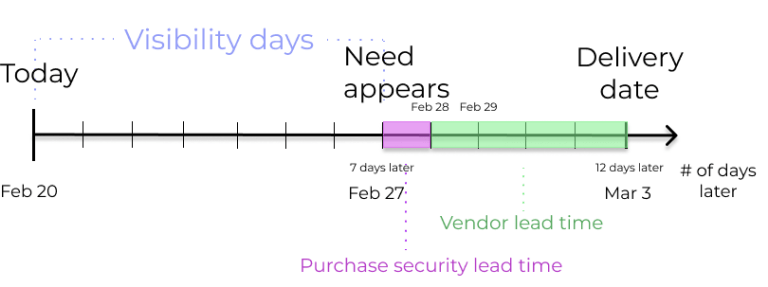
To see the product on the replenishment dashboard for the current date, February twentieth, set
the Visibility Days to 7.00.
To determine the number of visibility days needed to see a product on the replenishment dashboard, subtract today’s date from the date the need appears on the replenishment dashboard.
Example
Referring to the example above, today’s date is February twentieth, and the need for the product appears on February twenty-seventh.
(February 27 - February 20 = 7 days)
Incorrectly setting the Visibility Days fewer than seven days in this case results in the need not appearing on the replenishment dashboard.

Preferred route
Odoo ermöglicht die Auswahl mehrerer Routen im Reiter Lager in jedem Produktformular. So ist es beispielsweise möglich, sowohl Einkaufen als auch Fertigung auszuwählen und damit die Funktionalität beider Routen zu aktivieren.
Odoo also enables users to set a preferred route for a product’s reordering rule. This is the route that the rule defaults to if multiple are selected. To select a preferred route, begin by navigating to or .
Click inside of the column on the row of a reordering rule, and a drop-down menu shows all available routes for that rule. Select one to set it as the preferred route.

Wichtig
Wenn für ein Produkt mehrere Routen aktiviert sind, aber keine bevorzugte Route für die Nachbestellregel festgelegt ist, wird das Produkt anhand der ausgewählten Route nachbestellt, die im Reiter Lager des Produktformulars als erste aufgeführt ist.