Übersichts-E-Mails
Übersichts-E-Mails sind regelmäßige Speicherauszüge, die per E-Mail an Benutzer in der Organisation gesendet werden und detaillierte Informationen darüber enthalten, wie Ihr Betrieb läuft.
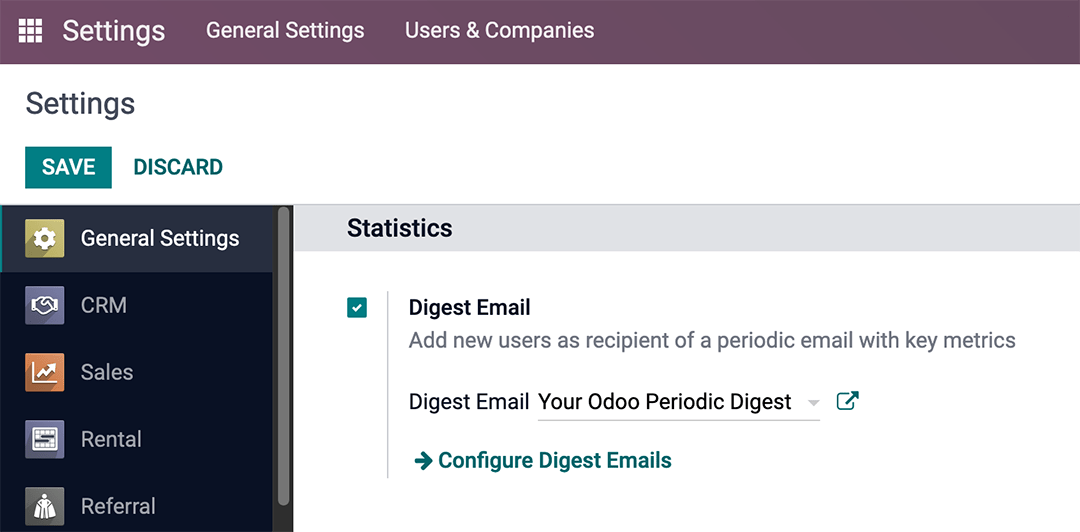
Um mit dem Versand von Übersichts-E-Mails zu beginnen, navigieren Sie zunächst zu , aktivieren die Funktion Übersichts-E-Mails und klicken auf Speichern.
Für Übersichts-E-Mails kann eine Vielzahl von Einstellungen konfiguriert werden, wie z. B:
Entscheidung darüber, welche KPIs in den Übersichts-E-Mails mitgeteilt werden
Festlegung, wie oft Übersichts-E-Mails gesendet werden
Auswahl, wer in der Organisation Übersichts-E-Mails erhält
Erstellung benutzerdefinierter Übersichts-E-Mail-Vorlagen
Hinzufügung zusätzlicher KPIs (Studio-APp erforderlich)
Bemerkung
Standardmäßig ist die Übersichts-E-Mail aktiviert, und Ihre periodische Übersicht von Odoo dient als primäre Vorlage, die alle KPI (key performance indicator)-Messungen in der Odoo-Datenbank enthält und täglich an Administratoren gesendet wird.
Warnung
Wenn Sie Duplikate von Datenbanken erstellen, die über Sendefunktionen verfügen (nicht im Testmodus), werden die Übersichts-E-Mails weiterhin von der duplizierten Datenbank versendet, es sei denn, Sie deaktivieren sie.
Um die Übersichts-E-Mails zu deaktivieren, gehen Sie zu . Deaktivieren Sie dann die Funktion Übersichts-E-mails, indem Sie das Kontrollkästchen deaktivieren und auf Speichern klicken. Siehe den Abschnitt Übersichts-E-Mail deaktivieren.
Standard-Übersichts-E-Mails anpassen
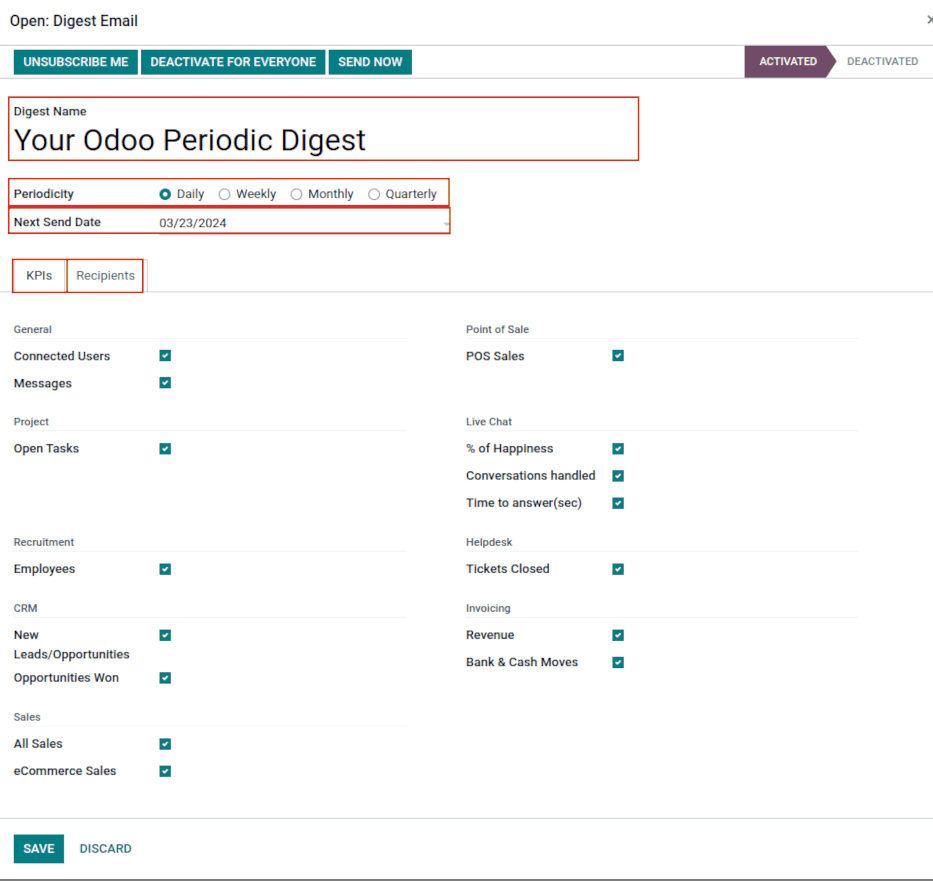
Um die Standard-Übersichts-E-Mail (Ihre periodische Übersicht von Odoo) anzupassen, gehen Sie zu , wählen Sie Ihre periodische Übersicht von Odoo und klicken Sie auf ↗️ (Externer Link) neben der Dropdown-Auswahl.
Ein Pop-up-Fenster erscheint und zeigt eine Reihe bearbeitbarer Einstellungen an, wie zum Beispiel:
Übersichtstitel: der Name der Übersichts-E-Mail.
Periodizität: legen Sie fest, wie oft Übersichts-E-Mails gesendet werden (Täglich, Wöchentlich, Monatlich oder Vierteljährlich).
Nächstes Mailingdatum: das Datum, an dem die Übersichts-E-Mail erneut gesendet wird.
Reiter KPIs: Aktivieren/deaktivieren Sie jeden berechneten KPI, der in Übersichts-E-Mails erscheint. Ein angekreuztes Kästchen bedeutet, dass ein KPI in der Übersichts-E-Mail aktiv ist. Siehe den Abschnitt über KPIs.
Reiter Empfänger: Fügen Sie Benutzer, die Übersichts-E-Mails erhalten sollten, hinzu oder entfernen Sie sie. Siehe den Abschnitt Empfänger.
Bemerkung
Die KPIs können mit Odoo Studio angepasst werden. Wenn Studio installiert werden muss, fallen zusätzliche Kosten für das Datenbankabonnement an. Siehe diesen Abschnitt über Benutzerdefinierte KPIs mit Osoo Studio.
Übersichts-E-Mail deaktivieren
Um eine einzelne Übersichts-E-Mail manuell zu deaktivieren, navigieren Sie zunächst zu , und klicken Sie auf Übersichts-E-Mails konfigurieren. Wählen Sie dann die gewünschte Übersichts-E-Mail aus der Liste aus, die deaktiviert werden soll.
Klicken Sie dann auf DEAKTIVIEREN FÜR ALLE, um die Übersichts-E-Mail für alle zu deaktivieren, oder auf MICH ABMELDEN, um den angemeldeten Benutzer aus der Mailingliste zu entfernen. Diese Schaltflächen befinden sich im oberen Menü, direkt über dem Übersichtstitel.
Übersichts-E-Mail manuell senden
Um eine Übersichts-E-Mail manuell zu senden, navigieren Sie zunächst zu , und klicken Sie auf Übersichts-E-Mails konfigurieren. Wählen Sie dann die gewünschte Übersichts-E-Mail aus der Liste aus und klicken Sie auf JETZT SENDEN. Diese Schaltfläche befindet sich im oberen Menü, direkt über dem Übersichtstitel.
KPIs
Vorkonfigurierte KPIs können der Übersichts-E-Mail über den Reiter KPIs des Formulars für die Übersichts-E-Mail-Vorlage hinzugefügt werden.
Navigieren Sie zunächst zu , und klicken Sie auf Übersichts-E-Mails konfigurieren.
Wählen Sie dann die gewünschte Übersichts-E-Mail und öffnen Sie den Reiter KPIs.
Um einen KPI zur Übersichts-E-Mail hinzuzufügen, markieren Sie das Kästchen neben der gewünschten KPI. Nachdem alle KPIs hinzugefügt (oder abgewählt) wurden, klicken Sie auf Speichern.
Die folgenden KPIs sind in Odoo im Reiter KPIs im Formular einer Übersichts-E-Mail-Vorlage verfügbar:
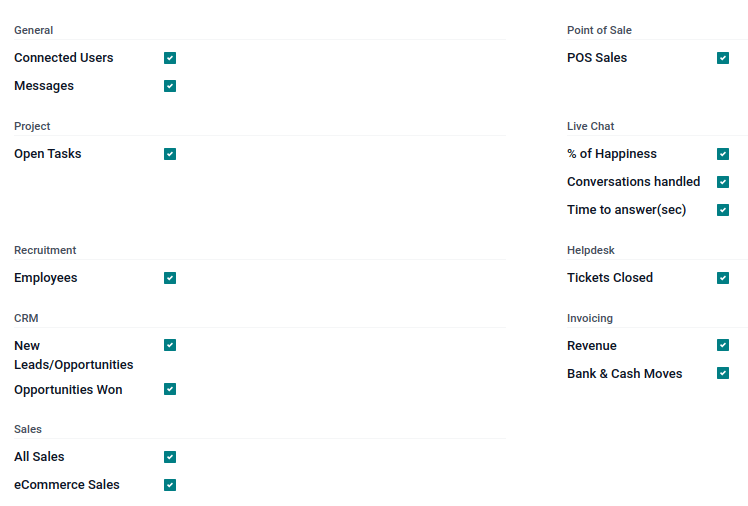
- Allgemein
Verbundene Benutzer
Nachrichten
- Projekt
Offene Aufgaben
- Personalbeschaffung
Mitarbeiter
- CRM
Neue Leads/Verkaufschancen
Gewonnene Verkaufschancen
- Verkäufe
Alle Verkäufe
E-Commerce-Verkäufe
- Kassensystem
Kassenverkäufe
- Livechat
% Zufriedenheit
Verwaltete Unterhaltungen
Zeit zum Antworten (Sek.)
- Kundendienst
Geschlossene Tickets
- Rechnungsstellung
Umsatz
Bank- und Bargeldtransaktionen
Empfänger
Die Empfänger von Übersichts-E-Mails werden im Reiter Empfänger des Formulars für die Übersichts-E-Mail-Vorlage hinzugefügt.
Um einen Empfänger hinzuzufügen, navigieren Sie zunächst zu , und klicken Sie auf Übersichts-E-Mails konfigurieren. Wählen Sie dann die gewünschte Übersichts-E-Mail aus und öffnen Sie den Reiter Empfänger.
Um einen Empfänger hinzuzufügen, klicken Sie auf Zeile hinzufügen. Daraufhin erscheint ein Pop-up-Fenster Empfänger hinzufügen mit allen verfügbaren Benutzern, die Sie als Empfänger hinzufügen können.
Aktivieren Sie im Pop-up-Fenster das Kontrollkästchen neben dem Name des/der Benutzer(s) und klicken Sie auf die Schaltfläche Auswählen.
Um einen Benutzer als Empfänger zu entfernen, klicken Sie auf das Symbol ❌ (entfernen) ganz rechts neben dem Benutzer im Reiter Empfänger.
Klicken Sie auf Speichern, um die Änderungen zu übernehmen.
Übersichts-E-Mails erstellen
Um eine neue Übersichts-E-Mail zu erstellen, navigieren Sie zu und klicken Sie auf Übersichts-E-Mails konfigurieren. Klicken Sie dann auf Neu, um eine neue Übersichts-E-Mail zu erstellen.
Es wird eine separate Seite mit einer leeren Übersichts-E-Mail-Vorlage angezeigt, auf der Sie eine Reihe von Einstellungen vornehmen können, darunter auch die folgenden:
Übersichtstitel: der Name der Übersichts-E-Mail.
Periodizität: legen Sie fest, wie oft Übersichts-E-Mails gesendet werden (Täglich, Wöchentlich, Monatlich oder Vierteljährlich).
Nächstes Mailingdatum: das Datum, an dem die Übersichts-E-Mail erneut gesendet wird.
Reiter KPIs: Aktivieren/deaktivieren Sie jeden berechneten KPI, der in Übersichts-E-Mails erscheint. Ein angekreuztes Kästchen bedeutet, dass ein KPI in der Übersichts-E-Mail aktiv ist. Siehe den Abschnitt über KPIs.
Reiter Empfänger: Fügen Sie Benutzer, die Übersichts-E-Mails erhalten sollten, hinzu oder entfernen Sie sie. Siehe den Abschnitt Empfänger.
Geben Sie der Übersichts-E-Mail einen Übersichtstitel, legen Sie Periodizität fest, wählen Sie die gewünschten KPIs und fügen Sie bei Bedarf Empfänger hinzu.
Nachdem Sie auf Speichern geklickt haben, steht Ihnen die neue benutzerdefinierte Übersichts-E-Mail als Auswahl im Feld Übersichts-E-Mail zur Verfügung, das sich in der befindet.
Benutzerdefinierte KPIs mit Osoo Studio
Die KPIs auf einem Formular für eine Übersichts-E-Mail-Vorlage, im Reiter KPIs, können mit Odoo Studio angepasst werden.
Warnung
Es fallen zusätzliche Kosten für das Datenbankabonnement an, wenn Odoo Studio installiert werden muss.
Um zu beginnen, klicken Sie auf das Symbol 🛠️ (Tools) oben rechts auf dem Bildschirm. Dies ist der Link zu Odoo Studio.
Um zusätzliche Felder zu erstellen, müssen Sie zwei Felder für das Übersichtsobjekt anlegen:
Erstellen Sie ein boolesches Feld mit dem Namen
kpi_myfieldund zeigen Sie es im Reiter KPIs anErstellen Sie ein berechnetes Feld mit dem Namen
kpi_myfield_value, das die benutzerdefinierte KPI berechnetWählen Sie im Reiter KPIs (Leistungskennzahlen) die KPIs.
Tipp
Hier ist der Quellcode für die Datei digest.py, die den Programmierer zur Codierung des berechneten Felds führt.
Siehe auch
Sie können auch im Reiter Empfänger und dann auf das vertikale Drei-Punkte-Menü (Kebab) klicken, um diese Ansicht zu bearbeiten. Klicken Sie entweder auf LISTENANSICHT BEARBEITEN oder auf FORMULARANSICHT BEARBEITEN, um diesen Reiter zu ändern.
Referenztabelle für berechnete Werte
BEZEICHNUNG |
WERT |
|---|---|
Verbundene Benutzer |
|
Gesendete Nachrichten |
|
Neue Leads |
|
Gewonnene Verkaufschancen |
|
Offene Aufgaben |
|
Geschlossene Tickets |
|
% Zufriedenheit |
|
Bearbeitete Gespräche |
|
Zeit zum Antworten (Sek.) |
|
Alle Verkäufe |
|
E-Commerce-Verkäufe |
|
Umsatz |
|
Bank- und Bargeldtransaktionen |
|
Kassenverkäufe |
|
Neue Mitarbeiter |
|