Genehmigungen
Benachrichtigen Sie Beteiligte und Manager automatisch, indem Sie den Phasen der zu prüfenden technischen Änderungsaufträge (ECOs) Genehmiger zuweisen. Änderungen können erst dann angewendet werden, wenn der zugewiesene Genehmiger sie akzeptiert hat. Genehmigungen gewährleisten Überprüfungen durch Teammitglieder, was Fehler und verfrühte Aktionen verhindert.
Siehe auch
Genehmiger hinzufügen
Um einen Genehmiger hinzuzufügen, gehen Sie zunächst zur , und klicken Sie auf die Projektkarte eines Änderungsauftragstyps, um die Gantt-Ansicht der technischen Änderungsaufträge zu öffnen.
Bewegen Sie auf der Seite Technische Änderungsaufträge den Mauszeiger über die gewünschte Phase und wählen Sie das Symbol ⚙️ (Zahnrad). Klicken Sie dann auf Bearbeiten, um ein Pop-up-Fenster zu öffnen.
Bemerkung
Genehmiger können jeder Phase hinzugefügt werden, es wird jedoch dringend empfohlen, sie der Verifizierungsphase zuzuweisen, die vor der Abschlussphase liegt, in der Änderungsaufträge angewendet und die Stücklistenversion aktualisiert wird.
Weitere Informationen finden Sie in der Dokumentation zu Phasenarten.
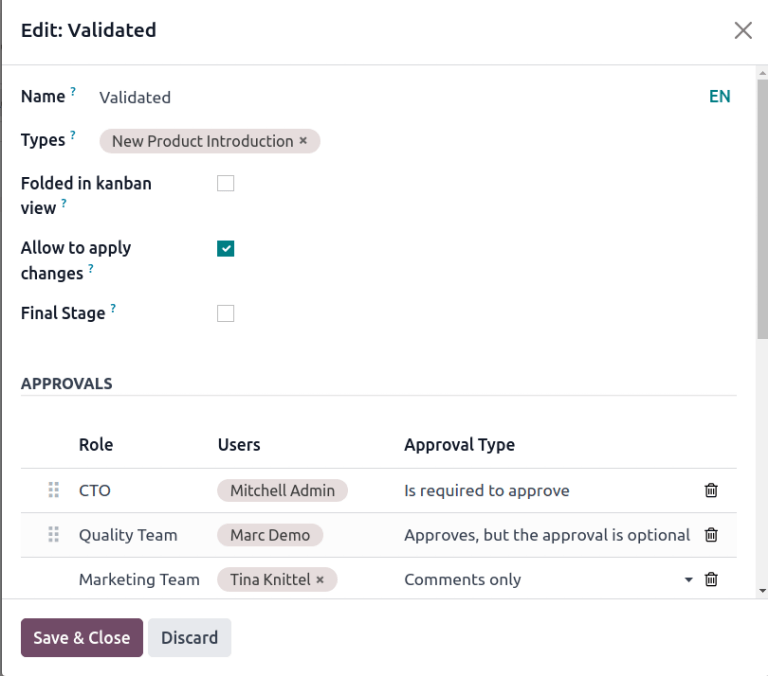
Klicken Sie im Pop-up-Fenster Bearbeiten auf die Schaltfläche Zeile hinzufügen unter Genehmigungen. Geben Sie anschließend unter Rolle die Position oder die Bezeichnung des Genehmigers ein (z. B. Technischer Leiter, Qualitätsteam usw.) und wählen Sie den entsprechenden Benutzer aus dem Drop-down-Menü aus.
Legen Sie anschließend den Genehmigungstyp auf Muss genehmigt werden, Genehmigung möglich, aber optional oder Nur Kommentare fest.
Example
Weisen Sie den CTO Mitchell Admin als erforderlichen Genehmiger für Änderungsaufträge in der Phase Validiert in der Änderungsauftragsart Neue Produkteinführung zu.
Genehmigungen der Qualitäts- und Marketingteams sind für die Anwendung von Änderungen am Änderungsauftrag nicht erforderlich, da ihre Genehmigungsart auf Genehmigung möglich, aber optional bzw Nur Kommentare gesetzt ist.
Genehmigungen verwalten
Genehmiger können ihre zu erledigenden Genehmigungen verfolgen, indem sie zur navigieren und die Karte für eine Änderungsauftragsart auswählen, auf der die Anzahl der ihnen zugewiesenen offenen Aufgaben angezeigt wird.
Die einzelnen Schaltflächen auf einer Projektkarte für einen Änderungsauftrag haben folgende Funktionen:
Die Schaltfläche # Technische Änderungen zeigt die Anzahl der laufenden Änderungsaufträge dieser Änderungsauftragsart an. Durch Klicken auf die Schaltfläche wird die Gantt-Ansicht der Seite Technische Änderungsaufträge geöffnet.
Meine Validierungen zeigt die Anzahl der Änderungsaufträge an, die der Genehmiger akzeptieren oder ablehnen muss. Durch Klicken auf diese Schaltfläche werden Änderungsaufträge angezeigt, die noch genehmigt oder abgelehnt werden müssen (mit dem roten Status Blockiert gekennzeichnet).
Die Schaltfläche Alle Validierungen zeigt die Anzahl der Änderungsaufträge an, die von einem Genehmiger genehmigt oder abgelehnt werden müssen. Durch Klicken auf diese Schaltfläche werden diese ausstehenden Änderungsaufträge angezeigt.
:guilabel:Anzuwenden` zeigt die Anzahl der Änderungsaufträge an, auf die der Benutzer Änderungen anwenden muss. Wenn Sie auf die Schaltfläche klicken, werden alle Änderungsaufträge angezeigt, die in der Verifizierungsphase genehmigt und geändert werden müssen.
Änderungsaufträge, die mit dem grünen Status Erledigt gekennzeichnet sind, wurden bereits genehmigt. Der Benutzer muss auf den Änderungsauftrag klicken, um die Formularansicht aufzurufen, und dann auf die Schaltfläche Änderungen anwenden klicken.

Technische Änderungsaufträge genehmigen
Navigieren Sie zu einem Änderungsauftrag in einer Überprüfungsphase, während Sie als zugewiesener Genehmigender angemeldet sind, um die Schaltflächen Genehmigen, Ablehnen und Änderungen übernehmen zu sehen.
Um den Änderungsauftrag zu genehmigen und die Änderungen in die Produktionsstückliste zu übernehmen, klicken Sie auf Genehmigen und dann Änderungen anwenden.
Die Schaltfläche Änderungen anwenden funktioniert nicht, bevor die Schaltfläche Genehmigen angeklickt wird. Außerdem wird die Historie der geklickten Schaltflächen im Chatter protokolliert.
Warnung
When the Approval Type is not set to Is required to approve, approval from the associated user is not needed before applying changes with the Apply Changes button. Thus, the Apply Changes button will work without requiring the Approve button to be clicked first.
Automatisierte Aktivitäten
When an ECO is moved to a verification stage, a planned activity is automatically created for assigned approvers to review the ECO. Approvers receive a notification in their activities inbox, accessible through the 🕘 (clock) icon at the top of the page.
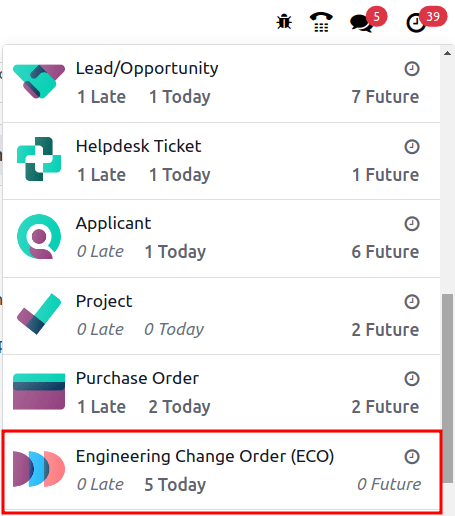
In the to-do task list, the Engineering Change Order (ECO) notification displays the number of activities marked Late, Today, and Future. Clicking on each of these buttons shows a filtered Gantt view of the respective ECOs.
Example
Scheduled activities are shown as a number on the 🕘 (clock) icon, with 5 ECOs
pending approval Today. Currently, there are 0 Late or
Future ECOs.
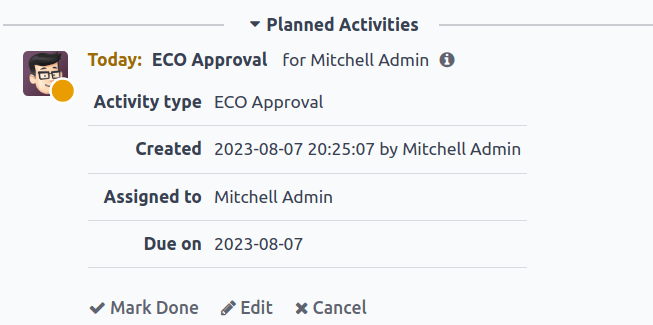
By clicking a pending ECO, a planned activity for ECO Approval is recorded in the chatter. Click on the i (Info) icon to view additional information, including the approval’s Created date, the approver Assigned to it, and the due date.
Folgeaktivitäten
When ECOs are rejected, tasks need to be assigned to project members for required modifications before ECO approval. To create tasks with deadlines, navigate to the rejected ECO form, and go to the chatter.
Select the Mark Done button in the Planned Activities section of the chatter to close the activity, and open a pop-up window for creating tasks.
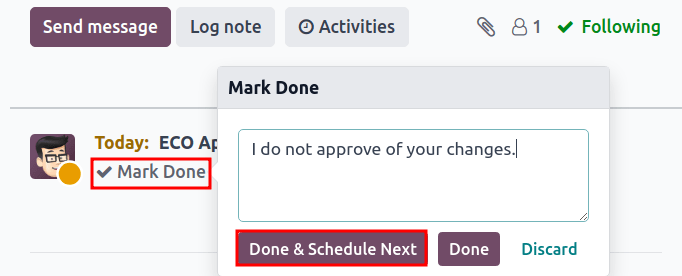
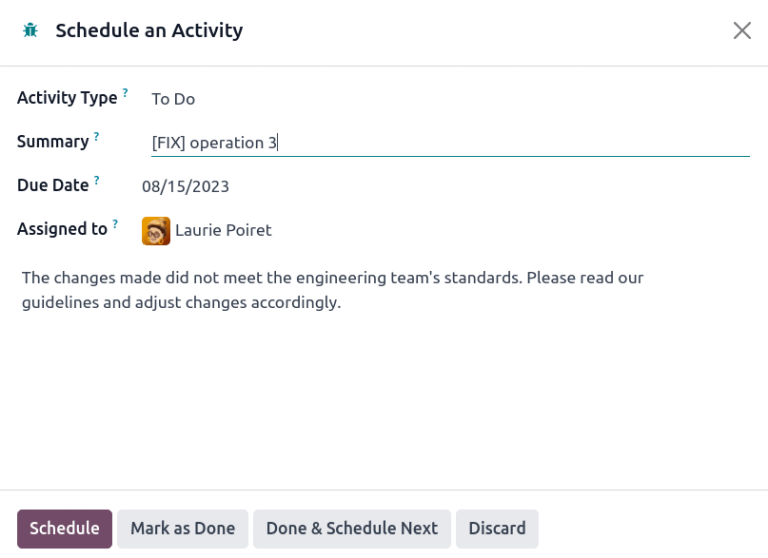
In the Mark Done window, click Done & Schedule Next to open a new Schedule an Activity window. Next, set the Assigned to team member and the Due Date for completing the changes. Provide task details in the Summary field and the text box. Click the Schedule button to close the window.
After closing the window, on the ECO form, move the ECO back one stage. Doing so ensures that when the team member completes the changes, and returns the ECO to the verification stage, a new ECO Approval task is created for the approver.
Example
The approver creates an activity for the Responsible of the ECO, Laurie Poiret,
that details the changes required for the approver to Accept the ECO. Clicking the
Schedule button creates a planned activity for Laurie due on 08/15/2023.