Règles de réapprovisionnement
Les règles de réapprovisionnement sont utilisées pour maintenir les niveaux de stock prévus au-dessus d’un certain seuil, sans dépasser un plafond défini. Pour ce faire, elles précisent une quantité minimale que le stock ne doit pas dépasser et une quantité maximale qu’il ne doit pas dépasser.
Vous pouvez configurer les règles de réapprovisionnement pour chaque produit en fonction de la route utilisée pour le réapprovisionner. Si un produit utilise la route Acheter, une demande de prix est créée lorsque la règle de réapprovisionnement est déclenchée. Si un produit utilise la route Fabriquer, un ordre de fabrication (OF) est créé à la place. Il en est ainsi quelle que soit la route de réassort sélectionnée.
Configurer les produits pour les règles de réapprovisionnement
In order to use reordering rules for a product, it must first be correctly configured. Begin by navigating to , then select an existing product, or create a new one by clicking New.
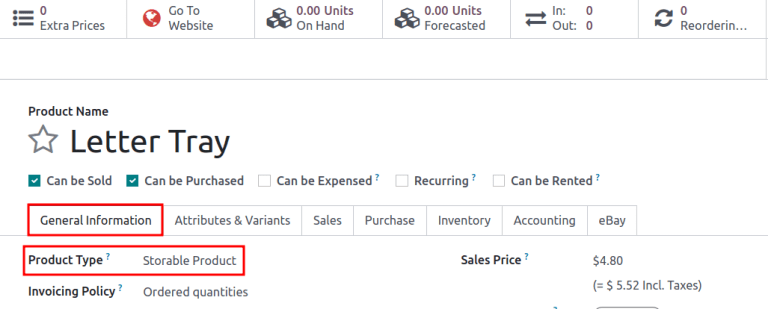
On the product form, under the General Information tab, make sure that the Product Type is set to Storable Product. This is necessary because Odoo only tracks stock quantities for storable products, and this number is used to trigger reordering rules.
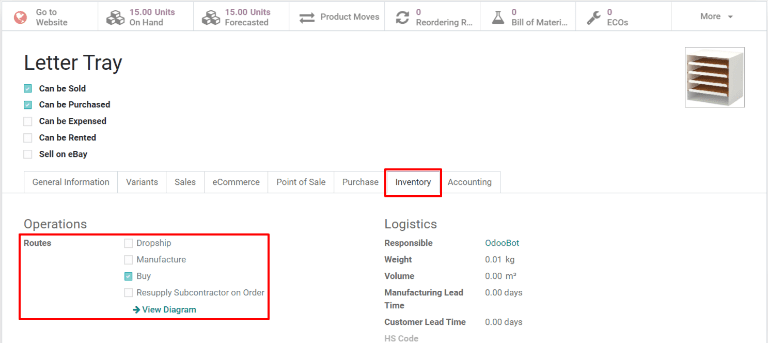
Ensuite, cliquez sur l’onglet Inventaire et sélectionnez une ou plusieurs routes dans la section Routes. Cela indique à Odoo quelle route utiliser pour réapprovisionner le produit.
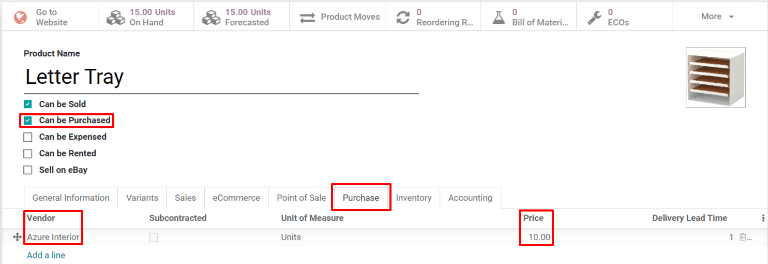
Si le produit est réapprovisionné à l’aide de la route Acheter, confirmez que la case Peut être acheté est cochée sous le nom du produit. Ceci fait apparaître l’onglet Achats. Cliquez sur l’onglet Achats et spécifiez au moins un fournisseur et le prix auquel il vend le produit, pour qu’Odoo sache auprès de quelle entreprise le produit doit être acheté.
Si le produit est réapprovisionné à l’aide de la route Fabriquer, il doit avoir au moins une nomenclature associée. C’est nécessaire parce qu’Odoo crée uniquement des ordres de fabrication pour les produits ayant une nomenclature.
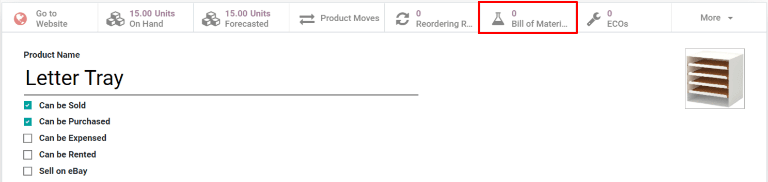
If a BoM does not already exist for the product, select the Bill of Materials smart button at the top of the product form, then click New to configure a new BoM.
Créer de nouvelles règles de réapprovisionnement
To create a new reordering rule, navigate to , then click New, and fill out the new line as follows:
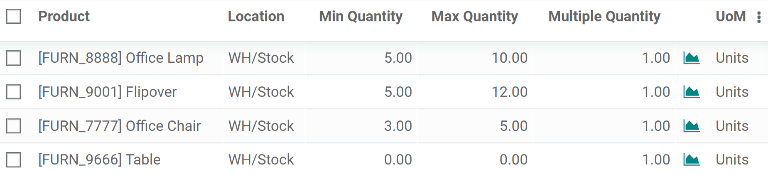
Produit : Le produit qui est réapprovisionné par la règle.
Emplacement : L’emplacement où le produit est stocké.
Quantité min : La quantité minimale qui peut être prévue sans que la règle ne soit déclenchée. Lorsque le stock prévu est inférieur à cette quantité, un ordre de réapprovisionnement est créé pour ce produit.
Quantité max : La quantité maximale jusqu’à laquelle le stock est réapprovisionné.
Quantité multiple : Précisez si le produit doit être réapprovisionné par lots d’une certaine quantité (par ex. un produit peut être réapprovisionné par lots de 20).
UdM : L’unité de mesure utilisée pour réapprovisionner le produit. Cette valeur peut être simplement
Unitésou une unité de mesure spécifique pour le poids, la longueur, etc.
Astuce
Reordering rules can also be created from each product form. To do so, navigate to , then select a product. Click on , then fill out the new line, as detailed above.
For advanced usage of reordering rules, learn about the following reordering rule fields:
Note
The fields above are not available by default, and must be enabled by selecting the (slider) icon in the far-right corner, and selecting the desired column from the drop-down menu.
Trigger
When stock falls below the reordering rule’s minimum, set the reordering rule’s trigger to automatic to automatically create purchase or manufacturing orders to replenish stock.
Alternatively, setting the reordering rule’s trigger to manual displays the product and forecasted stock on the replenishment dashboard, where the procurement manager can review the stock levels, lead times, and forecasted dates of arrival.
Pour plus d'infos
Astuce
The Replenishment dashboard is accessible by going to .
To enable the Trigger field, go to . Then, click the (slider) icon, located to the far-right of the column titles, and enable the Trigger option from the additional options drop-down menu that appears.
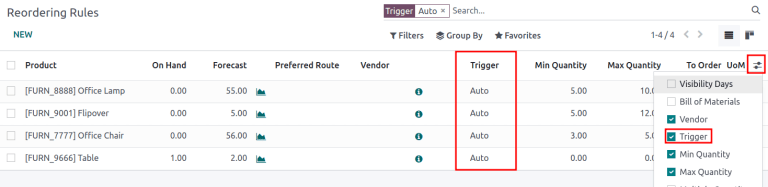
In the Trigger column, select Auto or Manual. Refer to the sections below to learn about the different types of reordering rules.
Auto
Automatic reordering rules, enabled by setting the reordering rule’s Trigger field to Auto, generate purchase or manufacturing orders when:
the scheduler runs, and the On Hand quantity is below the minimum
a sales order is confirmed, and lowers the Forecasted quantity of the product below the minimum
Astuce
The scheduler is set to run once a day, by default.
To manually trigger a reordering rule before the scheduler runs, ensure developer mode is enabled, and then select . Then, select the green Run Scheduler button on the pop-up window that appears.
Be aware that this also triggers any other scheduled actions.
Example
The product, Office Lamp, has an automatic reordering rule set to trigger when the forecasted
quantity falls below the Min Quantity of 5.00. Since the current
Forecast is 55.00, the reordering rule is not triggered.

If the Buy route is selected, then an RFQ is generated. To view and manage RFQs, navigate to .
If the Manufacture route is selected, then an MO is generated. To view and manage MOs, navigate to .
When no route is selected, Odoo selects the Route specified in the Inventory tab of the product form.
Manual
Manual reordering rules, configured by setting the reordering rule’s Trigger field to Manual, list a product on the replenishment dashboard when the forecasted quantity falls below a specified minimum. Products on this dashboard are called needs, because they are needed to fulfill upcoming sales orders, for which the forecasted quantity is not enough.
The replenishment dashboard, accessible by navigating to , considers sales order deadlines, forecasted stock levels, and vendor lead times. It displays needs only when it is time to reorder items.
Note
If the one-day window for ordering products is too short, skip to the visibility days section to make the need appear on the replenishment dashboard a specified number of days in advance.

Visibility days
Important
Ensure lead times are understood before proceeding with this section.
When manual reordering rules are assigned to a product, visibility days make the product appear on the replenishment dashboard () a certain number of days in advance.
Example
A product has a manual reordering rule set to trigger when the stock level falls below four units. The current on-hand quantity is ten units.
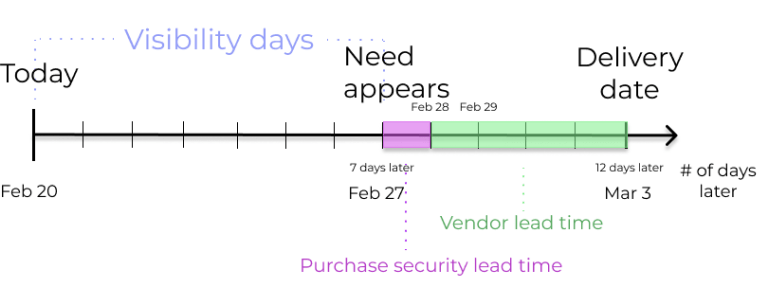
The current date is February twentieth, and the delivery date on a sales order (in the Other Info tab) is March third — twelve days from the current date.
The vendor lead time is four days, and the purchase security lead time is one day.
When the Visibility Days field of the reordering rule is set to zero, the product appears on the replenishment dashboard five days before the delivery date, which, in this case, is February twenty-seventh.
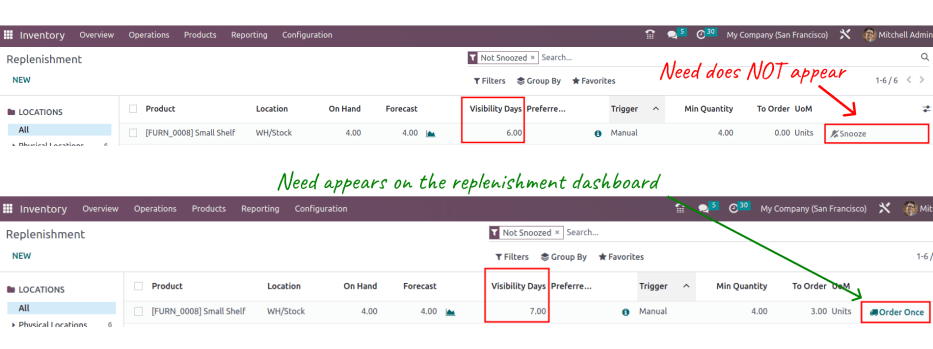
To see the product on the replenishment dashboard for the current date, February twentieth, set
the Visibility Days to 7.00.
To determine the number of visibility days needed to see a product on the replenishment dashboard, subtract today’s date from the date the need appears on the replenishment dashboard.
Example
Referring to the example above, today’s date is February twentieth, and the need for the product appears on February twenty-seventh.
(February 27 - February 20 = 7 days)
Incorrectly setting the Visibility Days fewer than seven days in this case results in the need not appearing on the replenishment dashboard.
Preferred route
Odoo permet de sélectionner plusieurs routes dans l’onglet Inventaire de chaque fiche produit. Par exemple, il est possible de sélectionner à la fois Acheter et Fabriquer, permettant ainsi l’exécution des deux routes.
Odoo also enables users to set a preferred route for a product’s reordering rule. This is the route that the rule defaults to if multiple are selected. To select a preferred route, begin by navigating to or .
Click inside of the column on the row of a reordering rule, and a drop-down menu shows all available routes for that rule. Select one to set it as the preferred route.

Important
Si plusieurs routes sont activées pour un produit et aucune route préférée n’est définie pour sa règle de réapprovisionnement, le produit est réapprovisionné en utilisant la route qui est répertoriée en premier dans l’onglet Inventaire de la fiche du produit.